
Intermediate
Intermediate
- Learn how to map out the neck with five CAGED shapes.
- Create melodic lines by targeting chord tones on strong beats.
- Discover how to enhance your phrases with chromatic notes.
Originally published on March 15, 2015
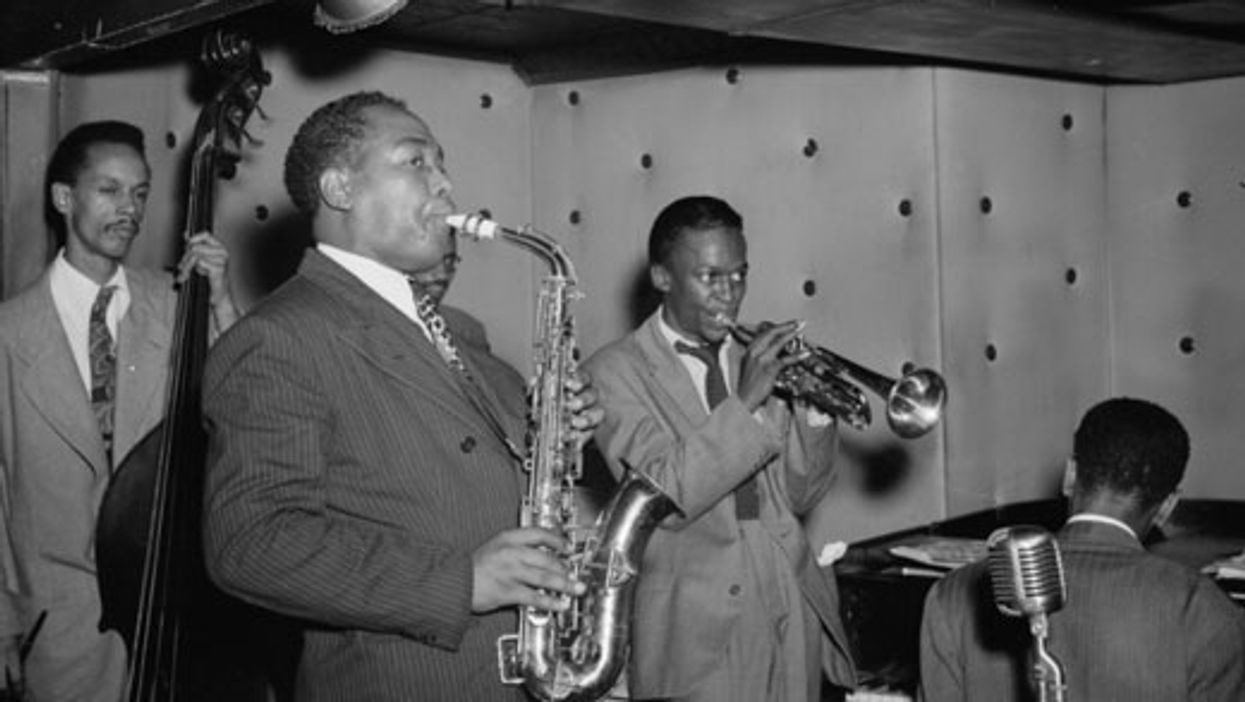
The CAGED system is a subject we’ve explored many times before in Beyond Blues, and as you may know, it plays a big role in the way I teach. If you need a quick refresher, or if you’re totally new to the CAGED concept, read “A Guitarist’s Guide to the CAGED System." This CAGED approach doesn’t often generate resistance, but when it does, I usually find that it’s because of a misunderstanding of the system—there’s a lot more to it than just barre chords. While we’ve discussed arpeggios and scale fingerings several times over the years, this lesson will finally bridge the gap between those two.
When I was first learning the CAGED system, there was a time when I lacked harmonic grounding. For example, I’d be improvising over an F Lydian vamp and once you removed the chords, my lines would sound like A minor. This proved that although I was able to navigate the neck well enough, there was no sense of hierarchy in my phrasing. I was viewing all the notes in a particular scale as equals. Over time I discovered that laying a foundation in chord tones was the key to breaking out of this rut. I had to learn which notes were chord tones and which notes served as melodic embellishments. This meant I’d be able to hit all the important notes at all the important times! No more landing on the 4 of a chord and suddenly panicking.
In previous columns, we’ve focused heavily on arpeggios, and if you’ve been following this series you’ll hopefully have a solid grounding in these patterns. But to be sure you’re clear on the details, let’s highlight these again using the “C” shape of the CAGED system.
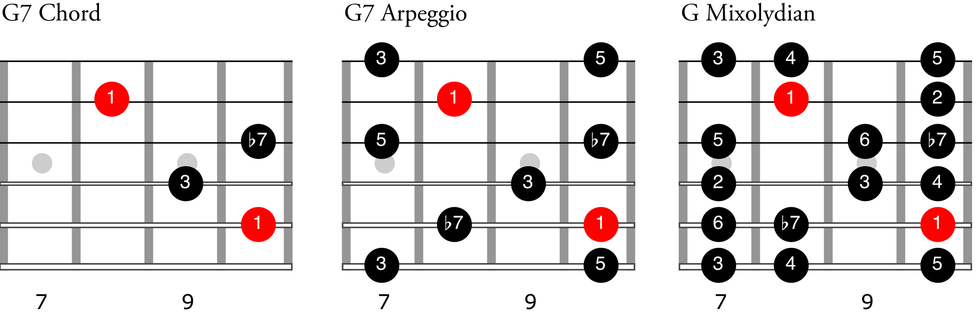
As you can see above, we’ve got three things to learn, but really they’re all very similar since the arpeggio contains the chord and the scale contains the arpeggio—that’s very important. Your goal is to be able to see the chord right away and instantly fill in the arpeggio and the scale around it.
In my experience, confusion can sometimes come when guitarists move between the chord, scale, and arpeggio. To deal with this, I came up with a little exercise (Ex. 1) that alternates between the arpeggio and the scale. You’ll start to see the scale, but won’t lose sight of where the chord tones are. I’ve done this for eight measures, but you could easily do it for 100. Remember that it’s not about numbers, you’re not learning patterns or thinking about tab, you’re seeing the two pieces of information and how they sit—and work together—with each other.
Ex. 1
Now if we transfer this arpeggio-scale relationship to other shapes of the CAGED system, you might find yourself in the “E” shape, which would look like this:
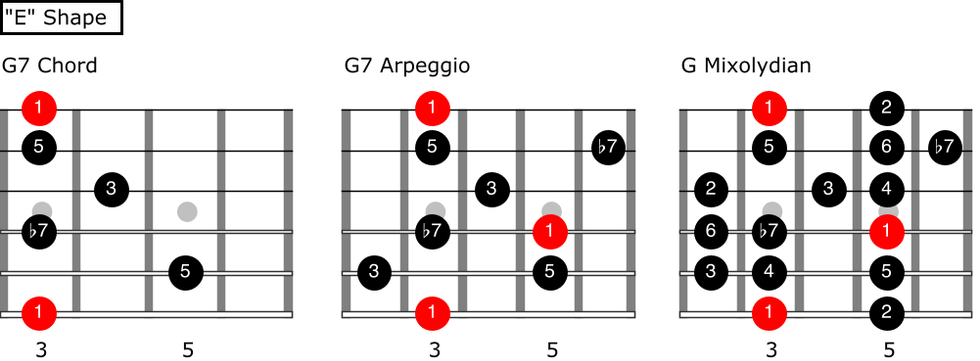
The next step would be to transfer the concept from Ex. 1 into the “E” shape (Ex. 2).
Ex. 2
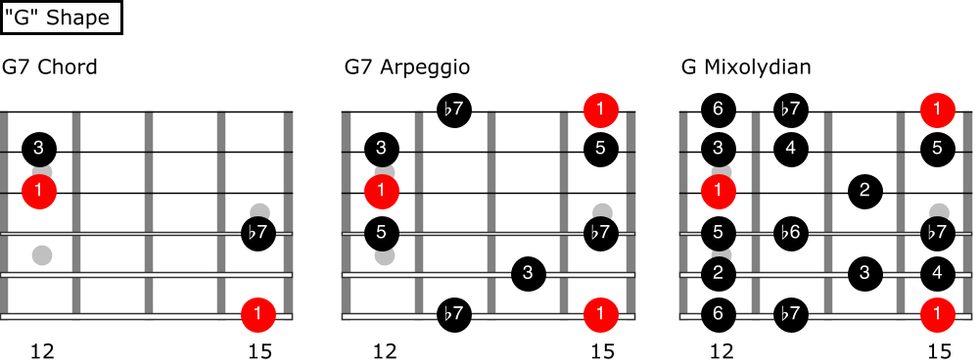
Now check out how this would work in the “G” shape with the corresponding diagrams and exercise in Ex. 3.
Ex. 3
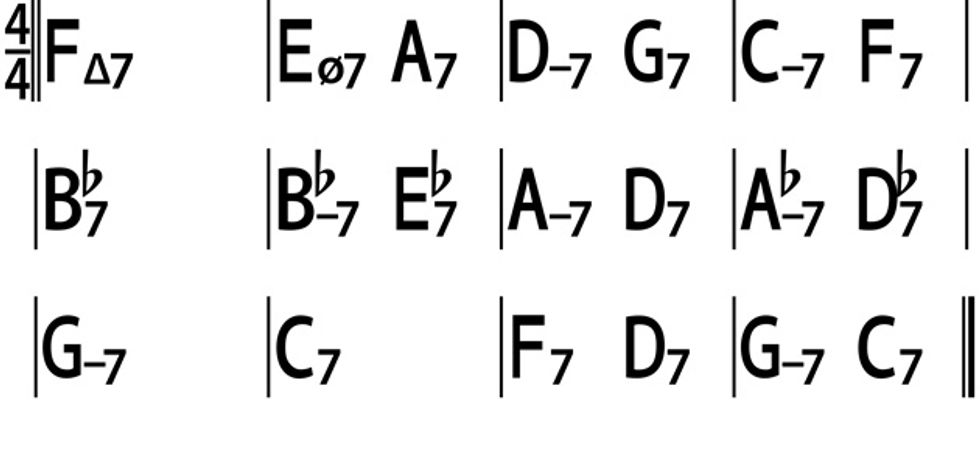
Now we can apply these ideas to some actual music. Ex. 4 shows a 12-bar blues progression in the key of G. We’re using the shapes we outlined above and simply moving them around the neck as needed. I’m still thinking of the relationship between the chord, arpeggio, and scale, rather than a mode. For example, even though I’m technically playing C Mixolydian in the second measure, I’m just thinking of C7. I see the chord and the arpeggio and just fill in around it. Simply look for the chord shape.
That’s the way to do this: Look for the chord shape, make sure you land on a chord tone when the chord changes, and allow the scale to fill in around it in that position. This strategy really gives us the sound of each chord as we move through the progression.
Ex. 4
In the final few examples, we’ll use the same approach but add in some chromaticism to enhance the lines. This highlights the fact that we’re not thinking about scales. In fact, we’re so focused on chord tones that we play melodic embellishments even if they aren’t diatonic to the key of G. Check out the last note of the first measure in Ex. 5. The Bb doesn’t actually fit over a G7 chord, but we don’t have to worry about that since we’re targeting a chord tone on the first beat of the next measure.
Ex. 5
In Ex. 6 we take the same approach, but in the “E” shape with a few additions. In measure two, approach the chord tone on the downbeat of measure three from above. Going into the fourth measure, we descend chromatically from the b7 to the 5 and add some chromatics in the fourth measure before resolving on the 3.
Ex. 6
We use the “G” shape for Ex. 7. It’s the same thing as before, only we’re using an enclosure at the end.
Ex. 7
Our final example (Ex. 8) applies our chromatic approach notes to a 12-bar blues progression—an approach that really helps to smooth things over between changes. Take this one slowly and try to come up with some of your own ... then apply them while playing over the backing track below.
Ex. 8
If you devote time to this technique in all five CAGED areas, you’ll open up your knowledge of the fretboard in a significant way. You’ll soon be in control of your phrases, no matter where you are on the neck. So good luck and get practicing!