Premier Guitar features affiliate links to help support our content. We may earn a commission on any affiliated purchases.
Rock
If your playing leans toward the louder, dirtier side of things, check out these lessons by everyone from Paul Gilbert and Herman Li to Jimmy Herring and Justin Derrico.
Great music tells a story. It builds on a plot and holds the listener’s attention as the story unfolds. We are especially moved by soloists who bare their souls and who keep us riveted with every twist and turn from their narrative. Pentatonics are the backbone of modern guitar vocabulary. Partially because they just sound good, but also because they lay so easily on guitar. There are several ingredients that make a guitarist sound brilliant, but one of the most important is chromaticism. Could there a be a way we could combine these two? Let’s find out.
This term chromaticism comes from the Greek word chroma, which means “color.” Using chromaticism means having the freedom to use all 12 notes over a given chord. Imagine the possibilities and freedom to play any note over a chord in composition or improvising! The quickest way to start adding color notes to the minor pentatonic scale is to add the 2nd and the 6th, which then gives you a Dorian mode. I’ve outlined it below using the A minor pentatonic scale.
A Minor pentatonic: A–C–D–E–G
A Dorian: A–B–C–D–E–F#–G
In general, there are chromatic notes that are outside the chord/scale, and notes that are outside the key. The latter carries a lot of tension against a chord and needs movement or resolution. From my days of playing jazz gigs in Toledo, OH, I recall what legendary trumpeter Jimmy Cook once told me regarding playing outside: “You can go up to the attic, but you have to come back down.” In other words, you can play outside tonally, but you must resolve at some point in order for your music to sound coherent.
Let’s get started on this journey of chromaticism together.
Before we go hog wild and add random notes, let’s begin by taking an A minor pentatonic scale and fill in the chromatic notes between the already existing box pattern. It’s almost arbitrary, but it will enable you to hear different colors added within the scale (Ex. 1).
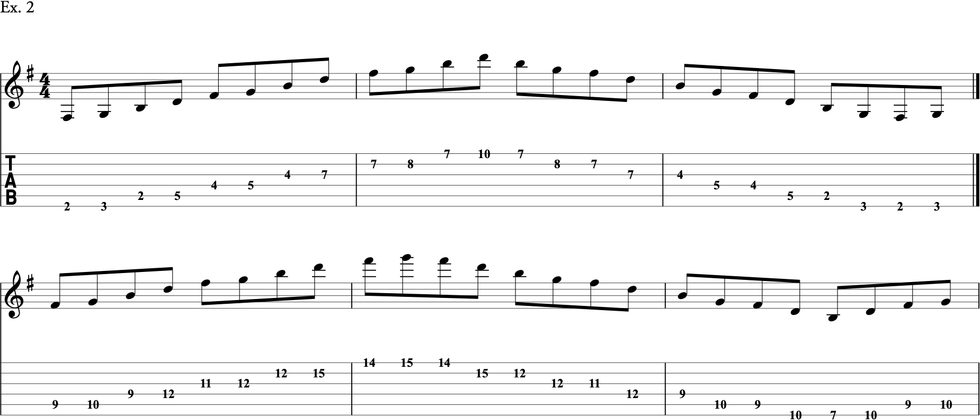
Chromatic Burst of Energy. In beat 1 of Ex. 2, we start with an A Dorian fragment followed by an extended chromatic line. The line in beat two starts on the b7 (G), highlighting the b5 (Eb) on beat 3, descending chromatically all the way down to B, and ending with A major pentatonic.
Bounce Around! We start on the b5 (Eb) followed by a typical chromatic rotation where we bounce around the b5. This idea lays quite well in the familiar pentatonic box. It’s easy and will add spice to your shredding (Ex. 3).
Side Stepping. A common approach to playing “outside” is side stepping. In other words, take the scale you’d normally use and displace it by a half-step above or below. By doing this, you’ll have instant access to notes that are harmonically outside the key—don’t think of them as wrong notes, just coloring notes. In Ex. 4 we take a pentatonic pattern from E minor pentatonic and sequence it in F minor pentatonic. As the notes can be analyzed over the E5 chord, it’s more important to view them as passing notes. Remember, the power of the sequence overrides the harmony!
Extend the Side Step. Ex. 5 uses the same concept of side stepping above but adds a note (D) to the displaced pattern. By doing so, this breaks the predictability of the phrase and places subsequent notes in new places.
Changing Tones.Ex. 6 is a fun lick to learn that starts with a strong, repeated three-note polyrhythmic figure (A#–B–D). The chromatic part occurs on beat 4 and utilizes changing tones, which is a type of non-harmonic tone.
Don’t Start On 1. The line starts on the 2nd (B), goes up a whole-step to C# followed by a double chromatic approach to Bb, down a whole-step to (G#), and finally resolving to the root (A). Once the A note is reached, there’s a cascading flurry of four-note groups settling in A minor pentatonic (Ex. 7).
Scrambles. This example (Ex. 8) was inspired by the legendary New York guitarist, Mark Hitt. Mark was a unique player, combining a rock sensibility with a jazz quotient. He developed an arsenal of twisting lines using chromaticism that he referred to as “scrambles.”
The pattern alternates between 1–3–4 and 1–2–4 fingerings, a typical fingering of the diminished scale. It can be analyzed where notes of the pentatonic are being targeted, but it’s all about the texture and excitement that is created. Make sure to play the line with slurs to get a fluid, legato sound.
Half-Step Approach. In this instance, we take the Im triad (Am) from the pentatonic scale and approach each chord tone from a half-step below (Ex. 9). This is more of a concept and exercise rather than a lick. This idea can be used with just about any improvising application.
One String Wonder. Ex. 10 highlights a series of chromatically descending half-steps. It’s an easy technique to get down and one I often use. It provides melodic interest, but also serves as an easy way to connect one position to the next. Here, we start on a high F that walks down a fourth to C in half-steps, followed by a C minor blues phrase.
Practice Tip
These chromatic lines sound best when played fast and with conviction. As always, approach new material slowly and accurately. Ignore your inner voice that may tell you that the “outside” notes are wrong. Once you’re able to play the lines up to speed, you’ll be amazed by how impressive it sounds. These ideas that will add motion, color, and excitement to your playing and enhance your musical expression when soloing.
In August 1960, hot on the heels of releasing his breakthrough record as a bandleader, Wes Montgomery won the New Star guitarist award in DownBeat magazine’s International Jazz Critics Poll. The album, The Incredible Jazz Guitar of Wes Montgomery, set the jazz world on fire, and featured one of the guitarist’s most electrifying approaches to soloing—moving from stunningly swinging single-note lines to breathtaking cascades of his trademark octaves, and culminating in wickedly masterful chordal soloing.
Playing with his thumb instead of a pick—initially, so as not to wake his family and neighbors during his late-night practice sessions—Montgomery’s tone was strikingly smooth and warm, while simultaneously being the epitome of cool.
The album has more than a few standout tracks, but, as DownBeat writer Ira Gitler raved in his 1960 review, “‘West Coast Blues’ will knock you out.” Composed by Montgomery, it is a decidedly non-traditional 12-bar blues, evoking a smoke-filled, late-night jam session. Also unique is its use of 6/4 time. But, fear not, you can think of a bar of 6/4 as simply being two bars of 3/4, with an invisible bar line in between.
Here’s the tune in its entirety. Note how Montgomery keeps his solo (0:58) compelling throughout, all the while building to a dazzling chordal crescendo. You can follow along using the accompanying chord chart.
- YouTube
Enjoy the videos and music you love, upload original content, and share it all with friends, family, and the world on YouTube.
Note: You can play all of the examples in this lesson either with a pick, or Wes-style with your thumb, but you’ll notice a snazzy change in tone trying the latter.
Half-Steps Are Hip
For the first four choruses of his solo, Montgomery focuses exclusively on single-note lines. Along the way, he injects new life by conjuring unique twists and turns. Every chorus is vibrant, always keeping us on the edge of our seats.
Let’s begin with Ex. 1 (1:09), in which Montgomery spices things up with some subtle rhythmic detours.
Ex. 1
Coming off of a series of eighth-notes in the solo’s previous bars, notice how adding just a slight hitch, like the tie in the middle of bar 1, can throw us rhythmically off balance for a moment (in a good way). The triplet figure in measure 2 is also pretty cool.
Now, you may have noticed that even though the initial chord is Ebm7 (Eb–Gb–Bb–Db), Montgomery chooses to treat it as if it’s Eb7 (Eb–G–Bb–Db), playing the major third right on beat 1. In jazz (or blues or rock), if you play with confidence, and phrase musically, you can often get away with breaking the rules.
Ex. 2 (1:28) demonstrates Montgomery’s skillful use of über-memorable motifs.
Ex. 2
Here, he establishes a unique rhythmic motif that he repeats, altering his note choices along the way to fit the underlying harmony. This creates a unique moment that immediately distinguishes the second chorus from the first and, again, keeps things moving along nicely.
Also, notice his use of neighbor tones—the note a half-step below any target note, regardless of whether it’s in the key (it often isn’t). This is an extremely hip jazz concept that can make your phrases come alive, as Montgomery’s does here.
He also employs another nifty melodic device, one that is often useful over a dominant chord: playing a min7 arpeggio starting on the chord’s 5. Over the Ab7 (Ab–C–Eb–Gb) in measure 1, Montgomery outlines an Ebm7 arpeggio (Eb–Gb–Bb–Db), the 5 of Ab7. Notice how its first two notes are the 5 and b7 of Ab7. Next comes some magic, as you begin to add the chord’s extensions—color tones that go beyond the b7—here, the 9 (Bb) and 11 (Db). Repeating the idea, he then plays an Fm7 arpeggio (F–Ab-C-Eb) over the Bb7 (Bb–D–F–Ab).
Ex. 3 (1:44) is another example of Montgomery employing an ear-catching motif, this time whipping up a bouncy descending phrase that also happens to include some neighbor tones.
Ex. 3
It’s so musical, yet Montgomery is simply playing the key of Bb’s diatonic arpeggios—those found naturally in the key—each introduced with a quick nod to a neighbor tone. But why does he target an Ebmaj7 arpeggio (Eb–G–Bb–D) to start? Another basic jazz melodic device, used over a minor 7 chord, is to play a major 7 arpeggio starting from its 3. Here, the chord is Cm7 (C-Eb-G-Bb) and its 3 is Eb, so your major 7 arpeggio starts from there; note that it adds D, the chord’s 9, to the conversation. (Conversely, over a major 7 chord, playing a minor 7 arpeggio from its 3 can also be very hip.) Montgomery ends the phrase in style, on a C, the 9 of Bbmaj7.
Octaves, Octaves (and More Octaves)
There are more great moments in the opening choruses, but we must move on to Montgomery’s trademark—his unearthly ability to play complex melodies entirely in octaves. This interval is most often played on two non-adjacent strings, with the unused string in between muted with the inside of your picking-hand index finger.
First, let’s take a quick look at Montgomery doing his octaves thing on tenor sax icon John Coltrane’s “Impressions.”
Ex. 4 (3:09) is a slickly syncopated line—emphasizing the “and” of beats—that climbs straight up a Cm11 arpeggio (C–Eb–G–Bb–D–F). Montgomery then ends the phrase with a bluesy descent of the Bb minor pentatonic scale (Bb–Db–Eb–F–Ab), exhibiting his keen sense for knowing when to just keep things simple.
Ex. 4
In Ex. 5 (3:52), Montgomery introduces an octave motif that he cycles through the chord changes. Notice how he changes it up slightly each time, either rhythmically or melodically, in a musical way.
Ex. 5
A Cavalcade of Chords
The final section of the solo features Montgomery’s thrilling mastery of chord soloing. It could easily be a full lesson in itself; below are just a couple of examples to get you started.
Ex. 6 (4:25) shows Montgomery creatively playing off of the basic chord changes from measures 18 to 20 of the chart.
Notice how he’s not rhythmically tied down to exactly where the chords change on the chart (beats 1 and 4). And he’s using partial chords, most notably omitting the root notes that might be added on an additional lower string in more standard rhythm playing. This makes for lighter-sounding voicings and more economical movement.
Now, even though he’s exclusively playing chords here, Montgomery is still thinking melodically, creating a melody by connecting the highest note of each chord. While an oversimplification, this is one of the most important considerations for choosing the different voicings he plays.
Ex. 7 (5:04) culminates with a brilliant descending phrase that closes out Montgomery’s solo, over the final three measures of the chord chart. Note the two different voicings of Db13 chord in bar 1. The first has the 9 (Eb) in the melody, whereas the second has the 13 (Bb). Having this arsenal of voicings allows him to freely construct flowing melodies. At times, he’s more implying the chords than outright playing them; for example, most of the F7 chords in bar 2 lack both their root (F) and b7 (Eb).
Ex. 7
Let’s close out with Montgomery playing yet another of his swingin’ tunes, “Twisted Blues.” And, if you enjoyed this lesson, check out my similar looks at jazz icons Mike Stern and Barney Kessel.
- YouTube
Enjoy the videos and music you love, upload original content, and share it all with friends, family, and the world on YouTube.
In my experience, constructing lines has always been about texture and structure. Developing ideas for soloing and writing melodies takes a keen sense of harmonic and rhythmic context. It’s about seducing the listener and delivering a ride that’s hard to forget—a ride that caters to the listener. Of course, it’s important to write for yourself and from the heart, but also remember that if your heart’s intent is to inspire others, then you’re on the right track for the long haul. And this is where melody comes in.
Melody deserves a certain level of priority in relation to harmony and rhythm. In this lesson, I’m going to show you a quick way to start improving your lines. The good news is music knows no bounds and music doesn’t care what level you’re at. Harmony and rhythm need to help each other tell your story.
In Ex. 1 we’ll be playing the Em7 arpeggio (E–G–B–D) in two positions. Don’t worry, we won’t get into too much theory, just remember these shapes can be transposed into any key. The top one starts in 10th position and shifts up the neck, while the bottom one starts in 5th position. Getting these under your fingers will help map out quite a bit of the fretboard. I try to only visualize one octave at a time, and then take that shape and move it wherever I need to chase the melodic and rhythmic ideas that inspire me.
Ex. 2 follows the same idea, but this time using a Gmaj7 arpeggio (G–B–D–F#). I’ve chosen E minor and G major because they are closely related key centers. When learning these arpeggios, focus on the string pairs that occur in each octave. In the extended arpeggio that ascends from the 2nd fret, notice how the patterns recur in each octave. That’s not always the case, as you’ll see in the second arpeggio that ascends from the 9th fret.
Next, we’re going to use the first Gmaj7 arpeggio—the one with the recurring pattern—to practice running through a sequence. Think of Ex. 3 in groups of five. When practicing such lines, I like to use drum grooves instead of a metronome. Now here’s the twist: To progressively challenge my technique, I keep changing the subdivision of the meter I’m using. For example, we’re in 4/4 time here. As I develop the sequence, I’ll increase the subdivision from quarter-notes, to quarter-note triplets, to eighth-notes, to eighth-note triplets, then 16th-notes, and finally 16th-note triplets. That not only increases my speed but it also forces me to be rhythmically aware, thus giving me both speed and accuracy. It gives me full control. Take your time with this example because we’ll apply the same shifting-subdivision concept to the next one.
We revisit the Em7 arpeggio pattern at the 12th fret for Ex. 4. Let’s take a moment to talk about picking. Please use whatever technique you feel most comfortable with, but if you must know, in the corresponding audio clip I’m using as much legato technique as I can. For those not familiar with this term, it means I’m using hammer-ons and pull-offs to sound many of the notes, as indicated in the notation and tab. But there’s no need to get hung up in the picking technique. If you want to pick every note using alternate or economy picking, then do so with style. If you want to hybrid pick, go for it. The point is to increase your rhythmic knowledge and execute some creative ideas.
Now it’s time to step up the subdivisions. In Ex. 5 and Ex. 6, we’re using the same arpeggios we mapped out earlier, only this time we’re playing 16th-notes. If this is something you haven’t done before, don’t be alarmed. Just think of it as a slight increase in speed. Learning to shift subdivisions with seamless control is a great way to expand your ability to develop lines.
Enough with the exercises—let’s make some music. Ex. 7 starts out by traversing the Em7 arpeggio with 16th-notes, then transitions into the next octave using 16th-note triplets. Then for variety, we mix in some pentatonic lyricism. That brings me to a side note: Always step away for a moment from using only arpeggios by mixing in some pentatonic or scalar lyricism to your lines. A line composed of only arpeggios can sound stiff and redundant. One way to avoid this is to sprinkle some scale tones into the phrase.
In Ex. 8, we’re using Em7 arpeggios again, but the position conveniently gives us a full three octaves to work with. Instead of sticking exclusively to the basic shape, I also included some pentatonic moves. Notice how mixing 16th-notes and 16th-note triplets add color to the line. The key to sounding like a professional player is to make sure your playing offers the listener variety in rhythm and note choice.
We head back to the Gmaj7 shape for Ex. 9. It starts out in the lowest octave, which is at the 2nd fret, and once again mixes in that good ol’ E minor pentatonic (E–G–A–B–D) tonality. We repeat the same thing an octave higher, but because we run out of real estate, we need to slide up before finishing off the line in a G major tonality.
In our final example (Ex. 10), we return to the Gmaj7 arpeggio in its higher position, though we’re treating it a bit more lyrically this time around. No sequences, just playing bits and pieces of the arpeggio.
Rhythm guitar is arguably the most important aspect of guitar playing, and it’s also one of the most challenging skills to develop. The discouragement many players feel when working on rhythms forces too many of them to oversimplify the nuances, and this can reduce a performance from exceptional to fine. In this lesson, we’ll investigate why rhythm guitar can be so puzzling and look at a few ways to keep yourself motivated enough to persevere and improve.
Why So Hard?
In my many years of teaching I have found that students can learn the basic open-position chord shapes relatively quickly. The same goes for the pentatonic and major scale patterns. Even riffs and hooks like “Smoke on the Water,” “Crazy Train,” and “Oh, Pretty Woman” come relatively quickly to beginners. The biggest challenge for most guitar players is mastering rhythm guitar.
I’m not referring to the basics, such as four down strums in a measure of 4/4, a down and up eighth-note strum, or even the slightly syncopated strum of Ex. 1.
Ex. 1
Rather, I’m talking about the rhythms in countless classic rock, folk, and pop songs, which are the mainstays—for better or worse—of every oldies station, cover band’s setlist, and many aspiring beginners’ guitar dreams. Why are these rhythms so challenging for most players?
Dictionary.com defines idiosyncratic as “something peculiar to an individual.” Well, there’s your answer. Many of our favorite songs and guitarists, such as Neil Young, Malcolm and Angus Young, Joni Mitchell, David Gilmour, Jimi Hendrix, and Prince, possess idiosyncratic strums. How can something peculiar to an individual be easily reproduced? It can’t. Imitation takes hard work, hours of practice and refinement, and highly developed listening skills. That is not to say that idiosyncratic strums can’t be reproduced, only that they can’t be imitated easily.
What Can Guitar Players do to Improve Their Rhythm?
The first priority is to confirm that you genuinely know how the rhythm was originally performed. In this day and age, with reliable, professionally created guitar transcriptions and instructional videos (as well as an abundance of isolated rhythm guitar tracks on YouTube), there is ample opportunity to both hear and see accurate rhythms. This doesn’t make the rhythm immediately easier to play. It will help you avoid practicing it incorrectly and allow you to generate modifications based on the original, rather than through guesswork.
Play the Part Correctly and Slowly
The second step I recommend is to endeavor to play the part correctly and slowly. This requires playing the rhythms with slower tempos and one measure at a time rather than the more common four-measure patterns. This second aspect is important as many idiosyncratic strums vary from measure to measure. Such a lack of uniformity adds to the artistry of the music, but it can be frustrating to imitate.
For instance, look at Ex. 2, which is similar to Pink Floyd’s “Wish You Were Here.” While the chords themselves, G–C–D–Am, are easy enough to fret, the strum pattern is a nightmare of mixed rhythms, with each measure not only containing a different pattern, but different string choices as well. (To make it even more tricky, David Gilmour continues to vary his rhythms throughout the song.) Let’s consider just the first measure. There’s only one chord, but three different rhythmic figures. It gets even worse than that. Sometimes the strum includes all six strings, other times one note, two notes, or three notes. Maddening! This is one of the most challenging aspects of idiosyncratic rhythm. And these types of variations show up over and over again in accurate portfolio transcriptions. Yes, it is correct, but it’s an ordeal to decipher.
Ex. 2
Here’s a tip. First work on the strum, not the individually plucked notes and strings. Strum the entire G chord (Ex. 3). Next, isolate the lowest note in the chord (Ex. 4). If you can play this correctly then you can begin mixing it up with a combination of full chords, single bass notes, and partial chords. Trust me, Gilmour wasn’t thinking, “Gotta play just the top three strings on the 16th-note upbeat of beat two and the two bottom strings on the ‘and’ of beat four.” It’s idiosyncratic! Once you have measure one correct, move on to measure two, which is slightly different. Measures three and four are also marginally altered.
Ex. 3
Ex. 4
Hopefully you’ll find that one new rhythmic pattern on its own is relatively manageable. Having to generate four different patterns in the space of four measures? In that situation, strums become exponentially more complex. As this lesson moves forward, all the examples will be variations on this theme, in different contexts, and citing different specific artists. The idea here is to demonstrate the vast complexity idiosyncratic playing can generate.
Neil Young's Strumming Patterns
In my experience, Neil Young has some of the most seemingly random strums one can find. He’ll play a song with only four chords but there will be 16 different strum patterns. It’s both inspiring and infuriating. Ex. 5 is an example of such an exasperating figure, based on “Heart of Gold.” There are four chords in two measures, each with a different strum, followed by variations on the same four chords! Brilliant and unbearable.
Ex. 5
Ex. 5
To make mastering this a bit more tolerable, as with the previous Gilmour-esque pattern, break it down into smaller parts. You’ll also want to add full chord strums on the Em and C. Ex. 6. and Ex. 7 demonstrate measures three and four of Ex. 5, isolated and repeated. Do this for the first two measures as well.
Ex. 6
Ex. 6
Ex. 7
Joni Mitchell's "Big Yellow Taxi"
Another icon of individuality is Joni Mitchell, who deserves a lesson all to herself. For now, Ex. 8 will suffice. In this example, based on “Big Yellow Taxi” (although the original is performed in open-E tuning), there is the added complication of muted strums.
Ex. 8
If these muted strums are new to you, I recommend you focus on the mutes, as shown in Ex. 9. Once that is comfortable, return to Ex. 8 and incorporate the barre chords into the pattern. As with all our examples thus far, break them down, making sure each measure is solid before moving on to the next. At the risk of belaboring the point, these strums are demanding—there is no instant gratification here. “Practice and refine” should be your mantra.
Ex. 9
Let's Talk About Jimi Hendrix
It would be impossible to write about either guitar icons or 6-string idiosyncrasy without mentioning Jimi Hendrix. Jimi’s use of his thumb to fret chords is alone worthy of attention. For now, let’s stick with his eccentric strumming patterns. A good place to start is probably Hendrix’s version of “Hey Joe.” It consists of a three-and-a-half-minute loop of the circle of fourths chord progression C–G–D–A–E, yet Jimi finds a new way to play the pattern every time. Ex. 10 offers one of countless variations you can attempt. Ex. 11 demonstrates how to break it down.
Ex. 10
Ex. 11
While it’s true that most AC/DC songs feature the same riff or chord pattern played repetitively, you’ll also find that many of those patterns are four measures long, with multiple, highly syncopated rhythms found within each measure. “You Shook Me All Night Long,” “Bad Boy Boogie,” and “Highway to Hell” are all excellent examples of this. Ex. 12 demonstrates Malcolm and Angus Young’s penchants for such patterns by imitating the rhythms of “For Those About to Rock (We Salute You).” As you can hear, there are four measures with an immense amount of space in them and four different rhythmic figures. The key to perfecting this sort of rhythm is to not rush. Either tap your foot or use a metronome to keep your tempo steady.
Ex. 12
Our final example isn’t exactly idiosyncratic, though the referenced artist is. While Prince’s music and personal style is incredibly diverse, he often wears his influences on his sleeves, whether those be James Brown, Jimi Hendrix, or Joni Mitchell. Nevertheless, he habitually put his own spin on the source inspiration.
Ex. 13 provides you with a funky rhythm that will improve your playing, no matter what genre you specialize in, as it features muted strings (similar to those in our Joni Mitchell example), a fast syncopated 16th-note strum, and a four-measure pattern that requires you to focus on the subtle variations found in the pattern. Once again, I’ll remind you to practice such patterns one measure at a time. Goodness, any one of these measures is funky enough on its own and would satisfy most funk musicians: It’s the idiosyncratic nature of Prince to go beyond.
Ex. 13
Ex. 14 is measure three of Ex. 13 isolated and repeated. I’ve chosen this measure because for me it’s the easiest to play (always start with what’s easiest for you). Note that in Ex. 14, I removed the muted strums. We know they’re in the original and we can add them in soon enough, as demonstrated in Ex. 15.
Ex. 14
Ex. 15
Finally, let’s play all four measures without the mutes, as demonstrated in Ex. 16. It is this sort of compartmentalized, methodical, attention-to-detail practice that will improve your playing.
Ex. 16
Words of Encouragement
Ironically, one of the best things I can tell you about practicing the guitar is, “Learning to play guitar is hard!” I don’t say this to discourage, but to give perspective. If it’s taking you a week to learn a certain rhythmic pattern, guess what? It might take you a month to really get it down. Still, the rewards are worth the effort. Good luck with your rhythms!