Last month we began discussing what to do with coils that have tested open with a multimeter. As mentioned last month, when the coil wire is broken at the ground connection, there’s not much that can be done short of a rewind.
However, there are two other conditions that can cause a coil to read open on a multimeter, but have easily repairable damage. The first is when the coil wire is broken at the hot connection and the second occurs when there is a break in one of the outer coil windings. Both problems are shown in the illustration below.
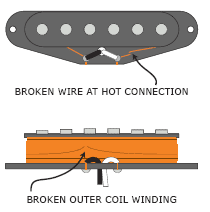 The fix for both pickups is to peel their coils. Peeling means removing sufficient wraps of wire from the coil to get past the break. Then the “good” end of the remaining coil wire is connected to the hot lead. In the first example, where the coil lead is broken at the hot lead, you’ll only be removing a wrap or two, so fixing this problem will have no effect tonally. In the second example you may be peeling a bunch of wire off of the coil, which may result in a very slight decrease in output. Despite the fact that it may seem like you’ve removed a ton of wire, in most cases the actual percentage of wraps that are removed is negligible, so the change in output should be hardly noticeable, if at all.
 The first thing to do is to heat the solder joint that connects the white wire to the pickup’s base and remove the white wire – you’ll also need to remove any coil wire that is still wrapped through the eyelet. Take your time and be careful while heating the eyelet with a soldering iron, picking any remaining wire strands out with needlenose pliers or tweezers. This process may also remove any remaining solder that fills the eyelet, but if it doesn’t you’ll need to remove the remaining solder with a solder sucker or desoldering braid.
One word of caution: be careful if you’re working on a pickup with a molded plastic bobbin, since heating the metal eyelet could cause the surrounding plastic to melt. If this is the case, use just enough heat to allow you to remove the coil wire and any remaining solder from the eyelet. You should now have something that looks like this:
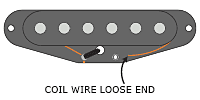 The next step is to peel off some of the layers of wire; the amount to be removed will depend on where the coil is broken.
 If it was broken right at the point where it attached to the eyelet, as in the first example, then you’ve already removed the broken section and peeling one or two wraps will suffice. Simply remove a wrap or two, then re-attach the wire to the eyelet, re-insert the white lead and solder it into place. Be sure to thread the coil wire through the eyelet several times, and make sure it’s taut before you solder it.
You should also remove the insulation from this section of the coil wire first in order to get a solid connection. I’ve seen instances where the soldering iron plus the molten solder/flux will heat the wire sufficiently to burn through the insulation and create a good connection, eliminating the need to remove the insulation manually, but it’s better to be safe than sorry. It’s definitely easier to remove the insulation now rather than having to do it later. The insulation can be easily removed by pulling the wire’s end between your thumb and a piece of 600- grit sandpaper a couple of times. You’ll see a subtle change in color where the insulation is removed, so you’ll have a visual indicator that you’ve stripped the insulation. You can also put one of your meter leads on this section, and the other on the pickup’s black lead, and test for continuity. If you break the wire in the process of removing the insulation, then simply peel off another wrap and try again.
Assuming that the break is further along, on one of the outer coil windings, then you’ll peel the wire until you reach the break. Now there are a couple of new considerations that we’ll discuss in detail next month. Until then!
George Ellison
Founder, Acme Guitar Works
acmeguitarworks.com
george@acmeguitarworks.com
302-836-5301







![Rig Rundown: Russian Circles’ Mike Sullivan [2025]](https://www.premierguitar.com/media-library/youtube.jpg?id=62303631&width=1245&height=700&quality=70&coordinates=0%2C0%2C0%2C0)
