Dear Jeff,
Being in U.K., I’m rather late to the party on your PG columns, but I now enjoy them online religiously.
Needing some vintage authenticity to accompany my newly acquired 335 and trusty old ’73 Strat, I had a tweed moment and got a 5E3 Deluxe. (It’s a clone, of course, but has been meticulously built to the original spec.) It can be a rather boomy affair up loud. (I think I’m right in saying that the distortion comes from the power tubes, as opposed of preamp tubes, as in many modern designs.) I heard that a suitable remedy for this boominess is to reduce the size of the first two coupling capacitors.
Another issue is the rattling cab when the amp is turned up loud. I read that this too is a result of the design, and that even originals do this. Any suggestions here?
The relative simplicity of the 5E3 circuit allows many players to build their own, or purchase clone brands at affordable prices, so I’m sure there would be much interest in the article.
All the best,
Mark GardinerSurrey Hills, England
Hello Mark,
Thanks for touching base from across the pond, and thanks for your questions. I’ll answer as best I can, but you have to spread the word about "Ask Amp Man" and Premier Guitar to all your stringed-instrument mates. Deal?
Okay, let’s get to work on your tweed Deluxe issues. The tweed Fender Deluxe went through several iterations during its lifetime. The most visible difference between the 5E3 design and the preceding 5A3, 5B3, 5C3, and 5D3 versions is the fact that the earlier models have only three input jacks. Two are labeled “Instruments,” and the third is labeled “Mic.” Back in those days, more than one amplified device would be plugged into a single amplifier. (Gasp! What was Leo thinking?) In the 5E3 design, this was changed to four input jacks, with high- and low-level inputs for both instruments and microphones.
Another difference is that in all four 5E3 predecessors, both halves of the second dual triode preamp tube are used as the phase inverter. This changed with the 5E3, which only used half of the second preamp tube, leaving the other half available to add a bit more gain. It also changed the response and feel of the circuit, which is probably why so many guitarists prefer this version. Also, the capacitor values in the signal path were increased from 0.05 µF to 0.1 µF. This provided more low end, which was probably a welcome addition at the time.
The problem is that, while the amplifier probably sounded better at the “intended” pre-distortion volume level, the amp can sound boomy or mushy when cranked into sweet overdriven tone territory. Reducing the values of the capacitors can make a difference here, but you’re not necessarily limited to the first two coupling caps, as you mentioned in your question. Let’s explore multiple options.
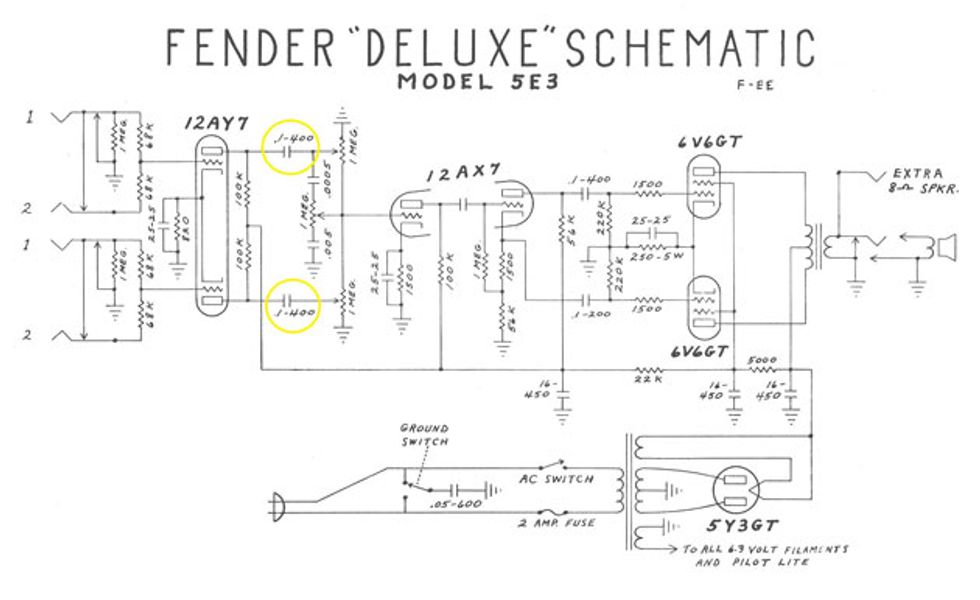
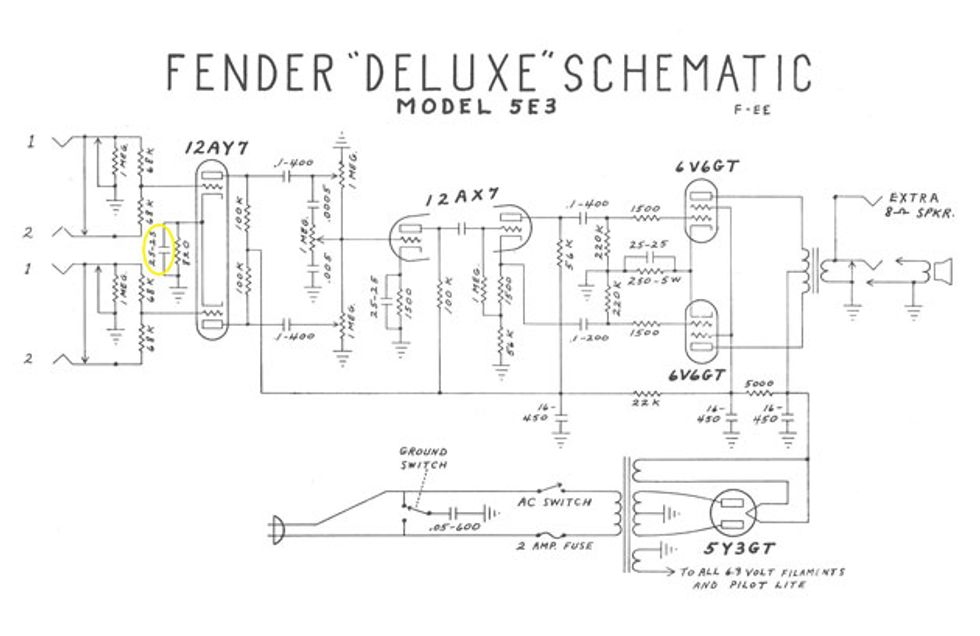
Option 1. Per your question, reduce the value of these two signal caps in the preamp section (see Fig. 1). Feel free to experiment with values from 0.05 µF (the values used in all the predecessors), as well as 0.022 µF, 0.01 µF, or even as low as 0.0047 µF.
(Your capacitors should be rated at a minimum of 400V DC, preferably 600 or higher. As far as type or brand, this is subjective. Each type can sound a bit different. If you have the ability to audition several, your ears can make the final decision. This pertains to all signal capacitors mentioned in this article.)
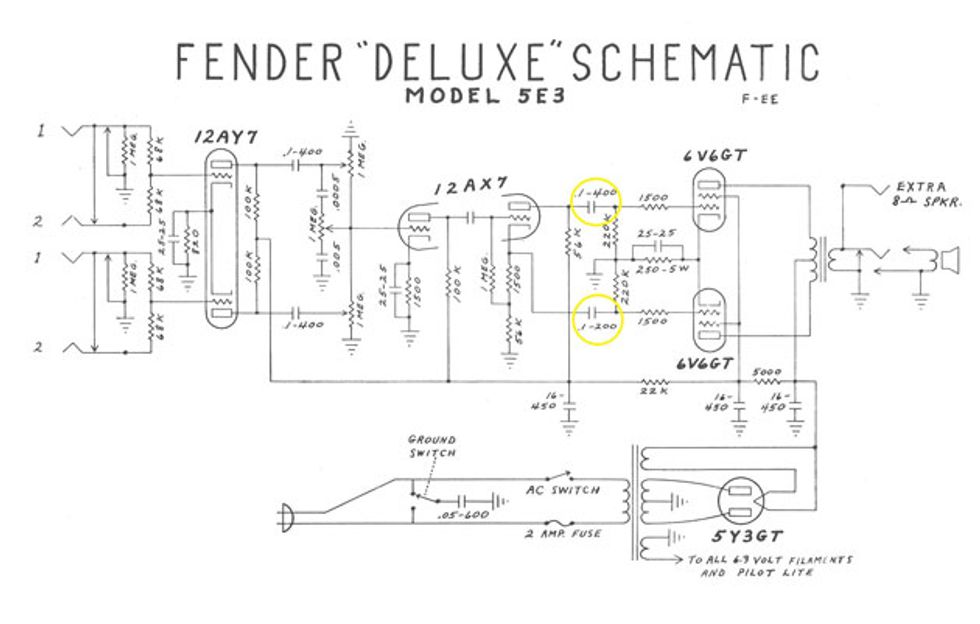
Option 2. Reduce the value of these two signal caps in the phase inverter section (see Fig. 2). Again, you can experiment with different values. Try from as large as 0.05 µF to as small as 0.01 µF. (I wouldn’t suggest anything smaller, as the amp could start to sound thin.)
Option 3. Reduce the value of the cathode bypass capacitor in the preamp (see Fig. 3). This may be all you need to do to remove the “flubbiness” from an amp, as it reduces the amount of gain in the lower frequencies. Experiment with values from 10 uf down to 1 uf or 0.68 µF. If it’s an electrolytic cap, just be sure it has a voltage rating of at least 25V DC, and that the positive terminal is connected to the tube, not ground.
One of these options, or a combination thereof, should give the amp a sound and response that works better for you. You can even get creative by mixing capacitor values in the preamp section to create two distinct-sounding channels.
Regarding the rattling cabinet: Since there are only four screws attaching the baffle to the cabinet in this design, there’s a possibility of some buzzing or rattling. Just make sure all screws and nuts are tightened down. The buzzing might also be coming from the upper-rear panel, so try adding some thin foam strips at the point where the chassis contacts the panel. You could also add more screws to hold the baffle tighter to the cabinet, but be aware that this may actually change the sound and feel of the amp.
I hope these ideas give you a deluxe version of your tweed Deluxe clone. Enjoy!