
Having the ability to artfully add those "in-between" notes is a cornerstone of jazz guitar. Here’s how you do it.
Intermediate
Intermediate
• Understand the basic elements of the CAGED system.
• Learn the “rules” for adding outside notes.
• Expand your view of the fretboard in every key.
Have you ever asked yourself if you “know” all your scales? Well, one might answer that question with the chromatic scale. Simply put, the chromatic scale is all 12 notes. Chromaticism plays an important role in the construction of melodic lines in jazz, allowing dissonance to resolve into consonance. Jazz players are fond of a famous quote that basically states: No matter where you are on the neck, if you hit a “wrong” note you’re only a half-step away from a “right” one. This lesson will show how to integrate chromatics into major and minor CAGED scale forms, as well as provide examples of jazz lines. While this lesson centers around a major scale, this method of visualizing chromatic scales works with all scale types.
Let’s begin with a fingering for a chromatic scale. Ex. 1 shows an ascending and descending one-octave chromatic scale in open and first positions. We’re starting on C, so I used a Cmaj7 chord as the underlying harmony.
Ex. 1
Let’s expand that idea in Ex. 2. Here we are starting on F and playing a chromatic scale up to the A on the 1st string before descending to where we started. Because we aren’t using any open strings, this fingering can easily be moved up and down the neck.
Ex. 2
To clearly see how to integrate the chromatic scale into the major scale forms, I believe it’s best to start with one-octave major scale fingerings. Since we want these to be movable all over the fretboard, I’ve written them in 2nd position to avoid any open strings.
Ex. 3 is based on the “A” shape in the key of C.
Ex. 3
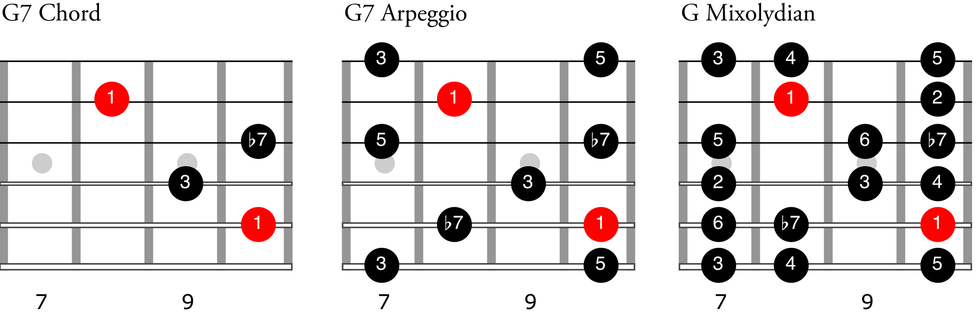
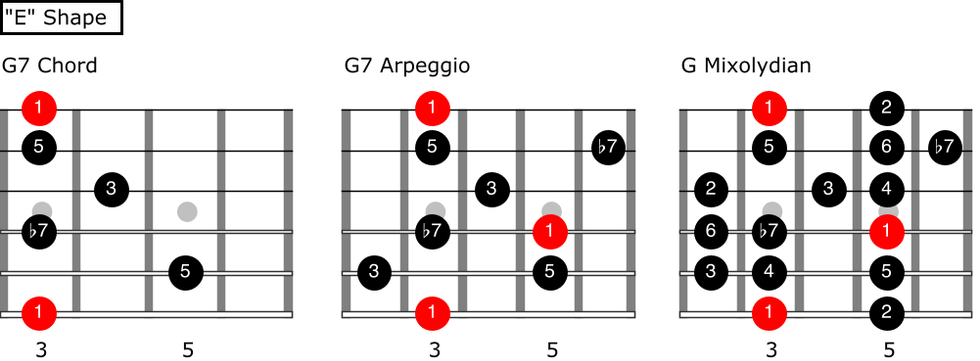
Ex. 4 is based on the “E” shape in the key of G.
Ex. 4
Ex. 5 is based on the “C” shape in the key of D.
Ex. 5
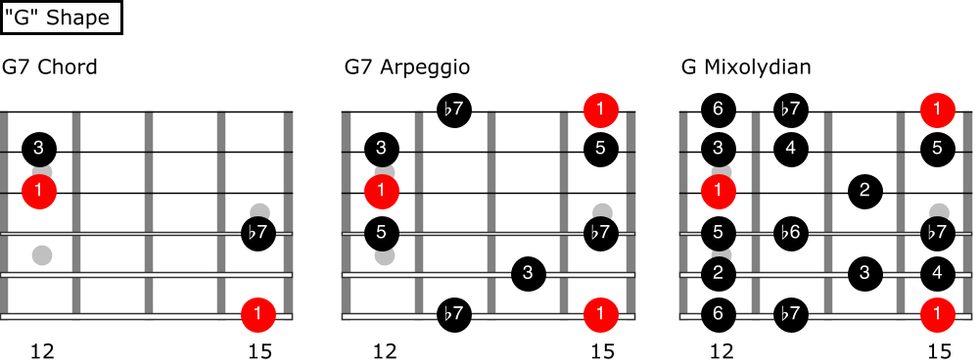
Ex. 6 is based on the “G” shape in the key of A.
Ex. 6
Finally, Ex. 7 is based on the “D” shape in the key of F.
Ex. 7
Now that we have our scale forms, let’s add in the chromatics by filling the spaces between the diatonic major scale tones. There are two possible fingerings for the chromatic scales derived from these forms, due to the guitar’s tuning. The following group of examples illustrates these fingerings.
Ex. 8 is based on the “A” shape in the key of C.
Ex. 8
Ex. 9 is based on the “E” shape in the key of G.
Ex. 10 is based on the “C” shape in the key of D.
Ex. 10
Ex. 11 is based on the “G” shape in the key of A.
Ex. 11
Finally, Ex. 12 is based on the “D” shape in the key of F.
Ex. 12
Generally, melodic lines are constructed using a balance of scalar and arpeggiated movement. Think of chord tones (root, 3, 5, 7) and the extensions (9, #11, 13) as areas of resolution. Chromatic passing tones are initially inserted between whole-steps, allowing connections and resolutions to chord and scale tones.
In measure one of Ex. 13, Ab is inserted between A and G, allowing a descending chromatic passage. Also, note the Eb inserted between E and D. Most of this example makes use of this device.
Ex. 13
In Ex. 14, I’m using mostly descending chromatic passing tones, but observe the ascending chromatics in measures one, two, and four. I briefly hit a C# in the first measure. Normally, I would resolve to D. Instead, I skip to E and then descend chromatically to D.
Ex. 14
By now, these chromatic devices should start to sound familiar to your ear. In Ex. 15, I’m pretty much sticking to ascending and descending chromatic movement.
Ex. 15
Ex. 16 balances the ascending and descending chromatic movement. Notice the four-note motivic sequence in measure two.
Ex. 16
Ex. 17 starts off with a very cool way to skip between two chord tones. In this case, we move from the root (F) to the 7 (E) and then descend chromatically to D. From there we skip up to the root and then leap down to A before approaching the root chromatically from G. When you start to isolate and analyze the nuances of these lines, they become easier to integrate into your own playing.
Ex. 17
Once you understand the basics of integrating chromatics into a one-octave major scale form, then you can apply those same principals to the full CAGED fingerings. Ex. 18 shows each fingering.
Ex. 18
Ex. 19 illustrates how to expand the full “C” shape to include all the chromatic notes.
Ex. 19
Ex. 20 expands on the “A” shape.
Ex. 20
Ex. 21 expands on the “G” shape.
Ex. 21
Ex. 22 expands on the “E” shape.
Ex. 22
Ex. 23 expands on the “D” shape.
Ex. 23
Ex. 24 expands on the “C” shape in closed position.
Ex. 24
The following examples cover the full range of the scale forms. All of the examples are over a major 7 chord quality.
Ex. 25 makes a straight-ahead use of ascending and descending chromaticism. To avoid turning your line into a total chromatic passage with no whole-steps, it’s important to balance diatonic and chromatic movement. Of special interest in this line is measure four, which leaps from G to E to G and follows with an ascending chromatic approach to A.
Ex. 25
In measure one of Ex. 26, notice the chromatic descent from A to G. This is followed with an ascending Gmaj7 arpeggio. The rest of the line is made up of various ascending and descending chromatic movements. A special moment occurs in measure four, where D skips to Ab and then moves down to F# before resolving on G. The G is therefore approached chromatically from both above and below, which is called a double-chromatic approach.
Ex. 26
Ex. 27 kicks off with almost a boogie-woogie pattern. When it gets to A, a skip occurs from A to C# (root to 3) and then moves to a chromatic descent from B to A. Similarly, a skip in measure four moves from D to E before resolving chromatically to D.
Ex. 27
There’s more sequential writing in the first measure of Ex. 28. The first two beats establish a bit of a chromatic motif that catches the ear. Measure three uses one of my favorite chromatic devices, where on beat 3 you skip up from a root to a 5 and then drop to the 7 and descend chromatically as little or as much as you want. In this case, I went chromatically from G# to F#.
Ex. 28
Finally, we have Ex. 29. If you’ve made it this far you must really love chromatics! We kick off with a downward leap from the root to the 3 before ascending chromatically to the 5. Always try to keep chord tones on the strong beats, as this will help give your lines focus and direction.
Ex. 29
Ethnomusicologist Frances Densmore records the song of Mountain Chief, head of the Blackfeet Tribe, on a phonograph for the Bureau of American Ethnology in 1916.
Once used as a way to preserve American indigenous culture, field recording isn’t just for seasoned pros. Here, our columnist breaks down a few methods for you to try it yourself.
The picture associated with this month’s Dojo is one of my all-time favorites. Taken in 1916, it marks the collision of two diverging cultural epochs. Mountain Chief, the head of the Piegan Blackfeet Tribe, sings into a phonograph powered solely by spring-loaded tension outside the Smithsonian. Across from him sits whom I consider the patron saint of American ethnomusicologists—the great Frances Densmore.
You can feel the scope and weight of theancient culture of the indigenous American West, and the presence of the then-ongoing women’s suffrage movement, which was three years from succeeding at getting the 19th Amendment passed by Congress. That would later happen on June 4, 1919—the initiative towards granting all women of this country the right to vote. (All American citizens, including Black women, were not granted suffrage until 1965.)
Densmore traversed the entire breadth of the country, hauling her gramophone wax cylinder recorders into remote tribal lands, capturing songs by the Seminole in southern Florida, the Yuma in California, the Chippewa in Wisconsin, Quinailet songs in Northern Washington, and, of course, Mountain Chief outside the Smithsonian in Washington, D.C. Author of more than 20 books and 200 articles, she carefully preserved the rich cultural diversity of Native Americans with over 2,500 field recordings.
Why am I writing about this? Firstly, to pay homage! Secondly, because it serves as a great reminder to seek and cultivate sound outside the studio as well. We live in a time of great technological power and convenience. Every week a new sample pack, plugin, pedal, or software instrument hits the market. For all the joy that these offerings bring, they deprive us of the joy of creating our own instruments from scratch.
This month, I’m advocating for you to make some field recordings of your own—nature, urban, indoor, outdoor, specific locations, animals, or anything that piques your interest! Bring the material back to the studio and make music with it! I’ll show you how to make your own sample libraries to use in your music. Tighten up your belts, a multipart Dojo is now open.
What do you need to get started? Quite simply, you just need any device that is capable of recording. This can range from your cell phone to a dedicated field recorder. The real question is: Do you want to use mics housed in handheld units or have more robust mic pres with the ability to power larger live/studio microphones using XLR connectors found with the larger units? Let’s look at three scenarios.
The Cellular Approach
The absolute easiest way to get started is with your cell phone. Take advantage of a voice-memo recording app, or use an app that records multitrack audio like GarageBand on iOS. Phone recordings tend to sound very compressed and slightly lo-fi—which might be exactly what you want. However, the method can also introduce unwanted noise artifacts like low-end rumble (from handling the phone) and phasing (moving the mic while recording). I recommend using a tripod to hold your phone still while recording. You might also want to consider using an external mic and some software to edit your sample recordings on the phone. I like using a Koala Sampler ($4.99) on iOS devices.
Upgrade Me
The next step up is to use a portable recorder. These have much better mic pres, and offer true stereo recording with pivoting mic heads. This can give you the added benefit of controlling the width of your stereo image when recording or helping isolate two sound sources that are apart from each other. You sacrifice the ability to easily edit your recordings. You simply import them into your computer and edit the recording(s) from there.
Pro-Level Quality
I would recommend this scenario if you want to record multiple sources at once. These devices also have SMPTE time code, 60+ dB of gain, phantom power (+48 volts), advanced routing, and a 32-bit/192 kHz sampling rate, so you’ll never have a distorted recording even when the meter gets unexpectedly pegged into the red from a loud sound source. I recommend the Zoom F8n Pro ($1099). Now you can use your microphones!
Best Practices
Try to safely record as close to the sound source as you can to minimize ambient noise and really scrub through your recordings to find little snippets and sound “nuggets” that can make great material for creating your own instrument and sample library—which we’ll explore next month! Namaste.
When Building Guitars—or Pursuing Anything—Go Down All the Rabbit Holes
Paul Reed Smith shows John Bohlinger how to detect the grain in a guitar-body blank, in a scene from PG’s PRS Factory Tour video.
Paul Reed Smith says being a guitar builder requires code-cracking, historical perspective, and an eclectic knowledge base. Mostly, it asks that we remain perpetual students and remain willing to become teachers.
I love to learn, and I don’t enjoy history kicking my ass. In other words, if my instrument-making predecessors—Ted McCarty, Leo Fender, Christian Martin, John Heiss, Antonio de Torres, G.B. Guadagnini, and Antonio Stradivari, to name a few—made an instrument that took my breath away when I played it, and it sounded better than what I had made, I wanted to know not just what they had done, but what they understood that I didn’t understand yet. And because it was clear to me that these masters understood some things that I didn’t, I would go down rabbit holes.
I am not a violin maker, but I’ve had my hands on some of Guadagnini’s and Stradivari’s instruments. While these instruments sounded wildly different, they had an unusual quality: the harder you plucked them the louder they got. That was enough to push me further down the rabbit hole of physics in instrument making. What made them special is a combination of deep understanding and an ability to tune the instrument and its vibrating surfaces so that it produced an extraordinary sound, full of harmonics and very little compression. It was the beginning of a document we live by at PRS Guitars called The Rules of Tone.
My art is electric and acoustic guitars, amplifiers, and speaker cabinets. So, I study bridge materials and designs, wood species and drying, tuning pegs, truss rods, pickups, finishes, neck shapes, inlays, electronics, Fender/Marshall/Dumble amp theories, schematics, parts, and overall aesthetics. I can’t tell you how much better I feel when I come to an understanding about what these masters knew, in combination with what we can manufacture in our facilities today.
One of my favorite popular beliefs is, “The reason Stradivari violins sound good is because of the sheep’s uric acid they soaked the wood in.” (I, too, have believed that to be true.) The truth is, it’s never just one thing: it’s a combination of complicated things. The problem I have is that I never hear anyone say the reason Stradivari violins sound good is because he really knew what he was doing. You don’t become a master of your craft by happenstance; you stay deeply curious and have an insatiable will to learn, apply what you learn, and progress.
“Acoustic and electric guitars, violins, drums, amplifiers, speaker cabinets–they will all talk to you if you listen.”
What’s interesting to me is, if a master passes away, everything they believed on the day they finished an instrument is still in that instrument. These acoustic and electric guitars, violins, drums, amplifiers, speaker cabinets—they will all talk to you if you listen. They will tell you what their maker believed the day they were made. In my world, you have to be a detective. I love that process.
I’ve had a chance to speak to the master himself. Leo Fender, who was not a direct teacher of mine but did teach me through his instruments, used to come by our booth at NAMM to pay his respects to the “new guitar maker.” I thought that was beautiful. I also got a chance to talk to Forrest White, who was Leo’s production manager, right before he passed away. What he wanted to know was, “How’d I do?” I said, “Forrest, you did great.” They wanted to know their careers and contributions were appreciated and would continue.
In my experience, great teachers throw a piece of meat over the fence to see if the dog will bite it. They don’t want to teach someone who doesn’t really want to learn and won’t continue their legacy and/or the art they were involved in. While I have learned so much from the masters who were gone before my time, I have also found that the best teaching is done one-on-one. Along my journey from high school bedroom to the world’s stages, I enrolled scores of teachers to help me. I didn’t justenroll them. I tackled them. I went after their knowledge and experience, which I needed for my own knowledge base to do this jack-of-all-trades job called guitar making and to lead a company without going out of business.
I’ve spent most of my career going down rabbit holes. Whether it’s wood, pickups, designs, metals, finishes, etc., I pay attention to all of it. Mostly, I’m looking backward to see how to go forward. Recently, we’ve been going more and more forward, and I can’t tell you how good that feels. For me, being a detective and learning is lifesaving for the company’s products and my own well-being.
Sometimes it takes a few days to come to what I believe. The majority of the time it’s 12 months. Occasionally, I’ll study something for a decade before I make up my mind in a strong way, and someone will then challenge that with another point of view. I’ll change my mind again, but mostly the decade decisions stick. I believe the lesson I’m hitting is “be very curious!” Find teachers. Stay a student. Become a teacher. Go down all the rabbit holes.
Featuring the SansAmp section, Reverb/Delay/Roto effects, and OMG overdrive, with new additions like a switchable Pre/Post Boost and Effect Loop. Pre-configured for the RK Killer Wail wah, this pedal offers versatile tones and unmatched flexibility.
Since the debut of the original RK5 in 2014, Richie’s needs have changed, both on and off the road. The RK5 v3 retains the same SansAmp section, Reverb/Delay/Roto section, and Richie’sSignature OMG overdrive. New features include a switchable Pre/Post Boost to beef up drive and distortion or increase the overall volume to punch up fills and solos, along with the addition of an Effect Loop. It has also been pre-configured to provide phantom power for Richie’s Tech21 Signature RK Killer Wail wah.
The all-analog SansAmp section of the RK5 focuses on clean tones within the tube amplifier sound spectrum. It includes 3-band active EQ, and Level and Drive controls. To dirty things up, you have the flexibility of using the Drive control, and the Boost function, or you can add overdrive from the OMG section. Or all three. Each method achieves different tones. The OMG section is based upon the Richie Kotzen Signature OMG pedal, which provides a wide range of overdrive, from clean to aggressive. You can add personality to a clean amp or use it for extra punch with a dirty amp tone. Controls include Drive for the overall amount of gain and overdrive and Tone with specialized voicing for adjusting the high-end and mid-range. A Fuzz switch changes the character and attack of the overdrive to a fuzz-style tone, making it thicker and woolier.
Other features include an independent foot-switchable Reverb witha choice of large and small“room sizes;” Tap Tempo Delay, which can be transformed into a rotating speaker effect; included Tech 21 Model #DC9 universal self-adjusting 9V DC power supply, with interchangeable international prong assemblies for use anywhere in the world. Anticipated availability: January 2025
For more information, please visit tech21nyc.com.
OM-balance and comfort suited for the fingerstylist on a budget.
Comfortably, agreeably playable. Balanced dimensions. Nice fretwork.
Lighter mahogany top looks less classically mahogany-like. Some compressed sounds in heavy-strumming settings.
$299
Guild OM-320
guildguitars.com
The Premier Guitar crew is spoiled when it comes to hanging out with nice flattops. But while those too-brief encounters with acoustics we can’t afford teach us a lot about the flattop at its most refined, they also underscore a disconnect between the cost and the acoustic guitar’s status as a true folk instrument of the people.
Guild’s OM-320, from the company’s new 300 series, sells for $299, which isn’t much more than a good-quality, entry-level flattop cost in the 1980s. Strikingly, there’s a lot of competition in this price class. Even so, the OM-320’s nice build quality and pretty tone in fingerpicking applications stand out in a very crowded price segment.
The United Guild of Deal-Seeking Pickers
Though Guild, in all its incarnations, has always made accessible guitars a part of their offerings, a $300 instrument with the company’s logo might give pause to players familiar with guitars from their various U.S. factories. Quality can be hit-or-miss on any guitar from any brand at the entry level. What’s more, a lot of guitars with different brand names come from just a few OEM facilities—lending a certain sameness on top of irregular quality. But the recent acquisition of Guild by Yamaha, who has a reputation for solid entry-level instruments, inspires confidence as far as these concerns go.
So, too, does the integrity of the OM-320 at the nuts-and-bolts level. I couldn’t find any overt lapses in quality control. And in many spots where that really counts, like the fretwork, the execution is especially good. Little details like the Guild logo overlay (rather than a simple decal) add a soupçon of luxury. So do the Guild-branded, Grover Sta-Tite-style butterbean tuners, which look stylish and feel sensitive and accurate.
“The neck inhabits a comfortable zone between C and D shapes that’s super agreeable and, at least in my case, a nice antidote for hand fatigue.”
Though the body is built from layered mahogany on the back and sides and a solid mahogany top, the latter is much lighter and amber- or honey-toned than the rich cocoa-hued mahogany tops you’d associate with a vintage Guild M-20, or, for that matter, theM-120 from the company’s contemporary Westerly line. As a result, you see a little more contrast in the grain and a little dimpling in certain sections of the wood. The lighter wood isn’t unattractive, it just looks less trad, if you’re chasing Nick Drake’s Bryter Layter style. If that’s important, you should adjust the “design/build” score appropriately.
Sit and Stay Awhile
Barring being covered in porcupine spines, almost any OM or 000 will qualify as a pure-comfort title finalist. It’s not too thick, too wide, nor too petite—a size and profile that also pays unique, civilized sonic dividends. Here, the OM body is complimented by a neck that feels like an especially natural match. I don’t have a bunch of inexpensive OMs on hand to compare, and there isn’t anything wildly unique about the shape, but the neck profile feels very proportionate to the body. It also, depending on your own sense of such things, inhabits a comfortable zone between C and D shapes that’s super agreeable and, at least in my case, a nice antidote for hand fatigue. The neck is not classically OM-like in terms of nut width. The M-320’s nut measures 1 13/16", which is typical of a 000, rather than the 1 3/4" associated with OMs. The extra width, of course, would make the guitar more appealing to some fingerstylists that need the space. At no point, however, did I feel anything close to cramped; it’s just very comfortable.
The combination of layered back and sides, OM/000 dimensions, and mahogany mean the OM-320 feels and sounds less than super-widescreen in terms of tone spectrum and power. Nevertheless, it sounds balanced and pretty—particularly with a droning, dropped 6th string and other more-elastic tunings where the guitar can exercise the lower extremes of its voice. Tuning to standard has the effect of highlighting midrange emphasis, which can get boxy and render the 3rd and 4th strings a bit less potent and present. That said, it’s still balanced and almost never collapses into a distorted harmonic blur. The bottom end maintains an appealing growl and, as long as you use a gentler picking approach, you can use the highest four strings in very dynamic ways. Using a capo emphasizes other cool, high-mid-focused voices in the guitar that coexist well with most strumming approaches.
The Verdict
Inexpensive guitars that feel great can make up for a lot of shortcomings in tone. But the OM-320’s deficiencies in the latter regard are few, and some perceived limitations, like midrange emphasis, are intrinsic to guitars with OM dimensions. So, while forceful strumming is not the OM-320’s strength, the comfortable playability might just lead you to those places anyway. And if you compensate accordingly with touch dynamics, you can conjure many sweetly chiming tones that might sound extra sweet given the bargain price