Chops: Intermediate
Theory: Intermediate
Lesson Overview:
• Develop fretting-finger
independence.
• Learn how to anchor one note
while moving others around it.
• Polish your picking patterns.
• Explore oblique and contrary
motion.
Welcome to the second lesson in our series on building fingerstyle technique. Last month, we explored exercises designed to strengthen the ring finger and include it in a variety of fingerpicking patterns [“Picking on the Ring Finger,”November 2011]. As promised, this month we’ll look at another aspect of fingerstyle technique—one that’s often overlooked when discussing fingerpicking—and that’s fretting-finger independence.
One benefit of fingerstyle technique is that it gives you the ability to simultaneously play multiple lines. This can be as simple as arpeggiating a chord while playing descending or ascending lines, or it can be as involved as juggling phrases that move in opposite directions. Whatever the situation, fingerpicking demands digital dexterity in both hands, and often it’s the fretting hand that actually has the toughest gig.
With that in mind, let’s look at ways to increase independence between the fretting hand fingers in the context of fingerpicking. We’ll dive right in with the Robert Johnson inspired blues turnaround shown in Fig. 1. In measure 1, use your 4th finger to hold the high D as you lower a major sixth chromatically on the 2nd and 4th strings. Your thumb (p), index (i), and middle (m) fingers pluck the 4th, 2nd, and 1st strings, respectively.

Measure 2 offers the same musical motif, but this time you’re holding A on the 2nd string (use your 4th finger again) and the major sixth descends on strings 3 and 5. That last five-fret stretch (beat 4) can be a bear, so ease into it gently. If you have trouble making the final Dm-to-A move, practice it slowly by itself a few times, and then rewind and try measure 2 in its entirety.
Incidentally, this example illustrates a type of counterpoint called oblique motion, in which one or more lines move against a fixed note or interval. This “anchor-some-notes-while-moving-others” approach gets to the heart of fingerstyle guitar.
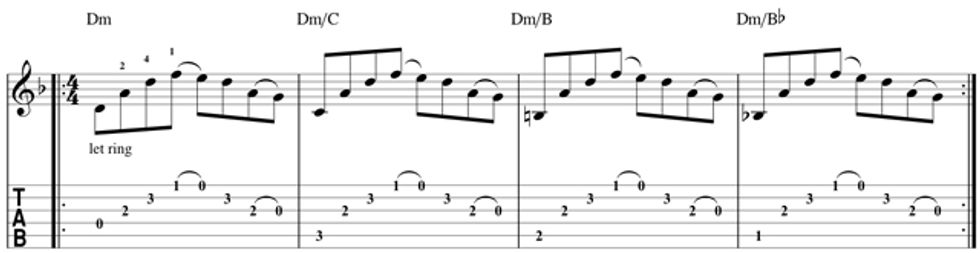
We encounter oblique motion again in Fig. 2, but this time, we’re arpeggiating a chord (Dm) above a descending bass line (D–C–B–Bb). There’s more to this slash-chord passage than meets the eye, as you have to shift your fingers around to hold the Dm chord while executing the bass line. Start with the fretting fingering as shown. Then as you sort out the subsequent moves, notice how the 4th finger is the only digit that doesn’t swap places with its mates sometime during this four measure passage. Pluck the bass line with your thumb and use your index finger on the 3rd string, your middle on the 2nd, and ring on the 1st.
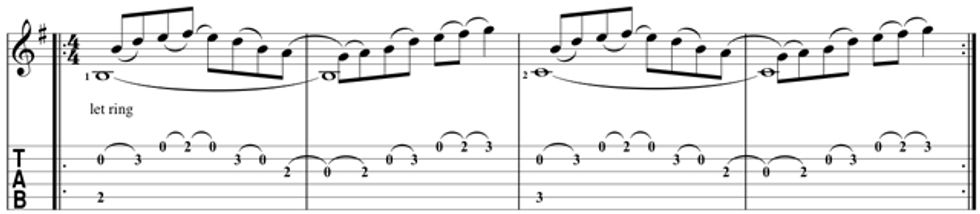
So far, we’ve parked the 4th fretting-hand finger and practiced moving the others around it. In Fig. 3, we flip the process and hold a sustaining bass note while playing a melodic phrase above it. Notice how the bass note changes every two measures, yet the melodic figure repeats. Use the same picking finger assignment as in the previous example.
FYI: Slash Chords
Sheet music and songbooks often
show chord symbols that contain
a slash mark. These “slash
chords” indicate specific voicings
that are crucial to the song
or piece, and they occur when
a chord’s lowest note is not the
root. The chord name is at the
left of the slash mark. The second
element—to the right of the
slash—indicates the lowest tone
in the voicing. For example, A/C#
specifies an A triad with a C# in the
bass. (To a bandmate, you’d say
“A over C#.”) Slash chords typically
occur when an arranger wants to
flag a bass line that moves through
a progression.
This passage sounds cool—once you decode all the subtle hammer-ons and pull-offs—but it’s a bear in terms of finger independence, so go slowly. When working out tricky independence exercises, it’s easy to overdo it and strain your finger muscles, and that’s not the goal. Regular, relaxed workouts are the key to better technique. By the way, this repeating passage sounds great through a flanger.
One of the most compelling sounds you can make on a guitar involves contrary motion, in which a melody and bass line move in opposite directions. Though it’s a creative challenge to compose music using contrary motion, it’s very easy to craft exercises to develop this technique. Here’s one: Simply select a scale and simultaneously ascend and descend through it. (This makes a great parlor trick, by the way, when you want to impress your guitar-playing buddies.)
Fig. 4 shows a humble G major scale that simultaneously moves in two directions. Using quarter-notes, the bottom line ascends starting on a low F# (the seventh degree of the G major scale), while the top 16th-note line descends starting on A (the second degree). Ultimately both lines converge on G—the root. Pretty cool, huh? Use your thumb to pluck the quarter-notes and your ring, middle, and index fingers to attack the 16ths.
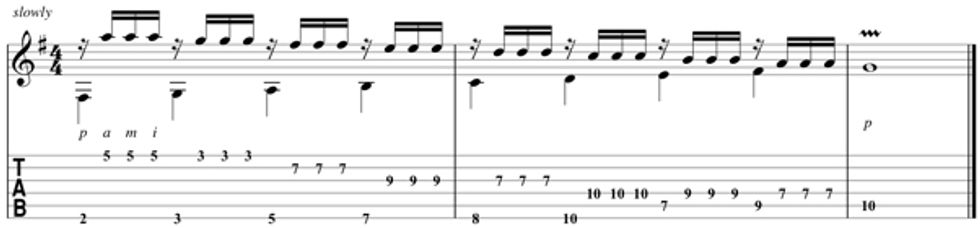
You can fret some of Fig. 4’s notes on different strings, so as an experiment, see if you can find an alternative way to play this example. Then for mega bonus points, select another scale and figure out how to ascend and descend through it using a similar picking-hand pattern.
Next month, we’ll continue expanding our fingerstyle chops by dipping into some basic bossa nova rhythms.
 Andy Ellis A veteran guitar journalist and senior editor at
PG, Andy is based in Nashville, where he backs
singer-songwriters on the baritone guitar. He
also hosts The Guitar Show, a weekly on-air and
online broadcast. For the schedule and links to
audio streams and archived audio interviews
with inspiring players, visit theguitarshow.com.
Andy Ellis A veteran guitar journalist and senior editor at
PG, Andy is based in Nashville, where he backs
singer-songwriters on the baritone guitar. He
also hosts The Guitar Show, a weekly on-air and
online broadcast. For the schedule and links to
audio streams and archived audio interviews
with inspiring players, visit theguitarshow.com.