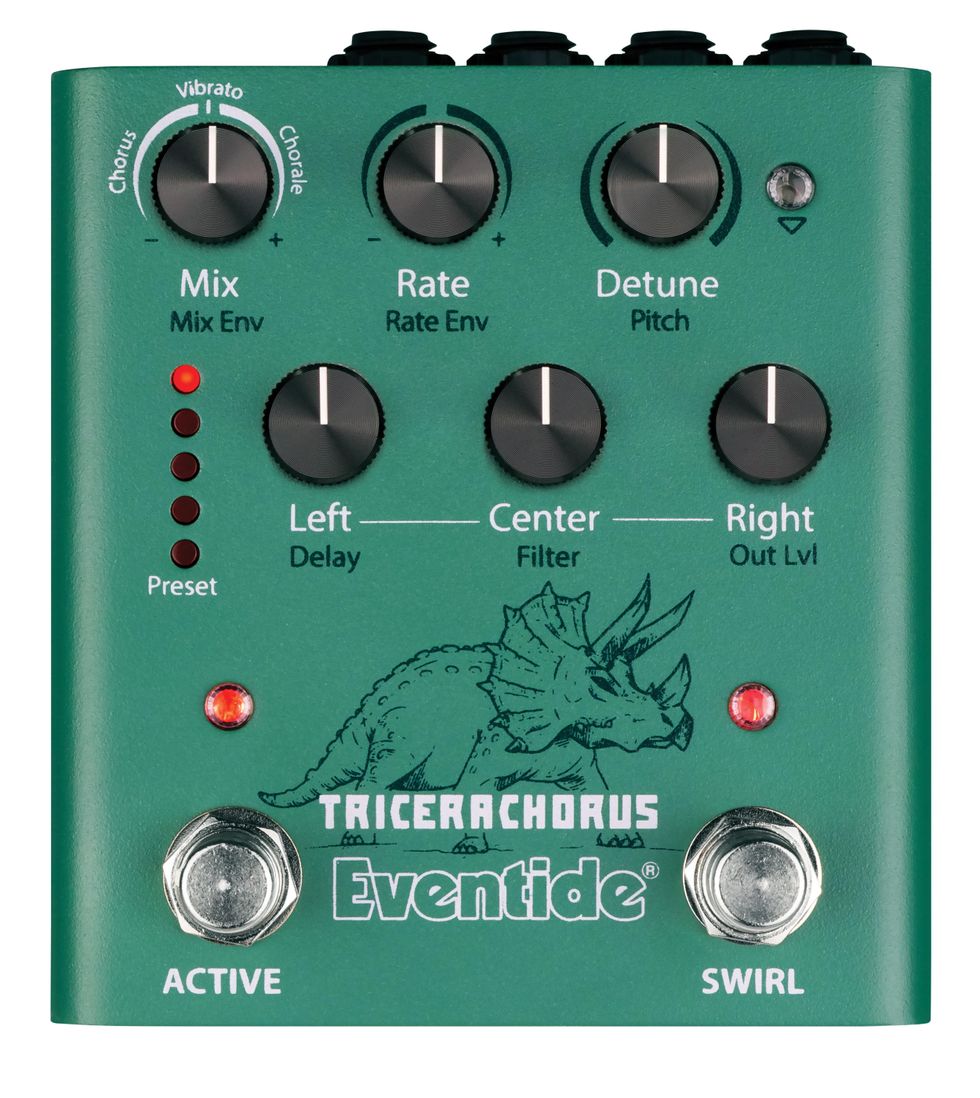
<p>Inspired by the classic Tri-Stereo Chorus and stompbox choruses of the 1970s and early 1980s, the TriceraChorus pedal pairs rich Bucket Brigade-style chorusing with Eventide’s legendary MicroPitch detuning for a lushness that rivals the jungles of the late Cretaceous Period. TriceraChorus features three chorus voices and three unique chorus effects which can be used to create a wide stereo spread with pulsing waves of modulation. The innovative “Swirl” footswitch adds psychedelic flanging, phasing, and Univibe-style tones. It has never been easier to dial in syrupy smooth, deep modulation on guitar, bass, synths, strings, vocals, and more.</p>
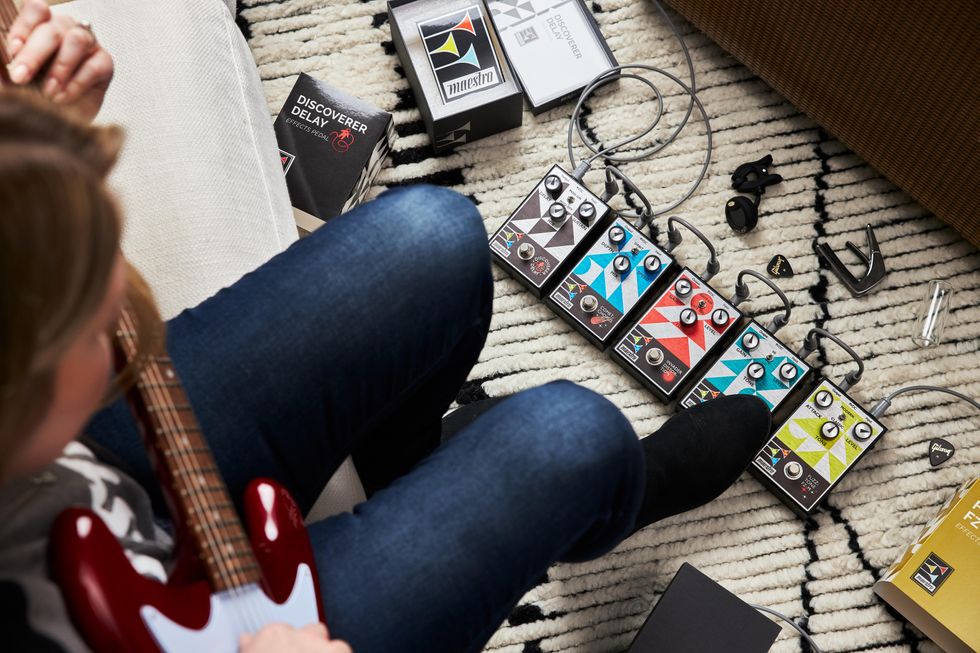
<p>To be called “legendary” is to have shaped music as we know it. From the Rolling Stones to the Raconteurs. From Pete Townshend to George Harrison and from Clapton to Frampton. They strived to coax the truest expression from their instruments - the sound they heard in their heads and their hearts. Their signature sound - so uniquely shaped by effects that it changed everything. It’s the Fuzz-Tone FZ-1 that fuels the groundbreaking riff in the Rolling Stones’ “(I Can’t Get No) Satisfaction” and the funky wah filter that anchors the “Theme from <em>Shaft</em>.” While the impact they had on the lineage of music is also unique, many have one thing in common—Maestro. So, while not everyone has heard of Maestro, everyone has <em>heard</em> Maestro. </p><p>Maestro, the “Founder of Effects,” is back with an all-new line of effect pedals - the Maestro Original Collection. Five new pedals, designed, voiced, and styled for the musician looking to shape their unique sound. A tribute to the sound and style of the brand’s much-beloved classic models of the 60s and 70s, with modern features, expanded versatility, and advanced tone-tweaking capabilities. Each function as an innovative “two-in-one” pedal, with a single toggle that switches between two distinct modes. Each features a straightforward three-knob setup, true bypass switching, and an ergonomic, pedalboard-friendly wedge profile. </p><p>It doesn’t matter what you play. As long as there are sounds being made, new legends will emerge. Maestro is back to help you SHAPE YOUR SOUND.</p>
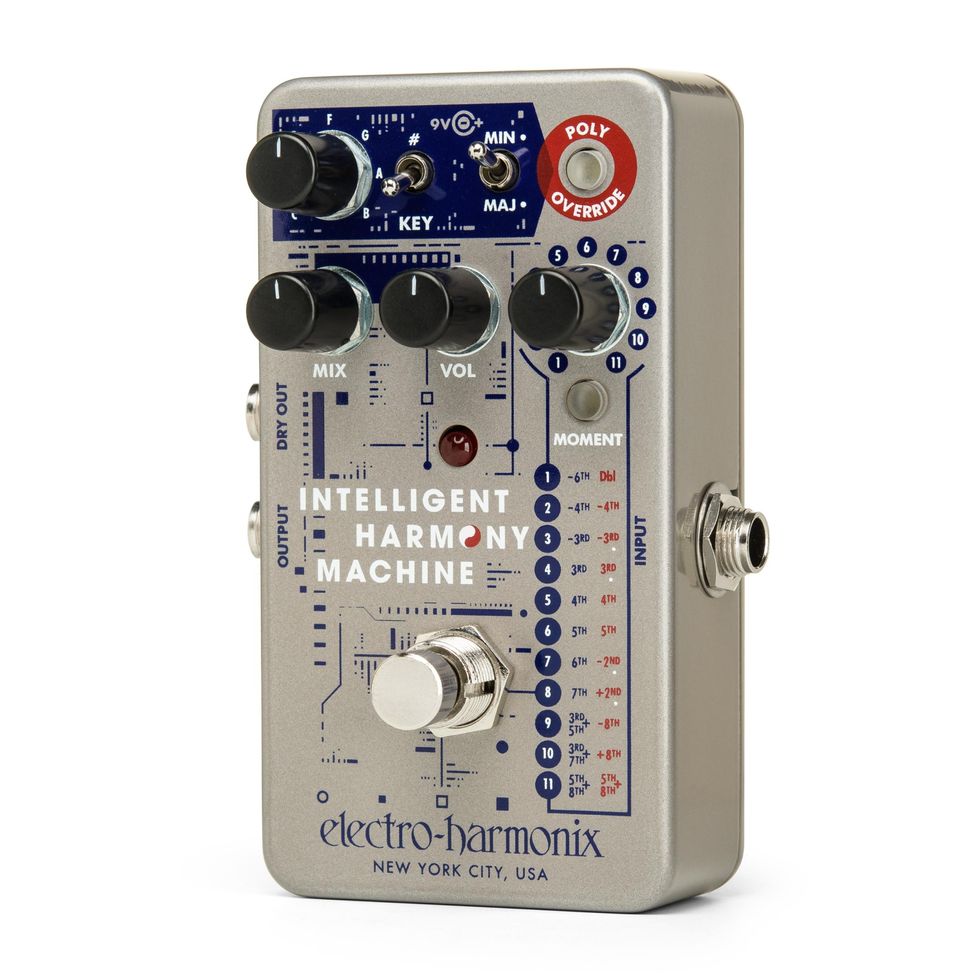
<p>The EHX Intelligent Harmony Machine instantly creates matching harmonies to what you play. It’s like having one – or even two – guitarists jamming with you at the same time and always in perfect sync. The Intelligent Harmony Machine opens a door to the music of great multi-lead guitar bands and multi-part harmonized solos. Plus, its ability to apply harmonies ranging from simple to sophisticated will totally transform what you play. Of course, it also boasts EHX’s renowned impeccable tracking and genuine musical tone.</p>
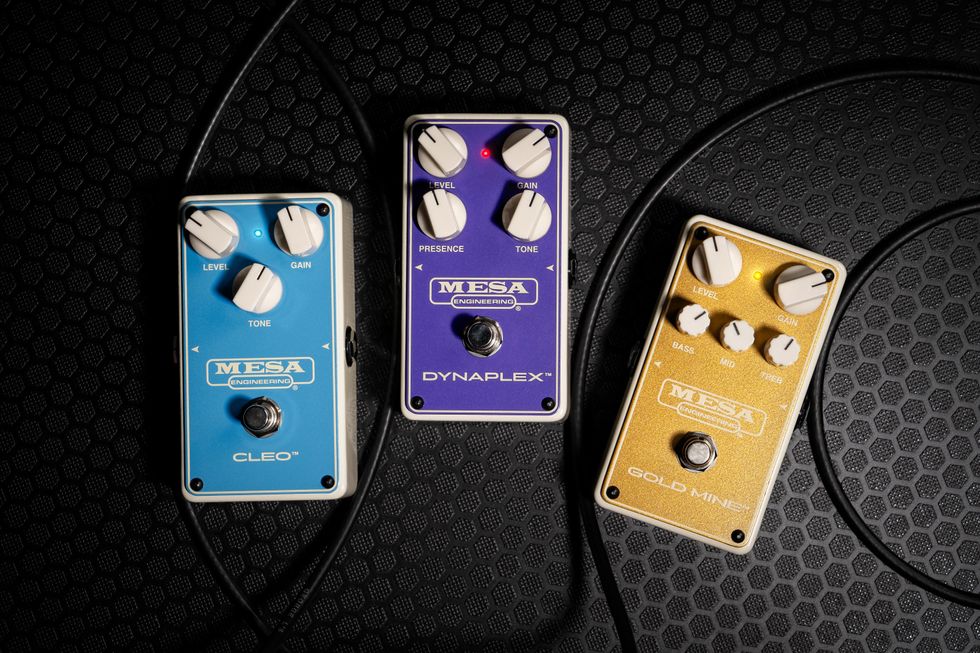
<p>MESA® Drive Pedals are built by the same artisans that create the award-winning Mark Five™ and the legendary Dual and Triple Rectifier® amps. They stand ready to serve up all rock genres with cut and aggression while retaining much of the signature warmth and organic sonic quality found in our amplifiers. Ranging from high to lower gain applications, including classic rock or howling blues, we have a drive pedal that will help you achieve the sounds that so many artists have employed in our amps to create the world’s heaviest guitar tones!</p>
<p>Progressing along the gain spectrum, the transparent boost/overdrive CLEO™ is joined by the vintage-inspired, medium gain DYNAPLEX™ and the higher gain GOLD MINE™. The CLEO is a transparent boost/overdrive design focusing on vintage-inspired low to medium gain overdrive sounds packed with dynamic nuance, lively attack, and a wide variety of essential clip sounds. Moving on to medium gain, the DYNAPLEX is all about the “British Crunch” style with classic mid punch, chirping harmonics, and the chime players desire for classic rock sounds and beyond. Progressing to the higher end of the gain spectrum, the GOLD MINE is focused on mid to high gain sounds, classic heavy chunk, and rich gain with harmonic complexity, soaring single note sounds, and the liquid gain and girth that gain lovers expect from MESA.</p>
<p>Like every MESA product, our pedals are built using the same quality components, craftsmanship, and inspiring performance as our custom amplifiers...all hand-built in Petaluma, California, USA! </p>
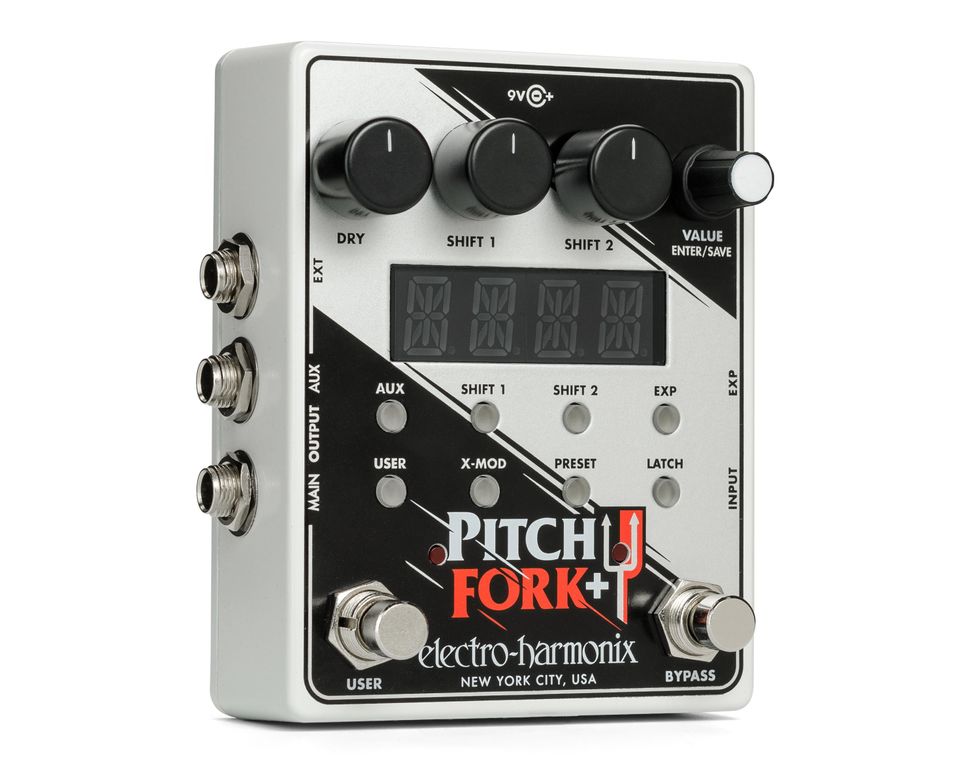
<p>Dual engine pitch shifting with nearly endless possibilities and expansive control options! The EHX Pitch Fork®+ features two independent pitch shifting engines with full control over each. Both will transpose your pitch up or down over a +/- three octave range and detune +/-99 cents. With rock solid tracking, an organic, musical tone and extensive control, it’s your ultimate harmonizer.</p>
<p>Pedal Pad pedalboards are hand-built for YOU in Coatesville, Pennsylvania! Our boards feature an ALL-IN-ONE solution where the board is also the case. Just pop the top and PLAY! Our ordering interface allows you to configure any board with a plethora of options. More options or requests? Just email or call and we'll make it happen! Most custom orders ship within 2-3 weeks!</p>
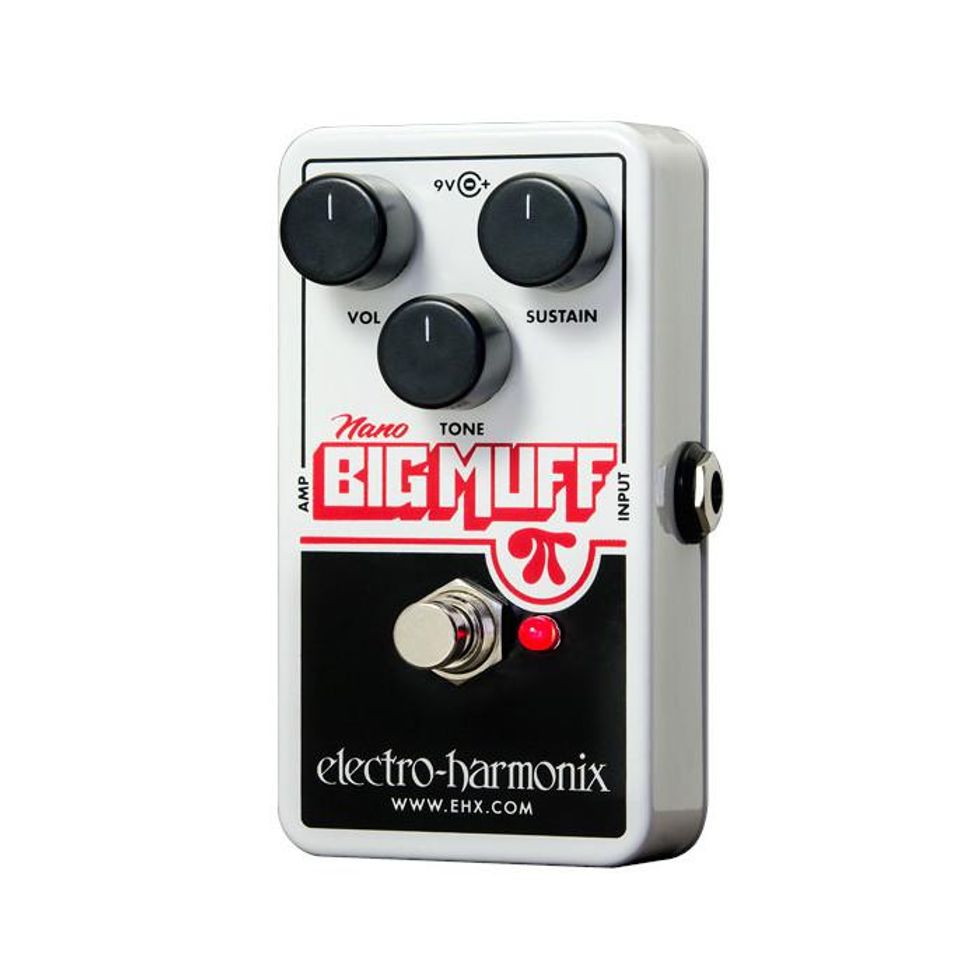
<p>EHX took the Big Muff Pi circuit and simply shrunk it without changing its rich, creamy, violin-like sustain and sound. The EHX Nano Big Muff Pi works and sounds identical in every way to our classic NYC Big Muff Pi. Get a piece of the pi for yourself!</p>
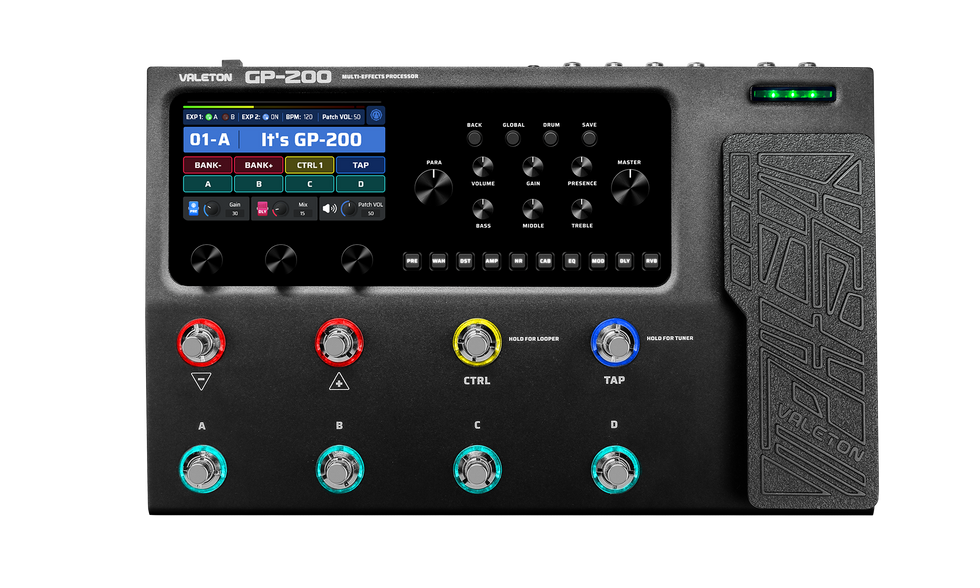
<p>Implementing the HD digital modeling technology accumulated throughout years of the Valeton team's diligent efforts, the GP-200 delivers hundreds of re-editions of tones from world-classic amplifiers and stompboxes with a comprehensive upgraded algorithm. Combining 140 legendary amplifiers and cabinets simulations and 100 renowned stompbox effect pedals, plus 20 factory cab IR slots, the GP-200 will guarantee your consistently great sound on stage.</p>
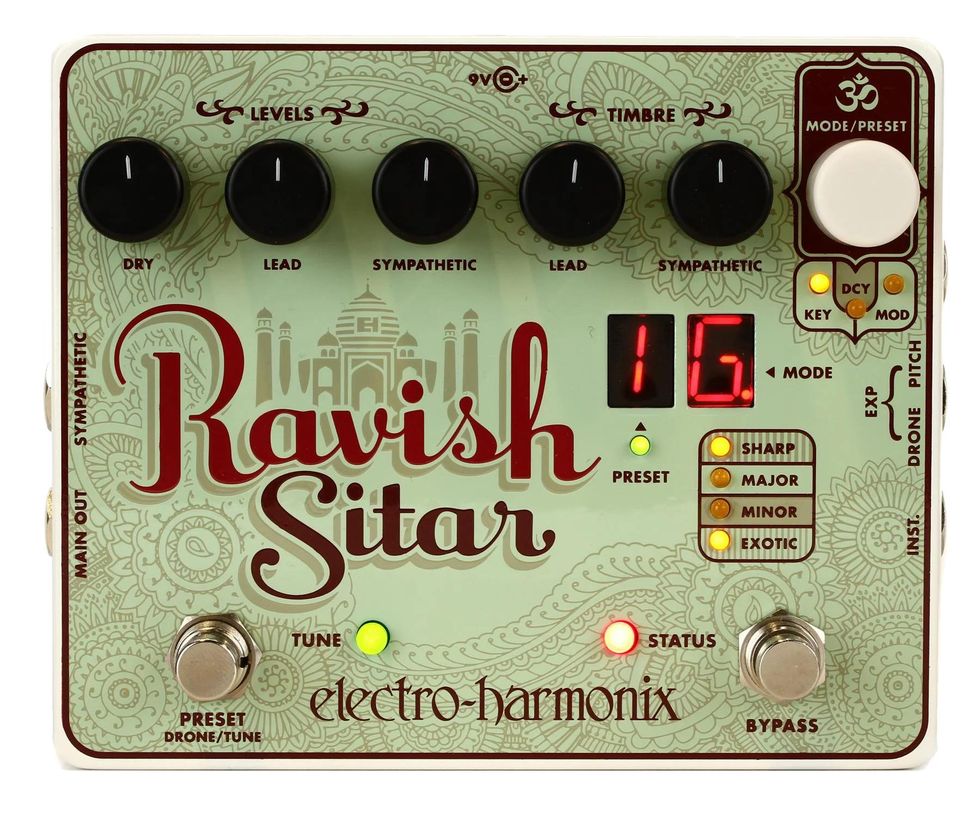
<p>Transform your electric guitar into a sitar! Very few instruments offer as much harmonic and dynamic flexibility as a sitar. Electro-Harmonix has streamlined the essence of the sitar into a compact enclosure that offers a polyphonic lead voice and tunable sympathetic string drones that dynamically react to your playing. With the EHX Ravish Sitar Emulator, you can create your own custom scales for the sympathetic strings while you set the decay time for the lead voice.<br><br>Two expression pedal inputs allow you to bend the pitch of the lead voice and control the volume of the sympathetic strings simultaneously. These unique controls offer the player the ability to program the Ravish to become a totally unique and organic instrument unto itself.<br><br>The Ravish is truly a design with the flexibility to be a crossover tonal wonder.</p>
Iconic amp sounds for your pedalboard. The Valvenergy series valve distortion pedals offer the warmth and harmonics of amp distortion in a compact pedal format. The all-analog signal path and Nutube allow for genuine overdrive and distortion tones with the feel of a real tube amp, while internally boosted voltage gives greater headroom and dynamics. Three output modes allow you to use this as a standard pedal, a line-level preamp, and a direct amp-sim using the built-in analog cabinet simulator.
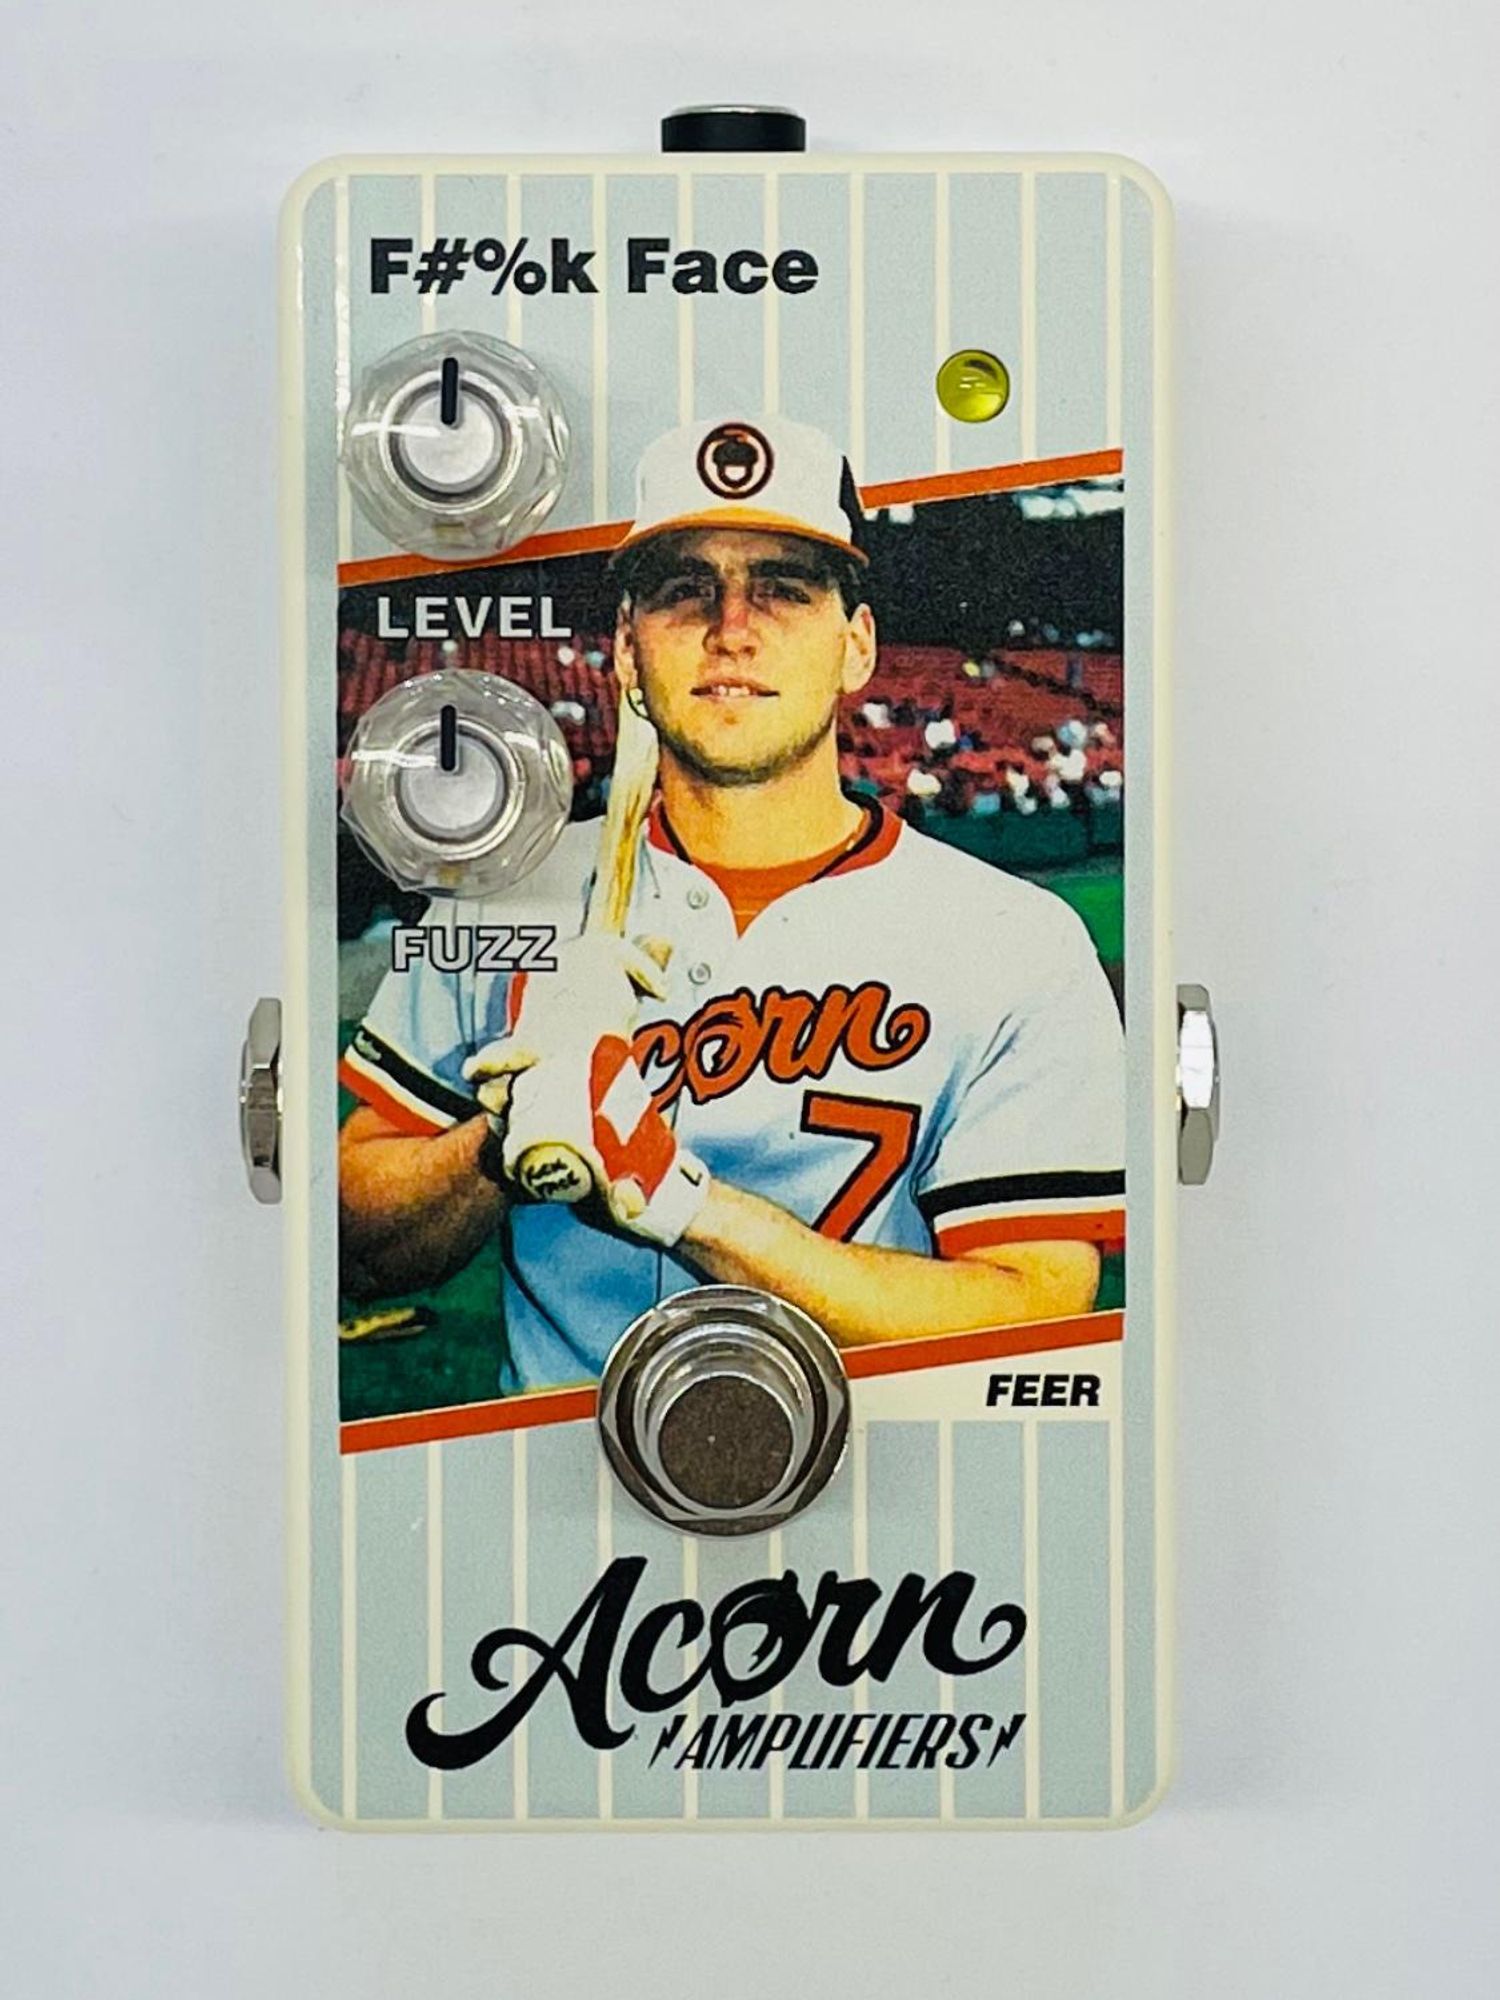
The F#%k Face is a triple gain stage fuzz with thick and meaty sustain that sounds huge in front of a slightly cranked tube amp. Baseball card collectors from the late 80’s will immediately recognize the infamous ‘error card’ graphics of the same name. The circuit is based on the legendary Fuzz with a different Face, but with an additional silicon transistor gain stage and voiced to retain more useable and dynamic fuzz tones all along the sweep of the two controls. In the front of your pedal chain, the F#%k Face will add dynamic interactivity to the volume controls on your guitar which enable a sweep from slight grit to full ripping-velcro breakup.
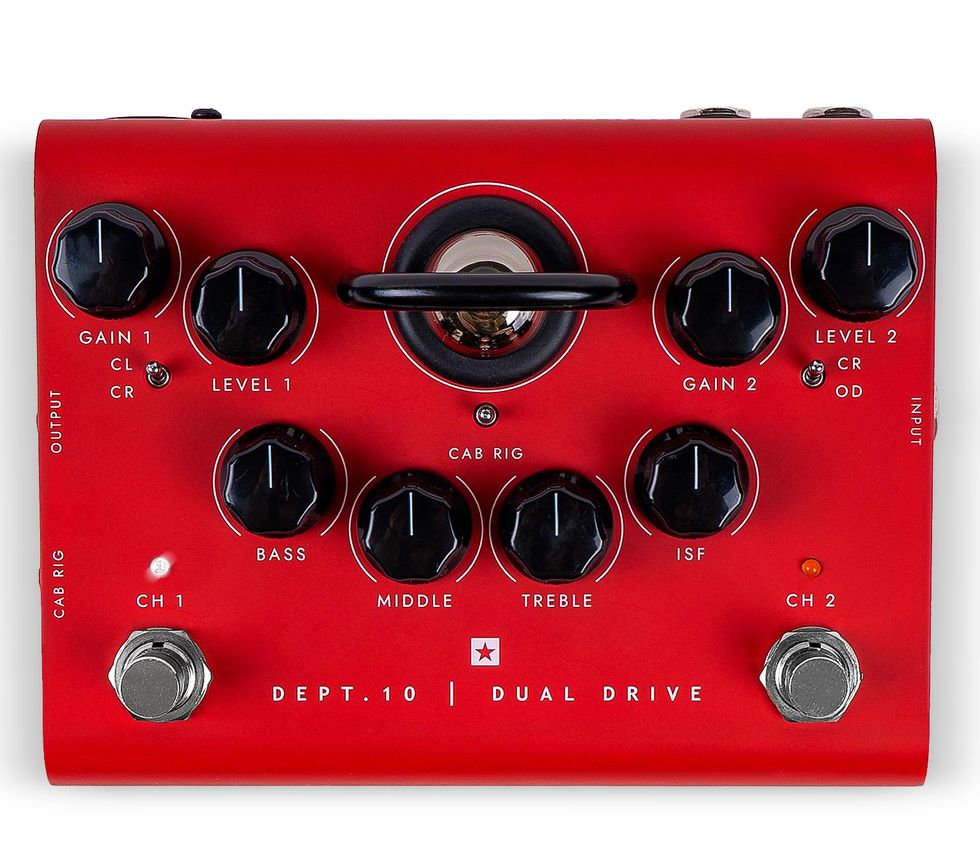
Brought to you by Blackstar’s R&D division responsible for blue-sky innovation and design, Dept. 10 are the most advanced valve pedals in the world. Meticulously designed and engineered by a team of musicians for musicians. At the heart of each Dept. 10 pedal is an ECC83 triode valve, running at more than 200V internally like a valve amp, which allows them to deliver organic tone, dynamics and break up. Dual Drive and Dual Distortion include Cab Rig, our next-generation DSP speaker simulator that reproduces the sound and feel of a mic’d up guitar cab in incredible detail. Deep-dive using our free software and capture the incredible tones via low latency USB, XLR D.I. out or headphones. Choose from Boost, Dual Drive or Dual Distortion to help you craft your perfect tone.
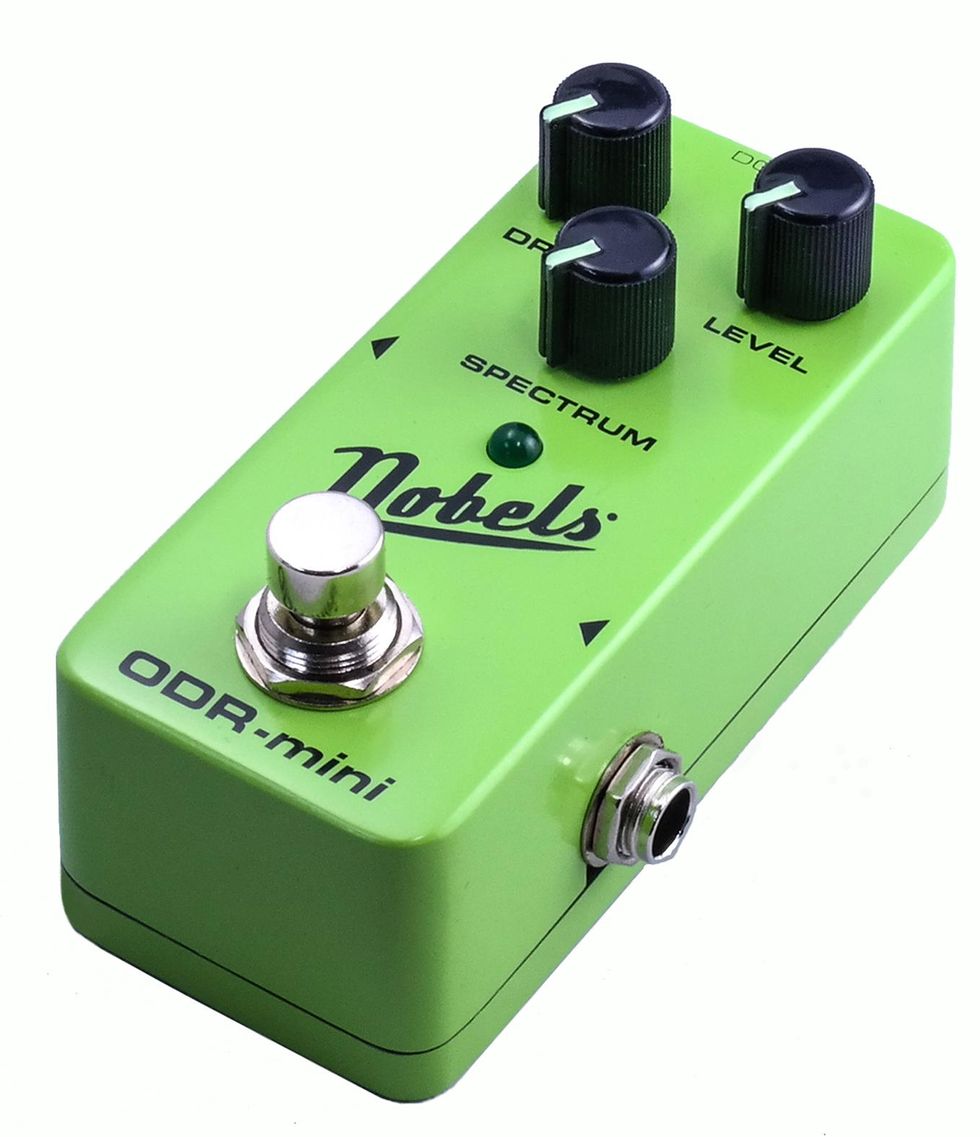
The ODR-mini delivers creamy, natural overdrive – Everything from pushed clean amp tones to gain filled stacks! It has the same tones as its legendary brother – the ODR-1. You‘ll love the warm mid-gain tones for rock and blues, and the screaming hard rock sounds from the ODR-1 Mini. Plus the mini features true-bypass switching, the SPECTRUM pot with mid-click, fluorescent pointers on the “GitD“ – knobs (Glow-in-the-Dark). Guaranteed to be a BIG part of your sound while a small part of your pedal board.
Effect-Type: Overdrive Analog Mono/Stereo: Mono In, Mono Out Control: Drive, Tone, Level Bypass Modus: True Bypass 9-18 Volt, center negative Consumption 25 mA Dimensions (WxLxH / mm): 42 x 93 x 50 Weight: 175 gr Country of origin: China Solid metal housing Low current consumption
Requires stabilized power supply 9-18 Volt DC, with min 100 mA, 2.1 mm plug, center negative, (not included)
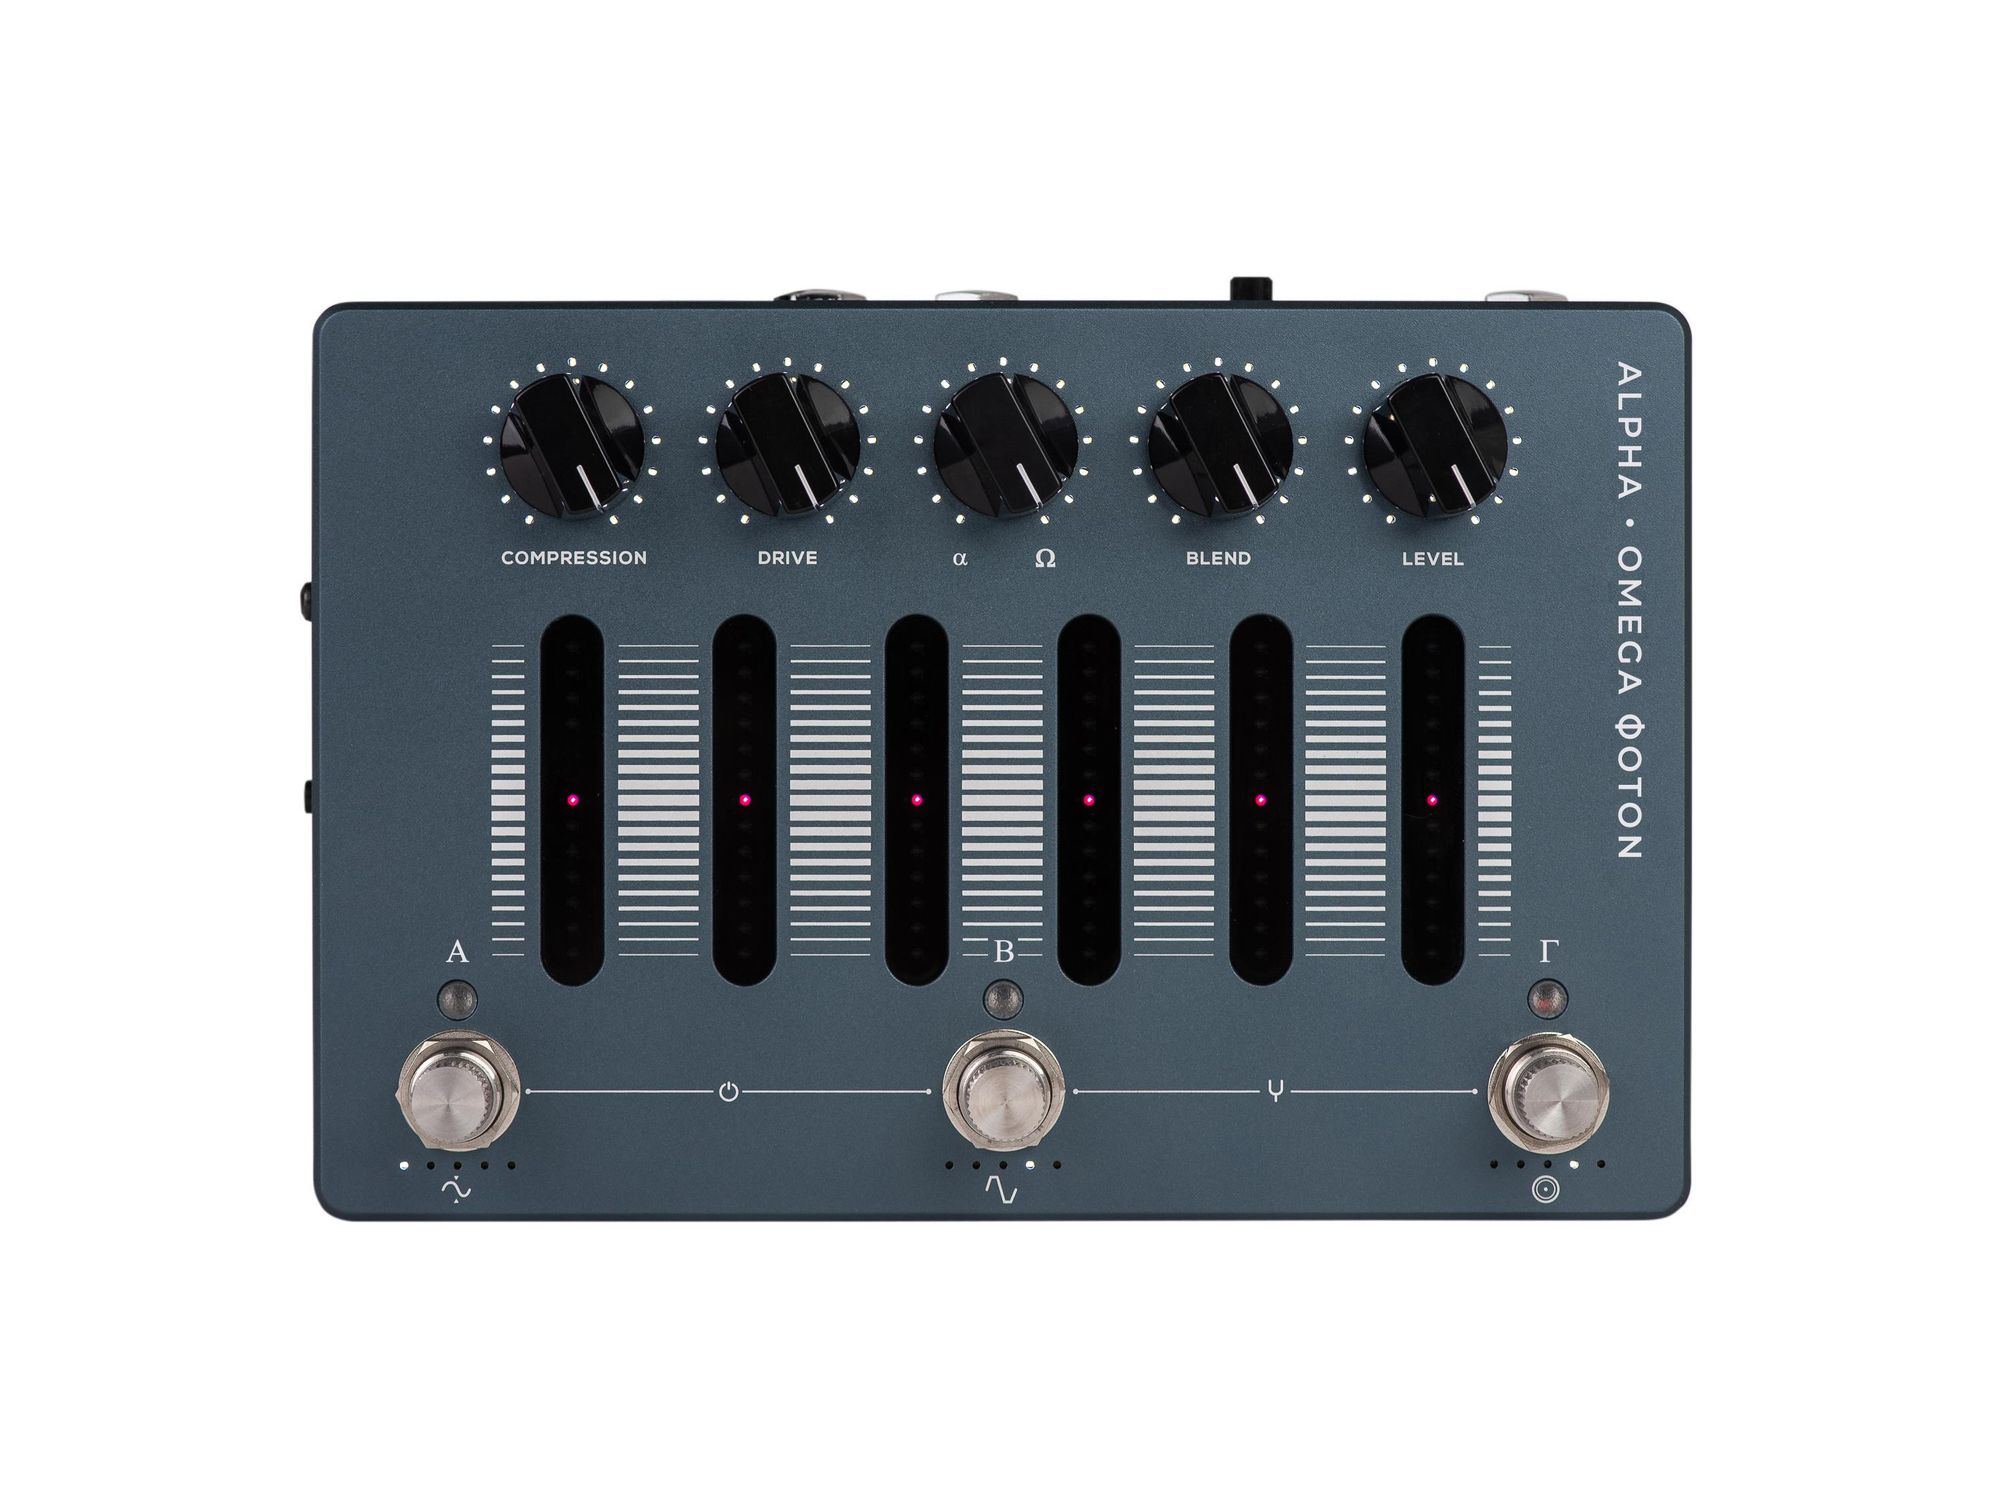
Versatility, empowerment, limitless options, and ever-demanding tools at the disposal of every musician and composer are today on demand. A call for inventive devices continues to make musicians more inspired, clever and connected. The Alpha·Omega Photon combines Darkglass' signature Alpha·Omega parallel distortion with the versatile format of the Aggressively Distorting Advanced Machine. In addition to powerful distortion and studio-quality compression, the Alpha·Omega Photon is capable as an audio interface via USB-C or an amp replacement using cab sim IRs and XLR DI output. See Video Follow on Instagram
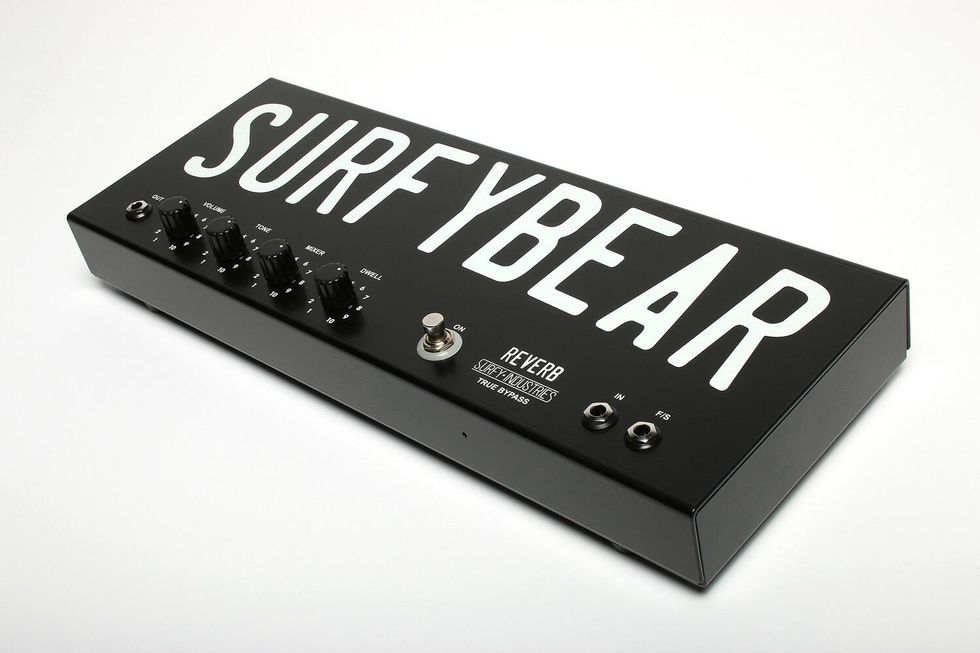
The Holy Grail of guitar reverb effects, the Fender®-style spring reverb, has been finally revisited with modern features! Try it and discover why most surf guitarists and the truly reverb addicted are turning to SurfyBear.
★ exclusive SurfyPan type-4 spring reverb pan by Accutronics® and Surfy Industries ★ aluminium body with removable feet on the bottom side for better positioning on pedalboards ★ clean boost to adjust the volume when the effect is on ★ innovative dual-LED on/off button ★ true bypass functionality to keep your signal intact when the effect is off ★ external footswitch possibility though the dedicated 1/4" jack (footswitch not included)


![Rig Rundown: The Black Crowes’ Rich Robinson [2026]](https://www.premierguitar.com/media-library/youtube.jpg?id=66952027&width=1245&height=700&quality=70&coordinates=0%2C0%2C0%2C0)