Hello and welcome back to Mod Garage. In this column, we will have a deeper look at servicing a Stratocaster and some hacks from the shop to make this task much easier and faster.
In general, Leo Fender’s credo was that “the design of each element should be thought out in order to be easy to make and easy to repair.” His approach was to build high-quality instruments while maintaining low manufacturing costs with mass production. When thinking about the design of the Stratocaster, there are at least two elements where one can have some doubts about the easy-to-repair approach, at least from today’s perspective: pickguards you can’t take off without removing the strings and truss rods you can’t access without removing the pickguard.
Within the historical context of Leo Fender’s time, I think he would say that he did everything right. Right from the start, the Fender company cared a lot about setting up their guitars before they were shipped out. The setup was meant to be set-it-and-forget-it, so truss rod access was not very important—accessing it from the neck heel was the design following function.
I’m not sure if this was really easier to build this way compared to accessing it from the headstock, but it was the method that offered better headstock stability and longevity. Nine out of 10 Stratocaster headstock repairs I see in the shop are guitars with truss-rod access from the headstock. Because of its design, this is a weak spot in the wood, so drilling a hole to access the truss rod will weaken it more. In old Fender papers I found an interesting bulletin that the neck was never meant to be repaired or refretted. Instead, a customer was simply meant to change the complete bolt-on neck.
Back in the ’50s, things like replacement pickups, mods, push-pull pots, multi-stage pickup switches, and the like were not yet invented, so there was no need to design the Stratocaster pickguard for easy access. It would only have to be removed for a serious repair, which shouldn’t have happened very often.
Times have changed noticeably, and today it is usual to perform a setup regularly to compensate for changing weather conditions, different string gauges, and so on. And trying new pickups, tone caps, mods, etc. is a kind of popular sport among most guitarists—set-it-and-forget-it was forgotten long ago!
“Back in the ’50s, things like replacement pickups, mods, push-pull pots, multi-stage pickup switches, and the like were not yet invented, so there was no need to design the Stratocaster pickguard for easy access.”
The design of the Stratocaster hasn’t changed much since the mid ’50s. Of course, standard procedure is now to have truss-rod access from the headstock, so at least the setup thing is finally solved. But Stratocasters with access to the pickguard from behind is something that would make a lot of things much simpler. Let’s see what can be done to make things easier and, of course, faster when you do have to remove your guitar’s neck or loosen the strings to get to the pickguard.
The gold standard way of servicing a Stratocaster is to remove the old strings so you have full access to the pickguard. This is especially perfect when you want to do some work under the hood of the pickguard like changing a pot, pickup, or any other electronics work. You can test everything before you put on the new strings and there is no additional work to consider. For setups this is a great starting point—you can roughly pre-adjust the neck to your preferences, but for the final setup, there is no way around putting on the new set of strings. Here are two of my favorite hacks in the shop to save some time and nerves.
The IKEA Hack
You all know these plastic kitchen sealing clips for resealing opened bags and packages. I like the IKEA model because they’re super sturdy, well-made, and will last a very long time. Take one of these clips—we will need the large version—open it, and cut six small grooves in it using a round needle file or any other similar tool for this. Try to come close to the string spacing behind the nut with your grooves. I usually take a black sharpie to mark the spacing on the plastic clip before using the file.
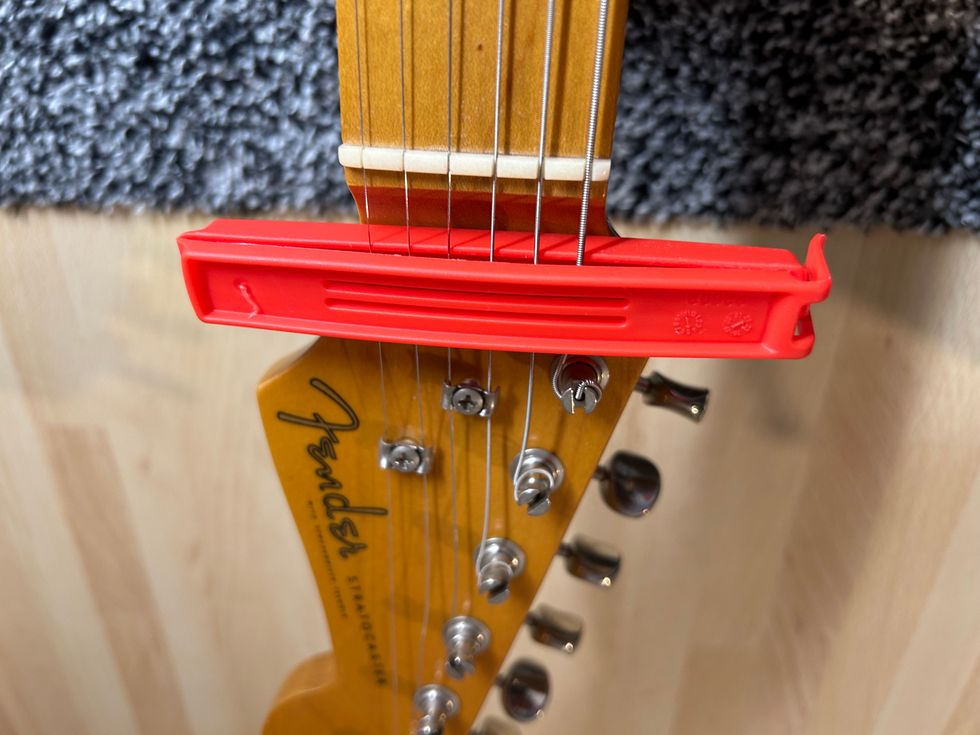
Photo courtesy of SINGLECOIL
After you’re finished, loosen the strings but don’t take them out of the tuner posts. Slide the opened clip under the strings behind the nut, put each string in one of the grooves, and close the clip. Now, you can pull the strings out of their posts and put them aside to have full access to the pickguard and the neck-heel truss rod. Because the modified clip will hold the strings in place, they will not tangle up into a bird’s nest of strings. For vintage-Kluson-style tuners or locking tuners, it can be very easy to pull the strings out of the posts and back in. For other types, you’ll need a little bit more patience to get the strings back in place, but it’s worth the effort.
The Old-Style Capo Hack
My first capo that I got when I was around 10 years old or so is still alive and employed in my shop. It’s a Dunlop 11C toggle-action capo that is still in production, and I bet a lot of you started with this capo, too. I use the curved version that my parents bought by accident for my classical guitar because they didn’t know about flat and curved fretboards. This one works great on all electric guitars.
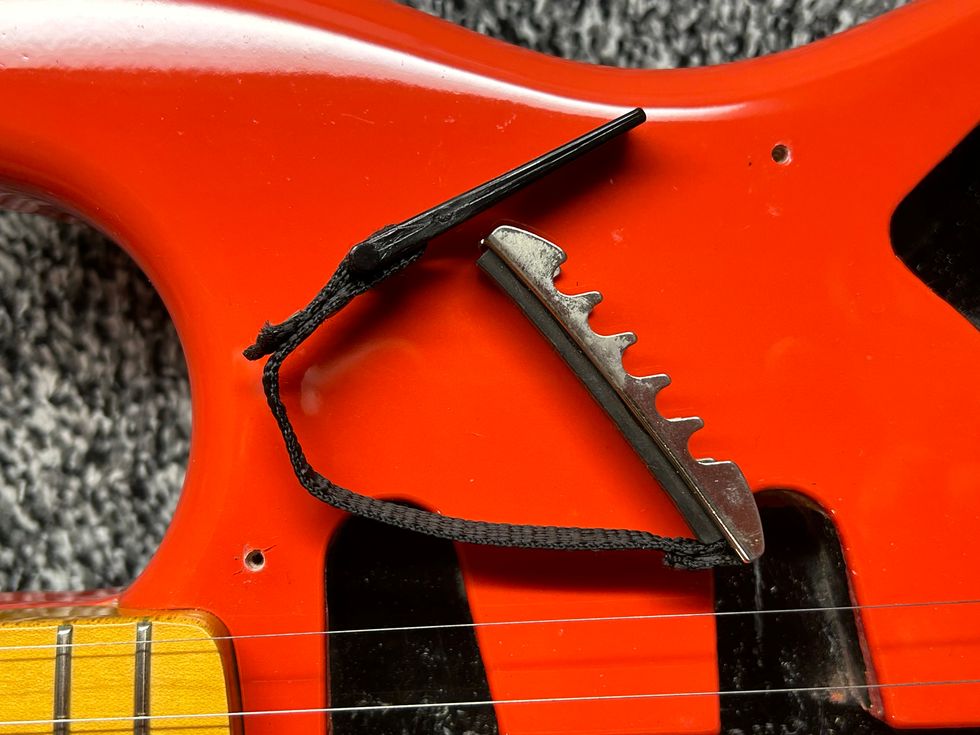
Photo courtesy of SINGLECOIL
Loosen all the strings slightly so they will not slip out of their posts. Put the capo on the first fret and close it. The strings can no longer slip out of the nut, the string trees, and the posts of the tuners.
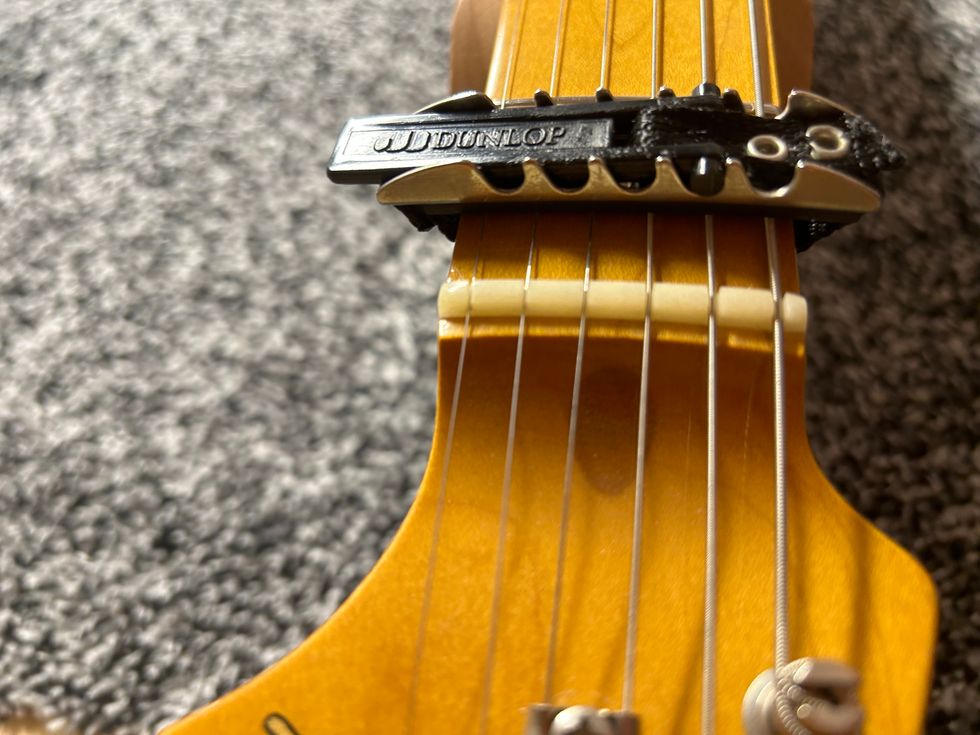
Photo courtesy of SINGLECOIL
Now, when you remove the neck, the capo will hold the strings in place. Putting the neck back on will be very easy: Fasten the screws, take off the capo, and tune the strings to pitch.
You see, there are at least two alternative ways to avoid changing the strings, especially if they are as good as new with only a few playing hours upon them. Often, little gizmos make a big difference.
Next month we will dive down into Epiphone history and see what they electronically cooked up in the mid ’60s, so stay tuned.
Until then ... keep modding!