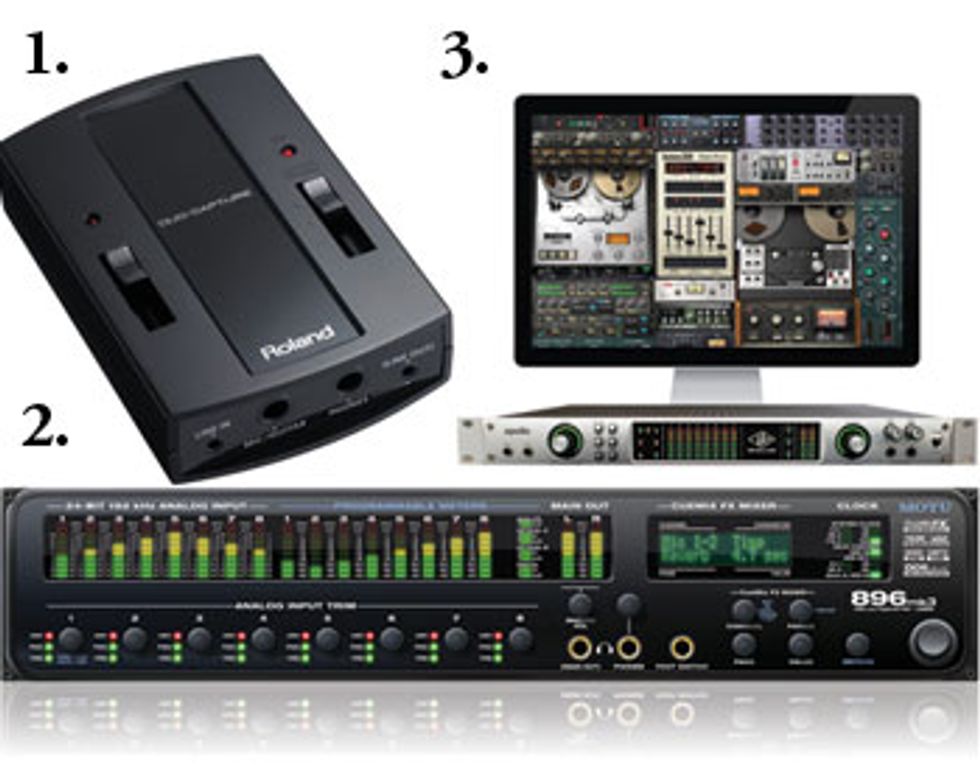
1. The 2-channel Roland Duo-Capture offers a surprising amount of connectivity with a mic preamp and line input, stereo outputs, and headphone outs for around $80 street. 2. A higher-end audio interface like the MOTU 896mk3 Hybrid can connect via Firewire or USB. 3. Introduced at the 2012 NAMM Show, the Universal Audio Apollo combines a full-featured audio interface with 18 inputs and 24 outputs, along with onboard DSP processing chips for running the company’s acclaimed UAD-2 plug-ins, many of which emulate vintage studio gear.
Last month’s column [“How to BuildA Recording Rig, Pt. 2,” April 2012] was the third chapter on choosing the right equipment for your recording studio. We’ve looked at strategies for narrowing down the options, discussed how to choose a recording centerpiece, and began exploring the possibilities for audio interfaces. Evaluating these things will help you narrow down your audio interface choices, but there is more to examine in order to solve this part of the puzzle.
Software Compatibility. The interface you choose has to work with the software you will be using. Fortunately, most interfaces support ASIO, CoreAudio, or other protocols that allow them to work with most audio software packages. This also applies to Pro Tools, which for years was a closed system when it came to audio interfaces, but is now open and can work with just about any unit on the market.
That said, some interfaces are more compatible than others. That means in some cases, there is tight integration between a particular interface and a particular piece of software. For example, some of Steinberg’s audio interfaces provide access to features in the company’s Cubase and Nuendo software that aren’t available when using audio interfaces from other manufacturers. It works the other way as well. Avid’s high-end Pro Tools audio interfaces have extra features available when using Pro Tools software. The Pro Tools interfaces will work with other software packages, but you can’t take advantage of those extra features if you’re not running Pro Tools.
Connectivity. The next factor we need to look at is connectivity—inputs and outputs. This is one of the most important things to think about when choosing an interface, and there are several different types of I/O connections.
Analog inputs are where the audio signals get routed into the interface from various devices such as keyboards, drum machines, external mic preamps, and more. An input doesn’t necessarily mean there is a microphone preamp built into the interface. Many analog inputs only accept line level, which is a higher level than a microphone puts out (we’ll talk more about mic preamps later in an upcoming column).
There are two types of analog inputs— balanced and unbalanced. Unbalanced connectors used to be considered “semi-professional,” though this designation has faded. Unbalanced connectors use a single conductor for the signal and a second conductor for the ground/shield. For example, guitars and keyboards are unbalanced devices. Balanced gear utilizes XLR or TRS connectors, which have two conductors for the signal and a third for the ground/shield. With this, balanced connections are much more immune to picking up airborne noise and the signal can be run for longer distances. Typically, “pro” equipment will have balanced connections, including most studio gear like mic preamps, compressors, EQs, and mixers.
The two operating levels for analog inputs are -10 dBV and +4 dBu. The differences aren’t really important, as long as you match the levels of all the devices you are connecting. That means connecting -10 gear to -10 inputs and +4 gear to +4 inputs for best results, unless you are using some sort of level- matching device. In most cases, +4 will be balanced, while -10 gear will be unbalanced.
Like analog inputs, analog outputs can be balanced (+4) or unbalanced (-10). Analog outputs are used to feed the signal to external components such as compressors, limiters, EQs, effects boxes, mixers, and more. Unless you’re planning to use these types of external gear in your studio during mixdown, you may not need that many outputs.
Digital I/O allows the routing of digital signals into and out of the interface. This is useful for connecting certain preamps, keyboards, effects processors, and some digital mixers. And having digital I/O can help the interface be more flexible when hooking up external gear. A digital connection can also be the “cleanest” way to get a signal in and out, since the signal doesn’t have to be reconverted to and from analog multiple times.
Monitor outputs are used to hook up your studio monitors or speakers, and usually have a dedicated volume control. Without monitor outputs, you’ll need to have an external box to route the signal to your speakers and control their volume. Some interfaces have two sets of monitor outputs, allowing you to hook up two sets of speakers. Switching between two sets can give you a broader reference for sonically evaluating your recordings.
Headphone outputs are essential for musicians to be able to hear themselves without the sound from the studio speakers bleeding into the microphones. Having more than one headphone output is useful when you are recording more than one musician at a time. And separately addressable, multiple headphone outputs are even better, since they allow each musician to hear their own version of the mix. Next time around, more on how to make your studio rig rock!
 Mitch Gallagher is
the former editor in chief of
EQ magazine. He’s written
more than 1000 articles
and six books on recording
and music technology, and
has released an instructional
DVD on mastering. His upcoming book is
entitled Guitar Tone: Pursuing the Ultimate
Electric Guitar Sound. To learn more, visit
mitchgallagher.com.
Mitch Gallagher is
the former editor in chief of
EQ magazine. He’s written
more than 1000 articles
and six books on recording
and music technology, and
has released an instructional
DVD on mastering. His upcoming book is
entitled Guitar Tone: Pursuing the Ultimate
Electric Guitar Sound. To learn more, visit
mitchgallagher.com.