
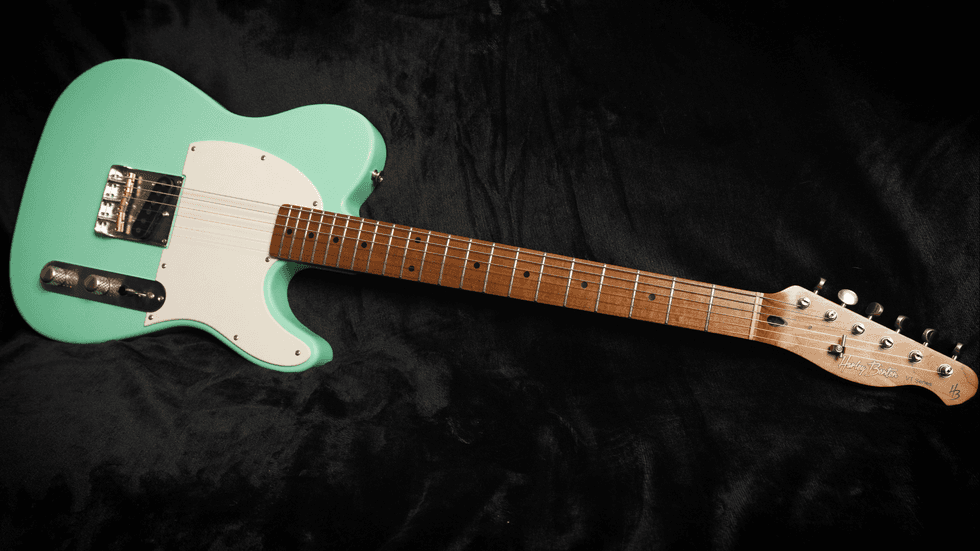

Hello, and welcome back to Mod Garage. After polishing the frets last month, we’re almost done with our Harley Benton project, and it’s time to put the neck back on. I have to say that I’ve really enjoyed this experiment as well as all your questions and emails, which clearly showed that there’s a lot of interest in sprucing up guitars like this.
There’s not much work left now: We’re going to bolt the neck back on, string up the guitar, and adjust everything to individual taste. Reattaching the neck took less than two minutes, and because the neck pocket is really tight, it fits like a charm. I always use a simple but sturdy handheld screwdriver for this job because it gives me full control over the torque. A cordless screwdriver can be risky, so if that’s your preferred option, work carefully.
As for the strings, I decided to switch from the factory-installed .010s to a regular set of .009s to see whether heavy-gauge strings are necessary to get a heavy tone. There are countless famous guitar players who have used light—and sometimes even ridiculously light—string gauges, such as Brian May (.008s) and Billy Gibbons (.007s). I certainly wouldn’t say either of them has a thin or weak tone. I installed a standard .009–.042 nickel-wound string set—no fancy stuff like stainless steel, Monel, Cobalt, silk-coated, cryogenically treated under the third full moon in January, etc. Just plain and simple. The bone nut and new tuners made installing and tuning the new strings a real joy.
A complete setup on any electric guitar always involves adjusting neck relief, action (string height), intonation, and pickup height. On our Harley Benton, achieving a professional setup was easy. The dual-action truss rod and excellent fretwork straight from the factory are a pleasure to work with. This guitar would easily allow for a super-low action without any significant string buzz, but I decided on a medium-low setup to accommodate the preferences of most players, without interfering with picking techniques like chicken pickin’ or hybrid picking. Thanks to the compensated bridge saddles, the intonation was almost spot-on right out of the box, without any height-adjustment screws sticking out above the saddles.
I set the bridge pickup height at 2.5 mm (0.0984”) on the low E string and 2.0 mm (0.0787”) on the high E string as a starting point, then fine-tuned the rest by ear until all six strings had a balanced output.
The whole procedure took approximately 30 minutes, and we now have a completely assembled guitar again. It turned out really well, and the difference in tone and playability from where we started is clearly audible and visible.
Remember the “before” video from our friend Haiko Heinz? I asked him to make another one featuring our now-overhauled guitar, and here it is.
[MELISSA - PLEASE INSERT QR CODE]
I can honestly say that I’ve worked on countless guitars over the last three decades, so I think I’ve had more than enough opportunities to make comparisons. This Harley Benton can now easily hold its own against guitars with a much higher price tag—period!
Over the years, I’ve seen some really bad issues with quality and flaws on electric guitars costing more than 10 times the price of this Harley Benton, especially when it comes to fretwork. Naturally, I don’t know whether all Harley Benton guitars are built to the same high standard, but this one was randomly picked from a large batch, so we can be pretty sure they didn’t send us a hand-selected premium guitar for our project.
And remember: Our budget was $500, including the guitar itself, and we still have $100 left that we can spend on a case or a cool gig bag.
I know the math behind this experiment can be considered somewhat naive or misleading because it’s based on the assumption that you do all the work yourself and already have most of the necessary tools and materials in your arsenal. If you must outsource certain tasks— making a new bone nut, or cutting a new pickguard—to your local luthier or guitar tech, it’s easy to break the $500 barrier. The same applies if you happen to get a guitar with poor fretwork that requires leveling, re-crowning, etc., and you don’t want to do that work yourself. But hopefully you can see from this project that it’s possible to completely overhaul and spruce up a cheap guitar to a level of detail approaching that of a custom-shop instrument.
It’s important to me to reiterate something I’ve said several times before: This is just one example and one way of planning and carrying out a project like this. It’s my preferred approach based on years of experience, but it’s not set in stone, and, of course, it’s not the only way to do it. There are many ways to get to Rome, and there’s certainly no crime in taking a different route or adapting my approach to suit your own needs.
So, what can we learn from this experiment? Let’s take a look at where we started and what we ended up with, according to Common Internet Guitar Knowledge (CIGK).
CIGK: A lightweight electric guitar will have no sustain, no loud tone, and a thin sound.
We started with a lightweight 7.2 pound (3.3 kg) guitar straight out of the box. After replacing the hardware, we now have an even lighter guitar at 6.72 pounds (3.05 kg), and it sounds fat and mean, with sustain for days. The overall weight of a solidbody electric guitar obviously has no significant influence on its amplified tone or sustain.
CIGK: Basswood is not a tonewood, so it won’t sound very good.
I compared this guitar with a Telecaster made from ash and equipped with the same pickup. I can clearly hear the sonic differences between the two guitars when playing them unplugged. Through the same amp, however, the two guitars sound remarkably similar. So, the wood used for the body appears to have little to no influence on the amplified tone of a solidbody electric guitar.
“There are many ways to get to Rome, and there’s certainly no crime in taking a different route or adapting my approach to suit your own needs.”
CIGK: The guitar is constructed from a multi-piece body, which will result in inferior tone.
See above … no significant difference in the amplified tone.
CIGK: The body isn’t nitro-lacquered but has an ultra-thick polyurethane finish, which we all know kills tone because the wood can’t breathe and resonate freely.
This will certainly have an influence when playing the guitar unplugged, but this is an electric guitar, not an acoustic guitar. Once amplified, the guitar sounds excellent, despite its super-thick polyurethane finish.
CIGK: The one-piece maple neck isn’t really one piece. It also has a glued-on maple fretboard, which isn’t vintage-correct and therefore kills the high-end and attack.
Not vintage-correct? Hmm. Fender used one-piece maple necks through much of the ‘50s and again in 1969, and those instruments are definitely vintage now. The Harley Benton has plenty of snap and attack, as well as high-end chime, in its amplified tone.
CIGK: We all know that only heavy strings produce a heavy tone and that thin strings have no sustain.
Billy Gibbons and Brian May have no sustain and a thin tone? I think we should tell them, just in case they’ve never noticed.
This experiment clearly shows that most CIGK should probably be renamed CIGB—Common Internet Guitar Bullshit.
We took one of the cheapest guitars available, one with plenty of features widely regarded as drawbacks, and transformed it into an excellent-sounding and highly playable instrument. Sure, it’s still a guitar with a very low resale value, no matter what parts you put into it. But in terms of performance, playability, and tone, it can now easily outrun guitars that cost considerably more.
The bottom line: It’s up to you to judge for yourself. I can only encourage you to give it a try. There’s not much you can lose, but there’s a lot you can learn.
And so, our experiment has reached its successful end. Our guitar will go up for auction soon, with all proceeds being donated to our local animal shelter.
Next month we will return to guitar mods, so stay tuned.
Until then ... keep on modding!