
Beginner
Beginner
- Learn how to visualize triads all over the neck.
- Develop an understanding of inversions.
- Create memorable and melodic guitar parts.
Mapping major and minor triads up and down the guitar neck can open new possibilities in your playing. It can also help you learn note locations on the fretboard, find new ways to play chord progressions, and inspire creative improvisations and compositions. But where do you begin?
If you’re a beginner or intermediate player who views areas on the neck as unknown grey areas, learning to map out triads can really help. It’s important to practice them slowly and systematically so you can build up positive muscle memory in the fretting hand while making sure you’re spelling triads correctly. In terms of a practical approach, it’s best to break down triads into four separate string groups. In other words, you’re only going to practice and play three adjacent strings at a time. For our purposes, think about string groups as 1–2–3, 2–3–4, 3–4–5, and 4–5–6.
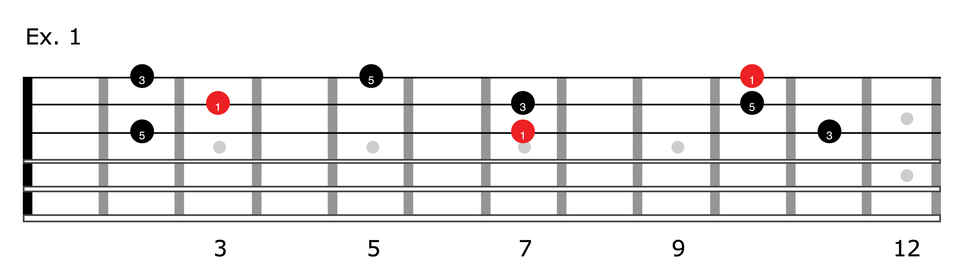
First, let’s look at a D major triad. The individual notes that spell a D major triad are D–F#–A (or scale degrees 1–3–5 of the D major scale). In Ex. 1 I’ve mapped out all three inversions of a D major triad on the top three strings. An inversion is simply a rearranged voicing of the same three notes contained in a triad. You’ll notice that the very first shape is probably one you already know and play often: the tried-and-true cowboy chord D with no open strings. That D chord shape has an A in the lowest voice. Since the 5 (A) is the lowest note of the chord we refer to it as a second inversion shape.
As we move up the neck, those notes cycle around to new positions, creating new shapes, and placing a different note in the lowest voice. Notice the second shape. It is also a D major triad, but the root is now in the lowest voice. This is a root position triad. Next, the third shape gives us the 3 in the lowest voice, or a first inversion triad.
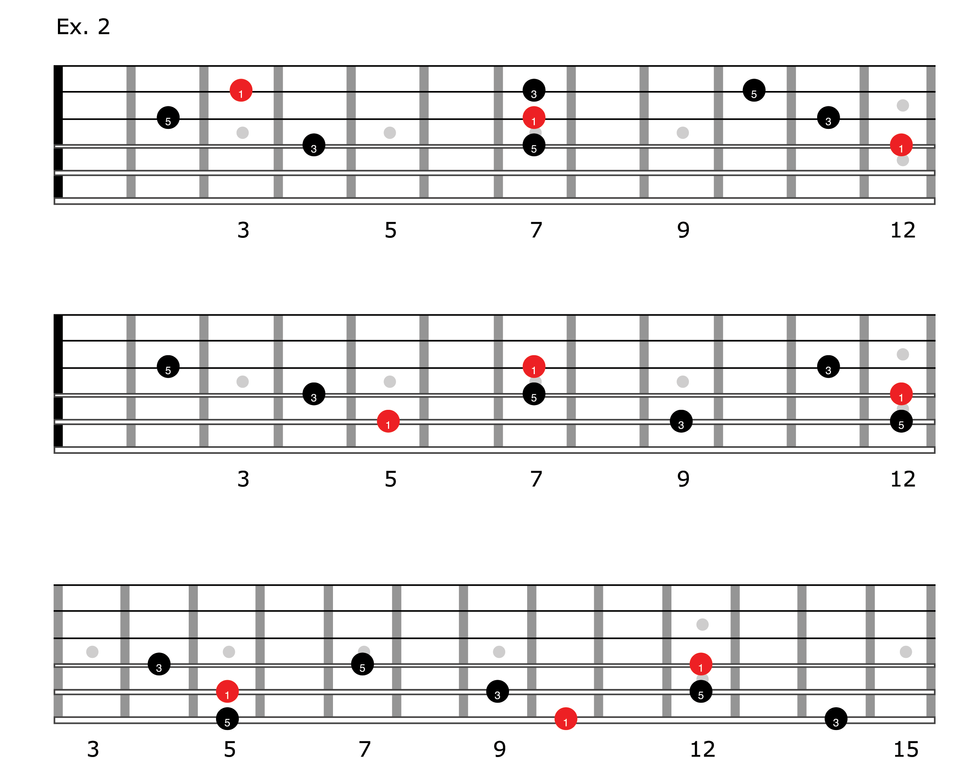
In Ex. 2, you’ll see triads in D major for the remaining string groups: 2-3-4, 3-4-5, and 4-5-6.
To point out the obvious, when it comes to practical applications of triads when playing songs and chord progressions, you’ll need a little more knowledge than just major triads. You can, however, cover a lot of ground simply knowing both major and minor triads.
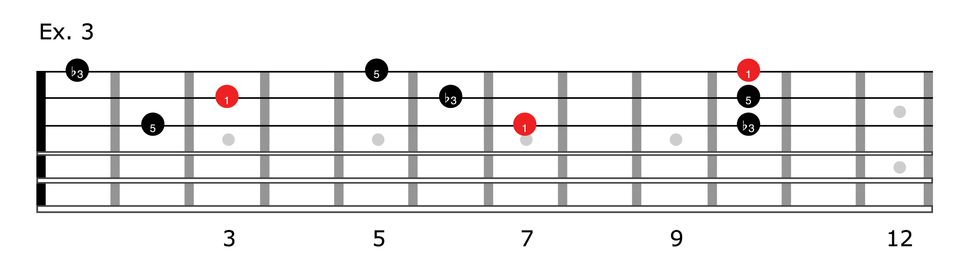
What’s the difference between a major and minor triad? Simply moving one note–the major third–down a single fret. In our examples, we will be moving the F# to F natural. In Ex. 3 you can see how this changes the shapes on the top three strings.
How to Practice Triads
While there are many ways to practice these exercises, I have seen students have the most success with a combination of two methods:
Play-and-Say. Play the chord, say out loud the name of its inversion, then arpeggiate through the chord saying the note names as you play them (“D major triad, second inversion, A, D, F#”).
Apply to a song or chord progression: Take a common chord progression and use triads on one string group instead of playing open chords.
Once you have a good knowledge of major and minor triads, you can start to mix and match inversions, weaving them together to play common chord progressions. In Ex. 4, we see a simple chord progression in D: D–Bm–Em–A. Let’s start by looking at this progression on the top set of strings. (I’ve written them out in half-notes in order to demonstrate the shapes more clearly. It’s up to you to invent strumming or picking patterns.)

Naturally, we want to move this progression around the fretboard. Ex. 5 is the same progression on strings 4–3–2. Here’s a tip: For these shapes I simply moved whatever note was on the 1st string down an octave to the 4th string.

Experiment and Explore
Try playing Ex. 4 and Ex. 5 backwards to hear the progression descending. Next, try jumping around to different inversions and octaves while still following the order of chords in the progression. This works well for electric guitar players looking to create unpredictable and complementary guitar parts while someone else plays open chords. Experiment with using various effects. Delays and reverbs can be especially fun when playing around with high-voiced triads. Arpeggiate through the triads, play them as punchy chop chords, add and remove notes with any spare fingers to create counter melodies—whatever sounds good to your ears.