Chops: Intermediate
Theory: Intermediate
Lesson Overview:
• Understand how to play multiple parts at once.
• Add syncopated chord fragments to a bass line.
• Learn how to approach practicing difficult pieces.
Click here to download a printable PDF of this lesson's notation.
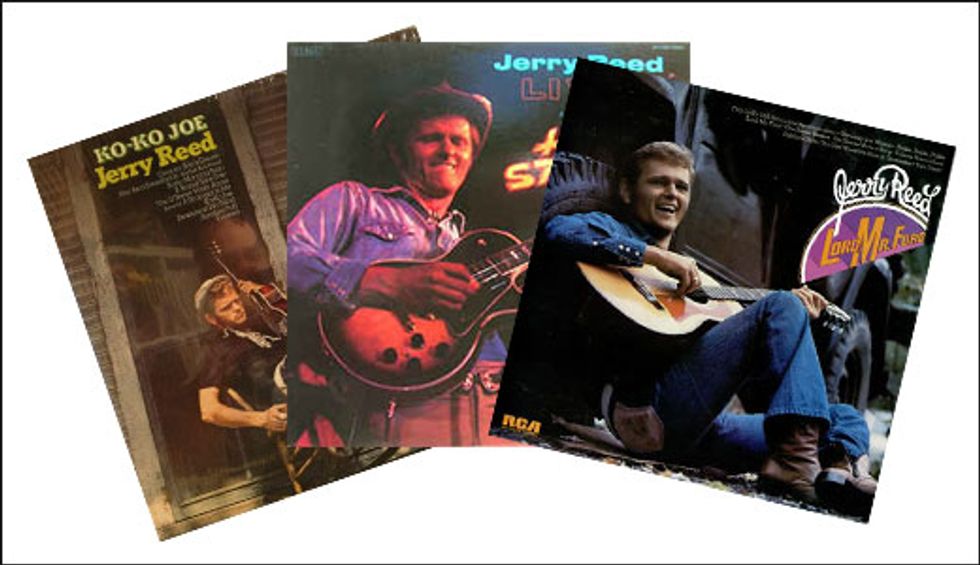
The basic concept of modern fingerstyle guitar—playing multiple parts at once—was deeply influenced by the work of guitarist, vocalist, producer, composer, and actor, Jerry Reed. The strongest elements of Reed’s style came out of American blues, gospel, and country music. He combined those traits with an intuitive prowess on the instrument and a rambunctious sense of humor. Throughout this lesson I’ll be focusing on some of the techniques Jerry used in his instrumental fingerstyle pieces, deconstructing elements of the riffs that are so characteristic of his style, and remixing them into playable exercises to help you absorb his ideas and apply them to your own playing.
Practice Notes
Reed’s guitar style was so uncommon and unique that finding an entry point
can be intimidating. I was once a newbie to fingerstyle guitar as well, so
I’m hoping this lesson is an antidote to that woe. If anything, learning
some of these exercises should also, incidentally, provide a foundation for
playing gospel voicings, syncopations, and blues-influenced counterpoint,
since these influences were integral to the “Jerry Reed” sound.
Much of Jerry’s other work can be understood simply by tackling his instrumental fingerstyle songs, so the exercises I’m presenting are derived from three Jerry Reed tunes: “Struttin’,” Jiffy Jam,” and “The Claw.” I developed these exercises from my own practice habits and routines.
In his Harvard Norton Lecture Series, Leonard Bernstein stated that “the best way to ‘know’ a thing is in the context of another discipline.” We can apply this idea to the fretboard. For example, to learn hard licks and develop more clarity and authority with a passage, I’ll break down each difficult phrase into micro-routines that are more manageable. I’ll also explore specific techniques in different settings to understand them outside of their original context. Later down the road, as I’m performing these pieces live, this approach allows me to understand what I’m doing well enough that if I ever lose focus mid-song, I can prevent more mistakes, and I can recover more smoothly from the mistakes I do make. This is useful when performing virtuoso pieces from any genre.
Creating exercises like these prevents me from over-emotionalizing the learning process, and allows me to practice more easily and more productively even when I don’t feel inspired to sit down and be creative. It reduces the process to just developing manageable exercises and putting in the practice time.
YouTube It
In this video, Jerry Reed heads over to fellow thumbpicker Thom Bresh’s place for an informal guitar pull. Naturally, Bresh asks Reed to demonstrate “The Claw,” and asks about its origin.
Thom Bresh: “Where’d you ever dream that lick up?”
Jerry: “I don’t know. It’s just one of those fits you pitch.”
When Jerry picked he usually kept his index finger tucked back and out of the way. He still used his index finger to pick, just not constantly. Other than that, when picking he used all his right-hand fingers and thumb. Jerry didn’t anchor his pinky on the pickguard—common practice in fingerstyle guitar. He did, however, keep his wrist anchored on the upper part of the guitar’s bridge, above the 6th string, so he had a physical point of reference for his picking hand. And unlike most thumbpickers today, he didn’t really bring his left-hand thumb over the top of the neck to fret bass notes. This may have been because he was playing nylon-stringed guitars, which usually have wider neck dimensions than steel-string guitars.
Left-Hand Technique
Jerry’s left-hand technique involved tremendous finger independence akin to
that of a classical guitarist. What is most notable about Jerry’s left-hand
fretting technique, though, is that it’s incredibly non-linear. Here’s what
I mean: If you watch someone like Chet Atkins or Tommy Emmanuel, it can be
easy to see the underlying shapes of the chords from which notes are being
played. It’s possible to see the CAGED system put to use in Chet and
Tommy’s arrangements, generally speaking. But it’s far more difficult to
find the chord shapes Jerry used in his tunes because when he was writing,
he’d typically start by creating a complex melody and a similarly complex
bass line. After having done all that, he would fill in between with
contrapuntal harmonies. The result was multiple riffs and fragments of
chord shapes, combined and played in competition with one another. Even
today this is still a rarely used approach to guitar composition, even
among fingerstyle players who have been directly influenced by him.
To add to this, Jerry used open notes wherever possible, and he was almost always playing passing chords under the melody line, so his left hand was constantly in motion on the neck and the fingerings changed continuously. All this gives Jerry’s compositions an unfamiliar feel, even though they fit into conventional songwriting structures. It made the songs memorable, but difficult to comprehend at first listen. However, these songs become easier to decode if you pay attention to the top and the bottom of the score. In other words, first follow what the melody and the bass line are doing, and how they interact with one another. After you’ve familiarized yourself with how that sounds, then try looking at how the harmonies and passing chords fit in between the bass line and melody.
I’ll let Jerry explain this at 1:10 in the video below. Jerry picks like Chet for a few measures and then goes back to his own style, after telling the audience beforehand so they’re in on the joke. This segment demonstrates exactly what I mean regarding Jerry’s left-hand fretting. (Also, I love watching guitarist Pat Bergeson’s reactions in the background of the video. Completely relatable.)
Jerry didn’t play a song the same way each time, but he kept many of the passing chords the same. To get you accustomed to the types of counterpoint Jerry wrote into his compositions, in these examples I’ll focus on fundamental fingerstyle syncopations and incorporate some typical Jerry-approved hammer-on and pull-off maneuvers.
Most of the examples will be in dropped-D tuning with no capo, and include passing chords modeled after those found in Jerry’s song “Struttin’.” The final example is in standard tuning, inspired by riffs Jerry used in “The Claw,” “Jiffy Jam,” and “Mr. Lucky.” I’ve designed these exercises to be played using just bare fingers and a thumbpick. If you really want to learn to play these accurately, I suggest practicing with a metronome. The way to know you’re really on time is if you can play so accurately that the sound of the metronome seems to disappear.
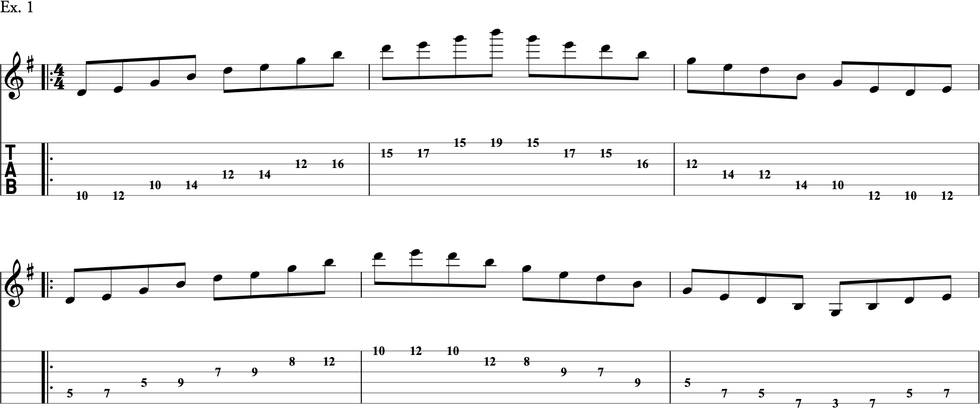
Ex. 1 , which is composed of double-stops fretted between the 4th and 7th frets, uses intervals and chord shapes similar to “Struttin’.” This will get you used to the weird harmonic movements in that intro, and also strengthen your fourth finger and increase its flexibility. The exercise involves barring multiple notes at one time with the fourth finger, while also stretching it a great deal. This particular musical phrase is unstable and circular, so it helps to count it out differently. As you’re counting the beat for this in your head and body, accent every beat instead of only the 1 and 3.
Click here for Ex. 1
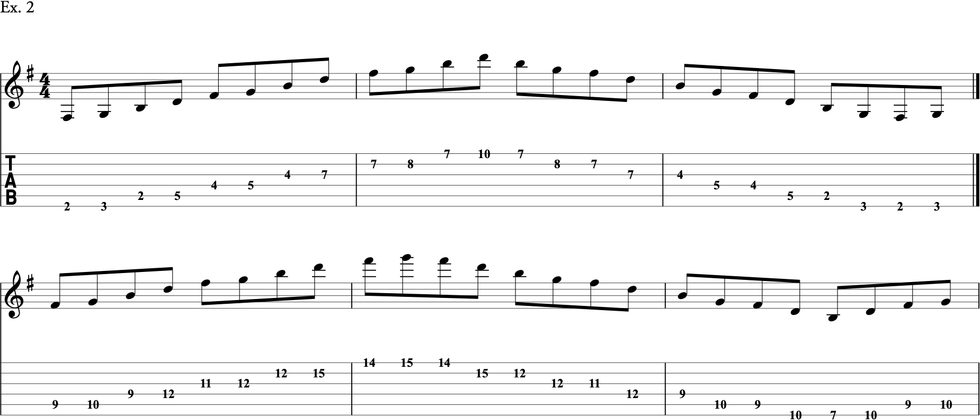
Ex. 2 uses the same chord shapes, but with different, and more stable, musical phrasing. I’ve also added a steady quarter-note bass line this time. As with playing double Dutch on the playground, I’ve used the first and last measures of the exercise to provide some momentum and a rhythm before you jump in to add the melody line over the top. Jerry was incredibly conscious of where the beat was in a song, especially while he was singing or talking over his guitar playing, so the purpose of this exercise is to give you a solid sense of where the beat is in a phrase.
Click here for Ex. 2
Next, we keep the exact same rhythmic notation as Ex. 2, except now the bass notes alternate in a 1–8–5–8 pattern (Ex. 3). It’s tricky to play this one cleanly, so practice it at lower speeds and get it clean before you speed up the exercise. If you’re struggling to get the syncopations on time, practice playing the alternating bass line by itself until it doesn’t require much thought, then gradually add the chord changes over it. Keep repeating the exercise on a loop until you get it right and it feels comfortable.
Click here for Ex. 3
A quick note about picking-hand technique : When playing syncopations, it can be helpful to bring your thumb out in front of the fingers on your picking hand, rather than tucking your thumb level with or behind your index finger (your hand should look less like a lute player’s hand, and more like Chet Atkins’ hand). Adjusting your wrist angle like this to create this posture will allow you to pick with smaller, more efficient movements, so your picking speed and string attack will be stronger. I see the lute-style hand position used more by women than men, and I also find I tend to use that posture, too. That technique can be advantageous for playing very delicate passages, but for alternating bass lines the Chet-style hand position is most ergonomic and gets a louder tone.
Now, let’s focus on some passing chords. I’ll let you decide on your own fingerings for this because people fret chords differently, but whatever you decide, at least be somewhat consistent with your fingerings when you play. In my experience, the movements in Ex. 4 are easier to play if you keep your second finger on the 2nd string at the 3rd fret for most of the exercise, while using your first finger to reach all the notes fretted on the 1st and 2nd frets. If you’re fumbling to find the notes, it means you’re not looking ahead enough to figure out what to do next, or you don’t know your fingerings well enough, or you don’t know the notes well enough. Again, it’s important to play this slowly at first, so you understand the exercise more clearly. This will help you develop a better foundation to play it well.
Click here for Ex. 4
Ex. 5 replicates Ex. 4, except it has alternating half-notes in the bass line. Again, let the notes ring, play clearly, and spend as little time in between chords as possible.
Click here for Ex. 5
With its cool groove, Ex. 6 is a lot of fun. It also yields appealing counterpoint without demanding much work from your fretting hand. I promise it’s easier than it looks on paper. The bass line is syncopated, but all I did to create that was introduce the melody half a beat before I introduced the bass line. The phrase in the melody is played two times throughout the exercise, and each melodic phrase can be cut in half. Just remember that in the first half, you’re simultaneously sliding up one note, while hammering on two others. In the second half, you’re sliding the whole chord up one fret.
Click here for Ex. 6
Let’s focus on clean fretting and picking in Ex. 7. Make sure the open-D drone notes are clearly audible, and that they don’t get muddled with the fretted shapes you insert between them. There are no hammer-ons in this exercise, so fret the notes at the exact moment when you would also pick them. This will develop fretting strength and dexterity in the fourth and first fingers. Mentally, your attention is divided between two different melody lines that use strange intervals. Play with the dynamics in this exercise. Practice allowing the lower melody line to be at the forefront by making it louder, then reverse course and allow the higher melody line to stand out by making it louder than the bass.
Click here for Ex. 7
We’ll use Ex. 8 as a complement to Ex. 7. It has the same harmonic characteristics, but focuses more on familiarizing you with the underlying passing chords on the lower strings. The chords are based on the riff Jerry uses to transition between verse and chorus in “Struttin’.”
Click here for Ex. 8
This example is the only one in this lesson that’s in standard tuning ( Ex. 9), and it’s based on the riffs you’d hear in songs like “Jiffy Jam,” “The Claw,” “Mr. Lucky,” and many others. There are a lot of contrapuntal double-note combinations, hammer-ons, and pull-offs. My best advice is to repeat and memorize this riff until it becomes completely second nature to your brain and hands. Some pieces or exercises won’t make much sense until after you have them under your fingers for a while, and I feel that could apply here.
Click here for Ex. 9
Here is a video where Jerry uses some of these techniques we’ve discussed, and they’ll help you understand how he integrates them into his unique style.
This video is invaluable simply for the intro to “Fine on My Mind.” Notice how effortlessly Reed can move multiple voices in different directions.
I hope this lesson gives you a solid starting point for understanding Jerry Reed’s material, and provides you the tools to learn to play in his style … while maintaining your sanity in the process!


