


WARNING:
If done incorrectly, some of the procedures described in this article may result in bodily injury and/or serious damage to your project instrument. If you’re uncomfortable with any of the steps in this article, consult a professional technician for assistance.Every day I get to make guitars from scratch—from the earliest stages full of sawdust to the final steps involving paint fumes, wet sanding, and buffing. So I must admit it was a welcome departure to be asked by Premier Guitar to show you some tips and tricks on assembling a parts guitar—because although it’s not extremely difficult, it’s also not as simple as it seems to end up with an instrument that feels, sounds, and plays like the custom guitar you hoped it would be.
To the beginners out there, forgive me if any of the ensuing text is over your heads. And to you veterans, forgive me if any of this seems condescending. I’ve tried to drive this project right down the center so there’s something in it for everyone. That said, those of you who’ve read a lot of DIY articles will quickly notice this one’s different in that we’re not following a particular order. With a parts-guitar build there’s not much need for that beyond obvious stuff like painting the body before adding hardware, mounting pots before soldering, and attaching hardware before stringing up for a test. Here we’re focusing on nuanced tricks of the trade that will help you avoid infuriating slip-ups that leave unsightly marks or result in subpar performance.
Why Build a Parts Guitar?
As a kid I played with Legos a lot. Of course, instead of following the directions, I dumped them all in a big bin and made my own monstrosities. Making a parts guitar is a lot like that. Some of the most fun-to-play guitars I own are parts guitars, or guitars where I’ve made a new neck or body for a stock guitar. You name it, and I’ve probably done it. I’ve also Frankensteined plenty of guitars out of parts that didn’t “belong” together.
One thing that will greatly increase your odds of success is to stick with the same manufacturer for the body and neck. I also advise sticking to parts made during roughly the same era—just in case the manufacturer changes some important specs that might alter how the pieces fit together. That’s exactly what we did for this build. Warmoth kindly donated all the parts for this project—and what’s even cooler is that you can enter for a chance to win the guitar at premierguitar.com/Warmoth-Parts-Guitar-Giveaway.
But there are more reasons to build a parts guitar than simply creating a custom instrument that combines disparate elements of production-line guitars with hardware and color options not available from mainstream manufacturers. Many production-line factories simply do not have time for the detail work you can perform as the master of your own bench. Skilled craftsmanship and labor usually makes up a significant portion of the cost in higher-quality instruments, and rightfully so. With a parts guitar, you can become part of this labor process. You can choose to painstakingly dress each fret individually, with many stages of buffing and polishing. You can custom slot each bridge saddle to match your preferred string size rather than the uniform, middle-of-the-road grooves from the typical mold. You can take the time to cut nut slots to suit your string gauges, and shape and round the nut for comfort and a clean look. You can choose your pickups and devise custom wiring schemes, choose your strap buttons and placement. The list of customizing options is endless. Of course, most of these things can be done on any instrument, but with a parts-guitar build one of the added bonuses is that you don’t have to undo work that’s already been done from the factory.
Choosing Your Parts
Although I’ve been building guitars practically my whole life, to this day I still get a little charge of excitement when a box of instrument parts arrives. This time I was particularly excited to see what the folks at PG had chosen for our project. Upon opening the box, the first thing that struck me was that the neck and body were both painted—quite well I might add. This is an excellent option if you’ve never painted a guitar before, or if the ones you have look more like an elementary school project than a $4,000 custom guitar. We won’t cover painting here, but if you’re interested in painting your own parts guitar there are several convenient guitar-oriented paint supplies available from brands such as Behlen, the Guitar ReRanch, and more.
Warmoth has an extensive selection of parts. The necks and bodies it manufactures are available in an impressive range of colors and pickup-rout combinations, with body and neck binding options, to say nothing of the wood selections—everything from the typical rosewood, maple, and alder to bubinga, zircote, and pau ferro. But the company also stocks virtually every other piece of hardware and electronics your project requires, including a diverse collection of pickup brands and models. Factor all these choices together and the possibilities for a customized axe are nearly infinite.
Most players will first decide on their preferred body style, then what sort of headstock they prefer. And while aesthetics is certainly a consideration for both, it’s at least as important to make sure the neck you choose is constructed to the same scale length and joint type as the body. For instance, Strat- and Tele-style necks both have a 25.5" scale, but the heel on the former is arched, while a T-style’s is squared off. They’re generally not considered compatible unless you want to make wood chips and employ the aforementioned Frankenstein techniques. When choosing a headstock it’s important to realize that a three-on-a-side (Les Paul-style) or a six-in-line (Strat-style) tuner arrangement can change the guitar’s feel (e.g., in the tautness of the strings), and even tone. The longer the string is behind the headstock, the more it will sympathetically stretch during string bends (unless you have a locking nut). The actual amount of tension required for the string to reach pitch doesn’t change (unless you alter the scale length), but with more string behind the nut and less of a headstock angle, it can seem “slinkier” to fret and bend since the string will give a little sympathetically.
PG chose Warmoth’s Mooncaster body, which is a semi-hollow design similar to the Fender Starcaster. It has an angled neck joint and Warmoth’s comfort contour in the rear belly area. We paired the body with Warmoth’s Modern Tiltback Construction neck. The company was kind enough to include two shorter screws for the front of the neck pocket and two standard length screws for the back. Absent that, I would have had to cut the screws down to avoid having them push up on the fretboard or pop up a fret.
Besides being mindful about body and neck choices, you’ll also want to keep a careful eye on seemingly minor details, like making sure you have screws of the proper length for pickup-mounting rings. (Our Mooncaster uses a tall ring for the bridge, and a short ring for the neck pickup.) Likewise, make sure your volume and tone pot shafts are of appropriate length: You’ll need longer shafts for carved-top guitars, shorter ones for instruments with a pickguard. As for knobs, whether they’re press-fit or have a set screw, make sure they’ll fit your pots’ posts. For example, if you have the more common 1/4" knurled-shaft pots, you can use most press-fit knobs as well as knobs with set screws. But some set-screw knobs have a larger hole for 6 mm-diameter solid shaft pots. If you have solid-shaft pots, make sure you get knobs that fit. If, as with our Mooncaster build, you’ve chosen to go with unusual wiring options, make sure you order switches and/or pots that accommodate what you hope to do. For instance, the folks at PG chose PAF-style Seymour Duncan Seth Lover humbuckers, but they also wanted to give the guitar single-coil voicing options so they ordered 4-wire Seths that allow the player to split each humbucker’s coils. To control this function we chose push-push pots, though you may choose push-pulls, mini toggles, mounting rings with built-in switches, or multiple other options.
Drilling Tips
Many parts companies, including Warmoth, offer you the choice of ordering bodies and necks with or without pre-drilled holes for hardware and assembly. However, even if you order parts with pre-drilled holes, chances are you’ll still have to drill at least a few holes for things such as strap buttons. Either way, make sure any holes you drill are perpendicular to the surface of the guitar—as close as possible to a perfect 90-degree angle. If the surface of the guitar has curves and contours in the area where you’re drilling, be even more careful about this. For example, the area where the rear strap button goes on our Mooncaster is not symmetrical, and the surface is not flat. Because of this, I don’t want to aim the drill bit straight toward the headstock, parallel with the strings (like you would on Strats, Teles, and Les Pauls), because if I did, the strap button wouldn’t sit flush. In order for the button to sit flush, I need to come at the target point at a 90-degree angle, which means I’m aiming a bit toward the treble side of the guitar.
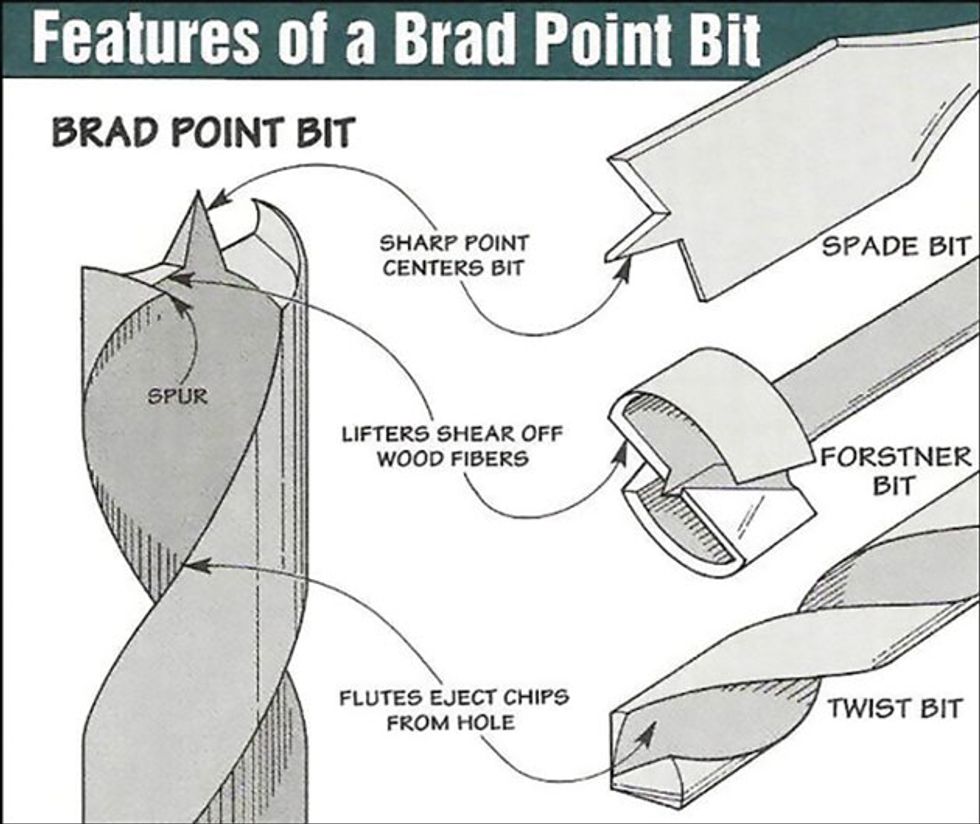
Figure 1. Brad-point bits are ideal because they make it much easier to drill straight holes in the desired location while minimizing risk of damage to the instrument’s finish.
When drilling fresh holes into painted surfaces, it’s best to have sharp, well-centered bits that won’t “walk” (drift away) from the intended drilling spot. Whenever possible I like to use brad-point bits (Figure 1) because they have a truer center, they almost never walk, and they cut through the paint rather than push and lift it like a twist bit. I also like them because, as the outside diameter begins to cut, you will immediately see whether you’re approaching the surface at 90 degrees. If you’re not, you’ll see a crescent moon shape along one side. To me, even a dirt-cheap set of brad-point bits is better for these tasks than a pro set of extra sharp twist bits. However, if all you’ve got are twist bits, you can decrease the odds of the bit wandering by running the drill in reverse as you get the hole started in the desired location. Once there’s a good starting hole, switch back to standard forward operation.
What’s the best approach if you have an existing hole that’s too small? A tapered reamer is my preferred tool, but you can also run a twist bit in reverse to open up a hole with less risk than going forward. However, both twist-bit options have their risks—backward pushes and mauls the wood, while forward can lift and chip the paint.
One more note about threading screws: Avoid letting threads bite into binding, because the glue joint is prone to cracking. This became a small consideration with our Mooncaster when I discovered the body binding was directly in the path of two of the screw holes for our square output-jack plate. While a football-shaped plate would have avoided this, I worked around the problem by carefully drilling a slightly larger hole for each of the two screws that would have to pass through the binding. These two larger holes only extended to the depth of the binding so that the screw threads wouldn’t touch the binding. For the rest of the depth I went back to the previous drill-bit size so that the screws could anchor firmly into the wood beneath the binding.
Cuckoo for Countersinks
Nearly every hole drilled, whether by you or the manufacturer, whether before or after paint, can benefit from a countersink. I recommend it highly. In fact, I’m obsessive about countersinking. When a screw’s threads begin to cut into wood, there is material displacement. That means the wood often bulges and lifts around the area, like a pimple. A countersink breaks the edge of your drilled hole by cutting or sanding a bevel. Countersinking the hole prior to driving a screw into it ensures that the screw goes in cleanly, that nuts and washers sit flush, and that the voices in my head are soothed and comforted temporarily.
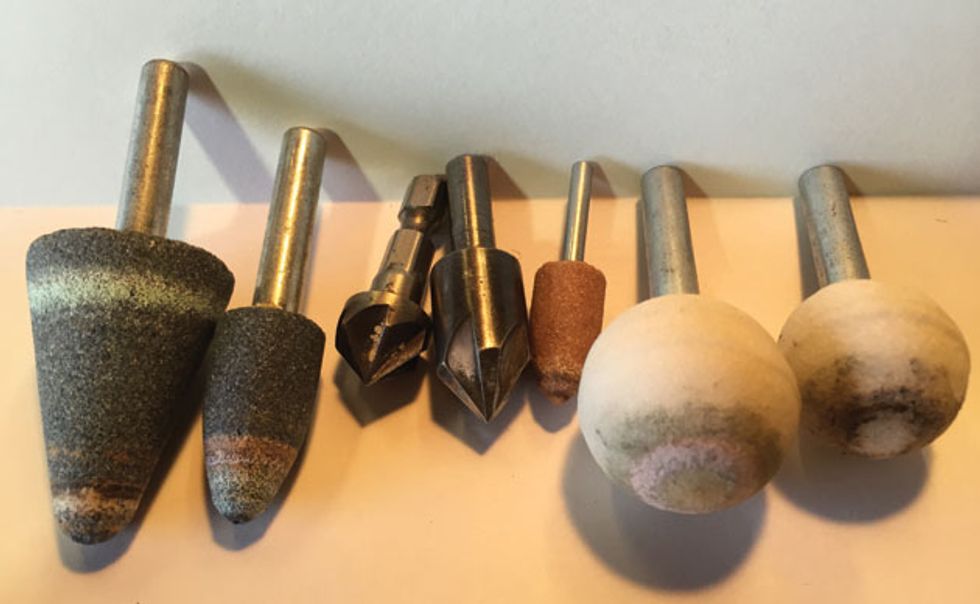
Countersink bits come in a variety of designs—from fluted metal units (center) to stone-grinding models—all of which help ensure that screws and hardware mount without damaging the underlying finish.
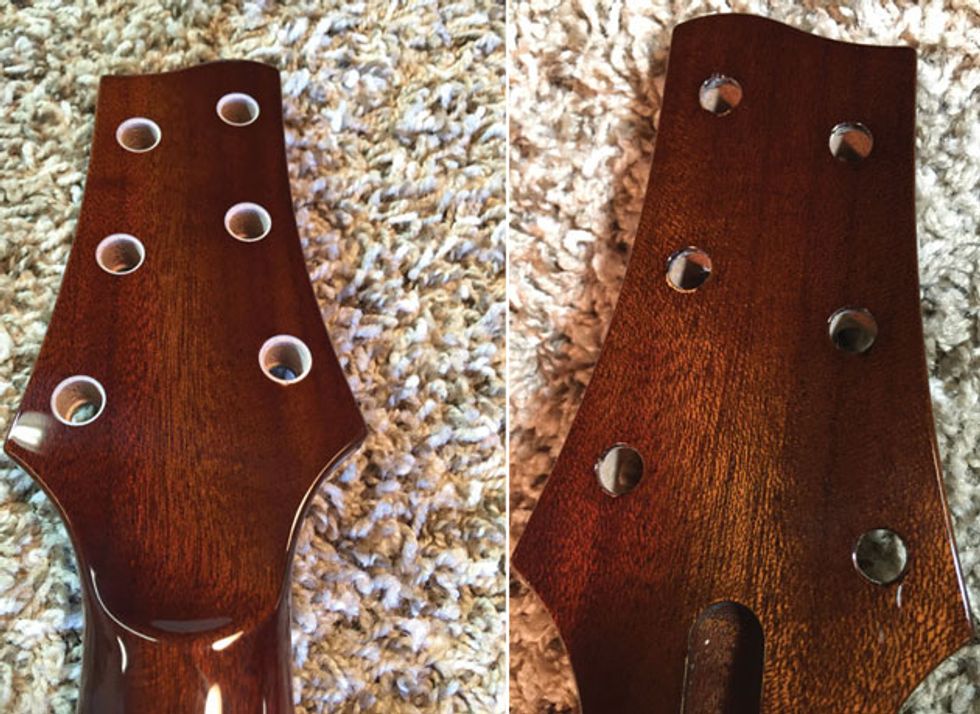
The Warmoth neck’s tuner routes before and after being countersunk.
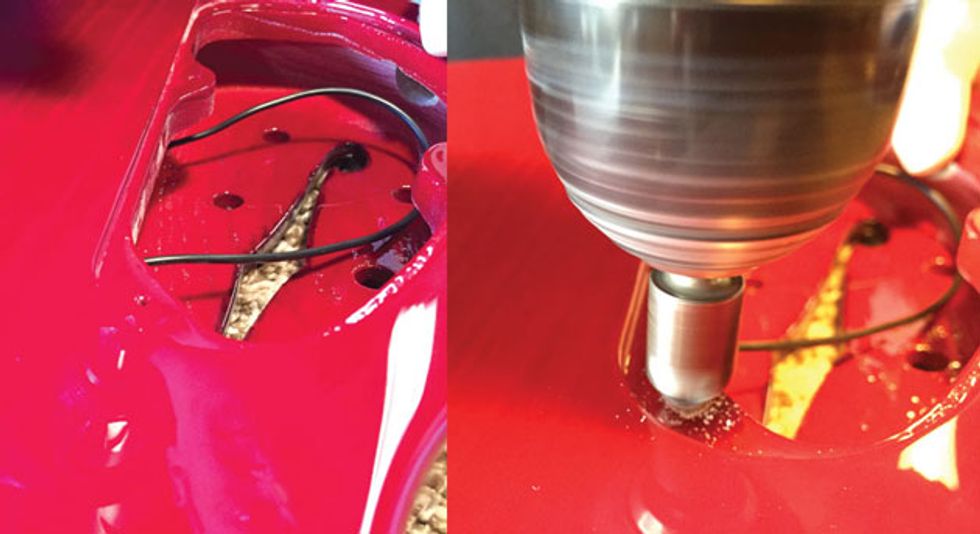
The Mooncaster’s control cavity before being countersunk, and during the process of countersinking.
Most guitar factories do not have time for countersinking. The most important areas for countersinking are where two pieces come together—such as the neck joint. If the wood bulges out there, it could cause fitment issues between the neck and body. The neck may not sit flush, and could be more prone to shifting. In addition, all holes in painted areas (for the strap buttons, mounting rings, and tuners) are at risk of cracking and chipping when you thread a screw into them. Countersinking alleviates this.
I have several different countersinking tools on hand. Sometimes a metal, fluted countersink is best, sometimes a stone-grinding style is best. I like to use the stone-type grinding bits for painted surfaces. They reduce or eliminate any chance of chipping. I like using a round ball style on larger holes when I just need a shallow countersink. However, there is one type of countersink I would advise not using: In my experience with wood and paint, single-flute designs are more prone to chipping and walking off center.
In addition to countersinking, each screw hole needs to be piloted with a drill bit appropriate for that screw size. I can’t think of any screws on any guitar that would safely go directly into the wood without some sort of problem, such as crooked threading, stripped heads, chipped paint, or worse. Even small tuner-locating screws need to be piloted, because they’re small enough that the heads will break off if you have to force them. But piloting poses yet another potential pitfall—the possibility that you’ll accidentally drill all the way through the headstock. With a small drill bit and the need to go about halfway through the headstock, it’s easy to let it get away from you. There are three easy options for avoiding this. One is to wrap a piece of tape marking the desired depth around the bit and watch carefully as you drill to make sure you don’t go any deeper. Or, if your drill chuck is deep enough, adjust the bit so that only the depth you need is protruding. If you have one, a drill press with a depth stop will provide the ultimate safeguarding.
Don’t Hurt ’Em (with a) Hammer
Although our Mooncaster arrived with the posts for its TonePros Tune-o-matic-style bridge already installed (and a ground wire already attached, too!), I wanted to make sure I caution you against using a hammer to pound in bridge anchors. Same goes for string ferrules. Aside from the damage if you miss your mark, you’re more likely to cause unintended consequences. If you have access to a drill press, a better option is to use it like an arbor press. Just be sure to protect the chuck and the guitar by placing something between them—and, of course, be careful not to accidentally turn the drill on while carefully pressing the parts into place! Also, if your bridge anchors (or any other parts) feel difficult to press in, you might need a larger hole. I’ve seen compressed bridge anchors split a guitar body—which obviously isn’t any fun for your project or your wallet. If you’re nervous that your press-fit parts are too loose, dab a small amount of superglue on the end before pressing it in.
Mental Prep
Whether it’s your first time building a parts guitar or your hundredth, it’s best to start out assuming something will go wrong. The big surprise on this build was that the Mooncaster body doesn’t have a rear-access panel for the 3-way pickup selector. That meant I had to fish the switch through the hollow cavity (the guitar is hollow from the electronics all the way to the cutaway). The trouble is, the cavity is quite shallow—which meant many 3-way switches wouldn’t fit. After searching through my vast collection of switches I finally found a little box-style 4PDT that fit, but even for a veteran like me it was quite a pain. I prewired the selector and used heat-shrink tubing to add more rigidity to the assembly so I could maneuver the switch into place and hold it there long enough to secure the nut. I also had to reach through the selector hole with tweezers and grab hold of the switch tip to pull it through, although tying a string around it would have also worked.
Besides anticipating frustrating little surprises, you should also start off your build knowing full well that you’ll probably end up scratching the guitar sometime during the project—no matter how clean your bench, no matter how careful you are. You might slip with the drill or the screwdriver. You might drop the pickup onto the guitar. Regardless, just stay calm and remember that it’s going to be fine in the end. After all, some people pay good money to have all sorts of dings put in their custom guitars!
Pickup and Electronics Advice
Despite what I just said about the inevitability of dinging your new guitar, there’s no reason not to take reasonable precautions to decrease the overall count. And before you ask, no—I didn’t scratch this giveaway guitar! And here are some tips on reducing the risk: If you’re installing humbuckers in mounting rings, do it away from the guitar—it’s easy to drop the pickup, send a spring flying into a body cavity, or worse. In the case of our Mooncaster’s Seth Lovers, it’s even riskier because the vintage-correct height screw has a slotted rather than a Phillips head. That means it’s very easy for the screwdriver tip to slip off and damage the guitar. Even after you’ve installed a pickup in its rings (or pickguard), it’s best to make as many macro adjustments as possible off of the guitar, then install the pickups. It’s also a good idea to keep a cloth or T-shirt on and around the guitar when you’re working over it. That way, anything you drop or set down is less likely to cause damage. I also like to polish the guitar early on so that the surface is slippery and things tend to slide off rather than scratch the surface.
As I mentioned previously, our Warmoth arrived with a ground wire already connected to its bridge anchors. Every electric guitar needs a bridge ground, so if your guitar body doesn’t have one you’ll have to figure out a way to connect a wire from the circuit to the metal of the bridge. In addition to this and standard pickup installation, applying shielding to your control cavities (and the underside of your pickguard) will reduce the amount of extraneous electrical interference that creeps into your signal.
Because the Mooncaster is a semi-hollowbody with an f-hole running down the center of the wiring area, I wasn’t able to completely enclose the electronics in shielding foil, but I was able to line the underside of the guitar’s top and back, as well as the cavity cover. To prevent the reflective-copper shielding on the back wood from being visible through the f-hole, I put black electrical tape over the foil (black shielding paint would have looked okay, too).
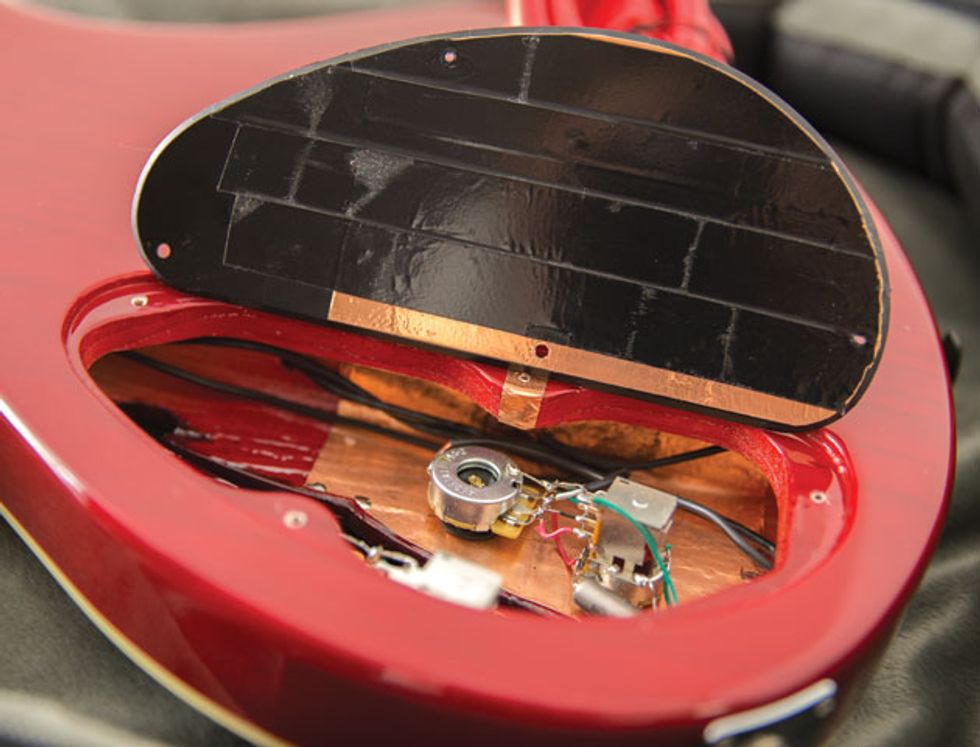
The Mooncaster’s control cavity, complete with copper-foil shielding on the underside of the top wood, electrical-tape-covered foil on the cover, and a strip of foil running across a screw hole from the cavity to the cover.
Keep in mind that shielding must connect to ground to be effective. You have to solder it all together as well, which is easier if you slightly overlap each piece of foil. I run another strip up to the cover area, over a screw hole. This way a screw penetrates the shield and ensures a strong connection between the cavity shield and the back cover.
Finishing Touches
Putting your own guitar together enables you to choose little finishing touches that often aren’t found on a factory guitar. Things like staggered-height tuners, custom-located string retainers, customized knob and switch locations, etc. With our Mooncaster, one of the finishing touches I wanted to add was beveling the truss-rod cover, which I think improves the look. I used a belt sander and a razor blade, but you can use files, sandpaper, a Dremel—anything you feel you can control well and get the job done with. You can also do things like scuff-sanding the back of the neck for a satin feel, while leaving the headstock glossy. Some prefer a stripped, oil-finished neck with a painted headstock. Many people use 0000 steel wool, or sandpaper ranging from 220-400 grit. I also like sponge sanding material for this, as it conforms to the contours and is very forgiving. However, our Warmoth neck came with a lovely brown-tinted gloss finish over mahogany, so I left it that way. Sometimes you can choose your knob locations, too. Our Warmoth body arrived with a 4-knob arrangement like a Les Paul.
To give the Warmoth’s truss-rod cover a more elegant look, I added a subtle bevel to its edges, which were previously a hard, perpendicular cut.
Setup
Although most factory guitars probably get a lot of the final-setup adjustments fairly close to where they ought to be, even new production-line guitars can benefit from a little extra setup work personalized to you. That may be due to your penchant for heavier- or lighter-than-normal string gauges, or simply the effects of your instrument’s trip through disparate temperatures and climates to get to you. But with a parts guitar you’re starting from nothing. This sometimes means it would benefit from fret leveling and crowning—a very detailed process that’s beyond the scope of this article. (If you’re not experienced in this area, it’s something any good tech can do.)
Assuming your parts guitar’s frets are level, the first adjustment you’ll need to make is to the truss rod. After your guitar is put together, it’s likely to need at least a little tension on the truss rod (by turning it clockwise) because many replacement necks come with no tension dialed in. I recommend putting a little tension on before you string it up, because it’s much easier on the truss-rod mechanism to be released, or make small movements, than to string the guitar up to full tension and then ask the truss rod to work against it. Clockwise to straighten, counterclockwise to release (or remember the tried-and-true guitarist’s mnemonic device: righty-tighty, lefty-loosey).
Our Warmoth neck came with a traditional 1-way truss rod, but there are also aftermarket necks (by Warmoth and other companies) with 2-way rods that work in both directions. With 2-way rods, there is a neutral position in the center before the threads catch in the other direction. This means you may find that it takes a few turns of the truss-rod nut before it seems to have any effect—but this is completely normal for a brand-new parts neck that’s never been strung up.
After you get the neck straightened to your desired amount of relief, and adjusted bridge height to your preferred level, you’ll want to intonate the guitar. Over the last decade or so there’s been a lot of new wizardry on this subject—tempered tunings, compensated nuts, micro-shifted fret locations, and pixie dust from the fourth dimension. But all you need to get it “close enough for rock ’n’ roll” is a simple tuner. The down-and-dirty way is to tune each string to pitch (either open/unfretted or using the 12th-fret harmonic), and then to fret the same string at the 12th fret with the same amount of fretting pressure you’re most likely to use during the average song. If the 12th-fret note is sharper than the open lower octave, move that string’s bridge saddle backwards. If it’s flat, move it forward. Once you’ve found the sweet saddle spot where both the open string and the 12th-fret octave are properly in tune, repeat these steps for the rest of the strings. When you’re finished intonating a 6-string guitar, a top view of the saddles usually looks like two sets of stairs: The top three (the G, B, and high E) slant backward in a rough line from each other, while the bottom three saddles (the E, A, and D strings) typically do the same.
Although it might not be as important for some players, for a truly pro touch I recommend carefully installing numbered knobs so that when they’re all the way up, their numbers align and the “10” is visible from your usual playing position. If they say “Volume” or “Tone” on top, orient them so that’s aligned when they’re up all the way. If you have any round toggle switches (such as this guitar’s 3-way), make sure that when you get the nut tightened, the switch is aiming in the direction you’d like it to work. I usually set this to be in the direction of your strumming motion, but everyone is different—you’re the boss on your guitar.
Parting Thoughts
If you decide you’d like to take a shot at building a parts guitar (or if you already have but now you’re finding yourself itching to give it another try), just remember to take your time, be deliberate about everything, go easy on yourself, and have fun. Beyond that, the most important thing is to make music with your project guitar when you’re done.
Of course if you get stuck on a problem or question, you can always ask the internet—where you’re sure to receive dozens of wrong answers and unwavering opinions for every two or three pieces of good advice. But even then it can be quite fun to learn how to discern who the loudmouthed amateurs are and find the nuggets of wisdom from experienced builders who’ve pretty much seen it all. Maybe I’ll see you out there and together we can argue with some highly opinionated keyboard warriors about the importance of countersinking!


