


Last month, we started an
unusual project—restoring
a vintage IRC pot that
had originally been installed
on a stunning 1954 Gibson
Les Paul. This pot had been
replaced with a modern unit,
but for many collectors, having
an instrument with 100
percent original parts is important.
And, as we discussed at
length in Pt. 1 of this series,
it’s a fact that vintage guitars
from the ’50s and ’60s have
some of the highest-quality
potentiometers ever made.
Why wouldn’t you want the
best for a ’54 Les Paul?
We left off with a description
of how—after carefully
positioning the pot in a vise
with padded jaws—I’d pried
open the case using a mini
screwdriver. In this description,
I explained how to avoid leaving
any visible micro pressure
marks around the four tabs.
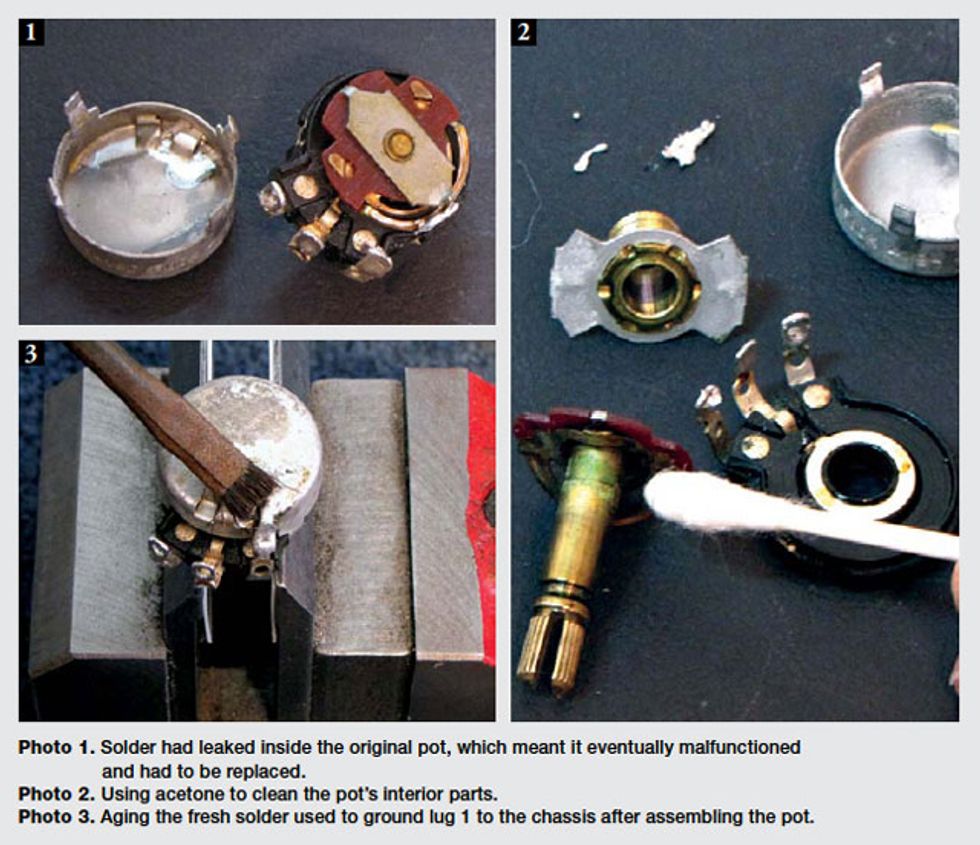
Now, let’s resume the
project: Once I’d removed
the chassis cap and aluminum
retainer clip, I could see that
solder had bled onto the wipers
(Photo 1). Fortunately, the
solder did not adhere because
of lubricants surrounding the
internal parts.
But this was only one of
two problems. The other was
that the brass shaft was still
locked in place. To free it, I
used a StewMac deadblow
fretting hammer and a punch
to lightly tap the brass shaft
loose. It looked to me like
some form of glue or fossilization
had taken place. I carefully
removed the substance using
acetone and Q-tips (Photo 2).
At that point, I lubed,
cleaned, and reassembled
everything. While reassembling
the pot, I used a StewMac
nut-and-saddle vise—which is
ideal for simple, non-aggressive
tasks—to hold it. I doublestuck
Mylar cheeks to the vise
jaws to avoid scratching the
chassis.
For the final step, I soldered
lug 1 to the chassis to ground
it. I then used a glue brush
to apply a solution that gave
the solder an aged appearance
(Photo 3). Voilà—a restored
’54 pot ready for duty in the
’54 Les Paul!
 John Brown is the
inventor of the Fretted/Less
bass. He owns and operates
Brown’s Guitar Factory,
a guitar manufacturing,
repair, and restoration facility
staffed by a team of talented
luthiers. His guitar-tool and accessory designs
are used by builders all over the world. Visit
brownsguitarfactory.com or email John at
info@brownsguitarfactory.com.
John Brown is the
inventor of the Fretted/Less
bass. He owns and operates
Brown’s Guitar Factory,
a guitar manufacturing,
repair, and restoration facility
staffed by a team of talented
luthiers. His guitar-tool and accessory designs
are used by builders all over the world. Visit
brownsguitarfactory.com or email John at
info@brownsguitarfactory.com.


