Ex. 2 is the same recording, but with much treble removed. I’ve also added distortion using EchoBoy’s saturation control. (Don’t worry if your delay doesn’t have a distortion setting. Next month we’ll see how to add distortion to delay using separate delay and overdrive plug-ins.) Image 1 shows the settings.
You can hear the same properties in Scotty Moore’s definitive rockabilly slap on Elvis Presley’s classic “Mystery Train.”
Ex. 3 uses a small tweed amp model and a similar delay setting to approximate the dark, somewhat distorted sound of Moore’s Echosonic, an amp with built-in tape echo. For a similar sound, cut lots of delay treble, turn the feedback control to zero (just one echo), and add a touch of distortion if possible. Try delay times between 100 and 150 milliseconds, depending on the song’s tempo.
That rockabilly slap is a great sound, but for better or worse, a familiar one. So let’s explore some cool alternatives.
Echoes of Africa. Tape delay was a popular sound for African guitarists from the late 1960s through the ’70s. It adds a lovely liquid fluidity to the pretty arpeggios and double stops of Central African pop guitar playing. Here's a fine example, “Malala,” by the great Congolese guitarist Nicolas Kasanda (better known as Docteur Nico), one of the creators of the guitar-driven rumba-rock style later known as soukous.
It’s a brighter tape sound, with a longer delay time and two or three echoes rather than single slap. Here it sounds like le Docteur is playing through an amp. But many guitarists from Africa—a continent rich in music, but poor in gear—recorded directly into the mixing board, adding tape delay to their squeaky-clean tones. In Ex. 4 I bypassed the amp model for a similar effect. Image 2 shows my EchoBoy settings, with a delay time of 285 milliseconds, some high and low cut (but not as dark as the rockabilly sound), and lots of simulated tape saturation.
It sounds a little chaotic soloed like this. But somewhat counter-intuitively, the rhythm seems more coherent when you add bass, drums, and dry-toned backing guitars, as in the Dr. Nico example. This musical style often features three or four guitars, and the echo on the lead guitar helps it stand out as the solo instrument.
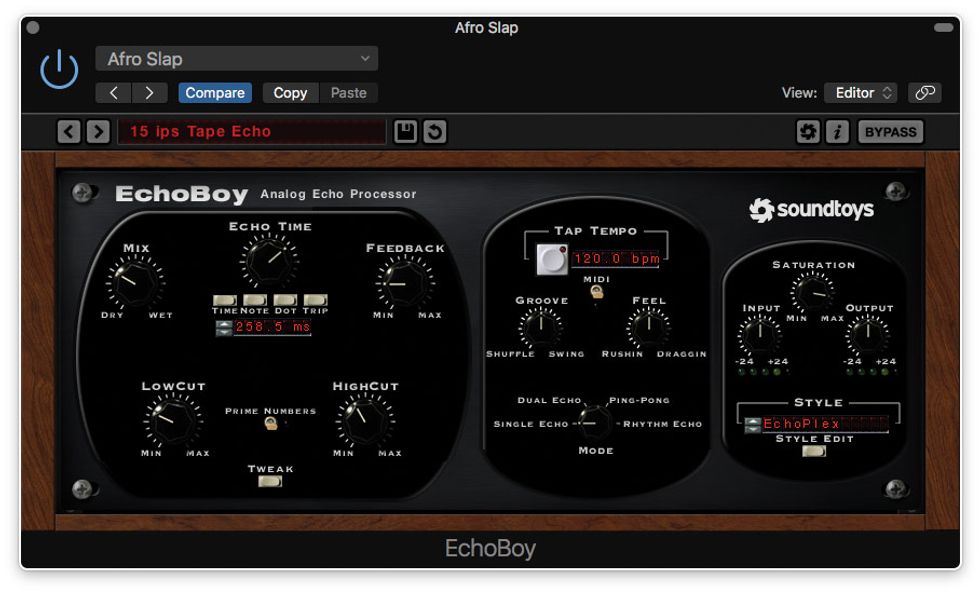
Image 2
Authoritative Echo. Here’s a slapback variation I call “the Great Dictator,” because it makes me think of some autocrat addressing a stadium full of followers, with a hard, steely echo bouncing off of reflective concrete surfaces. For this sound I keep the treble strong, cut some bass, add modest distortion, set a delay time of about 250 ms, and select a low feedback setting—maybe two or three echoes. [Ex. 5.]
Again, it can seem rhythmically chaotic. But if you dial back the wet level, you get a spacious sound that stands out against backing instruments, as in Ex. 6.
Now let’s introduce a new idea: subtlety! A not-so-secret trick among pop producers is to add a single short echo to lead vocals, in addition to reverb and other effects. The echo can be nearly subliminal, yet it helps a lead vocal (or a guitar!) stand out in a mix. The lead guitar that enters at 00:07 in Ex. 7 is as present as a poke in the nose, even though the track has generous amounts of spring reverb.
Ex. 8 adds a touch of echo on the lead part, paradoxically helping the sound blend into the mix and command centerstage.
This time I didn’t add the delay effect directly to the guitar’s channel strip, but placed it on an aux bus. Routing the sound this way opens up many more sonic possibilities—ones we’ll explore next month!
Stompboxes such as Catalinbread's Heliotrope and Malekko Heavy Industry's Scrutator can inflict digital distortion
on analog signal chains.
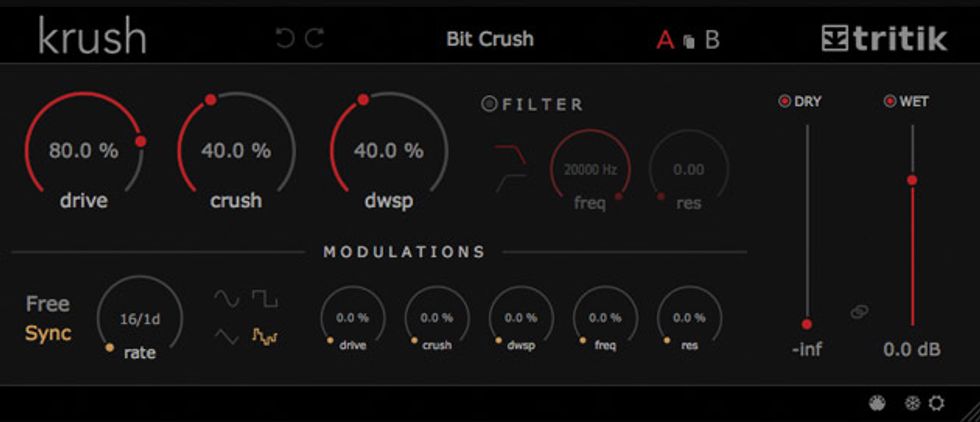
Image 1
Two of the big knobs control bit crushing and downsampling (labeled “dwsp"). The leftmost knob sets the drive level feeding the effect. Higher drive settings are wilder and noisier.
To the right of the big knobs are simple low-pass and high-pass tone controls that siphon off highs and/or lows downstream from the digital distortion. The res control adds resonant feedback at the filter cutoff frequencies. At the far right are wet/dry faders. (All examples heard here are 100 percent wet.) The bottom row is the modulation section, with an LFO that can sync to a track's metronome. There are four modulating waveforms to choose from. The remaining knobs specify which parameters are subject to modulation. Impressive for a free plug-in, huh?
You can combine bitcrushing and downsampling, as heard in Clip 3. (The settings are those shown in Image 1.) Obviously, bitcrushed sounds can be so degraded that they have no definite pitch. That's not a bad thing, necessarily—you can say the same about many cymbal and drum sounds. But as you downsample, there's a strong resonance at the filter cutoff point, which you can use to roughly tune the effect.
You might not identify the primary pitch in Ex. 4 as D. But when the Dm bass-synth riff enters after four bars, they kinda/sorta cooperate harmonically.
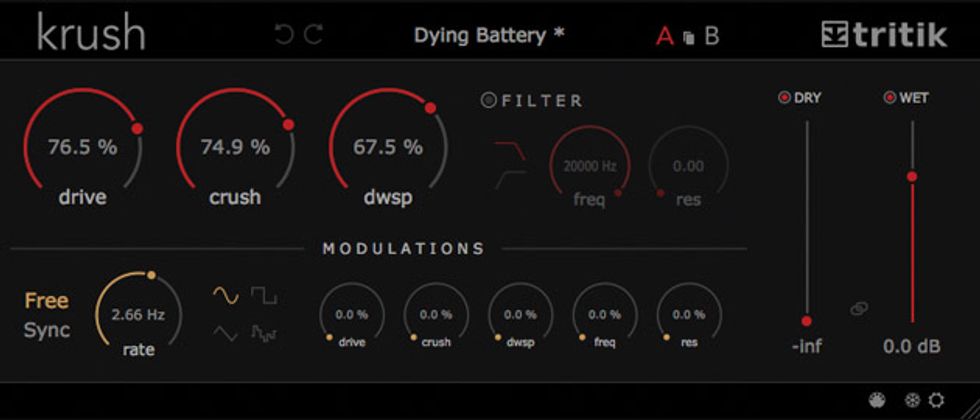
Image 2
The heavy downsampling in Ex. 4 yields a more bass-like tone. Image 2 shows the settings.
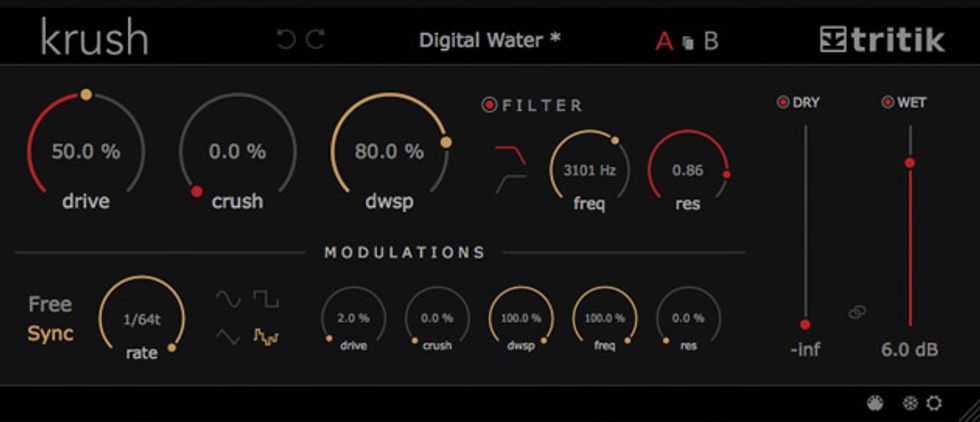
Image 3
Now let's try incorporating Krush's modulation section, as seen in Image 3. With the lowpass filter resonance set high and fast 64th note triple modulation routed to both the filter frequency and the downsampling amount, you get the splish-splash water effect of Clip 5.
Naturally, once you capture such sounds within your DAW, you can stir up additional trouble. In Clip 6, for instance, I doubled the guitar recording, processed each clip with its own Krush setting, and panned the two tracks in stereo. Note how the glitching adds rhythmic tension as it clashes against the quantized electronic beats. It's similar to the way rhythmically imperfect loops can add tension and character to hip-hop tracks.
Bring the noise. Here we've looked at downsampling within your DAW. But you can create similar effects without a computer thanks to recent bitcrushing stompboxes such as Catalinbread's Heliotrope and Malekko Heavy Industries' Scrutator, which convert your analog signal to lo-res digital.
Obviously, these flavors aren't for everybody. But before you shriek “never!" I urge you to explore these sounds in musical contexts. Bitcrushed audio can be brutal on its own, but you may be surprised by how often this abrasive effect can lend texture and interest to a mix, especially alongside less extreme sounds.