
Diaries of the Mad Axemen: relive the Woodshed Chronicles of the guitars designed for and played by Randy Rhoads.
As Randy dazzled the guitar community with his playing, many guitarists remained curious about the tools of his trade. Randy's main guitar was a GibsonĀ Les Paul Custom, which was flanked by two unique V-shaped guitars. While much has been written about these guitars, most observations have simply scratched the surface. With the help of luthiers Karl Sandoval and Grover Jackson, we revisit these very special guitars of Randy Rhoads.
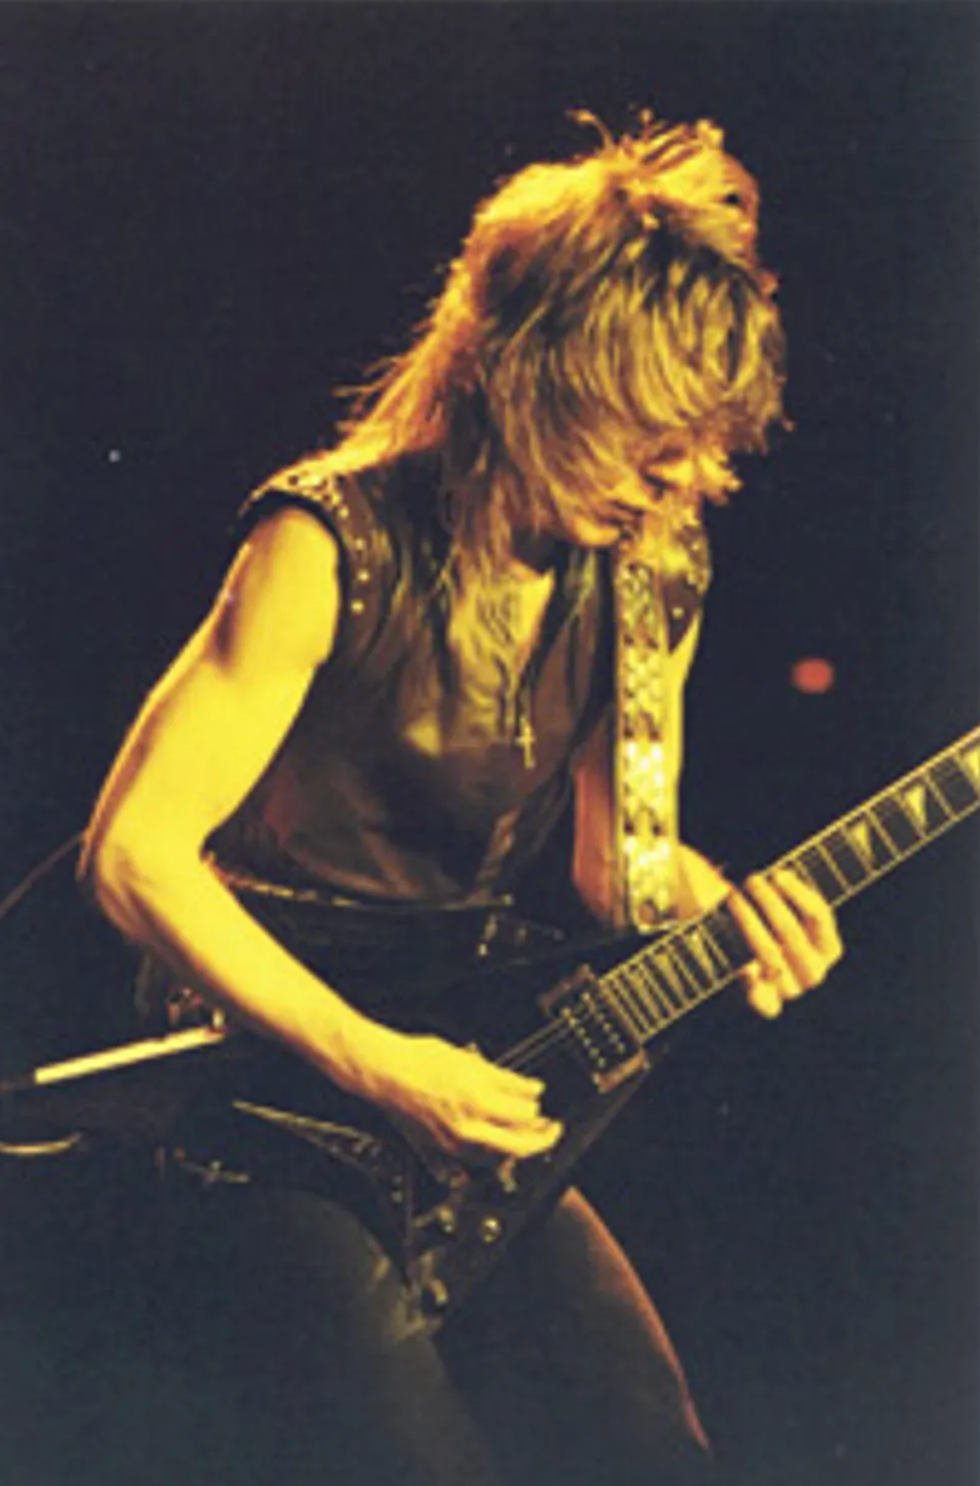
Randy Rhoads began his performing career playing a cream-colored Gibson Les Paul Custom. His Quiet Riot bandmates had acquired it collectively for Randy's sole use in the late seventies. Initially, Randy thought it was made in 1963, but would later discover it was actually made in 1972. This revelation came from John "JT" Thomas, an avid Gibson collector and guitarist for the British band Budgie, who opened during Rhoads' first European tour with Ozzy. The Les Paul was Randy's main guitar throughout his career and he used it for a majority of his recordings and performances with Osbourne.
The Les Paul Custom, per 1972 spec, had a four-piece body: two layers of mahogany with a thin layer of maple in the middle and a carved maple top. It was white when new, but the nitrocellulose lacquer yellowed over time. It was also heavier than fifties era Les Paul Customs. Randy made only a few cosmetic alterations to the guitar, replacing the brass toggle switchplate and substituting the Grover tuning machines with Schallers. The most noticeable marking on this guitar was Randy's name engraved on the pickguard. Pickups during this era of construction were Gibson-produced "T-Buckers," named for the T-shaped tool marking made in the forward bobbin of the pickup.
An Idea for a New Guitar
Before joining up with Ozzy Osbourne for Blizzard of Ozz, Randy was still slugging it out on the L.A. scene, playing shows with Quiet Riot. In 1979, Randy found himself gigging with another local guitarist he admired from the band Xciter, George Lynch, who would later come to fame in Dokken. In those days, the two often conversed about technique, amps and, of course, guitars. One particular evening, Lynch showed up with a new single-pickup V-shaped guitar. Randy was excited to see it and asked to check it out. The guitar had a flat radius fretboard and a tremolo bar on the body, something uncommon on V-shaped guitars at the time. To Randy, it was like two worlds collidingāa Gibson-inspired shape with a Fender-made mechanism. Lynch had had the guitar custom-made by a local luthier named Karl Sandoval. As Randy was fascinated by the design of this guitar, George urged him to give Karl a call.
Karl Sandoval began his career as a luthier while playing guitar in the band Smokehouse. He was on the same scene that included many of Randy Rhoads's contemporaries, like Eddie Van Halen and George Lynch. He built relationships with other guitar players on the basis of his guitar playing and the amazing guitars he made for himself. He had been working with Wayne Charvel at the Charvel guitar shop when he received a call from the Quiet Riot guitarist. He recalls that first conversation with Rhoads, saying, "I remember Randy giving me a call, telling me that he was backstage with George doing a show and got to play the guitar I made for George."
On his first visit with Sandoval, Randy discussed ideas for his own version of what he had seen on George Lynch's V. That was July 3, 1979.
"I can remember that day," Sandoval says, "walking around in my garage discussing this guitar ... talking about the headstock, the color, the bowtie inlay on the neck. He wanted the Les Paul's double humbuckers and the Fender Strat tremolo. He also asked about putting the toggle switch and the output jack on the upper wing." Randy also mentioned that he did not want a bolt-on neck because he wanted the guitar to have the playability of a Gibson.
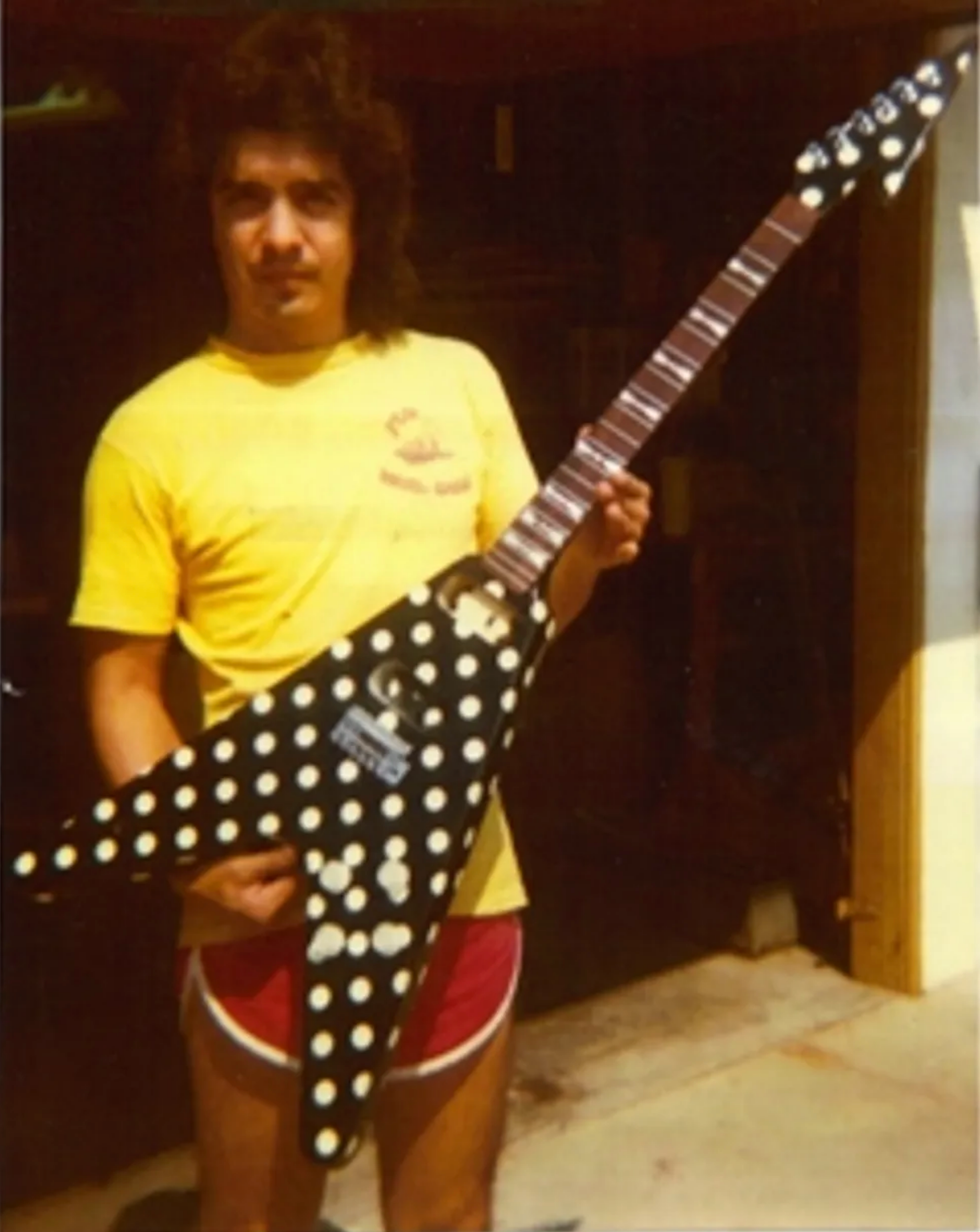
Sandoval with Rhoads'' in-progress first V.
As Sandoval tells the story, "I talked with Randy about coming up with something different in a guitar, a different look, saying, 'Let's come up with a different headstock, a different color, come up with an identity.' And then he started to tell me, 'V body with polka dots' ...honestly, I thought that was hideous but then I just kinda used my imagination." Randy wanted 3/4" dots painted all over the guitar, and to give it perspective, he didn't want them randomly placed on the guitar.
"I took his ideas and I put them all together," Sandoval continues. "I was real good at putting guitars together in my head. I could visualize the guitar in my head before it's even started. He didn't want a bolt-on, so the neck is set into the body."
Building a New V
The first step in building this guitar was finding a Danelectro neck. Sandoval had become accustomed to using these necks, and they were a central feature of his guitars, but he still had to hunt one down: "I would go to swap meets and pawn shops a lot. Back in the day, I was picking up Silvertones and Danelectros for like 15 to 25 bucks. I couldn't even get necks from wholesalers for that price! Basically I took them off the guitars and I ended up with a lot of guitar bodies and no necks."
Contrary to popular belief, these necks did have truss rods. As Sandoval describes them, "It's two I-beam, non-adjustable truss rods glued into the neck before the fretboard is glued on. If you look at the end of these necks, you'll see two slots. That's where these on-edge I-beam truss rods are. It's like an inch-thick steel that will not bend. And it makes a maple neck very heavy. I think that's what contributed to the sound of Randy's guitar. There's a lot of metal there."
Because Randy wanted a Gibson sound, the two-piece body was constructed out of mahogany. But unlike a traditional Gibson-made Flying V, this body had to be much thicker to accommodate the depth needed for the Fender tremolo bridge sustain block.
"I had to tell him that it's going to be thick because 1 3/4" is the size of the block on the bridge," says Sandoval. "A Strat body is anywhere from 1 5/8" to 1 3/4". An original Gibson Flying V isn't that thick." Control cavities would be placed on the upper wing for the pickup selector switch and on the outside edge of the upper wing for the output jack. Having cut the body out, the next procedure was attaching the Danelectro neck to it.
Sandoval hit upon a unique way to position the neck and glue it to the body that incorporated the surrounding support: "I came up with a very simple neck pocket glue-in system. I have an extension of the neck underneath the existing neck where the neck pocket is and you shape the body around the neck. There's actually more wood that extends out and supports the neck. It's a square neck going into a square neck pocket, but you've got a lot of surface area when you clamp it with wood glue. It will never break."
Routing for the pickups presented a minor problem because the string spacing of the Gibson-style bridge position pickup was narrower than the width of the Fender tremolo bridge. As Sandoval states, "It's a good thing that you have a flux circle magnetic field underneath the strings." The pickups used on this guitar were a DiMarzio Super Distortion in the bridge position, and a PAF in the neck position. The electronics were similar to Gibson specs: two volume and two tone controls located on the bottom wing of the guitar.
When Randy and Karl drew up the design of this guitar, they also came up with a headstock design that was shaped like a harpoon or an arrowhead. Using the existing Danelectro headstock, Sandoval attached wood to either side, creating a paddle that the new shape could be drawn onto.
"I left the existing headstock on and doweled the sides to graft on pieces of wood," explains Sandoval. "Then the correct shape was cut out."
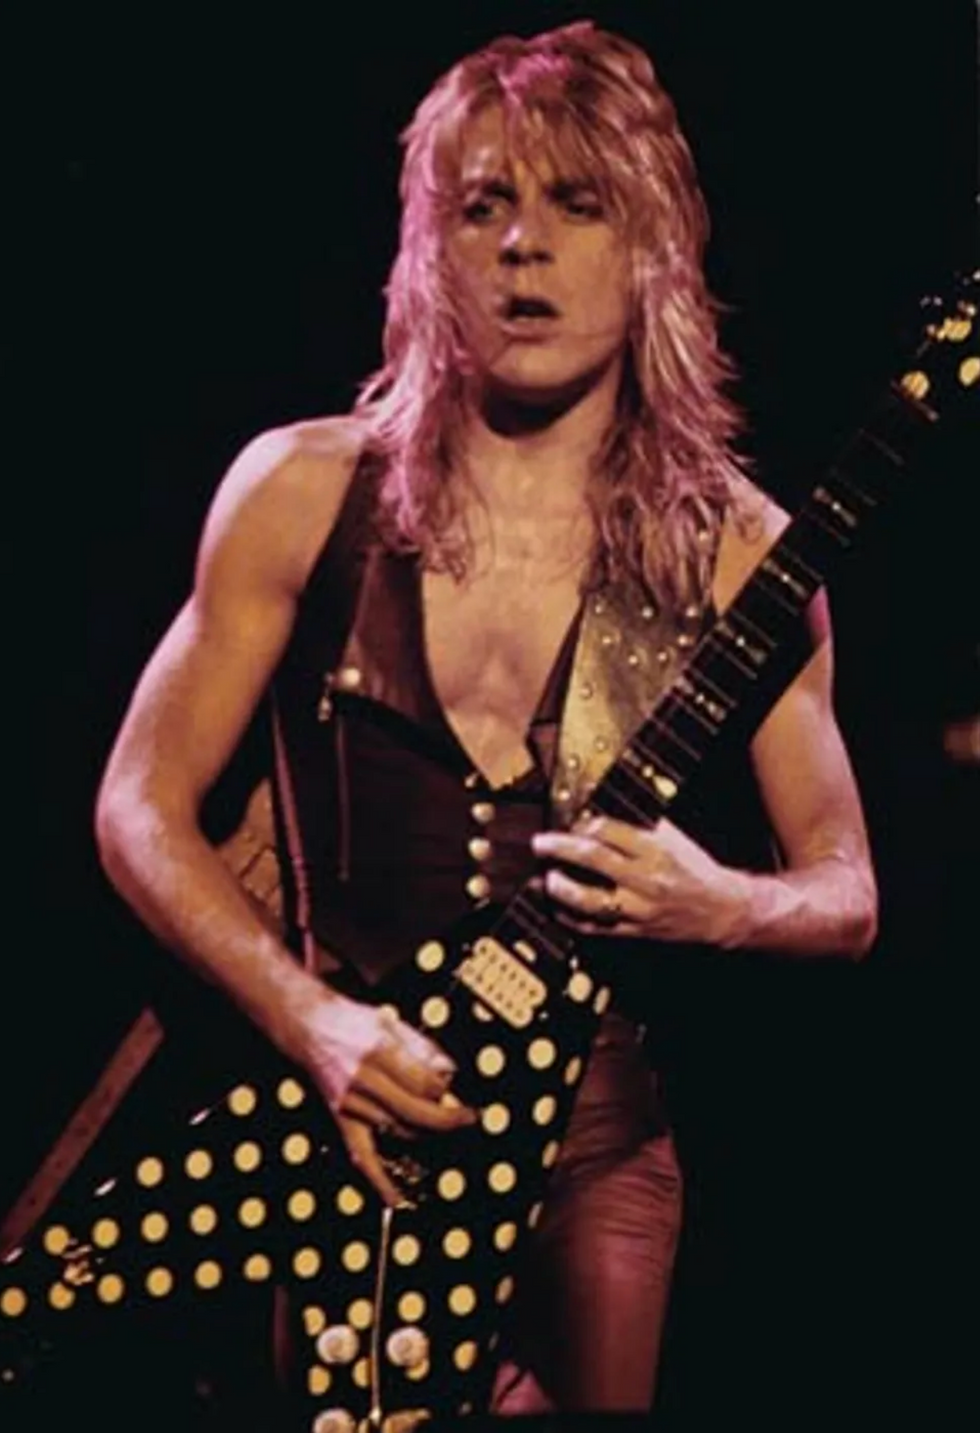
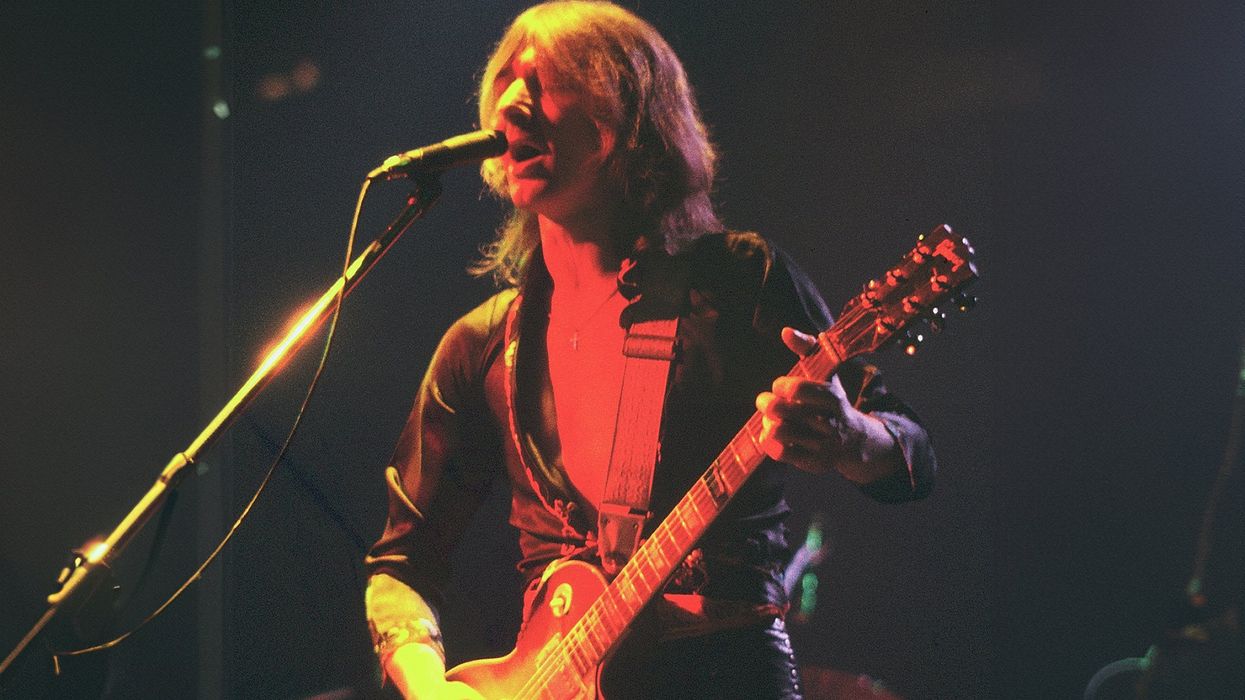
Rhoads with his Sandoval V.
Photo by David Plastik
When Randy and Karl drew up the design of this guitar, they also came up with a headstock design that was shaped like a harpoon or an arrowhead. Using the existing Danelectro headstock, Sandoval attached wood to either side, creating a paddle that the new shape could be drawn onto."I left the existing headstock on and doweled the sides to graft on pieces of wood," explains Sandoval. "Then the correct shape was cut out."
The outcome of these elements was a Flying V shaped guitar made by Karl Sandoval but based on Randy Rhoads's ideas. The guitar had a scale length of 25 1/2", a 17" radius neck, and was finished in nitrocellulose lacquer. Although it is not widely known, Randy actually broke the headstock off the guitar only three weeks after it was built.
"He was devastated," Sandoval remarks. "I remember that call." As Randy described it, he was standing with the guitar when the strap came loose. The guitar fell and crashed to the floor, neck first. When Randy brought the guitar back to Sandoval, it wasn't as bad as it looked, but it was still a major wreck. "When the neck broke," he remembers, "it shattered down the middle. It blew out ... I saw multiple fibers of the wood sticking out on the neck part."
Sandoval continues: "He was more concerned about my work and what I had done, and he felt like he ruined my work. But I took it in and charged him another $75. I repaired it and it came out as good as new." The damage proved a testament to the strength of the neck pocket and of the neck itself, because the guitar did not break at the area where the neck joins the body. Guitars that take a similar fall will normally break somewhere in the middle or at the neck joint. Randy's guitar was repaired and little could be seen of the damage.
Randy Rhoads's Sandoval V guitar, a hybrid of a Gibson and a Fender, was completed in September 1979. Soon after that, Randy would leave his band Quiet Riot, having been tapped to play in Ozzy Osbourne's new band. Sandoval's creation headed overseas to England and a tour through Europe in 1980, and scores of Europress photographers snapped shots of it. In December of that year, Randy flew home to the states for Christmas. It was on that flight that he came up with an idea for a new guitar. He couldn't wait to get it built.
A Second V Takes Shape
Around the same time, Wayne Charvel sold the San Dimas, California workshop to a prospective new business partner, Grover Jackson. With Wayne gone, Karl Sandoval left to continue developing his company, Sandoval Engineering. This is what led Randy to call Grover Jackson about making his new guitar.
On December 23, 1980, Randy went to the San Dimas production facility to meet with Grover Jackson, the new head of the Charvel Manufacturing at that time. The Charvel factory was empty, since all of the employees had gone for the week of the Christmas holidays. Jackson sat in his office awaiting Randy's arrival. He recalls, "We sat there from noon until midnight and just talked about everything in the world. He brought a little scrap of paper that had four to five line drawings, saying, 'This is kinda what I want this guitar to look like.' We scribbled and made more drawings and he left."
Grover Jackson circa 1980.
Those line drawings featured an asymmetrical V-shaped guitar body, with the bottom wing shorter than the top. It was to have pinstripes and, like the Sandoval V, a neck-thru-body design, rather than a bolt-on neck. During this marathon conversation, Randy told Jackson he had already chosen a name for the guitar: The Concorde.
According to Jackson, Ozzy and Sharon (then Arden) had bought him a ticket on the Concorde to come home to the United States, and that's where he came up with the name. From a marketing point of view, Jackson was concerned about the general look of the guitar and how the company's name should be presented.
"Charvel, at the time, was producing bolt-on, Fender-style guitars. Well, here's this crazy batwing thing, and I was afraid that might dampen the sales of the Charvels," Jackson reveals, "so I asked Randy if he would mind if we put a different name on this instrument, because we were going to create this new thing that was not like the other stuff. So it was also out of fear that I didn't want to piss on what we already had going on."
The final detail to be sketched out was the headstock shape. In time, that shape would become the company's trademark.
"Randy had that body shape drawing and it needed something that sort of matched it in radical-ness," Jackson explains. "So I came up with the head. I had been a vintage guitar guy and was always a Gibson Explorer fan. I wondered what I could do to an Explorer head to make it more modern and aggressive looking. Randy and I sketched around that idea and came up with the head, which later became a trademark." Charvel began making the guitar a few days after Christmas and Randy went back to England after the holidays.
The line drawings turned into reality when Jackson transferred them to a piece of Baltic birch.
"We band-sawed it to shape and then sanded it as best we could to use that as a template on a pin router to cut out the body," recalls Jackson. "It was real Cro-Magnon stuff." That template went through quite a few edits so they'd only have to cut the body once. Jackson remembers the sculpting of the guitar as being prehistoric in technique when compared to today's production standards: "The body was screwed to the template and then run around the pin router. This was pre-vacuum fixtures and pre-toggle clamps. And then it was sanded and sent to the paint shop."
Jackson says he added the beveled edges while carving the body: "I was making some BC Rich Bich's right about that time for my friend Bernie Rico. Those had beveled edges and I added the beveled edges to the Rhoads body. I ripped off my buddy! I'm being honest, okay?"
Jackson continued work on this guitar with Charvel's woodshop foreman, Tim Wilson, who did all the woodworking at the factory. As Wilson remembers, this was going to be a big guitar.
"The whole center block was solid maple," he explains. "The wings were also maple. It was a big hunk of tree. This thing was going to weigh a ton."
The end result was a very pronounced V-shaped guitar with a lot of surface area. The neck joined the body at the 14th fret, and it featured 22 frets on a compound radius ebony fretboard with pearl block inlay and binding. The frets were Dunlop 6230s, which is considered a small fretwire in comparison to Gibson frets. This was basically Dunlop's version of Fender fretwire.
Wilson recalls how certain things were done by hand back then that would be considered obsolete by today's standards: "Compound radius makes the surface of the fretboard flatter as you move up the neck, which goes from 12" to 16" in radius. We shaped that by hand. The neck shape was thick, somewhat like a fifties-era Gibson Les Paul, which is what Randy specified, and it was 25 1/2" in scale."
And, like a Gibson, the nut width was 1 11/16". In contrast to the Sandoval V, this time Randy's aim was to have a guitar that had a Gibson sound and Fender playability. Like the Sandoval V, it also had a tremolo bridge. Made by metalsmith Bill Gerein for Charvel, this bridge was a production standard on many Charvel guitars at the time. It was made of brass with a heavy brass sustain block.
Also like the Sandoval V, it had two volume and two tone controls. The pickups were a Seymour Duncan Distortion at the bridge, and a Jazz model in the neck positions, both mounted to the body with solid brass pickup bezels, also made by Gerein. The selector switch was located along the outer edge of the upper wing of the guitar. The output jack was placed on the outside edge of the lower wing, where the V shape converges. It was painted white with black pinstripes, undercoated with polyester and finished in polyurethane. And, as Tim Wilson had predicted, it was a very heavy guitar.
Redesign for the Concorde
The first version of the Rhoads Concorde guitar was completed in late February or early March of 1981, and it was shipped to Randy in Europe. Randy would report back to Jackson that he was having trouble reaching the upper register frets. He was also concerned with public perception of the guitar, since fans were asking him if he'd cut up a Gibson Flying V. Approaching Jackson for another guitar, Rhoads wanted to have a second one made that was more radical, with a narrower V shape so that it would be more original looking; so people wouldn't think he'd butchered a Gibson.
"One of the things that wasn't cool was the guitar was just too big," Wilson is quick to point out. "The body shape was just too big and it was made out of maple, so it weighed a ton."
In October of 1981, Randy and Grover Jackson got together once again to scribble, draw and debate the design of another guitar. Jackson had prepared three neck-thru-body guitar blanks with headstocks on them; the wings or sides of the body were just blank pieces of material. He placed one on a table while Randy looked on.
Rhoads playing the second Concorde shortly before his death.
"We stood over a workbench and drew for several hours ... drew on the blanks, erased it, sanded it off and drew some more ... more here, less there, and finally Randy said, 'That's it'," remembers Jackson. With the crude pencil drawing on this piece of wood, Jackson took it to the bandsaw and carved the body, a procedure that Randy could not stand to watch. Laughingly, Jackson admits, "Some guys want to know about the mechanics like car guys would be. And some guys want to know none of that, and Randy was one of those guys. He couldn't watch me cut it on a bandsaw."
By the end of the day, Jackson had shaped the wood according to the pencil drawings and handed it to Randy so he could hold it and see how it felt and what it would look like. Having done that, he began planning the building process while Randy went off to begin the first leg of the 1981 Diary Of A Madman tour with Ozzy overseas.
By the time the tour landed in the US a couple of months later, manager Sharon Arden had built the Ozzy Osbourne show up to major headline status by investing in full production staging, lighting and tour staff. Full stage rehearsals were conducted at Francis Ford Coppola's Zoetrope studios in Hollywood before everyone headed to San Francisco to begin the tour. Meanwhile, in his San Dimas factory, Jackson had the second guitar built and completed. He delivered it to Randy on December 27 during the final rehearsals at Zoetrope. This version of the guitar had a much more distinctive shorter lower wing, making the upper wing much more pronounced.
"It had a simple elegance to it," says Jackson. Clearly, this was not a hacked-up Gibson Flying V.
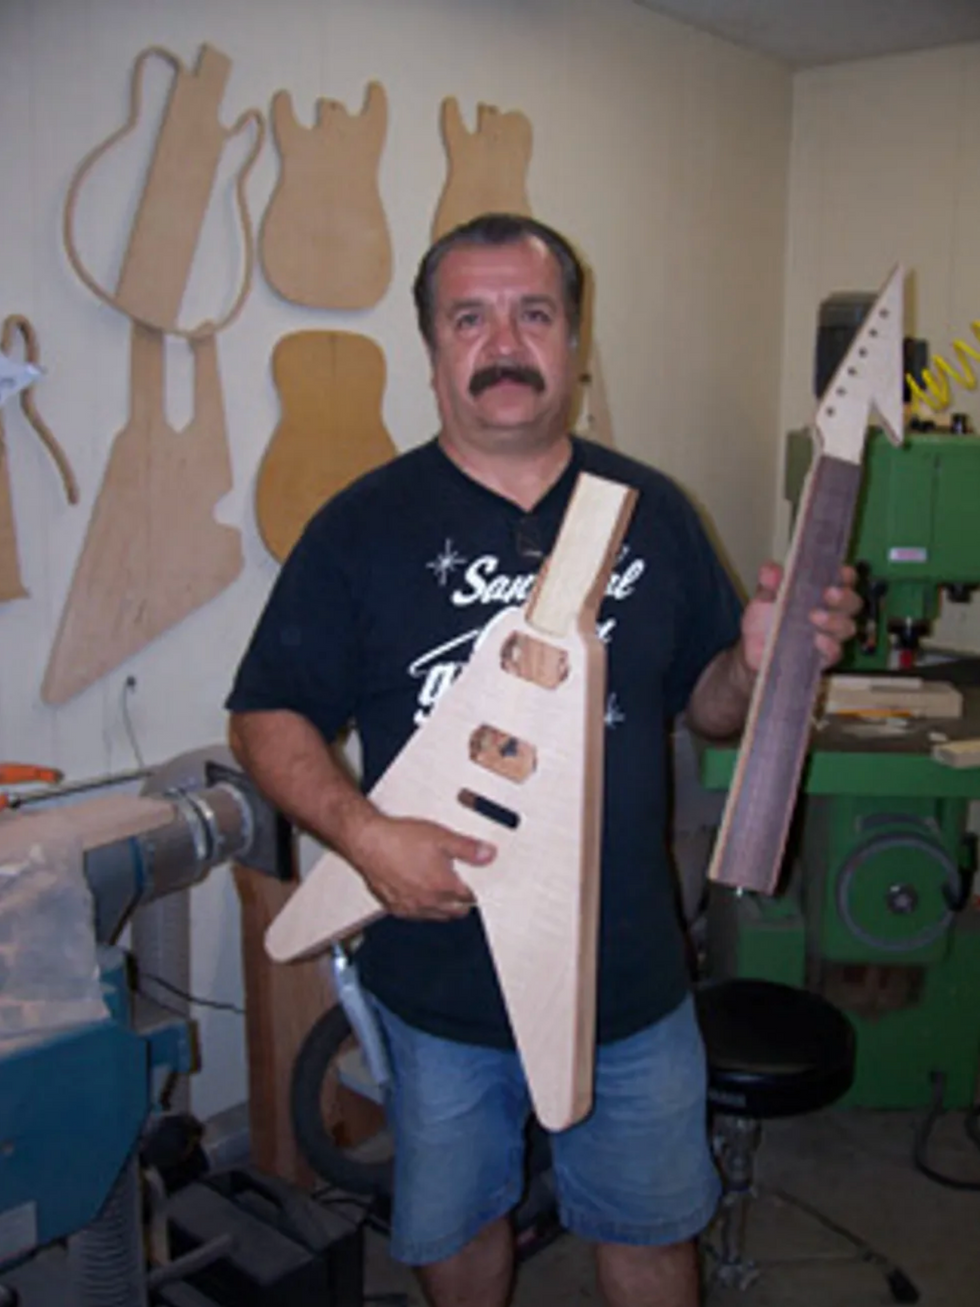
Jackson with one of his latest projects.
Despite the success of the guitar's redesign, Randy seemed a little hesitant to dive into it. Jackson offers some insight, saying, "A strange little quirk about Randy in my memoryāand other people might dispute thisāRandy was superstitious about guitars. I made a guitar for Jeff Beck one time and he just took the guitar onstage and played it in front of thousands of people. Randy was the opposite of that. Boy, he wanted to look at the guitar and then put it away. The next day, he'd pick it up, hold it, put it down and he'd go away. And a few days later, he'd pick it up and he'd play it a little bit and then he'd put it away. He had to kind of get synced up to it. He was playing the guitar by the time he passed away. There are pictures of him playing it, but he didn't play it the whole show. It wasn't the only guitar he played, and he was warming up to it. I think he was happy with it."
Two and a half months later, Randy Rhoads was killed in a plane crash. He was dead at the age of 25. His death still echoes within those who knew him. Fans around the world were just discovering his fantastic guitar style, and then suddenly he was gone. Grover Jackson, who had just stepped off a plane himself to visit a girlfriend in Reno, received the news while he was still at the gate. He is quick to admit he was, "Stunned ... and I'm still stunned."
Jackson says he owes a large portion of the success of his company to Randy. In fact, "... a huge amount ... an unbelievable amount is owed to Randy." Today, Jackson manufactures motorcycle, medical and musical instrument parts. Reminiscing about his days with the Jackson/Charvel Guitar Company, he says, "I saw the company as a toolmaker. There were these guys that had a job, which happened to be playing guitar. We were trying to be a toolmaker for guys doing work."
Karl Sandoval in his southern California workshop.
As for Karl Sandoval, hearing of Randy's death is still a fresh memory: "I remember I was in my shop and one of my friends called. He said Randy Rhoads had been killed. I turned the radio on and sure enough, they were talking about it. It was something like how a local rockstar was tragically killed in a plane crash. I was sad and felt bad because he was so young."
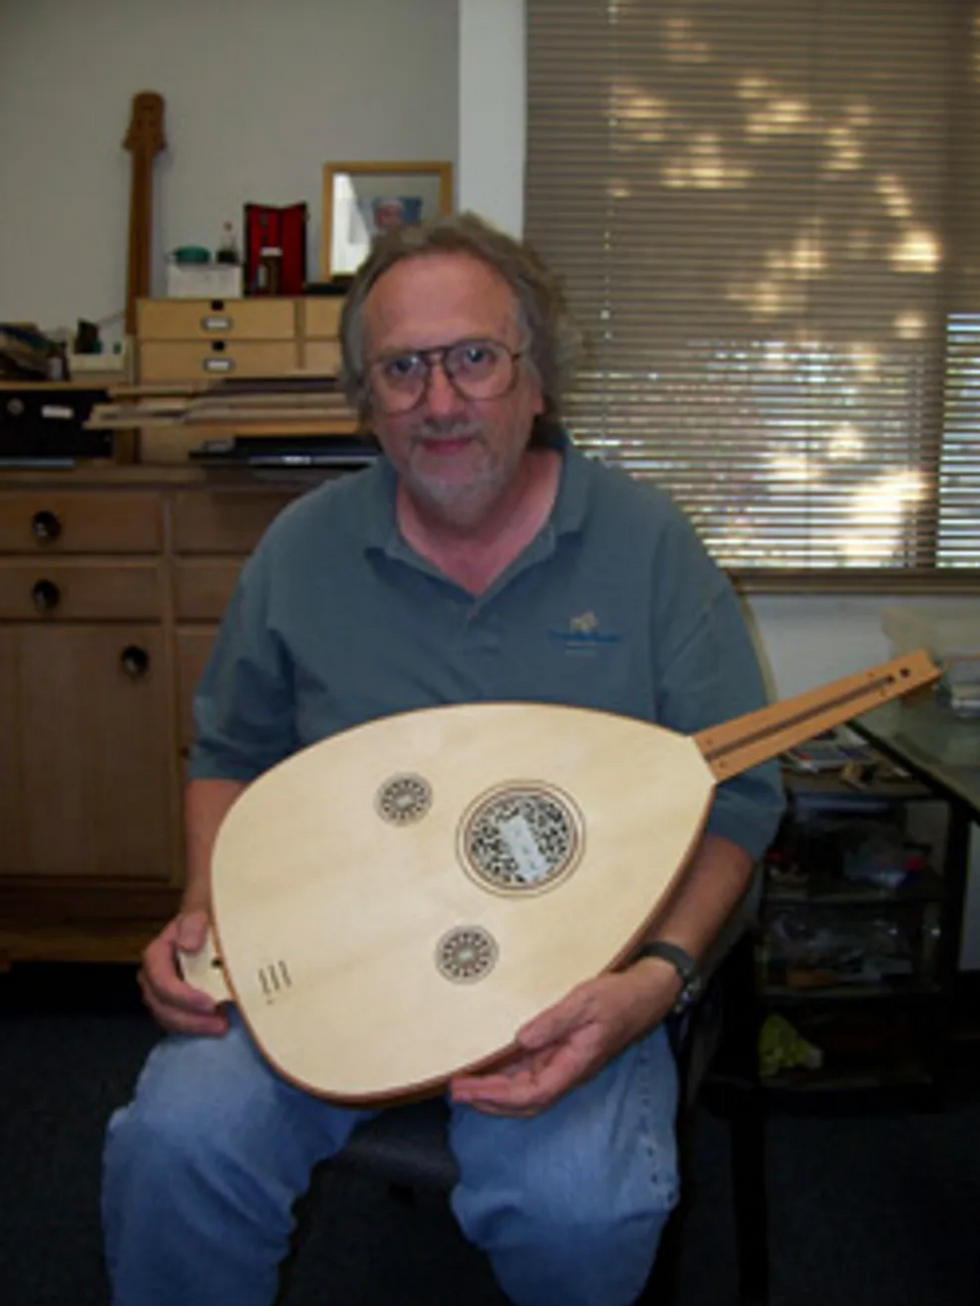
In the years since, Sandoval has expanded his guitar manufacturing business to include a guitar building school in southern California. For more information, visit his website at karlsandoval.com.
The man who did much of the woodwork on the white pinstriped V guitar made for Randy, Tim Wilson, holds the experience in very high regard. He would later become Jackson Guitars' general manager, and he built the company into a major player in the guitar manufacturing game.
Retired and living in southern California, Wilson says in retrospect, "I thought it was just going to be a big hit. I really did, and I really thought we were onto something. If things went our way, we were going to be pretty big. So, I was pretty proud of it, and I'm still proud of it to this day. It's one of the proudest moments of my life, having the honor of working on that guitar."
[Updated 11/4/21]
An easy guide to re-anchoring a loose tuning machine, restoring a ālostā input jack, refinishing dinged frets, and staunching a dinged surface. Result: no repair fees!
Pardon my French, but Iām about to misethe hell out of some en scenein this article about do-it-yourselfĀ guitar repair. Buckle-vous up.
The Guitarist is in the middle of double-tracking a solo. Itās not quite right. Creative juices are flowing, but at any moment, the gate could slam shut. Their social media feed is stagnant, and the algorithm thirsts for content. The studio is 80 bucks an hour. That new boutique fuzz pedal would sound great on this track, surely? It would, of course, as these things are the cure for all problems, but it rests just out of reach.
Desperate for a solution, the Guitarist rests their perfect new guitar against the warm tube ampāonly for a moment ⦠but a horrible amplified bwaang from wood, string, and concreteās violent meeting breaks the temporary silence as gravity muscles potential into the kinetic. The Guitarist breathes a defeated āaw, man,ā like a loosened balloon farting hopelessly across an empty room. The gate closes, juices no longer loose, locked, impenetrable by any transistor-based effect. And itās time to assess the damage.ā
I bet you saw yourself in the opening scene of Twenty-Four-and-Three-Quarter-Inches of Woe, which may be the title of the screenplay I just started to write, most likely due to the fact that youāve made a similarly boneheaded mistake with your instrument.
Unfortunately, my storytelling skills didnāt save a nice new Epiphone Casino from sliding off my amp, meeting the floor, and earning some damage on the way down. Yeah, thatās a true story, and Iām sure something similar has happened to you as well. It can happen to anyone who plays guitar for long enough, but thereās no need for despair yet.
If youāve been victimized by gravity like I have, as long as the damage isnāt major, you can fix a lot of things yourself. Iāll use my felled Casino as an example. It suffered a loosened tuner, an input jack that fell inside the guitar, a damaged fret, and a few dents in the finish. While I work, Iāll provide some suggestions for supplies and tools to keep in your home repair kit, just in case you ever need them.
Tools for the Tasks
We ordered all of the tools we used in these repairs, excluding the painterās tape and the toothpicks, which we picked up during lunch at Jackās Bar-B-Que, from StewMac.
The essentials:
⢠ESP Multi Spanner
⢠Archtop Guitar Helping Hand
⢠Guitar Tech Screwdriver Set
⢠3 Corner Fret Dressing Files
⢠Ultra Thin Master Glue
⢠GluBoost Fill nā Finish
⢠Rectangular Sanding Kit
Canāt Tune It like That
First, letās take care of the loose tuner, since itās currently in no shape to reliably hold string tension. The tumble knocked it sideways, which loosened the screws holding in the key, which caused the wood around the screws to strip. Itās alarming to see, but this is a very simple fix.
Add to Repair Kit: Round toothpicks, water-thin CA glue, glue applicator tips, safety goggles
[Note: For the unfamiliar, CA is short for cyanoacrylate. Itās commonly referred to as āSuper Glue,ā but since that is a brand name, not the generic, Iāll refer to it here as āCA glue.ā]
First, remove the tuner by backing the screws out, then pull the tuner from the headstock. My Casinoās tuning keys use a press-in bushing to hold the post straight in the headstock, so no further disassembly is required. However, if you experience this issue with a guitar with more modern-styled tuning keys, youāll need to use an appropriately sized wrench or socket to remove the screw-in bushing before removing the key.
Next, break a toothpick in half, insert the thicker end into the hole where your mounting screw used to be. Break it off flush with the surface, and repeat the process with the other hole.
Safety goggles on: Itās CA glue time. Trust me, you do not want to squirt this stuff into your eye. Fit an applicator tip to the glue bottle and practice your squeeze on a scrap piece of paper or wood, far away from anything you donāt want glued to your guitar or yourself. This stuff is magicāit will bond things you never intended if you arenāt careful.
All you need is a very small drop, so practice until you can confidently flow out just a small controlled amount. Once youāve mastered that, drop a small amount of water-thin CA glue into each filled hole. It will soak through the toothpick into the surrounding wood just enough for this quick fix. Let it cure for at least 15 minutes, but longer is even better.
Pop the tuner back in and drive the screws straight into the toothpick-filled holes. The screw will compress the toothpick into the existing wood and create new threads strong enough to hold your tuner in place.
Congratulations! You fixed it well enough to at least make it through a session. Iāve done this on several guitars that lasted years with no issues, so you should be confident in your work.
Hit the Road, Jack
Look, thereās no way to sugarcoat this. Fishing an output jack out of a hollowbody guitar is a pain. You can do this. All you need is patience and a few handy gadgets.
Add to Repair Kit: flashlight, multi-spanner, small drywall anchor, āhelping hand,ā small screwdriver
Your first task is to locate the jack inside the guitar. Odds are it didnāt fall far away from where it needs to be, since itās probably wired to one of your control potentiometers. Use your flashlight to shine some light inside the f-hole to help find it.
I found mine wedged against the treble side of the rim, a little farther away than I can reach with my fingers. This is not zesty. I am unhappy but equipped and determined.
The tool I described as a āhelping handā becomes useful here. Itās essentially just a bent hook at the end of a handle made out of pliable heavy wire. Several guitar parts suppliers sell something similar. I got mine from StewMac for a reasonable price, but if you want to be thrifty about it, thereās no reason why you canāt cut and bend a wire coat hanger.
Take a few deep breaths, and working through the f-hole, use the hook end of your helping hand to gently pull the output jack back toward where it was mounted. Bend the helping hand however needed to reach the jack as easily as possible.
I managed to pull the jack back enough to put a small screwdriver through the jackās mounting hole and then through the jack itself. That screwdriver will act as a guide while I lift the jack back into place with the helping hand.
You should expect this will take several attempts. Try not to get frustrated. With enough patience, youāll be able to get the jack back where it belongs. Once you have the jack in place, carefully thread the washer and nut back onto the jack. It shouldnāt take much effort to thread it back on. Just be careful not to cross-thread the nut.
Now that the nut is threaded on enough so it wonāt fall back in, the challenge is to tighten it without twisting the jack itself to avoid breaking any wires. Iāve seen and used a few different methods to accomplish this, but I came across one recently that I really like.
This is where youāll use your drywall anchor. Get one small enough to fit inside the jack without using too much force, then tighten the screw in the anchor so that it spreads to fit tightly inside the jack. This will hold it steady enough to tighten the nut with a multi-spanner tool or an appropriately-sized wrench.
I like a multi-spanner for this job, because itās always the right size and is slim enough to not be clumsy for operations like this. Like the helping hand, lots of suppliers sell something similar using different names. Mine is made by ESP and also arrived in my StewMac tool box. I use it all the time for all sorts of tasks.
Once the nut is tightened, unscrew the drywall anchor, remove it, and test the jack for sound by plugging your guitar into an amp. A positive result should be obvious at this point, but if you donāt hear any signal, or an excessive consistent buzz, get in touch with your local repair tech.
Got a Dent In My Fret, Man
Honestly, face-first is probably the best way a guitar like my Casino could have hit the ground. The damage couldāve been far worse. Check any forum for endless complaints about Gibson/Epiphone headstock breaks. But I do need to address some damage to a fret caused during the fall.
The issue here is that plain steel electric guitar stringsālike your G, B, and E stringsāare considerably harder than most frets (my stainless steel fret contingency, put your hands down and let me finish), so itās possible for a string to leave a small sharp dent in a fret if you hit it with enough force. This specific issue might go unnoticed until itās time to bend a note at that fret, then youāll feel and hear the string catch it. No good.
Before we get started: Having allof your frets carefully levelled, recrowned, and polished is alwaysa better solution than partially levelling just a few frets. But considering the entire premise weāve constructed, which is a situation where we just want the guitar back in action relatively quickly, a partial fret level on the upper frets is perfectly fine as long as itās done carefully.
Add to Repair Kit: Crowning file (three-corner or rounded), assortment of sandpaper (400 grit to 800 should be fine), 0000 extra-fine steel wool (optional), fretboard conditioner, permanent marker.
First thing we need to do is identify which frets need the work. Letās say you have a nick in your 17th fret on the treble side under the B string. The goal is to bring the height of that damaged fret and all the frets past it down until the nick disappears. After that, remove the strings before you begin working.
To accomplish this, mark the damaged frets and all frets past it with a permanent marker. A trusty black Sharpie works great for this, but any darker color works fine. For this repair, we only need to work on the treble side of the frets, so thatās all you need to focus on. Also, use some blue painterās marking tape to protect the area of the guitar near where you will be working. Small slips of a file or sandpaper can cause some nasty injuries to the guitarās surface.
Next, level the damaged fret and all frets past it (moving toward the bridge) with something stiff enough to not flex under pressure. I keep an old credit cardāa nice sturdy oneāwith a bit of 400-grit sandpaper glued to one side along the shorter edge, 800 grit on the other side. Start with the 400 and work your way down, being careful not to use too much pressure. Let the sandpaper do the work.
Youāll notice the ink is removed as you sand. The way to make sure youāre keeping everything level is to stop frequently and observe the new clean areas on top of each fret. Each one should be about the same width.
This will take a while. A 400-grit sandpaper does not remove material quickly, 800 grit even less so. Iām suggesting this technique because working slowly makes it more difficult to get yourself in trouble. Several suppliers sell mini files for spot leveling, but I donāt recommend starting there because they remove fret material pretty aggressively.
Eventually youāll notice the little divot in your 17th fret is almost gone. Nowās time to switch to 800 grit to finish the job. You guessed correctly: This will take even longer, but itāll leave a nice finish without removing any more material than necessary.
Great! Now you have five flat-topped frets. That wonāt sound very good, so now you need to re-crown them, giving them a rounded profile to match the other frets. I like to use a 3-corner file to slowly round over each side of the fret, working from the fretboard up, but if you feel like dropping some serious flow on a specialized crowning file, this job can be a lot easier. Be sure to get the marker back out, ink up each fret, and stop filing when just a tiny sliver of ink is left on top of each fret.
Use a piece of 800 grit paper to remove any file marks and smooth out each fret. If you have finer grits, you could work your way up to 1200 or so, but donāt go too hard or you could undo your work. You just want the frets clean and smooth. At this point, I like the way frets feel after a quick buff with 0000 steel wool, but the mess left behind does rightfully deter a lot of repair techs. If you opt in for this, be sure to tape off your pickups and consider finding a second location for this step.
Work in some fretboard conditioner if you like (skip it if you have a maple or synthetic board; no need for that here), put some new strings on, and check your work. Play every note on these frets, to make sure they ring out without any buzzes. It may not look perfect, but as long as the guitar sounds good, youāre okay until itās time for a full level/crown/polish job.
Not Finished Until Itās, Uh, Finished
Now for the last souvenir from my Casinoās short journey to the floor. I noticed a few spots along the rim of the guitar where the finish was damaged. Specifically, it looks like the guitar hit something with an edge on the way down hard enough to put a couple of jagged dents in it, right along the binding.
Funny, thatās actually what binding is intended forāprotecting edges and corners from damage. Anyway, we need to discuss a few things about guitar finishes.
For the purpose of this article, Iām only going to discuss repairs to the clear coat, since thatās where my damage is. Most guitars now are finished using polyurethane or lacquer for the top clear-coat layer.
Speaking verygenerally, lacquer finishes are softer and less durable, which makes hiding repairs a lot easier if you have the skills and patience. Polyurethane finishes are hard and tough in every way: hard to damage and tough to hide repairs regardless of skills or patience.
I happen to know that my formerly mint-condition Casino has a polyurethane finish, which means Iām going to lower my expectations with this repair. Instead of trying to make it look like it never happened, which will take a lot of work, Iāll just try to keep it from getting worse over time, which will take considerably less work.
It also means I wonāt be discussing how to repair lacquer finishes, which is a bit more in-depth, requires a lot more patience and practice, and is therefore not really recommended for the average DIYāerāat least not in the scope of this piece. So if your guitar has a lacquer finish, I donāt think this part applies. Let someone else take care of it, or maybe skip this part and learn to love your guitar as is. The latter is still an admirable move.
Add to Repair Kit: Nothing! You already have what you need from the previous repairs. Feel good about that.
Since the damage is a pronounced dent with sharp edges in the clear coat, all I really need to do is seal it with an appropriate material. And the material appropriate for repairing polyurethane finishes isāyou guessed itāCA glue, because it dries hard, clear, and quickly, much like polyurethane.
Step one: Use painterās masking tape around the area of the damage, just in case the glue runs when applied. Step two: Put glue on the dented finish. CA glue will fill in all the small cracks within the damage and seal the existing finish. Be careful; use the smallest-drop-possible technique you perfected when fixing the tuning peg, and give it plenty of time to dry.
Thatās it. Thatās all I need to keep the finish from continuing to chip the more I play it. Yes, I saved the easiest one for last, as a little treat.
Obviously, this isnāt a particularly beautiful repair, so I could go above and beyond by using thicker CA glueāfor example, GluBoost Fill nā Finishāto fill it in completely, sand it level, and polish the area back to the original mirror gloss. Dan Erlewine has a few excellent YouTube videos outlining this exact method that are easy to find, and I encourage you to try if youāre so inclined. But for my purposes, this will do.
Accidents will happen if youāre actually playing your guitar, but theyāre no cause for panic when they do. Even though the guitar isnāt perfect anymore, itās perfectly playable, and I can get by with it for now. I broke it, so I fixed it, which is something I hope you feel empowered to do should you break yours.
Next time, Iāll use a good guitar stand.
Growing up in Australia, guitarist Jedd Hughes tells us he dreamed of playing in Vince Gillās band as far back as elementary school. Now, he lives in Nashville and stands next to the man himself on stage night after night. Weāve invited Jedd to join us on this episode of 100 Guitarists to talk about just what makes Vinceās playing so special.
Jedd tells us how his dream came true and how he first started playing with Vince. We dig deep into how everybodyās favorite country guitarist raises the bar every time he picks up the guitar, how he gets his amazing clean tone, and we take time to appreciate all aspects of his solosāincluding how he builds them and how he plays such clean bends. As for why his concerts are so long? āHe loves to play.ā
In our current listening segment, weāre covering the Black Crowes and Jimmy Pageās Live at the Greek box set and a live recording from Burlington, Vermontās Breathwork.
This episode is sponsored by EMG Pickups.
Martin Guitar is celebrating 30 years of collaboration with Eric Clapton with the release of two special anniversary guitarsāthe 000-42EC 30th Anniversary and the 000-EC 30th Anniversary.
Ericās legendary 1992 MTV Unplugged performance sparked a resurgence in acoustic music and inspired the creation of Martinās first Eric Clapton signature model, the 000-42EC, in 1995. Over the past three decades, his partnership with Martin has produced some of the most sought-after signature guitars in the companyās history.
000-42EC 30th Anniversary
Inspired by the 1939 000-42 he played during Unplugged, the 000-42EC 30th Anniversary is limited to just 300 instruments. It features a solid Adirondack spruce top with antique toner and solid Guatemalan rosewood back and sides for rich, vintage-inspired tone. Golden Era-inspired Adirondack spruce X-bracing enhances resonance and projection, while the Authentic 1939 neck shape with a 1 11/16" nut width provides a comfortable, pre-war feel.
Details like Golden Era 42-style snowflake inlays, Waverly open-gear tuners, and a vintage gloss finish complete the look. Each guitar includes a paper label hand-signed by Eric, a printed certificate of authenticity, and a premium embroidered Harptone case with a matching shroud exclusive to this model.
Price: $10,999.
000-EC 30th Anniversary
For players seeking a more understated nod to Ericās sound, the 000-EC 30th Anniversary is available only through March 2026. It features a solid spruce top and solid East Indian rosewood back and sides for a balanced, resonant tone. The same Authentic 1939 neck shape and 1 11/16" nut width provide a comfortable feel, while the herringbone-trimmed top, antique white binding, and Golden Era 42-style snowflake inlays deliver a refined look.
Each 000-EC 30th Anniversary guitar includes a paper label with Ericās pre-printed signature and a certificate of authenticity. It also comes in a premium embroidered case.
Price: $3,999.
Ericās relationship with Martin began in 1995 with the introduction of the original 000-42EC, which sold out almost immediately. The 000-28EC, introduced in 1996, remains one of Martinās best-selling models. Over the years, he and Martin have collaborated on a range of limited editions, most recently a trio of Dreadnoughts released in 2023 to benefit the Crossroads Centre, the addiction recovery center he founded in 1998.
In addition to his signature guitars, Eric also personally endorses Claptonās Choice Signature Stringsāhis go-to acoustic strings for both stage and studio. Designed to resist corrosion and deliver the legendary sound he demands, theyāre available in light and medium gauges.
āIf I could choose what to come back as, it would be a Martin OM-45,ā Eric has said, underscoring his deep connection to Martin guitars and their enduring sound.
Learn more about these guitars and other new Martin guitars, strings, accessories, lifestyle products, and parts at martinguitar.com.
The least exciting piece of your rig can impact your tone in a big way. Hereās what you need to know.
Hello, and welcome back to Mod Garage. This month, we will have a closer look at an often overlooked part of our guitar signal chain: the guitar cable. Weāll work out what really counts and how your cableās tonal imprint differs from your guitarās tone-control function.
Today, the choice of guitar cables is better than itās ever been, and you can choose between countless options regarding color, stability, plug style, length, diameter, bending strength, shielding, etc. A lot of companies offer high-quality cables in any imaginable configuration, and there are also cables promising special advantages for specific instruments or music styles, from rock to blues to jazz.
Appearance, stability, longevity, bending stiffness, and plug configuration are matters of personal preference, and every guitarist has their own philosophy here, which I think is a great thing. While one player likes standard black soft cables with two straight plugs, their buddy prefers red cables that are stiff as hell with two angled plugs, and another friend swears by see-through coiled cables with golden plugs.
āWe often want to come as close as possible to sounding like our personal heroes, but we fail because weāre using the wrong cable for a passive guitar.ā
Regarding reliability, all these parameters are important. Who wants a guitar cable making problems every time you are on stage or in the studio? There are also technical parameters like resistance, capacitance, transfer resistance on the plugs, and more. Without making it too technical, we can summarize that, sound-wise, the only important technical parameter for a passive guitar circuit is the capacitance of the cable. Sadly, this information is often missing in the manufacturerās description of a guitar cable, and thereās another thing we have to keep in mind: Most manufacturers try to offer cables with the smallest possible capacitance so the guitar can be heard āunalteredā and with a āpureā tone. While these are honourable intentions, they are self-defeating when it comes to making a guitar sound right.
Letās take a trip back to the past and see what cables players used. Until the early 1980s, no one really cared about guitar cablesāplayers simply used whatever was available. In the ā60s and ā70s, you could see a lot of ultra-long coiled cables on stage with players like Clapton, Hendrix, May, Townshend, Santana, and Knopfler, to name just a few. They used whatever was available, plugged in, and played without thinking about it. Ritchie Blackmore, for example, was famous for notoriously using incredibly long cables on stage so he could walk around. Joe Walsh and many other famous players did the same. Many of us have these playersā trademark sounds in our heads, and we often want to come as close as possible to sounding like our personal heroes, but we fail because weāre using the wrong cable for a passive guitar. So what are we talking about, technically?
Itās important not to look at the guitar cable, with its electrical parameters, as a stand-alone device. The guitar cable has to be seen as part of the passive signal chain together with the pickups, the resistance of the guitarās pots (usually 250k or 500k), the capacitance of the wires inside the guitar, and, of course, the input impedance of the amp, which is usually 1M. The interaction of all these in a passive system results in the resonance frequency of your pickups. If you change one of the parameters, you are also changing the resonance frequency.
āRitchie Blackmore, for example, was famous for notoriously using incredibly long cables on stage so he could walk around.ā
You all know the basic formulation: The longer the cable, the warmer the tone, with āwarmerā meaning less high-end frequencies. While this is true, in a few moments you will see that this is only half the truth. Modern guitar cables are sporting a capacitance of around 100 pF each meter, which is very low and allows for long cable runs without killing all the top end. Some ultra-low-capacitance cables even measure down to only 60 pF each meter or less.
Now letās have a look at guitar cables of the past. Here, capacitances of up to 400 pF or more each meter were the standard, especially on the famous coiled cables. See the difference? No wonder itās hard to nail an old-school sound from the past, or that sometimes guitars sound too trebly (especially Telecasters), with our modern guitar cables. This logic only applies to our standard passive guitar circuits, like those in our Strats, Teles, Les Pauls, SGs, and most other iconic guitar models. Active guitars are a completely different ballpark. With a guitar cable, you can fine-tune your tone, and tame a shrill-sounding guitar.
āNo problem,ā some will say. āI simply use my passive tone control to compensate, and thatās it. Come on, capacitance is capacitance!ā While this logic seems solid, in reality this reaction produces a different tone. āWhy is this?ā you will ask. Thankfully, itās simple to explain. You might be familiar with the typical diagrams showing a coordinate system with "Gain/dB" on the Y-axis and "Frequency/kHz" on the X-axis. Additional cable capacitance will shift the resonance frequency on the X-axis, with possible differences of more than one octave depending on the cable. A cable with a higher capacitance will shift the resonance frequency towards the left and vice versa.
Diagram courtesy Professor Manfred Zollner (https://www.gitarrenphysik.de)
Now letās see what happens if you use your standard passive tone control. If you close the tone control, the resonance frequency will be shifted downwards mostly on the Y-axis, losing the resonance peak, which means the high frequencies are gone. This is a completely different effect compared to the additional cable capacitance.
Diagram courtesy Professor Manfred Zollner (https://www.gitarrenphysik.de)
To summarize, we can say that with different cable capacitances, you can mimic a lot of different pickups by simply shifting the resonance frequency on the X-axis. This is something our passive tone control canāt do, and thatās exactly the difference you will have to keep in mind.
So, letās see what can be done and where you can add additional cable capacitance to your system to simulate longer guitar cables.
1. On the cable itself
2. Inside the guitar
3. Externally
In next monthās follow-up to this column, we will talk about different capacitances and how you can add them to your signal chain with some easy-to-moderate modding, so stay tuned!
Until then ... keep on modding!