Get custom-shop options on a bargain budget by making it yourself.
After playing and collecting pedals for a while, many players decide that off-the-shelf pedalboards don't quite offer all of the options they'd prefer for organizing and getting the most out of their stompboxes. Some of us want little more than a platform with space for our effects and a power supply, while others are at the opposite end of the spectrum and can't live without various jacks and specialized connections being built right into the pedalboard.
For this DIY piece, I wanted to solve the problem I'm facing: I have a growing pedal collection, but after using some of the pre-assembled products on the market for a while I decided they weren't quite cutting it. I wanted something closer to a custom pedalboard—minus the elevated price tag. After scoping out the range of custom options offered by various companies, I decided to make something with all the features I wanted. It's a bit more involved than duct-taping everything to an IKEA shelf, but it's definitely not as involved as some of the space-age control centers on the market. I was careful to keep costs as low as possible, though. in fact, I was able to keep the price around $100.
Tools & Supplies
- Appropriate lengths of 1/2" oak and 3/4" cabinet-grade birch
- Table Saw (with taper angle attachment and 80-tooth blade)
- Mitre Saw
- Router (with 1/2" straight bit)
- Medium-sized Phillips screwdriver (or similar-sized bit for a power drill)
- (6) 1/2" self-tapping wood screws (1/8" diameter with fine threads)
- (24) 1" self-tapping wood screws (1/8" diameter with fi ne threads)
- (10) 1 1/4" self-tapping wood screws (1/8" diameter with fi ne threads)
- Kreg Jig
- Marinco 5278BL power inlet
- (2) solderless Neutrik conenctors
- 7/8" hole saw
- 1 3/4" hole saw
- Power drill
- 1/8" drill bit
- Wire strippers
- Electrical tape
- IEC power cord
- 2" industrial-strength Velcro
- 220-grit sandpaper
A couple of notes about things we're not covering here: I won't go into the theory of wiring up your board (effect order, switching options, etc.)—that's a whole other topic. Here we're covering the basics of getting a signal and power to and from your board. Also, though most players need a pedalboard case because they drag their boards all over the place, we'll refer you to the fine folks at blackbirdpedalboards.com, stompin-ground. com, nycpedalboards.com and other outlets with a multitude of sizes, options, and materials for you to choose from once you've decided on the final size and shape of your board.
All right—let's get to it!
Step 1
Lay out your pedals on the floor in ideal performing position and use a tape measure to determine what size of board will fit them. I decided on 24" x 16". I wanted my board to have an angled surface so I can comfortably reach two rows of pedals, so we'll also make the surface angle from 4" high in back down to 1 1/2" high along the front edge. This will also let me mount a power supply underneath.
Step 2
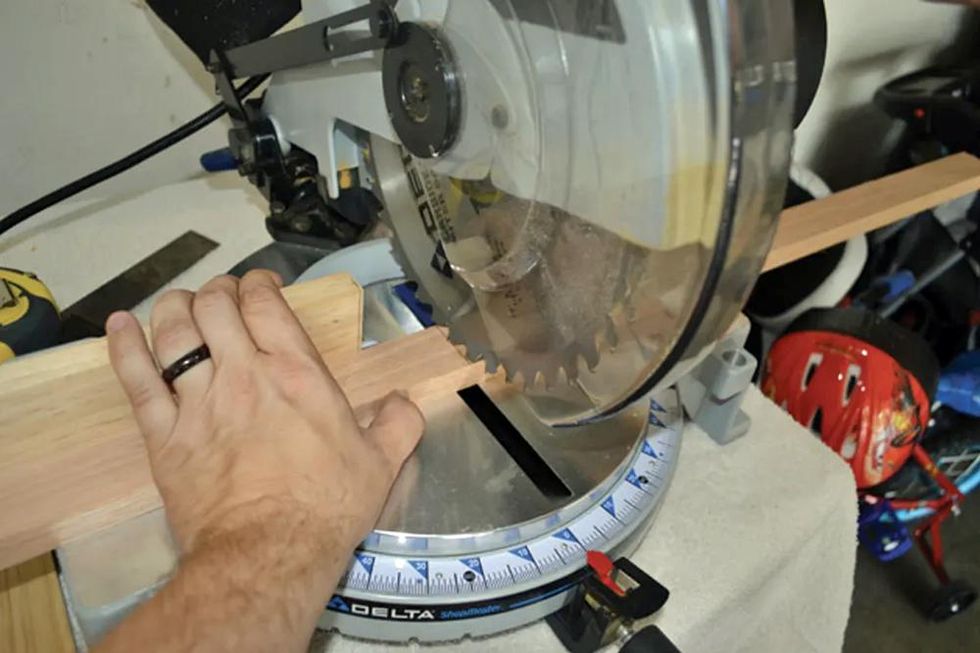
Next, we need a basic frame. I used a miter saw to cut the four sides to the appropriate lengths. I chose 1/2" oak for the sides, and 3/4" cabinet-grade birch for the top.
Step 3
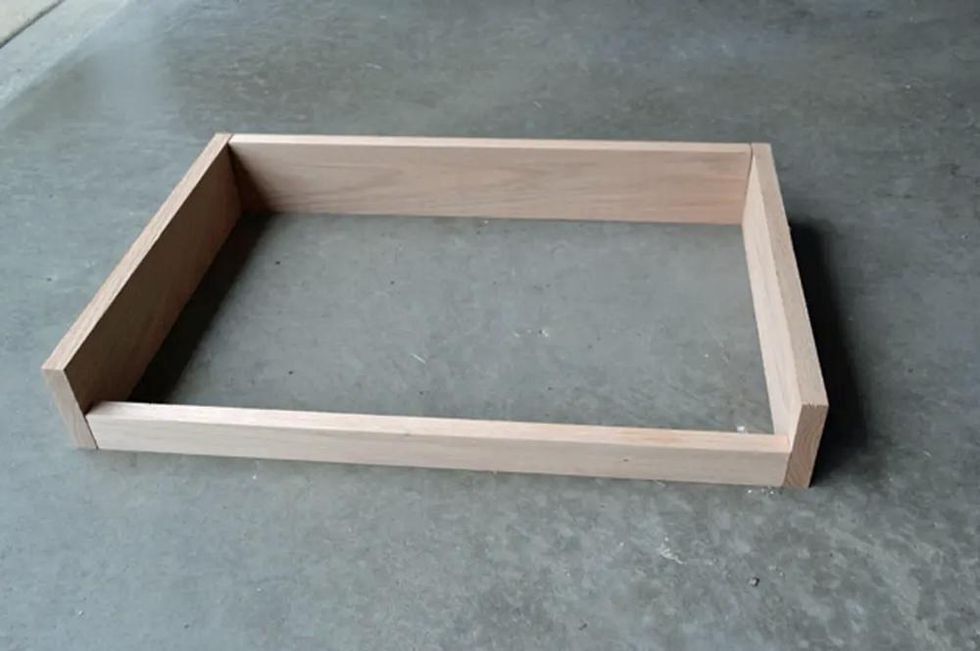
I determined that a 7-degree cut on each of the pedalboard's side pieces would provide the optimum surface incline.
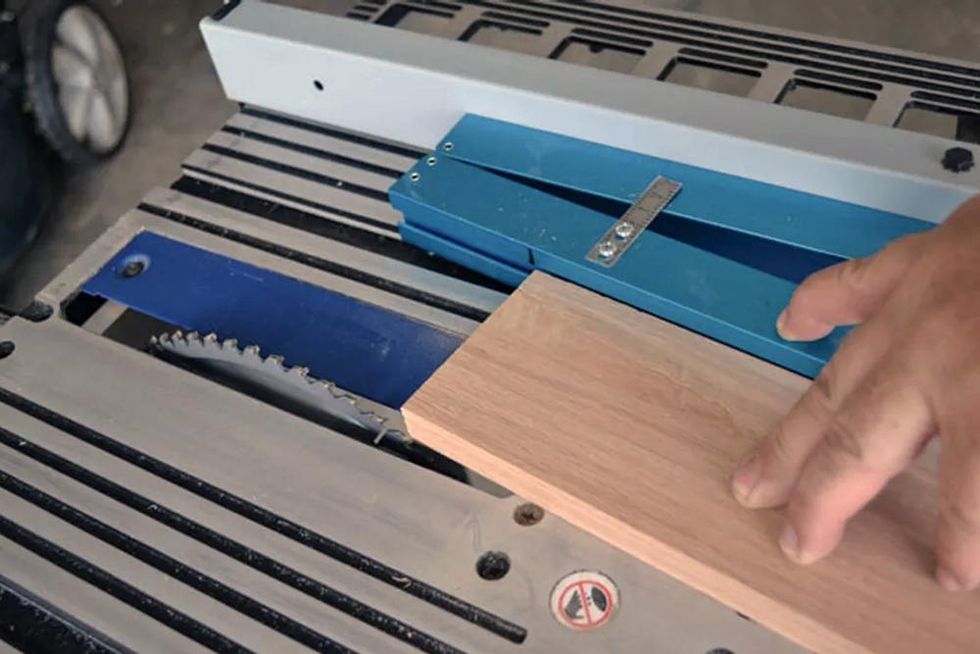
To cut the sides flat and even so they'd make complete contact with the underside of the top, I used a table saw and the blue taper-angle attachment in the top portion of this photo. A blade with a higher number of teeth reduces the chance of rough or damaged edges, so I used an 80-tooth blade.
Step 4
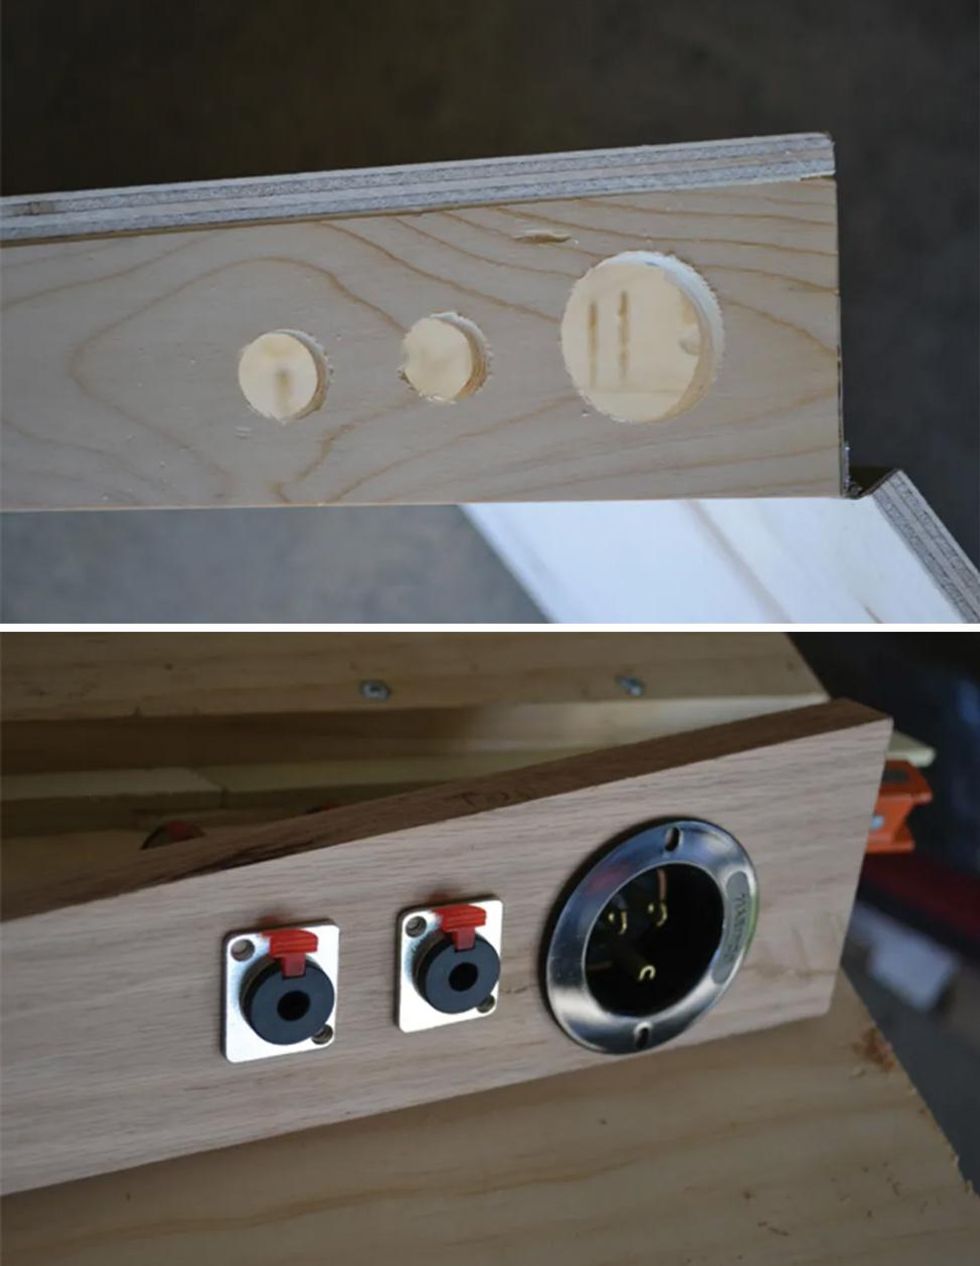
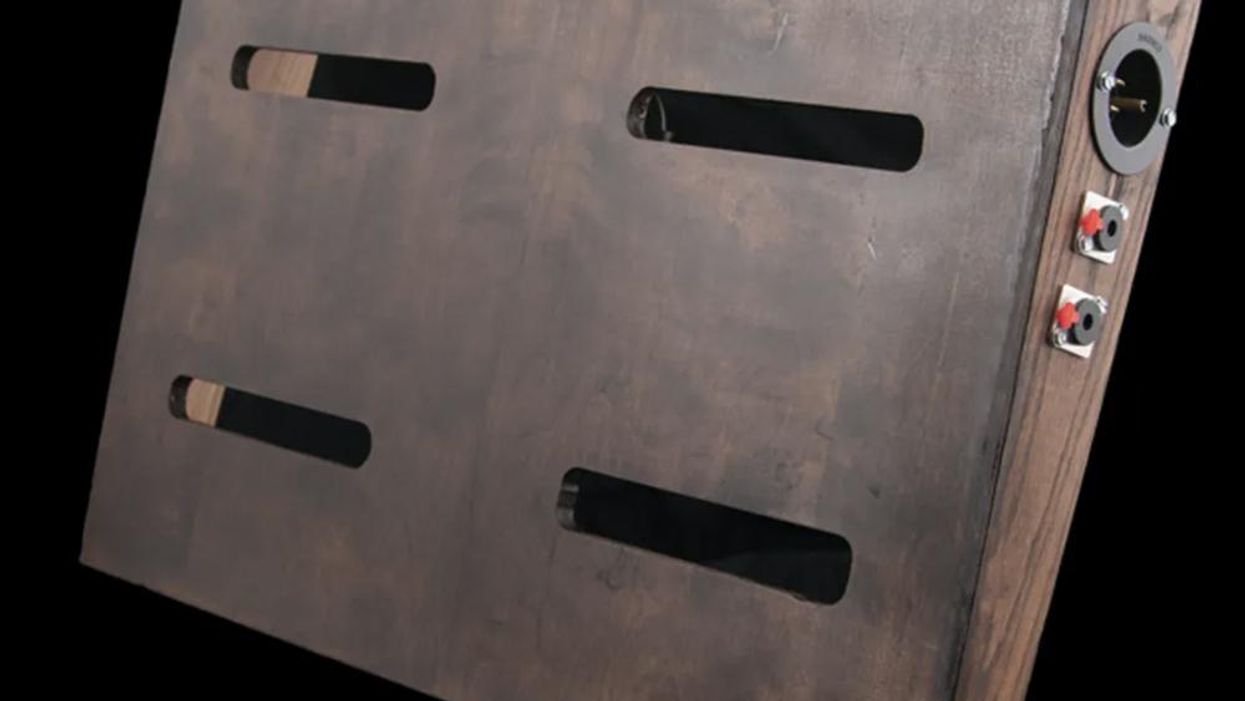
I cut the holes for the power inlet and neutrik connectors in the board's right side piece. I used a 7/8" hole saw for the smaller holes, and a 1 3/8" hole saw for the larger one. If you prefer adding more jacks for, say, an effects loop or a parallel acoustic setup, add the appropriate number of connectors using the same tools.
Step 5
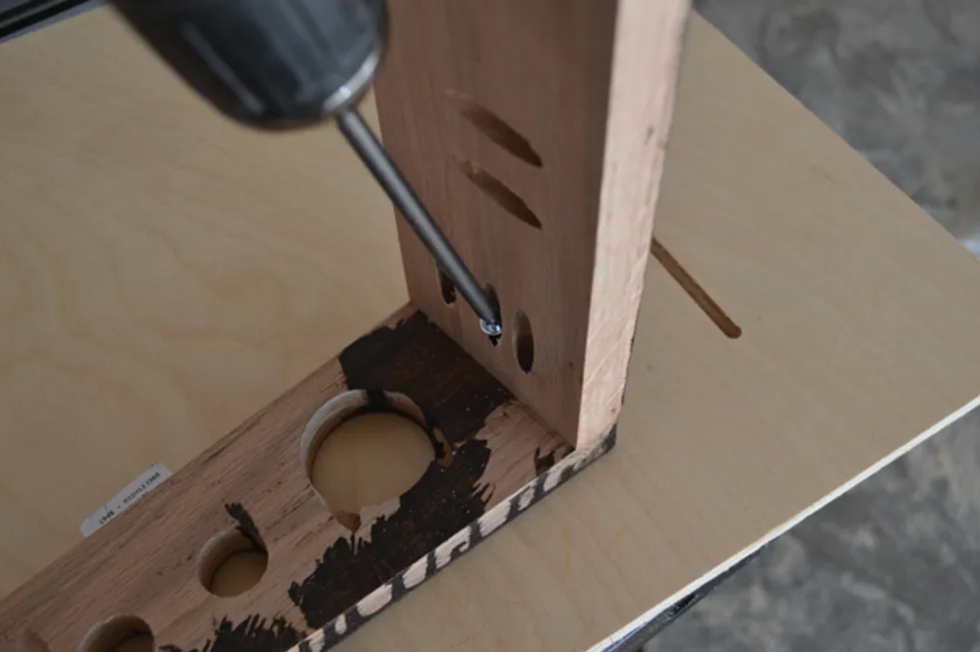
To assemble the frame, we need holes for the screws. I used a kreg jig to pre-drill all the holes with a 3/8" drill bit. for a secure fit, I used two 1 1/4" screws for the front two edges, and three for each of the back corners. be sure to use fine-threaded screws, which prevent splintering and hold things together much tighter. While you're tightening the screws, make sure everything is square and level so it won't rock back and forth during use—the last thing you need to worry about while performing is whether you're stomping too hard.
Step 6
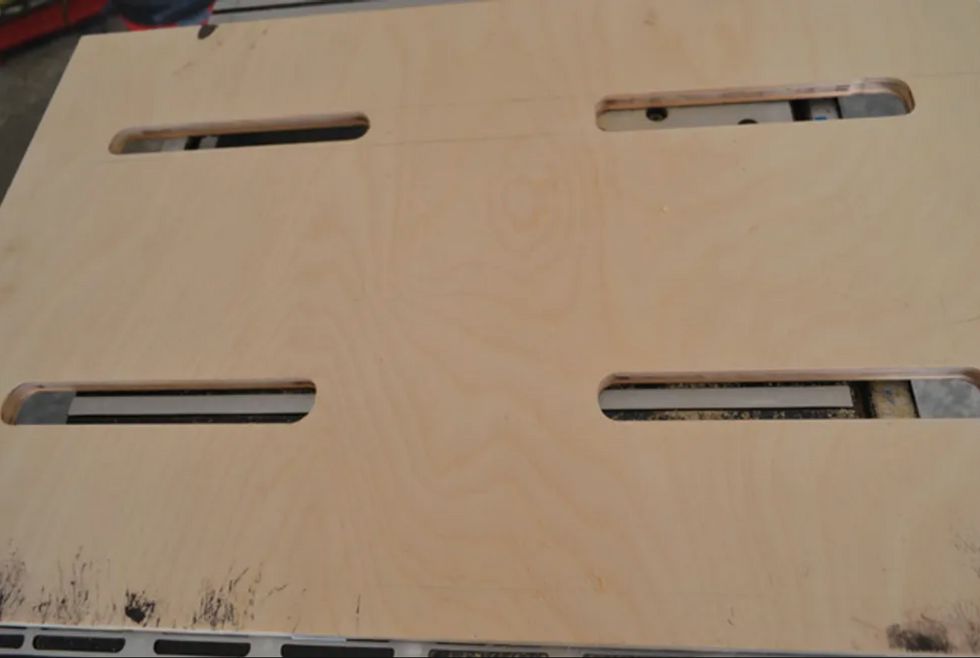
In order for the signal and power cables to pass efficiently throughout the board, I opted for a slotted pattern on the top piece. I used a 1/2" straight bit in my router to cut each channel. Each slot was 7" long, and I left 6" of wood between each pair. Be careful about placing the slots too close together—it can weaken the top of the pedalboard.
Step 7
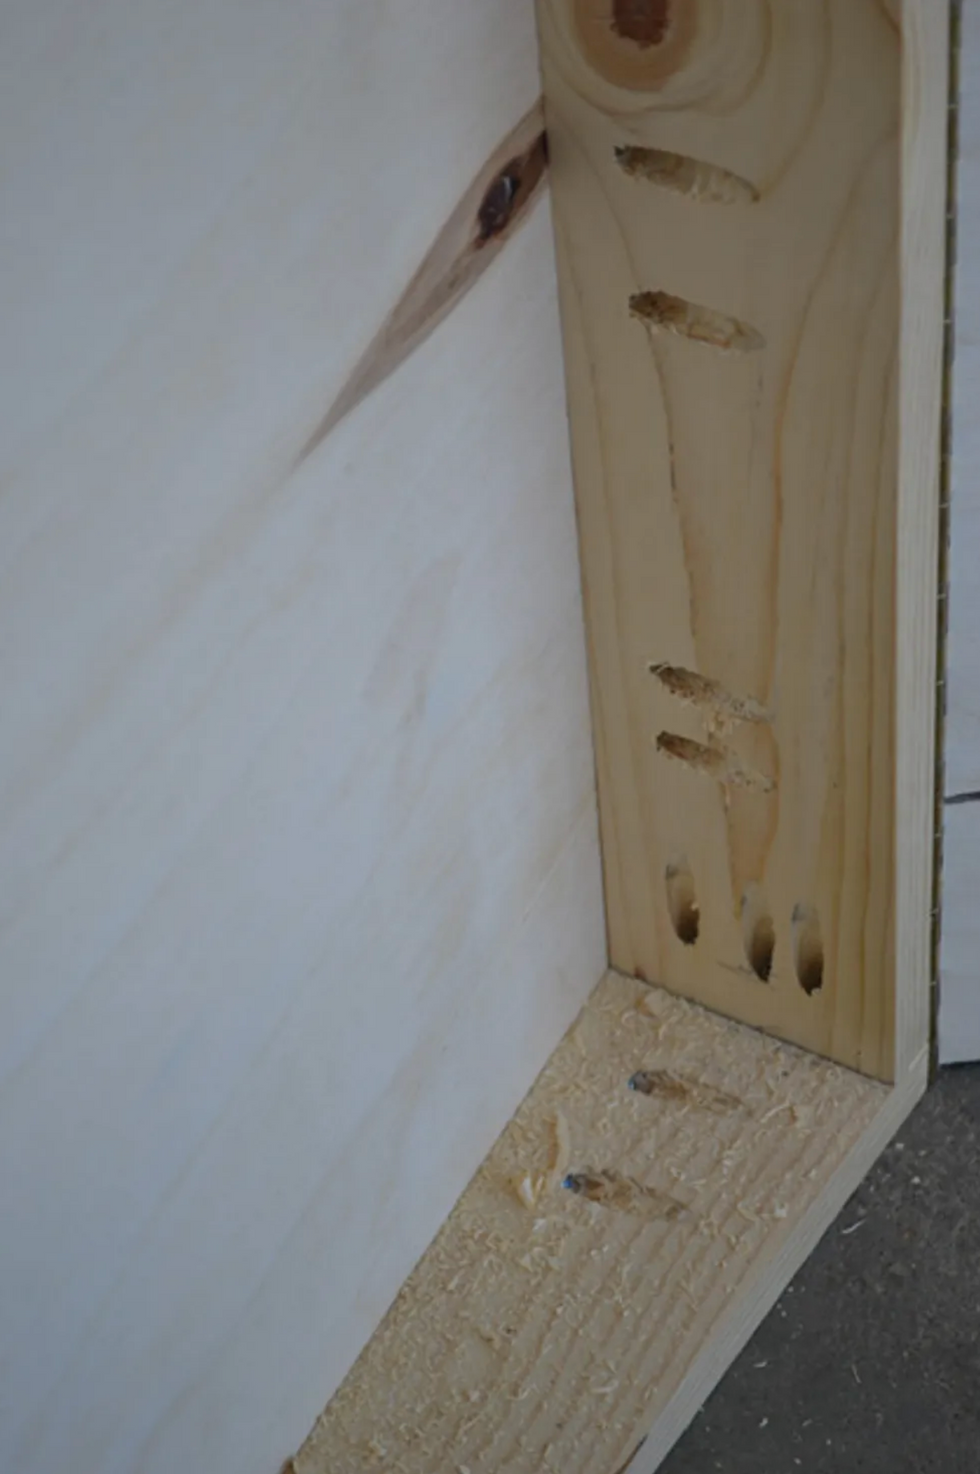
To attach the top piece, I used the Kreg jig and a 3/8" drill bit to pre-drill three pairs of holes along each surface. I spaced them 7" apart along the front and back, and 3" apart along the sides. The top of my board is 1/2" thick, so I used 1" wood screws that wouldn't puncture the top surface. Using screws rather than glue makes it so I can easily remove the top if I ever want to replace or repair anything.
Step 8
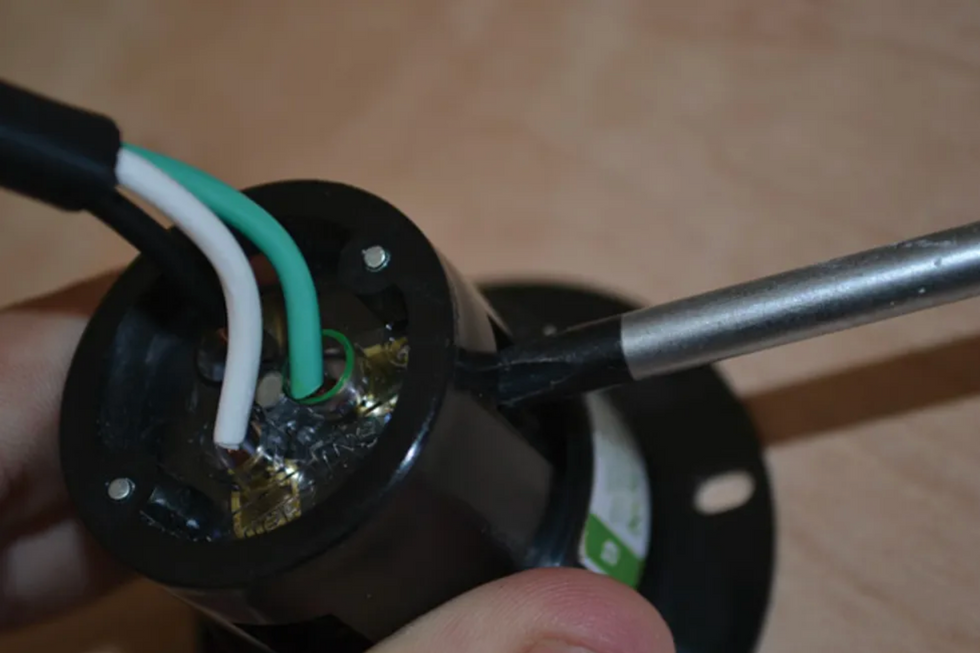
Now it's time to wire up the hardware connectors. I didn't want to risk a bad connection with the power jack, so I used a Marinco 5278BL flanged inlet, which lets you connect wires with screws rather than solder. (You can find this part, as well as the solderless connectors, at pedalboardshop.com.)
To begin, snip the male end from a regular IEC power cord. Inside you'll see three wires with black, green, and white insulation. Strip about 1/2" of the insulation from each wire, then match the wires with the corresponding inlet connectors. Finally, tighten each screw and wrap any exposed wire with electrical tape.
Step 9
Before attaching the hardware, apply whatever finish you prefer. I used a dark polyurethane stain. Don't be afraid to do a few coats to achieve the desired hue, just make sure you wipe the board thoroughly between each one. After the stain has dried, be sure to sand the top surface of your board so that whatever you use to attach the pedals—be it Velcro or a specialized product like Godlyke's Power-grip—has a nice surface to bond to.
Step 10
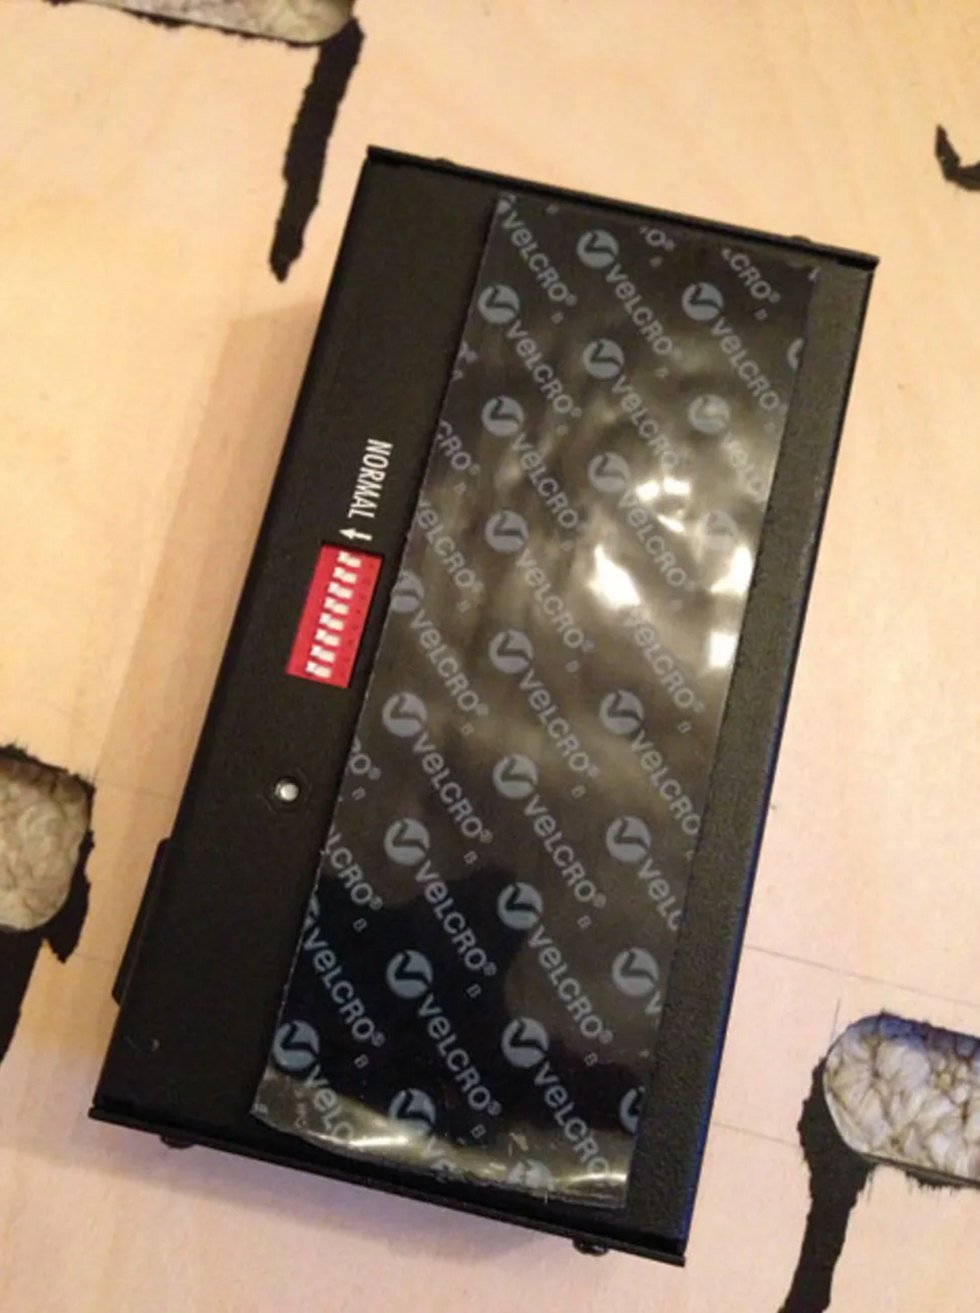
To facilitate a power supply upgrade or replacement in the future, I used a 2" strip of industrial-strength Velcro to attach the power supply to the underside of the top piece.
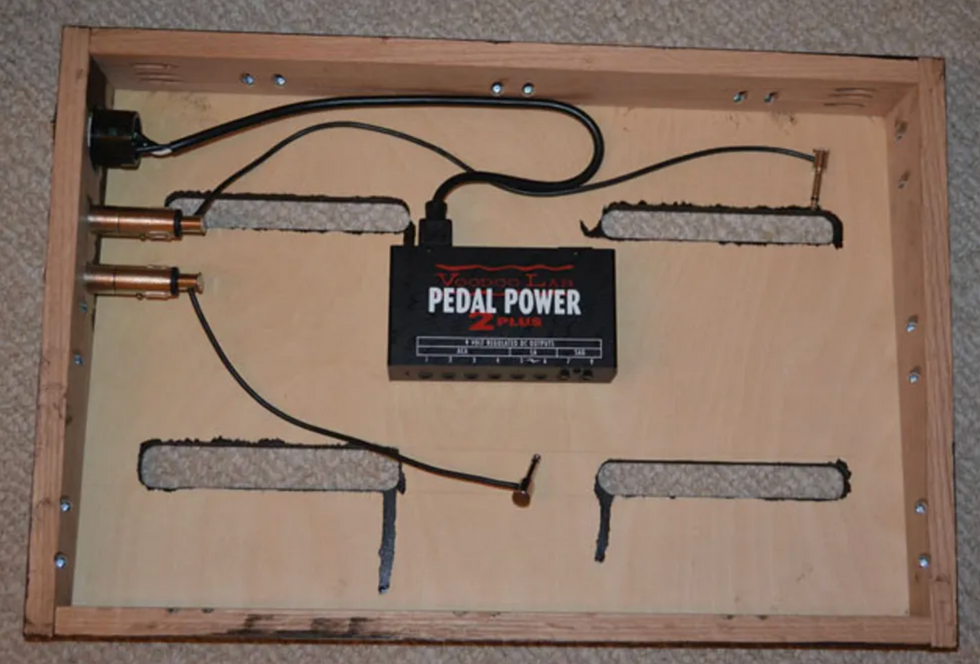
Mount the power supply and install the wired inlet and solderless connectors with 1/2" wood screws.
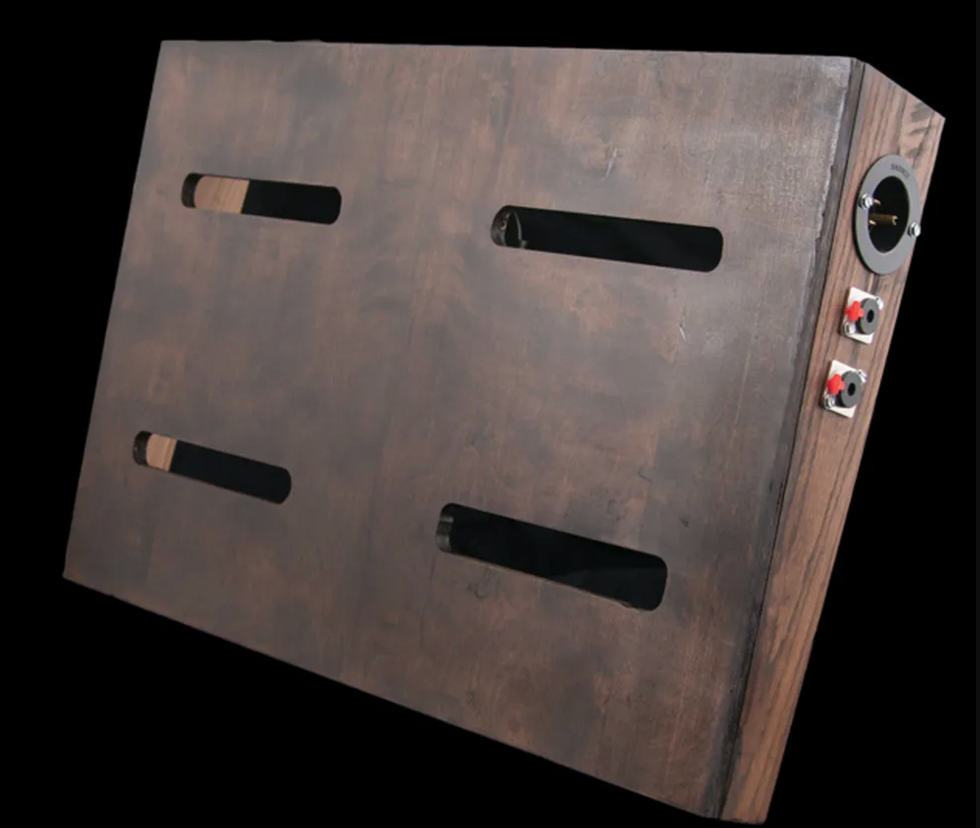
Use fine-grit (at least 220) sandpaper to sand the surface nice and smooth so the Velcro adheres sufficiently.
That's it! Once you've attached your pedals and wired up your power and signal cables, you're ready to plug in and go—enjoy!
Special thanks to Mason Marangella from Vertex Effects, David Quinones from Blackbird Pedalboards, Luke Summers from Agape Custom Shop, and Michael Helweg from Helweg Pedalboards.
[Updated 7/27/21]
- How to Build a Flight-Friendly Pedalboard - Premier Guitar ›
- DIY: How to Make a 9V Power Supply Out of a Drill Battery - Premier ... ›
- 10 DIY Patch Kits to Streamline Your Board - Premier Guitar ›
- Powering Your Board - Premier Guitar ›
- The Stompbox-Builder’s Secret Weapon - Premier Guitar ›
- DIY: How to Make a 9V Power Supply Out of a Drill Battery - Premier Guitar ›
- Reader Pedalboards 2022, Part 1 - Premier Guitar ›
- Tools for the Task: Pedalboard Power Supplies - Premier Guitar ›
- Learn How to Swap Diodes to Improve Your Overdrive - Premier Guitar ›
- DIY: How to Level, Crown & Dress Guitar Frets - Premier Guitar ›
- DIY 101: How to Build a Delay Pedal Kit - Premier Guitar ›
- Discover the Power of J. Rockett Archer Select: Review - Premier Guitar ›
- Way Huge Stone Burner Fuzz Pedal Review ›
- EarthQuaker Devices Zoar Dynamic Audio Grinder Review ›
- Are Pedals Necessary for True Guitar Freedom? ›
- JAM Pedals Harmonious Monk mk.2 Review ›
- Reader Pedalboards 2024: Fuzzy to Checkered Guitar Pedals ›
- EHX Pico Attack Decay, Oceans 3-Verb, Canyon, Deep Freeze ›
- Beetronics Nectar Guitar Pedal Review ›
- Want to Build Pedals? Here's the Ultimate Kit Roundup ›
- Mojo Hand FX Stylus Modulation Pedal ›
- Death By Audio Octave Clang V2 Review ›
- MXR Layers Review: Unleash Your Sonic Creativity - Premier Guitar ›
We’re giving away pedals all month long! Enter Stompboxtober Day 11 for your chance to win today’s pedal from Hotone Audio!
Hotone Wong Press
Cory Wong Signature Volume/Wah/Expression Pedal
Renowned international funk guitar maestro and 63rd Grammy nominee Cory Wong is celebrated for his unique playing style and unmistakable crisp tone. Known for his expressive technique, he’s been acclaimed across the globe by all audiences for his unique blend of energy and soul. In 2022, Cory discovered the multi-functional Soul Press II pedal from Hotone and instantly fell in love. Since then, it has become his go-to pedal for live performances.
Now, two years later, the Hotone team has meticulously crafted the Wong Press, a pedal tailored specifically for Cory Wong. Building on the multi-functional design philosophy of the Soul Press series, this new pedal includes Cory’s custom requests: a signature blue and white color scheme, a customized volume pedal curve, an adjustable wah Q value range, and travel lights that indicate both pedal position and working mode.
Cory’s near-perfect pursuit of tone and pedal feel presented a significant challenge for our development team. After countless adjustments to the Q value range, Hotone engineers achieved the precise WAH tone Cory desired while minimizing the risk of accidental Q value changes affecting the sound. Additionally, based on Cory’s feedback, the volume control was fine-tuned for a smoother, more musical transition, enhancing the overall feel of volume swells. The team also upgraded the iconic travel lights of the Soul Press II to dual-color travel lights—blue for Wah mode and green for Volume mode—making live performances more intuitive and visually striking!
In line with the Hotone Design Inspiration philosophy, the Wong Press represents the perfect blend of design and inspiration. Now, musicians can channel their inner Cory Wong and enjoy the freedom and joy of playing with the Wong Press!
A more affordable path to satisfying your 1176 lust.
An affordable alternative to Cali76 and 1176 comps that sounds brilliant. Effective, satisfying controls.
Big!
$269
Warm Audio Pedal76
warmaudio.com
Though compressors are often used to add excitement to flat tones, pedal compressors for guitar are often … boring. Not so theWarm Audio Pedal76. The FET-driven, CineMag transformer-equipped Pedal76 is fun to look at, fun to operate, and fun to experiment with. Well, maybe it’s not fun fitting it on a pedalboard—at a little less than 6.5” wide and about 3.25” tall, it’s big. But its potential to enliven your guitar sounds is also pretty huge.
Warm Audio already builds a very authentic and inexpensive clone of the Urei 1176, theWA76. But the font used for the model’s name, its control layout, and its dimensions all suggest a clone of Origin Effects’ much-admired first-generation Cali76, which makes this a sort of clone of an homage. Much of the 1176’s essence is retained in that evolution, however. The Pedal76 also approximates the 1176’s operational feel. The generous control spacing and the satisfying resistance in the knobs means fast, precise adjustments, which, in turn, invite fine-tuning and experimentation.
Well-worn 1176 formulas deliver very satisfying results from the Pedal76. The 10–2–4 recipe (the numbers correspond to compression ratio and “clock” positions on the ratio, attack, and release controls, respectively) illuminates lifeless tones—adding body without flab, and an effervescent, sparkly color that preserves dynamics and overtones. Less subtle compression tricks sound fantastic, too. Drive from aggressive input levels is growling and thick but retains brightness and nuance. Heavy-duty compression ratios combined with fast attack and slow release times lend otherworldly sustain to jangly parts. Impractically large? Maybe. But I’d happily consider bumping the rest of my gain devices for the Pedal76.
Check out our demo of the Reverend Vernon Reid Totem Series Shaman Model! John Bohlinger walks you through the guitar's standout features, tones, and signature style.
Reverend Vernon Reid Totem Series Electric Guitar - Shaman
Vernon Reid Totem Series, ShamanWith three voices, tap tempo, and six presets, EQD’s newest echo is an affordable, approachable master of utility.
A highly desirable combination of features and quality at a very fair price. Nice distinctions among delay voices. Controls are clear, easy to use, and can be effectively manipulated on the fly.
Analog voices may lack complexity to some ears.
$149
EarthQuaker Silos
earthquakerdevices.com
There is something satisfying, even comforting, about encountering a product of any kind that is greater than the sum of its parts—things that embody a convergence of good design decisions, solid engineering, and empathy for users that considers their budgets and real-world needs. You feel some of that spirit inEarthQuaker’s new Silos digital delay. It’s easy to use, its tone variations are practical and can provoke very different creative reactions, and at $149 it’s very inexpensive, particularly when you consider its utility.
Silos features six presets, tap tempo, one full second of delay time, and three voices—two of which are styled after bucket-brigade and tape-delay sounds. In the $150 price category, it’s not unusual for a digital delay to leave some number of those functions out. And spending the same money on a true-analog alternative usually means warm, enveloping sounds but limited functionality and delay time. Silos, improbably perhaps, offers a very elegant solution to this can’t-have-it-all dilemma in a U.S.-made effect.
A More Complete Cobbling Together
Silos’ utility is bolstered by a very unintimidating control set, which is streamlined and approachable. Three of those controls are dedicated to the same mix, time, and repeats controls you see on any delay. But saving a preset to one of the six spots on the rotary preset dial is as easy as holding the green/red illuminated button just below the mix and preset knobs. And you certainly won’t get lost in the weeds if you move to the 3-position toggle, which switches between a clear “digital” voice, darker “analog” voice, and a “tape” voice which is darker still.
“The three voices offer discernibly different response to gain devices.”
One might suspect that a tone control for the repeats offers similar functionality as the voice toggle switch. But while it’s true that the most obvious audible differences between digital, BBD, and tape delays are apparent in the relative fidelity and darkness of their echoes, the Silos’ three voices behave differently in ways that are more complex than lighter or duskier tonality. For instance, the digital voice will never exhibit runaway oscillation, even at maximum mix and repeat settings. Instead, repeats fade out after about six seconds (at the fastest time settings) or create sleepy layers of slow-decaying repeats that enhance detail in complex, sprawling, loop-like melodic phrases. The analog voice and tape voice, on the other hand, will happily feed back to psychotic extremes. Both also offer satisfying sensitivity to real-time, on-the-fly adjustments. For example, I was tickled with how I could generate Apocalypse Now helicopter-chop effects and fade them in and out of prominence as if they were approaching or receding in proximity—an effect made easier still if you assign an expression pedal to the mix control. This kind of interactivity is what makes analog machines like the Echoplex, Space Echo, and Memory Man transcend mere delay status, and the sensitivity and just-right resistance make the process of manipulating repeats endlessly engaging.
Doesn't Flinch at Filth
EarthQuaker makes a point of highlighting the Silos’ affinity for dirty and distorted sounds. I did not notice that it behaved light-years better than other delays in this regard. But the three voices most definitely offer discernibly different responses to gain devices. The super-clear first repeat in the digital mode lends clarity and melodic focus, even to hectic, unpredictable, fractured fuzzes. The analog voice, which EQD says is inspired by the tone makeup of a 1980s-vintage, Japan-made KMD bucket brigade echo, handles fuzz forgivingly inasmuch as its repeats fade warmly and evenly, but the strong midrange also keeps many overtones present as the echoes fade. The tape voice, which uses aMaestro Echoplex as its sonic inspiration, is distinctly dirtier and creates more nebulous undercurrents in the repeats. If you want to retain clarity in more melodic settings, it will create a warm glow around repeats at conservative levels. Push it, and it will summon thick, sometimes droning haze that makes a great backdrop for slower, simpler, and hooky psychedelic riffs.
In clean applications, this decay and tone profile lend the tape setting a spooky, foggy aura that suggests the cold vastness of outer space. The analog voice often displays an authentic BBD clickiness in clean repeats that’s sweet for underscoring rhythmic patterns, while the digital voice’s pronounced regularity adds a clockwork quality that supports more up-tempo, driving, electronic rhythms.
The Verdict
Silos’ combination of features seems like a very obvious and appealing one. But bringing it all together at just less than 150 bucks represents a smart, adept threading of the cost/feature needle.