
An easy guide to re-anchoring a loose tuning machine, restoring a “lost” input jack, refinishing dinged frets, and staunching a dinged surface. Result: no repair fees!
Pardon my French, but I’m about to misethe hell out of some en scenein this article about do-it-yourself guitar repair. Buckle-vous up.
The Guitarist is in the middle of double-tracking a solo. It’s not quite right. Creative juices are flowing, but at any moment, the gate could slam shut. Their social media feed is stagnant, and the algorithm thirsts for content. The studio is 80 bucks an hour. That new boutique fuzz pedal would sound great on this track, surely? It would, of course, as these things are the cure for all problems, but it rests just out of reach.
Desperate for a solution, the Guitarist rests their perfect new guitar against the warm tube amp–only for a moment … but a horrible amplified bwaang from wood, string, and concrete’s violent meeting breaks the temporary silence as gravity muscles potential into the kinetic. The Guitarist breathes a defeated “aw, man,” like a loosened balloon farting hopelessly across an empty room. The gate closes, juices no longer loose, locked, impenetrable by any transistor-based effect. And it’s time to assess the damage.”
Thanks to StewMac and Epiphone for providing the gear for this project!
4 Minor Guitar Repairs Anyone Can Do Without a Tech | DIY
I bet you saw yourself in the opening scene of Twenty-Four-and-Three-Quarter-Inches of Woe, which may be the title of the screenplay I just started to write, most likely due to the fact that you’ve made a similarly boneheaded mistake with your instrument.
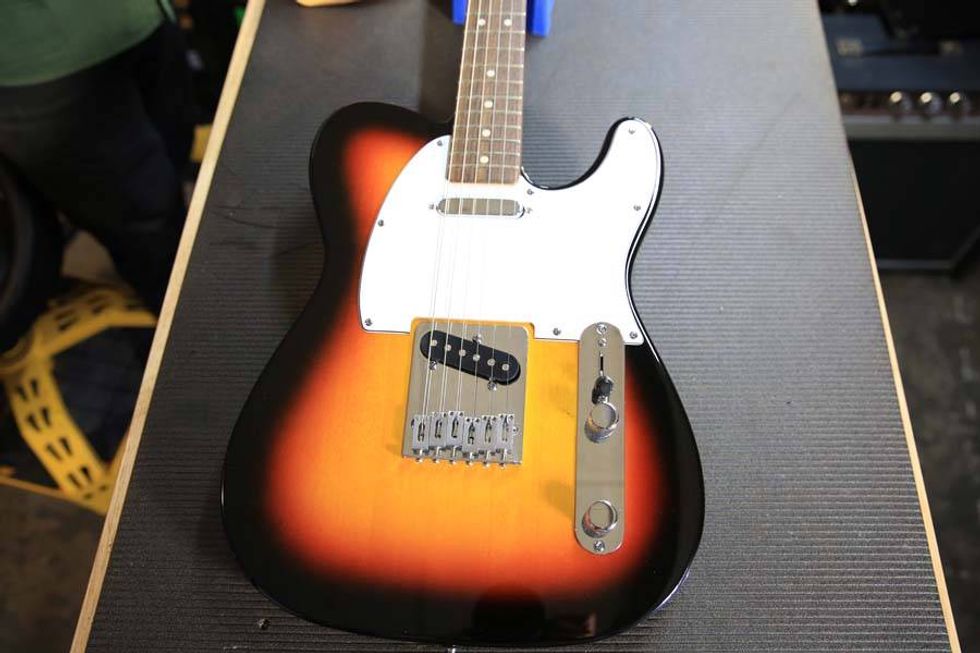
Unfortunately, my storytelling skills didn’t save a nice new Epiphone Casino from sliding off my amp, meeting the floor, and earning some damage on the way down. Yeah, that’s a true story, and I’m sure something similar has happened to you as well. It can happen to anyone who plays guitar for long enough, but there’s no need for despair yet.
If you’ve been victimized by gravity like I have, as long as the damage isn’t major, you can fix a lot of things yourself. I’ll use my felled Casino as an example. It suffered a loosened tuner, an input jack that fell inside the guitar, a damaged fret, and a few dents in the finish. While I work, I’ll provide some suggestions for supplies and tools to keep in your home repair kit, just in case you ever need them.
Tools for the Tasks
We ordered all of the tools we used in these repairs, excluding the painter’s tape and the toothpicks, which we picked up during lunch at Jack’s Bar-B-Que, from StewMac.
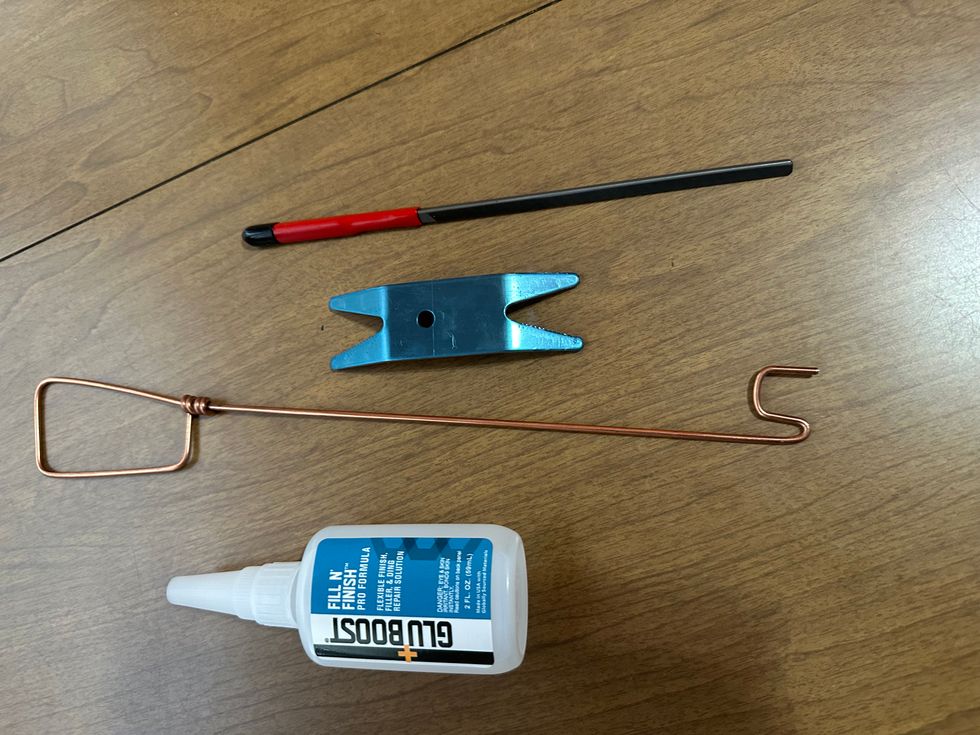
The essentials:
• ESP Multi Spanner
• Archtop Guitar Helping Hand
• Guitar Tech Screwdriver Set
• 3 Corner Fret Dressing Files
• Ultra Thin Master Glue
• GluBoost Fill n’ Finish
• Rectangular Sanding Kit
Can’t Tune It like That
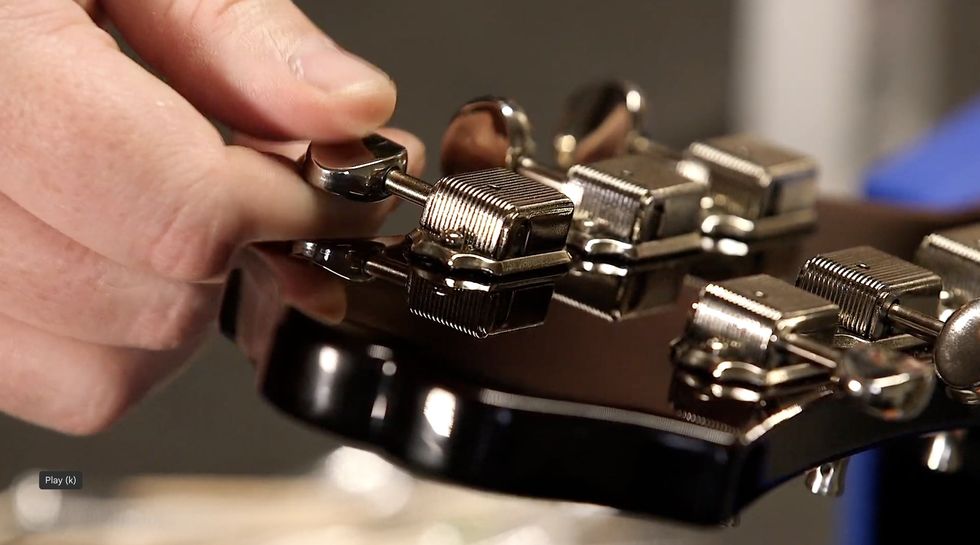
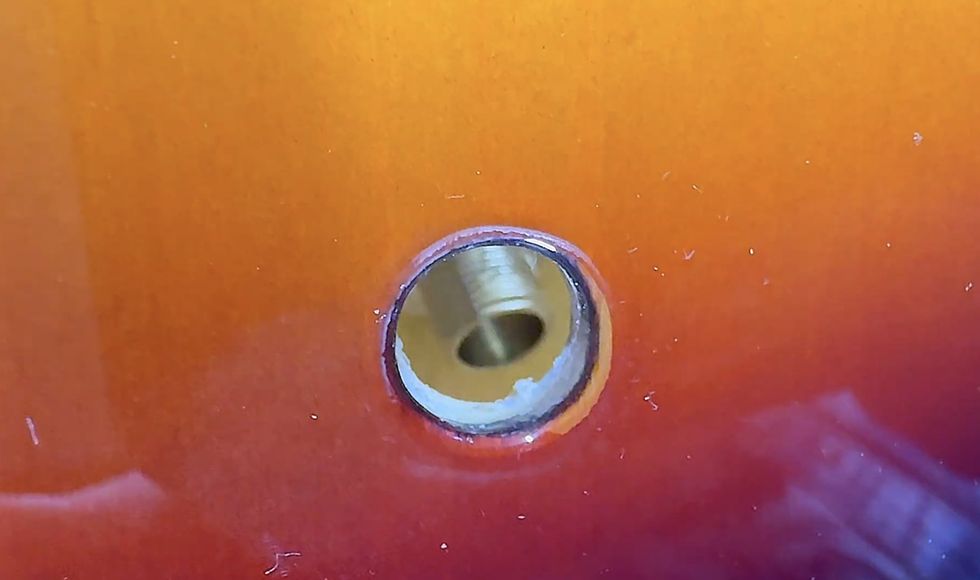
First, let’s take care of the loose tuner, since it’s currently in no shape to reliably hold string tension. The tumble knocked it sideways, which loosened the screws holding in the key, which caused the wood around the screws to strip. It’s alarming to see, but this is a very simple fix.
Add to Repair Kit: Round toothpicks, water-thin CA glue, glue applicator tips, safety goggles
[Note: For the unfamiliar, CA is short for cyanoacrylate. It’s commonly referred to as “Super Glue,” but since that is a brand name, not the generic, I’ll refer to it here as “CA glue.”]
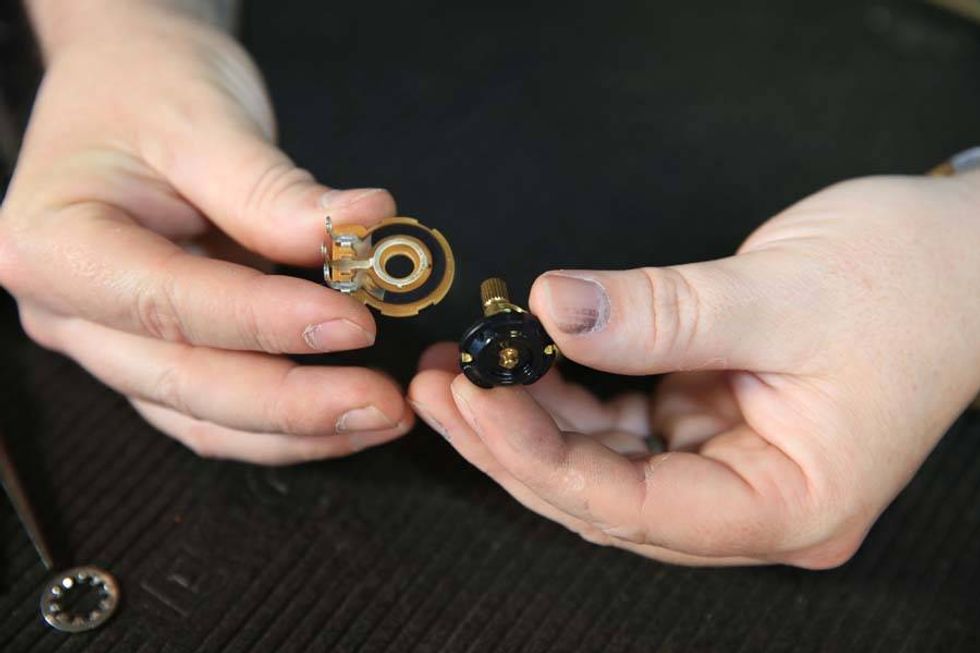
First, remove the tuner by backing the screws out, then pull the tuner from the headstock. My Casino’s tuning keys use a press-in bushing to hold the post straight in the headstock, so no further disassembly is required. However, if you experience this issue with a guitar with more modern-styled tuning keys, you’ll need to use an appropriately sized wrench or socket to remove the screw-in bushing before removing the key.
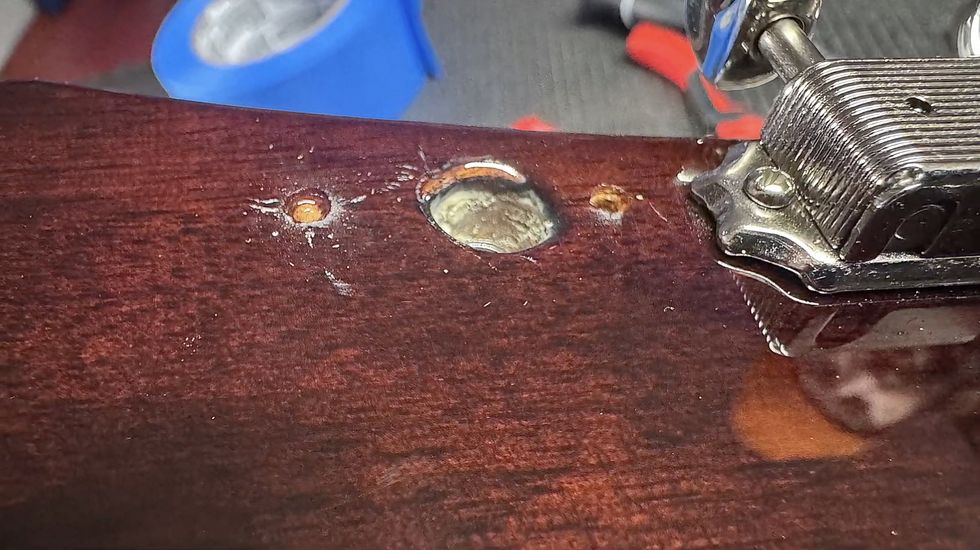
Next, break a toothpick in half, insert the thicker end into the hole where your mounting screw used to be. Break it off flush with the surface, and repeat the process with the other hole.
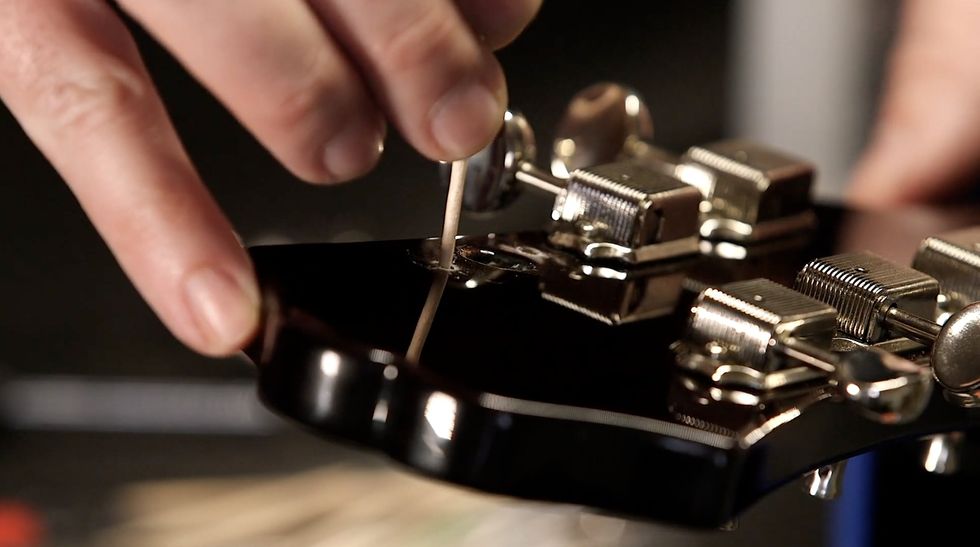
Safety goggles on: It’s CA glue time. Trust me, you do not want to squirt this stuff into your eye. Fit an applicator tip to the glue bottle and practice your squeeze on a scrap piece of paper or wood, far away from anything you don’t want glued to your guitar or yourself. This stuff is magic—it will bond things you never intended if you aren’t careful.
All you need is a very small drop, so practice until you can confidently flow out just a small controlled amount. Once you’ve mastered that, drop a small amount of water-thin CA glue into each filled hole. It will soak through the toothpick into the surrounding wood just enough for this quick fix. Let it cure for at least 15 minutes, but longer is even better.
Pop the tuner back in and drive the screws straight into the toothpick-filled holes. The screw will compress the toothpick into the existing wood and create new threads strong enough to hold your tuner in place.
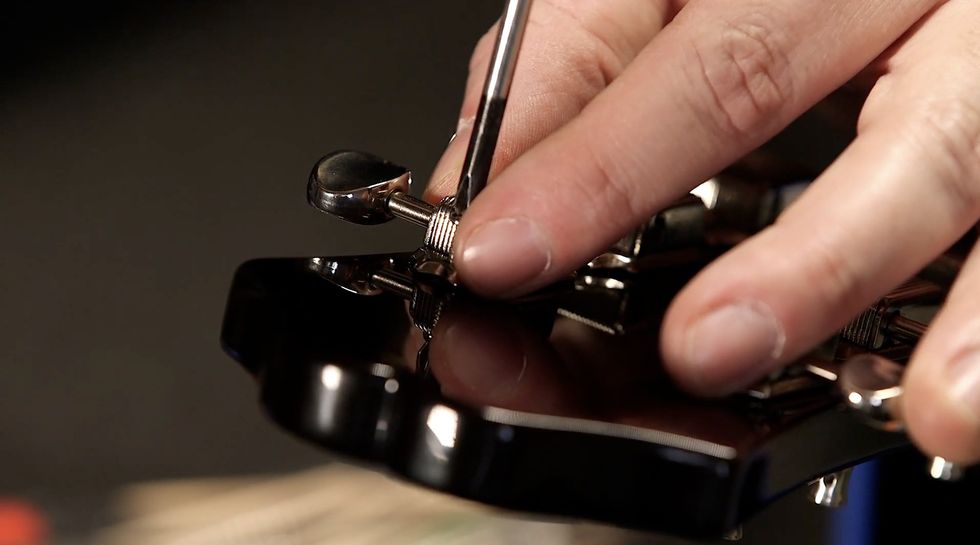
Congratulations! You fixed it well enough to at least make it through a session. I’ve done this on several guitars that lasted years with no issues, so you should be confident in your work.
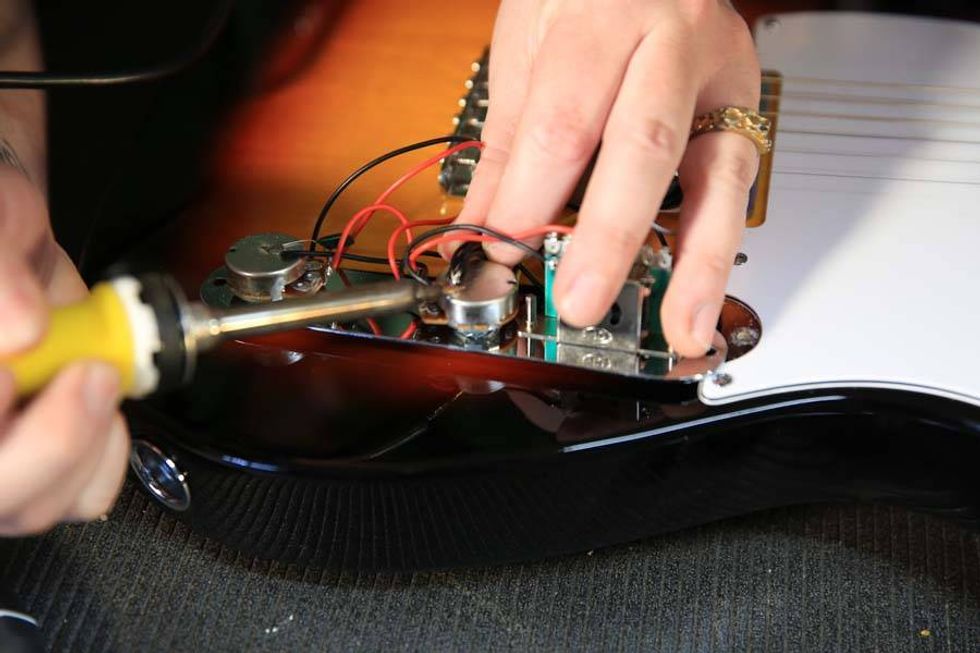
Hit the Road, Jack
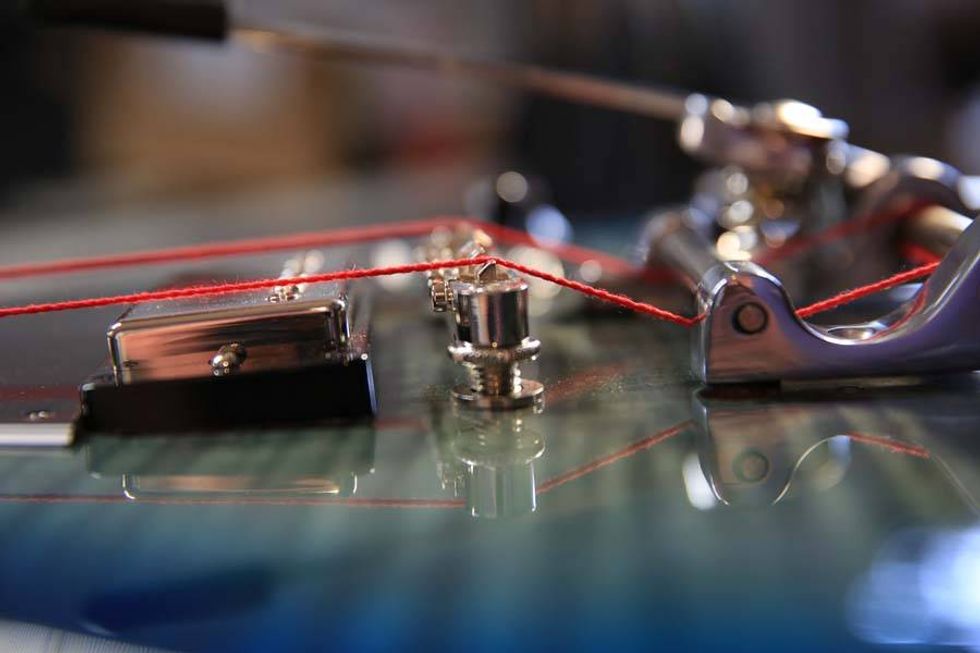
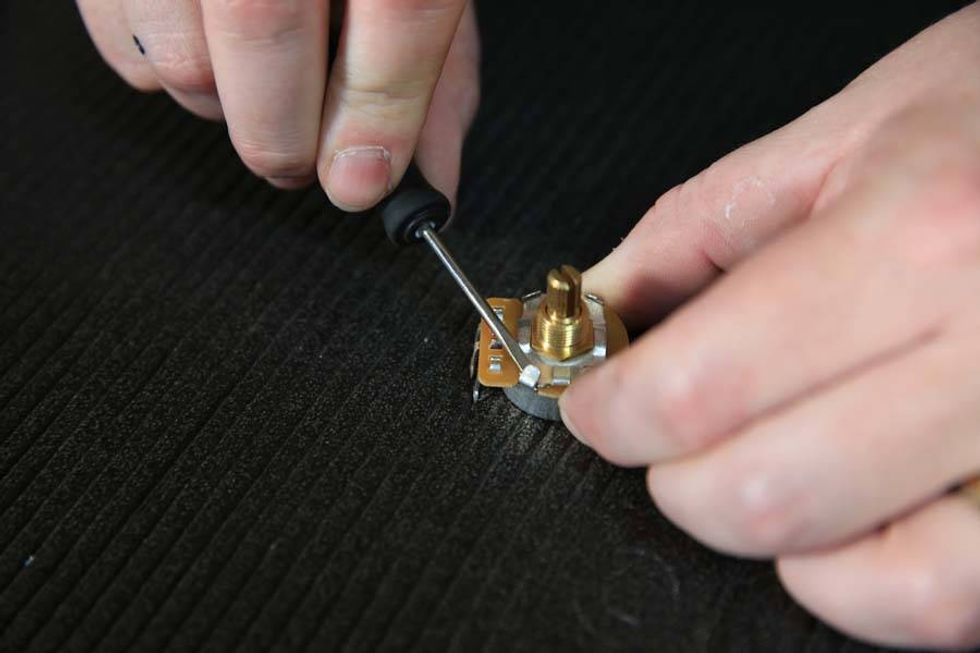
Look, there’s no way to sugarcoat this. Fishing an output jack out of a hollowbody guitar is a pain. You can do this. All you need is patience and a few handy gadgets.
Add to Repair Kit: flashlight, multi-spanner, small drywall anchor, “helping hand,” small screwdriver
Your first task is to locate the jack inside the guitar. Odds are it didn’t fall far away from where it needs to be, since it’s probably wired to one of your control potentiometers. Use your flashlight to shine some light inside the f-hole to help find it.
I found mine wedged against the treble side of the rim, a little farther away than I can reach with my fingers. This is not zesty. I am unhappy but equipped and determined.
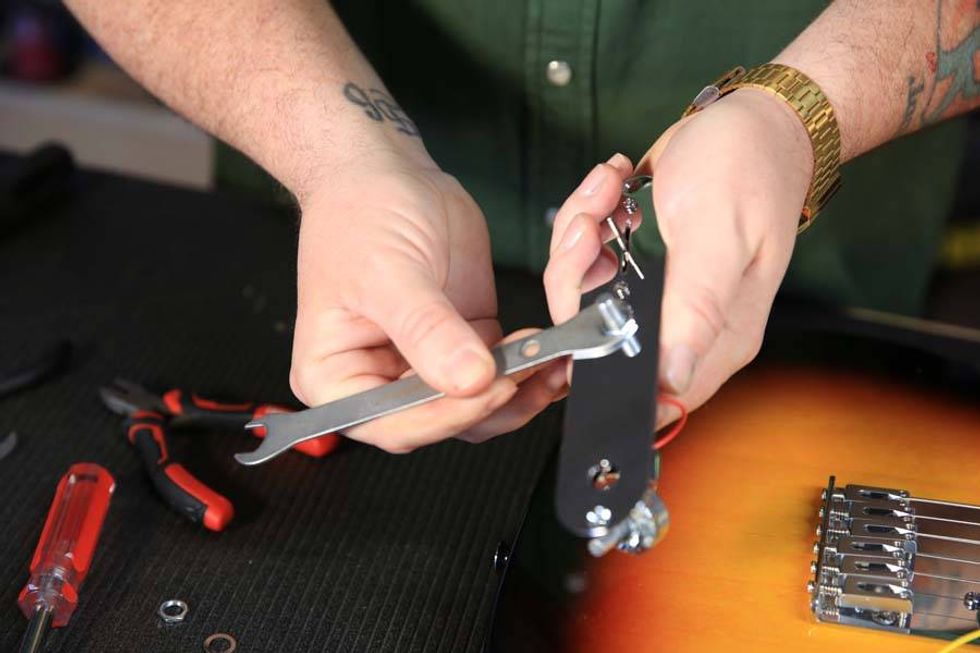
The tool I described as a “helping hand” becomes useful here. It’s essentially just a bent hook at the end of a handle made out of pliable heavy wire. Several guitar parts suppliers sell something similar. I got mine from StewMac for a reasonable price, but if you want to be thrifty about it, there’s no reason why you can’t cut and bend a wire coat hanger.
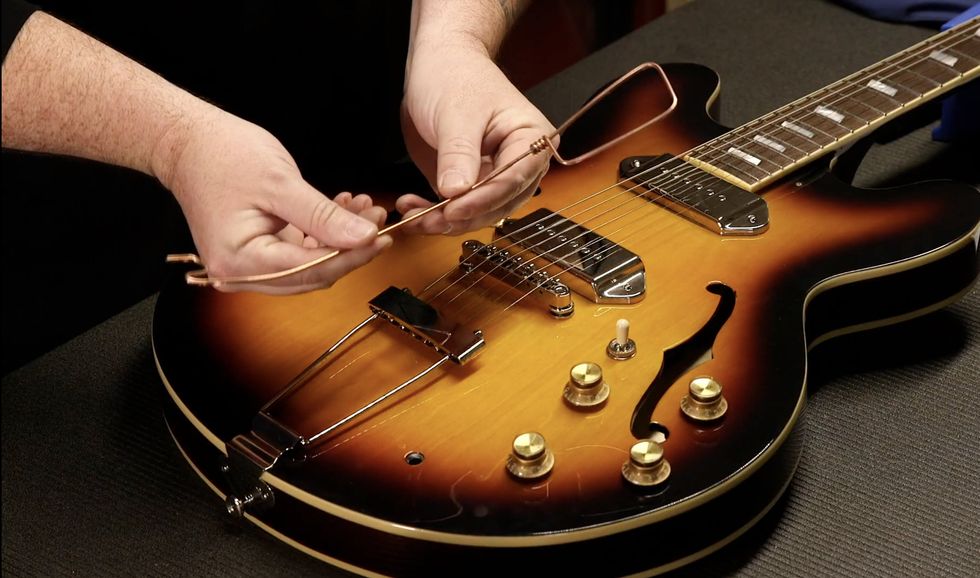
Take a few deep breaths, and working through the f-hole, use the hook end of your helping hand to gently pull the output jack back toward where it was mounted. Bend the helping hand however needed to reach the jack as easily as possible.
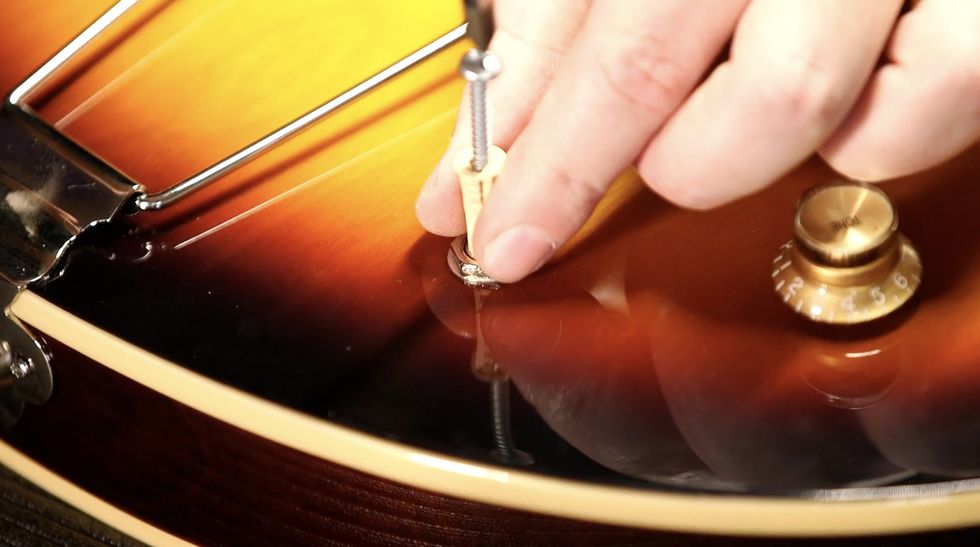
I managed to pull the jack back enough to put a small screwdriver through the jack’s mounting hole and then through the jack itself. That screwdriver will act as a guide while I lift the jack back into place with the helping hand.
You should expect this will take several attempts. Try not to get frustrated. With enough patience, you’ll be able to get the jack back where it belongs. Once you have the jack in place, carefully thread the washer and nut back onto the jack. It shouldn’t take much effort to thread it back on. Just be careful not to cross-thread the nut.
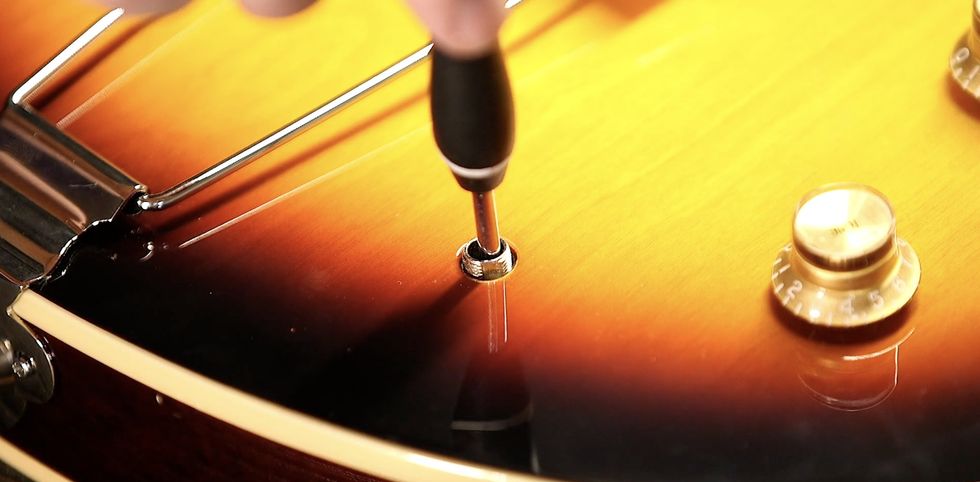
Now that the nut is threaded on enough so it won’t fall back in, the challenge is to tighten it without twisting the jack itself to avoid breaking any wires. I’ve seen and used a few different methods to accomplish this, but I came across one recently that I really like.
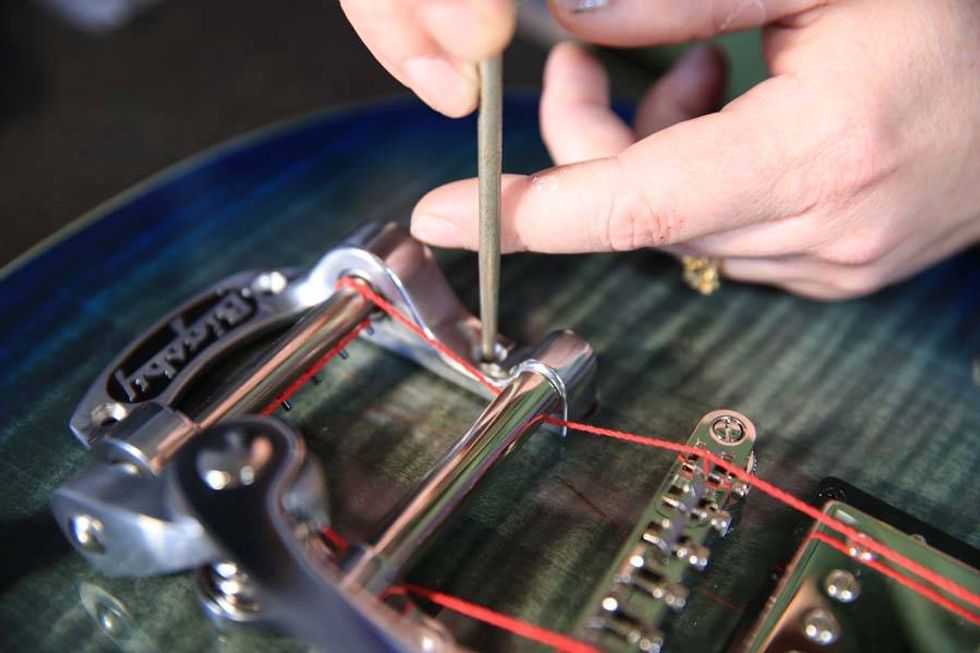
This is where you’ll use your drywall anchor. Get one small enough to fit inside the jack without using too much force, then tighten the screw in the anchor so that it spreads to fit tightly inside the jack. This will hold it steady enough to tighten the nut with a multi-spanner tool or an appropriately-sized wrench.
I like a multi-spanner for this job, because it’s always the right size and is slim enough to not be clumsy for operations like this. Like the helping hand, lots of suppliers sell something similar using different names. Mine is made by ESP and also arrived in my StewMac tool box. I use it all the time for all sorts of tasks.
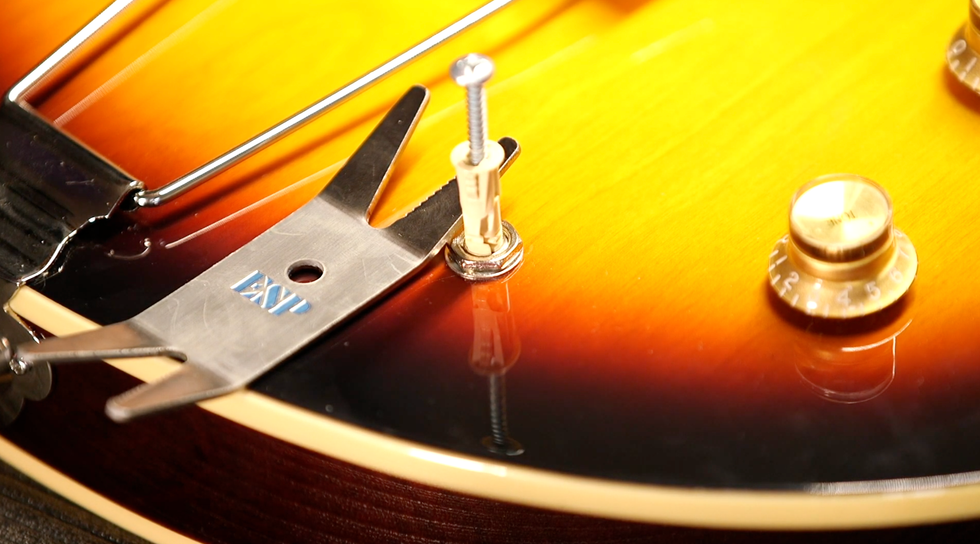
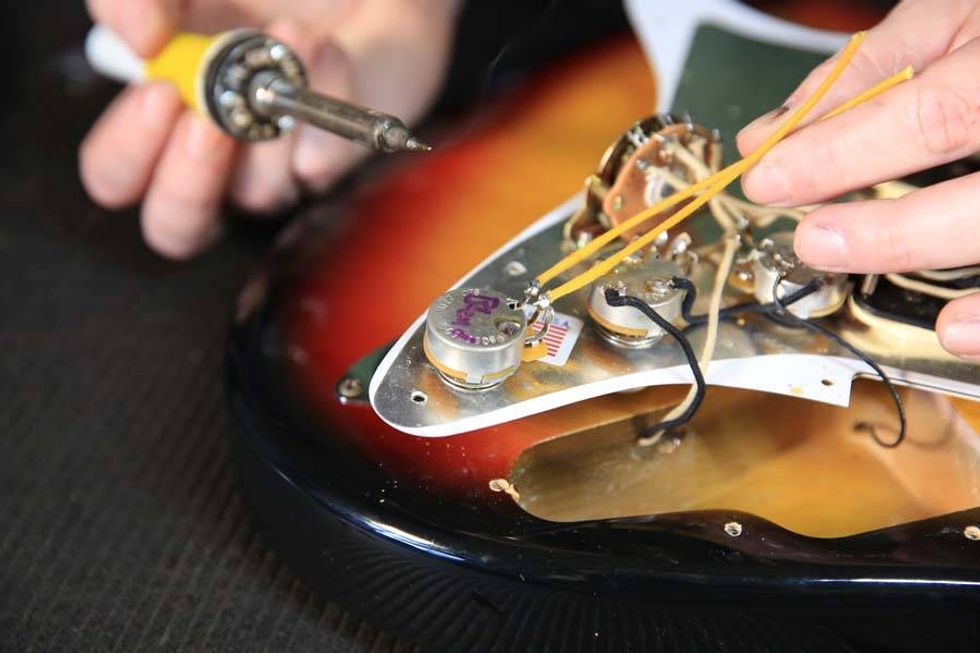
Once the nut is tightened, unscrew the drywall anchor, remove it, and test the jack for sound by plugging your guitar into an amp. A positive result should be obvious at this point, but if you don’t hear any signal, or an excessive consistent buzz, get in touch with your local repair tech.
Got a Dent In My Fret, Man
Honestly, face-first is probably the best way a guitar like my Casino could have hit the ground. The damage could’ve been far worse. Check any forum for endless complaints about Gibson/Epiphone headstock breaks. But I do need to address some damage to a fret caused during the fall.
The issue here is that plain steel electric guitar strings—like your G, B, and E strings—are considerably harder than most frets (my stainless steel fret contingency, put your hands down and let me finish), so it’s possible for a string to leave a small sharp dent in a fret if you hit it with enough force. This specific issue might go unnoticed until it’s time to bend a note at that fret, then you’ll feel and hear the string catch it. No good.
Before we get started: Having allof your frets carefully levelled, recrowned, and polished is alwaysa better solution than partially levelling just a few frets. But considering the entire premise we’ve constructed, which is a situation where we just want the guitar back in action relatively quickly, a partial fret level on the upper frets is perfectly fine as long as it’s done carefully.
Add to Repair Kit: Crowning file (three-corner or rounded), assortment of sandpaper (400 grit to 800 should be fine), 0000 extra-fine steel wool (optional), fretboard conditioner, permanent marker.
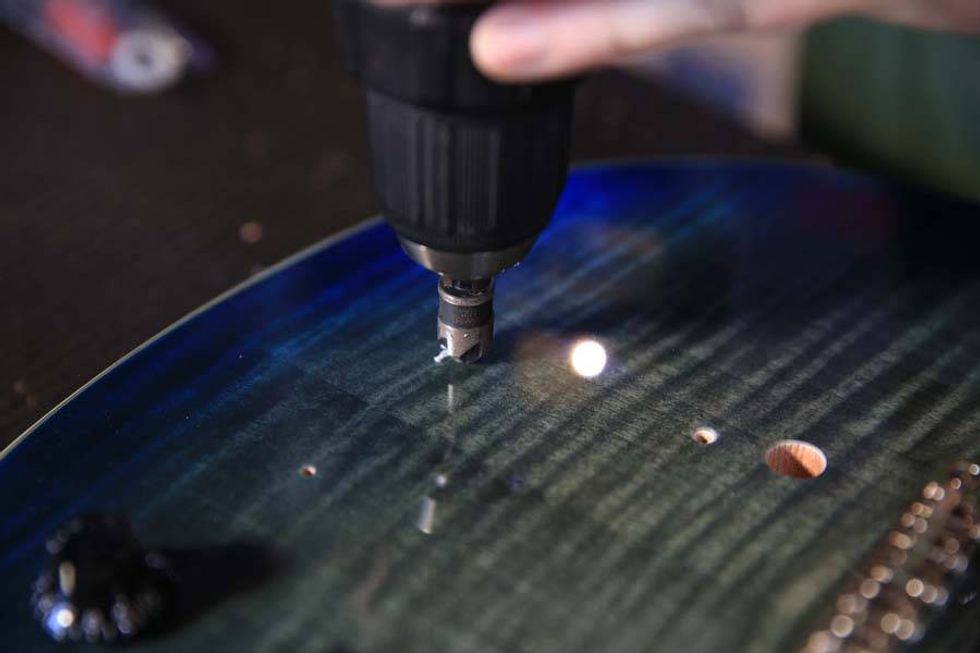
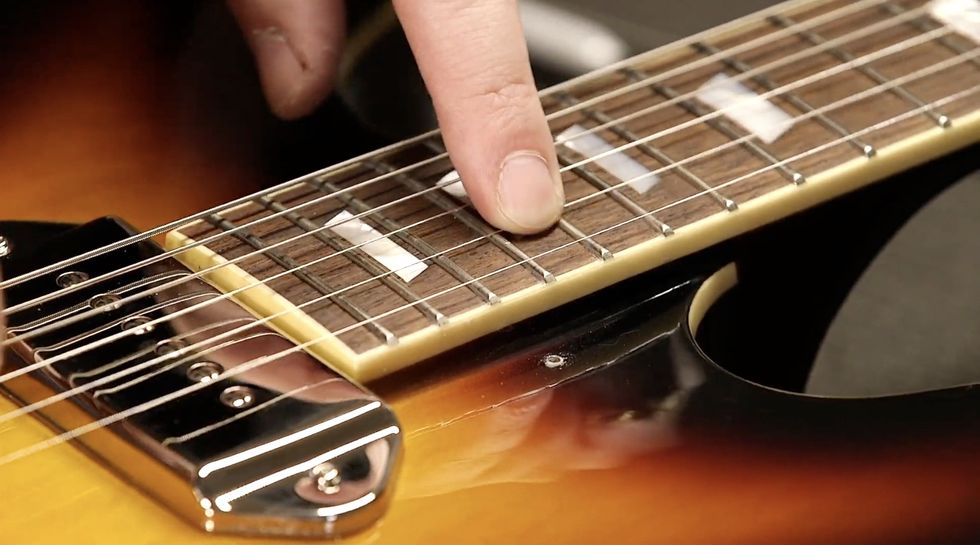
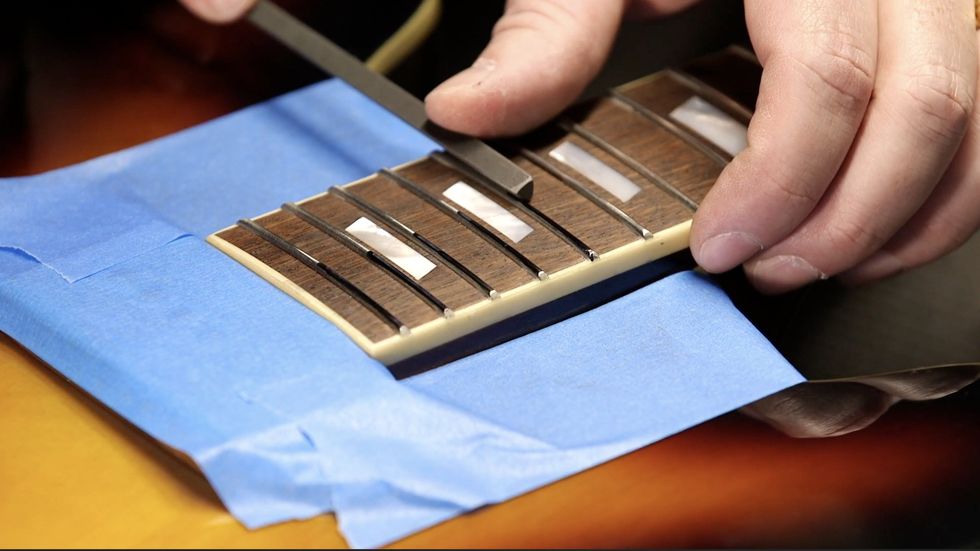
First thing we need to do is identify which frets need the work. Let’s say you have a nick in your 17th fret on the treble side under the B string. The goal is to bring the height of that damaged fret and all the frets past it down until the nick disappears. After that, remove the strings before you begin working.
To accomplish this, mark the damaged frets and all frets past it with a permanent marker. A trusty black Sharpie works great for this, but any darker color works fine. For this repair, we only need to work on the treble side of the frets, so that’s all you need to focus on. Also, use some blue painter’s marking tape to protect the area of the guitar near where you will be working. Small slips of a file or sandpaper can cause some nasty injuries to the guitar’s surface.
Next, level the damaged fret and all frets past it (moving toward the bridge) with something stiff enough to not flex under pressure. I keep an old credit card—a nice sturdy one—with a bit of 400-grit sandpaper glued to one side along the shorter edge, 800 grit on the other side. Start with the 400 and work your way down, being careful not to use too much pressure. Let the sandpaper do the work.
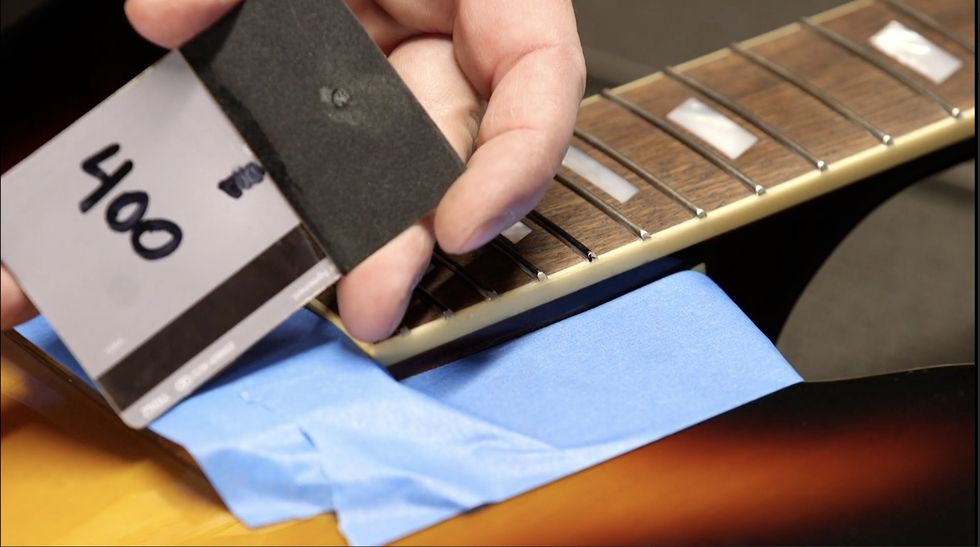
You’ll notice the ink is removed as you sand. The way to make sure you’re keeping everything level is to stop frequently and observe the new clean areas on top of each fret. Each one should be about the same width.
This will take a while. A 400-grit sandpaper does not remove material quickly, 800 grit even less so. I’m suggesting this technique because working slowly makes it more difficult to get yourself in trouble. Several suppliers sell mini files for spot leveling, but I don’t recommend starting there because they remove fret material pretty aggressively.
Eventually you’ll notice the little divot in your 17th fret is almost gone. Now’s time to switch to 800 grit to finish the job. You guessed correctly: This will take even longer, but it’ll leave a nice finish without removing any more material than necessary.
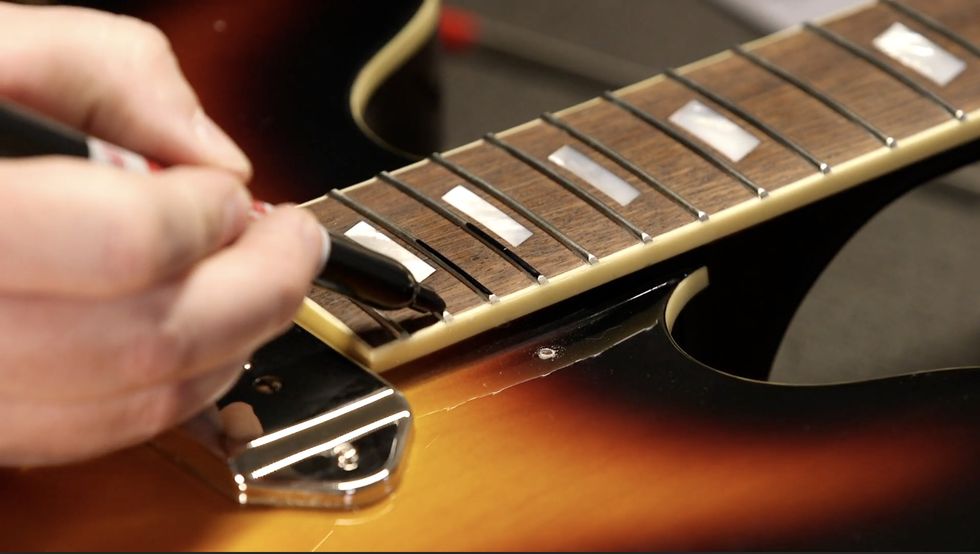
Great! Now you have five flat-topped frets. That won’t sound very good, so now you need to re-crown them, giving them a rounded profile to match the other frets. I like to use a 3-corner file to slowly round over each side of the fret, working from the fretboard up, but if you feel like dropping some serious flow on a specialized crowning file, this job can be a lot easier. Be sure to get the marker back out, ink up each fret, and stop filing when just a tiny sliver of ink is left on top of each fret.
Use a piece of 800 grit paper to remove any file marks and smooth out each fret. If you have finer grits, you could work your way up to 1200 or so, but don’t go too hard or you could undo your work. You just want the frets clean and smooth. At this point, I like the way frets feel after a quick buff with 0000 steel wool, but the mess left behind does rightfully deter a lot of repair techs. If you opt in for this, be sure to tape off your pickups and consider finding a second location for this step.
Work in some fretboard conditioner if you like (skip it if you have a maple or synthetic board; no need for that here), put some new strings on, and check your work. Play every note on these frets, to make sure they ring out without any buzzes. It may not look perfect, but as long as the guitar sounds good, you’re okay until it’s time for a full level/crown/polish job.
Not Finished Until It’s, Uh, Finished
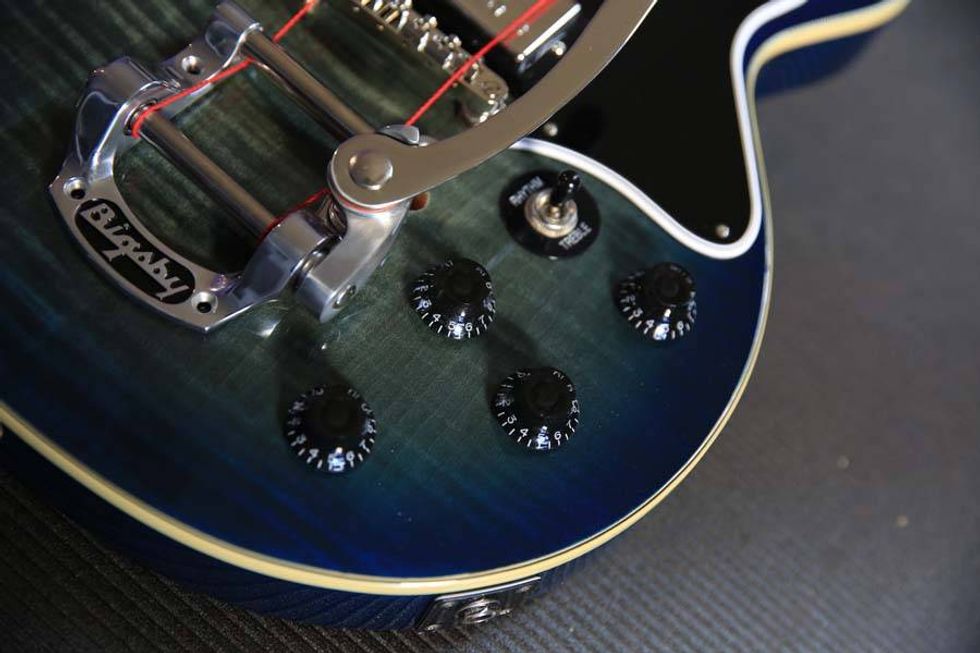
Now for the last souvenir from my Casino’s short journey to the floor. I noticed a few spots along the rim of the guitar where the finish was damaged. Specifically, it looks like the guitar hit something with an edge on the way down hard enough to put a couple of jagged dents in it, right along the binding.
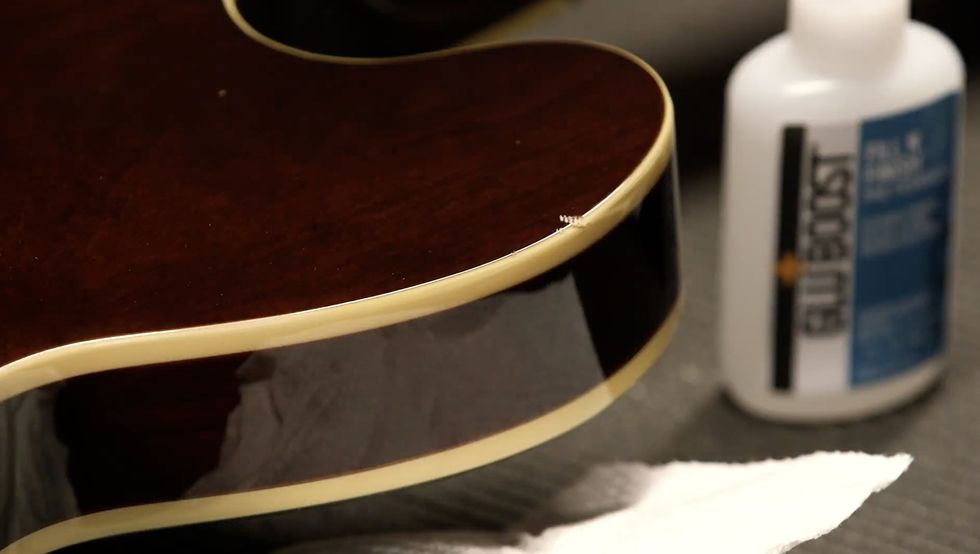
Funny, that’s actually what binding is intended for–protecting edges and corners from damage. Anyway, we need to discuss a few things about guitar finishes.
For the purpose of this article, I’m only going to discuss repairs to the clear coat, since that’s where my damage is. Most guitars now are finished using polyurethane or lacquer for the top clear-coat layer.
Speaking verygenerally, lacquer finishes are softer and less durable, which makes hiding repairs a lot easier if you have the skills and patience. Polyurethane finishes are hard and tough in every way: hard to damage and tough to hide repairs regardless of skills or patience.
I happen to know that my formerly mint-condition Casino has a polyurethane finish, which means I’m going to lower my expectations with this repair. Instead of trying to make it look like it never happened, which will take a lot of work, I’ll just try to keep it from getting worse over time, which will take considerably less work.
It also means I won’t be discussing how to repair lacquer finishes, which is a bit more in-depth, requires a lot more patience and practice, and is therefore not really recommended for the average DIY’er—at least not in the scope of this piece. So if your guitar has a lacquer finish, I don’t think this part applies. Let someone else take care of it, or maybe skip this part and learn to love your guitar as is. The latter is still an admirable move.
Add to Repair Kit: Nothing! You already have what you need from the previous repairs. Feel good about that.
Since the damage is a pronounced dent with sharp edges in the clear coat, all I really need to do is seal it with an appropriate material. And the material appropriate for repairing polyurethane finishes is—you guessed it—CA glue, because it dries hard, clear, and quickly, much like polyurethane.
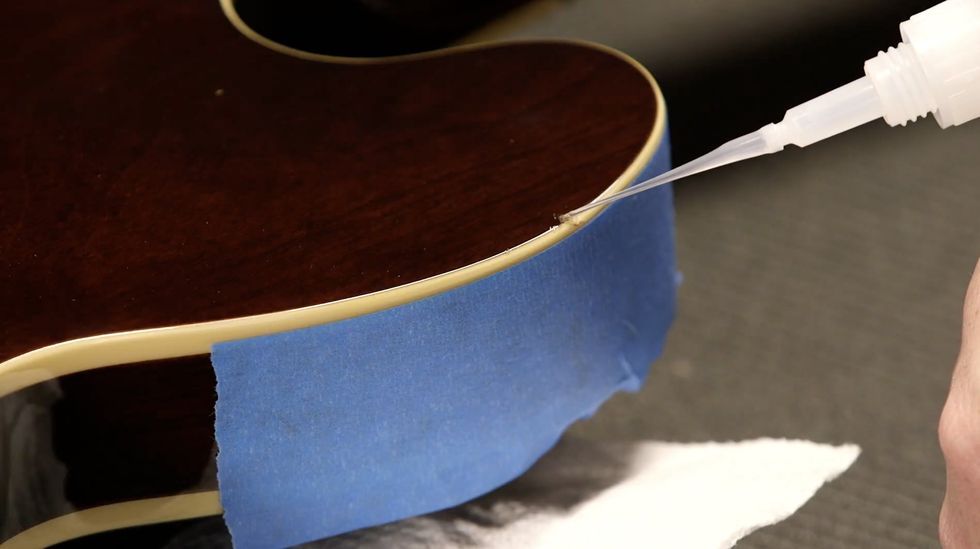
Step one: Use painter’s masking tape around the area of the damage, just in case the glue runs when applied. Step two: Put glue on the dented finish. CA glue will fill in all the small cracks within the damage and seal the existing finish. Be careful; use the smallest-drop-possible technique you perfected when fixing the tuning peg, and give it plenty of time to dry.
That’s it. That’s all I need to keep the finish from continuing to chip the more I play it. Yes, I saved the easiest one for last, as a little treat.
Obviously, this isn’t a particularly beautiful repair, so I could go above and beyond by using thicker CA glue—for example, GluBoost Fill n’ Finish—to fill it in completely, sand it level, and polish the area back to the original mirror gloss. Dan Erlewine has a few excellent YouTube videos outlining this exact method that are easy to find, and I encourage you to try if you’re so inclined. But for my purposes, this will do.
Accidents will happen if you’re actually playing your guitar, but they’re no cause for panic when they do. Even though the guitar isn’t perfect anymore, it’s perfectly playable, and I can get by with it for now. I broke it, so I fixed it, which is something I hope you feel empowered to do should you break yours.
Next time, I’ll use a good guitar stand.
- Marshall Dunn - Premier Guitar ›
- Routing 101: Replacing a Bridge P-90 Pickup With a Humbucker ›
- The DIY Relic Job—Fantasy or Reality? ›
- DIY Pedalboard Build ›
Vox’s Valvenergy Tone Sculptor
Two new pedals from the Valvenergy series use a Nutube valve to generate unique dynamics and tone ranges that can be used to radical ends.
When tracking in a studio or DAW, you’re likely to use compression and EQ on most things. Many enduringly amazing and powerful records were made using little else. And though many musicians regard both effects as a bit unglamorous and utilitarian, EQs and comps are as capable of radical sounds as more overtly “weird” effects—particularly when they are used in tandem.
I spent a day workshopping ideas in my studio using just the Vox Valvenergy Smooth Impact compressor and Tone Sculptor EQ, and a dash of amp tremolo and reverb to taste. In the process, I produced more arresting sounds than I had heard from my guitars in many days. There were radical direct-to-desk-style Jimmy Page/Beatles distortion tones, sun-sized, cosmic electric 12-string, Bakersfield twang that could burn through crude, and many other sweet and nasty colors. Most decent EQ and compressor combinations can achieve variations on all those themes. But the Smooth Impact and Tone Sculptor also reveal interesting personalities in unexpected places.
The individuality and energy in the Vox Valvenergy pedals is attributable, in part, to the Nutube vacuum tube used in the circuit. Though it looks little like a vacuum tube as most guitarists know them, the thin, wafer-like Nutube is, in fact, a real vacuum tube like those used in fluorescent displays. Fluorescent display tubes have limitations. A maximum operating voltage of around 40 volts means they aren’t useful for bigger power tube applications like a 6L6, which has an operating voltage of about 400 volts. But it can work quite well as a preamp tube in concert with an op amp power section, which is how the Nutube is used in the new Valvenergy pedals, as well as older Vox products like the Vox MV50 and Superbeetle amps.
Valvenergy Tone Sculptor
When you think about “cinematic” effects, you likely imagine big reverb or modulation sounds that create a vivid picture and feeling of space or motion. But narrow, hyper-focused EQ profiles can evoke very different and equally powerful images. Radical EQ settings can add aggression, claustrophobic intimacy, and stark, explosive dark-and-light contrasts more evocative of Hitchcock’s Psycho than Ridley Scott’s Blade Runner.
Any of these moods can be summoned from the Valvenergy Tone Sculptor. Six sliders cut or boost 10 dB frequency bands spanning 100 Hz to 5.6 kHz. A seventh slider cuts or boosts the master output by 12 dB. This platter of options might not sound like much. But you can use these seven controls together to very specific ends.
“Radical EQ settings can add aggression, near-claustrophobic intimacy, and stark, explosive dark-and-light contrasts.”
For example, bumping the high-midrange and the master output produces narrow cocked-wah-like filter sounds with enough push to produce extra amp overdrive—effectively turning the Tone Sculptor into a buzzy, almost fuzz-like filter effect. But unlike a wah, you can carefully scoop high end or add a spoonful of bass to blunt harsh frequencies or give the tone a bit more weight. You can also broaden the palette of an amp/guitar pairing. I matched a particularly trebly Jazzmaster bridge pickup with a very hot and toppy Vox AC15-flavored amp for this test—a recipe that can be spiky on the best days. But with the Tone Sculptor in the line, I could utilize the same sharp, fuzzy, and filtered Mick Ronson wah tones while shaving some of the most piercing frequencies.
EQ pedals exist on many points along the cost spectrum. And at $219, the Tone Sculptor lives on the high side of the affordable range. Does it offer something less expensive models can’t deliver? Well, for one thing, I found it relatively quiet, which is nice whether you’re shaping toppy high-contrast effects or performing more surgical adjustments. And the sliders feel nuanced and nicely tapered rather than like a dull axe with a few basic frequency notches. But in many situations I also liked the color imparted by the circuit—generated, presumably, by the Nutube. “Color,” in audio terms, is a broad and subjective thing, and one should not necessarily expect the warm, tube-y glow of a vintage tube Pultec. Still, the Tone Sculptor has many forgiving, flattering qualities—typical of studio EQs—that enable fine tuning and experimentation with more radical and creative applications of the effect.
Valvenergy Smooth Impact
As with the Tone Sculptor, the Smooth Impact’s use of Nutube engenders certain expectations. It’s easy to surmise that because Smooth Impact has a vacuum tube in the circuit that it will behave like a little Teletronix LA-2A leveling amplifier. That’s a big ask for a $219 stompbox. On the other hand, the Smooth Impact exhibits some appealing characteristics of studio tube compression. At lower compression levels, it works well as a thickening agent—adding mass without much additional noise. And at higher compression levels it can sound snappy, crisp, and tight without feeling like you’ve bled every trace of overtone from your signal.
The Smooth Impact’s controls aren’t totally atypical. But because it lacks some familiar features like variable attack and release, yet is more complicated than a 1-knob DynaComp, you have to trust your ear to navigate interactions among the controls. The most unfamiliar of these is the 3-way vintage/natural/sag toggle. The first two are defined by preset attack and release settings: Vintage is slow attack and long release, and natural is the opposite. The sag mode’s compression is more like what you get from tube saturation, and it’s useful for adding thickness and complexity to a thin amp tone at modest compression levels.
Though the vintage and natural modes certainly have a different feel, they don’t always sound worlds apart. And like the sag mode, the thing they have in common is the way they enrich lifeless amp output at low to medium compression, with a bit of grind from the tube gain and a little extra makeup gain from the output. At the most aggressive settings, the tube gain can get a little crispy. And really crushing the compression can flatline your tone without adding much in the way of extra sustain. These are limitations common to many compressors with similar features. But unless I was chasing very ultra-snappy Prince and Nile Rodgers fast-funk caricatures, I enjoyed the Smooth Impact most in its in-between ranges, where mass, mild, harmonious drive, and low noise showcase the pedal’s sometimes studio-like personality.
Significantly smaller and lighter than original TAE. Easy to configure and operate. Great value. Streamlined control set.
Air Feel Level control takes the place of more surgical and realistic resonance controls. Seventy watts less power in onboard power amp. No Bluetooth connectivity with desktop app.
$699
Boss Waza Tube Amp Expander Core
Boss streamlines the size, features, and price of the already excellent Waza Tube Expander with little sacrifice in functionality.
Many of our younger selves would struggle to understand the urge—indeed, the need—to play quieter. My first real confrontation with this ever-more-present reality arrived when Covid came to town. For many months, I could only sneak into my studio space late at night to jam or review anything loud. Ultimately, the thing that made it possible to create and do my job in my little apartment was a reactive load box (in this case, a Universal Audio OX). I set up a Bassman head next to my desk and, with the help of the OX, did the work of a gear editor as well as recorded several very cathartic heavy jams, with the Bassman up to 10, that left my neighbors none the wiser.
Boss’ firstWaza Tube Amp Expander, built with an integrated power amp that enables boosted signal as well as attenuated sounds, was and remains the OX’s main competition. Both products have copious merits but, at $1,299 (Boss) and $1,499 (Universal Audio), each is expensive. And while both units are relatively compact, they aren’t gear most folks casually toss in a backpack on the way out the door. The new Waza Tube Expander Core, however, just might be. And though it sacrifices some refinements for smaller size, its much-more accessible price and strong, streamlined fundamental capabilities make it a load-box alternative that could sway skeptics.
Micro Manager
The TAE Core is around 7 1/2" wide, just over 7 " long, and fewer than 4 " tall, including the rubber feet. That’s about half the width of an original TAE or OX. The practical upside of this size reduction is obvious and will probably compel a lot of players to use the unit in situations in which they’d leave a full-size TAE at home. The streamlined design is another source of comfort. With just five knobs on its face, the TAE Core has fewer controls and is easier to use than many stompboxes. In fact, the most complicated part of integrating the TAE Core to your rig might be downloading the necessary drivers and related apps.
Connectivity is straightforward, though there are some limitations. You can use TAE Core wirelessly with an iOS or Windows tablet or smartphone, as long as you have the BT-DUAL adaptor (which is not included and sets you back around 40 bucks). However, while desktop computers recognize the TAE Core as a Bluetooth-enabled device, you cannot use the unit wirelessly with those machines. Instead, you have to connect the TAE Core via USB. In a perfectly ordered world, that’s not a big problem. But if you use the TAE Core in a small studio—where one less cable is one less headache—or you prefer to interface with the TAE Core app on a desktop where you can toggle fast and easily between large, multi-track sessions and the app, the inability to work wirelessly on a desktop can be a distraction. The upside is that the TAE Core app itself is, functionally and visually, almost identical in mobile and desktop versions, enabling you to select and drag and drop virtual microphones into position, add delay, reverb, compression, and EQ effects, choose various cabinets with different speaker configurations and sizes, and introduce new rigs and impulse responses to a tone recipe in a flash. And though the TAE Core app lacks some of the photorealistic panache and configuration options in the OX app, the TAE Core’s app is just as intuitive.Less Is More
One nice thing about the TAE Core’s more approachable $699 price is that you don’t have to feel too bad on nights that you “underutilize” the unit and employ it as an attenuator alone. In this role, the TAE Core excels. Even significantly attenuated sounds retain the color and essence of the source tone. Like any attenuator-type device, you will sacrifice touch sensitivity and dynamics at a certain volume level, yielding a sense of disconnection between fingers, gut, guitar, and amp. But if you’re tracking “big” sounds in a small space, you can generate massive-sounding ones without interfacing with an amp modeler and flat-response monitors, which is a joy in my book. And again, there’s the TAE Core’s ability to “expand” as well as attenuate, which means you can use the TAE Core’s 30-watt onboard power amp to amplify the signal from, say, a 5-watt Fender Champion 600 with a 6" speaker, route it to a 2x12, 4x12, or virtual equivalent in the app, and leave your bandmate with the Twin Reverb and bad attitude utterly perplexed.
The Verdict
Opting for the simpler, thriftier TAE Core requires a few sacrifices. Power users that grew accustomed to the original TAE’s super-tunable “resonance-Z” and “presence-Z” controls, which aped signal-chain impedance relationships with sharp precision, will have to make do with the simpler but still very effective stack and combo options and the “air feel level” spatial ambience control.The DC power jack is less robust. It features only MIDI-in rather than MIDI-in/-through/-out jacks, and, significantly, 70 watts less power in the onboard power amp. But from my perspective, the Core is no less “professional” in terms of what it can achieve on a stage or in a studio of any size. Its more modest feature set and dimensions are, in my estimation, utility enhancements as much as limitations. If greater power and MIDI connectivity are essentials, then the extra 600 bones for the original TAE will be worth the price. For many of us, though, the mix of value, operational efficiencies, and the less-encumbered path to sound creation built into the TAE Core will represent a welcome sweet spot that makes dabbling in this very useful technology an appealing, practical proposition.
Darkglass Electronics unveils ANAGRAM, a flagship bass platform designed to redefine tone, flexibility, and performance. The pedal’s extraordinarily deep feature set includes multiple effects and modeling, an on-board looper and tuner.
Best of all, ANAGRAM brings together these creative tools in a streamlined, rugged format that’s designed for ease of use. Onstage and in the studio, bassists can quickly access and fine-tune their sound via the ANAGRAM interface:
- 7-inch high-brightness touchscreen for clear and intuitive control.
- Three footswitches for live performance control.
- Six high-resolution endless rotary knobs for precise parameter adjustments.
- Flexible input and output configuration.
With ultra-low latency, extensive customization, and seamless integration into the Darkglass ecosystem, it supports both studio precision and stage performance. Combining 15 years of innovation with cutting-edge processing power, ANAGRAM offers a purpose-built solution for bassists seeking unparalleled sound-shaping capabilities.
Anagram
Powered by a state-of-the-art hexacore processor and 32-bit/48kHz audio processing,ANAGRAM delivers ultra-low latency, pristine clarity, and studio-grade sound. Its intuitive blocks-based architecture lets players create signal chains in series (12 blocks) or parallel (24blocks) using a high-resolution touch display. ANAGRAM features three control modes—Preset,Scene, and Stomp—for instant switching, parameter adjustments, and traditional pedalboard-style operation. With a curated collection of distinct preamps, 50+ customizable effects, a looper, tuner, and user-generated IR support, ANAGRAM delivers unmatched creative flexibility.Seamless integration with the Darkglass Suite allows for expanded control and functionality. Additionally, Neural Amp Modeler (NAM) integration provides access to thousands
of high-quality amp and effect models, expanding tonal possibilities from analog warmth to futuristic textures.
"Anagram represents the culmination of years of research and development," says Marcos Barilatti, Managing Director of Darkglass Electronics. "We set out to create a product that not only pushes the boundaries of bass tone but also inspires musicians to explore new sonic territories."
Housed in a rugged anodized aluminum chassis, ANAGRAM is road-ready, compact, and powered via 9V or USB-C (PD). With flagship features at a compelling price, ANAGRAM represents the new standard for bassists seeking a modern platform for their performance.
Street $1199.99 USD
Alongside Nicolas Jaar’s electronics, Harrington creates epic sagas of sound with a team of fine-tuned pedalboards.
Guitarist Dave Harrington concedes that while there are a few mile markers in the music that he and musician Nicolas Jaar create as Darkside, improvisation has been the rule from day one. The experimental electronic trio’s latest record, Nothing, which released in February on Matador, was the first to feature new percussionist Tlacael Esparza.
Taking the record on tour this year, Darkside stopped in at Nashville’s Brooklyn Bowl, where Harrington broke down his complex signal chains for PG’s Chris Kies.
Brought to you by D’Addario.
Express Yourself
Harrington bought this mid-2000s Gibson SG at 30th Street Guitars in New York, a shop he used to visit as a kid. The headstock had already been broken and repaired, and Harrington switched the neck pickup to a Seymour Duncan model used by Derek Trucks. Harrington runs it with D’Addario NYXL .010s, which he prefers for their stretch and stability.
The standout feature is a round knob installed by his tech behind the bridge, which operates like an expression pedal for the Line 6 DL4. Harrington has extras on hand in case one breaks.
Triple Threat
Harrington’s backline setup in Nashville included two Fender Twin Reverbs and one Fender Hot Rod DeVille. He likes the reissue Fender amps for their reliability and clean headroom. Each amp handles an individual signal, including loops that Harrington creates and plays over; with each amp handling just one signal rather than one handling all loops and live playing, there’s less loss of definition and competition for frequency space.
Dave Harrington’s Pedalboards
Harrington says he never gives up on a pedal, which could explain why he’s got so many. You’re going to have to tune in to the full Rundown to get the proper scoop on how Harrington conducts his three-section orchestra of stomps, but at his feet, he runs a board with a Chase Bliss Habit, Mu-Tron Micro-Tron IV, Eventide PitchFactor, Eventide H90, Hologram Microcosm, Hologram Chroma Console, Walrus Monument, Chase Bliss Thermae, Chase Bliss Brothers AM, JHS NOTAKLÖN, two HexeFX reVOLVERs, and an Amped Innovations JJJ Special Harmonics Extender. A Strymon Ojai provides power.
At hip-level sits a board with a ZVEX Mastotron, Electro-Harmonix Cathedral, EHX Pitch Fork, Xotic EP Booster, two EHX 45000 multi-track looping recorders, Walrus Slöer, Expedition Electronics 60 Second Deluxe, and another Hologram Microcosm. A Live Wire Solutions ABY Box and MXR DC Brick are among the utility tools on deck.
Under that board rest Harrington’s beloved Line 6 DL4—his desert-island, must-have pedal—along with a controller for the EHX 45000, Boss FV-50H volume pedal, Dunlop expression pedal, Boss RT-20, a Radial ProD2, and another MXR DC Brick.