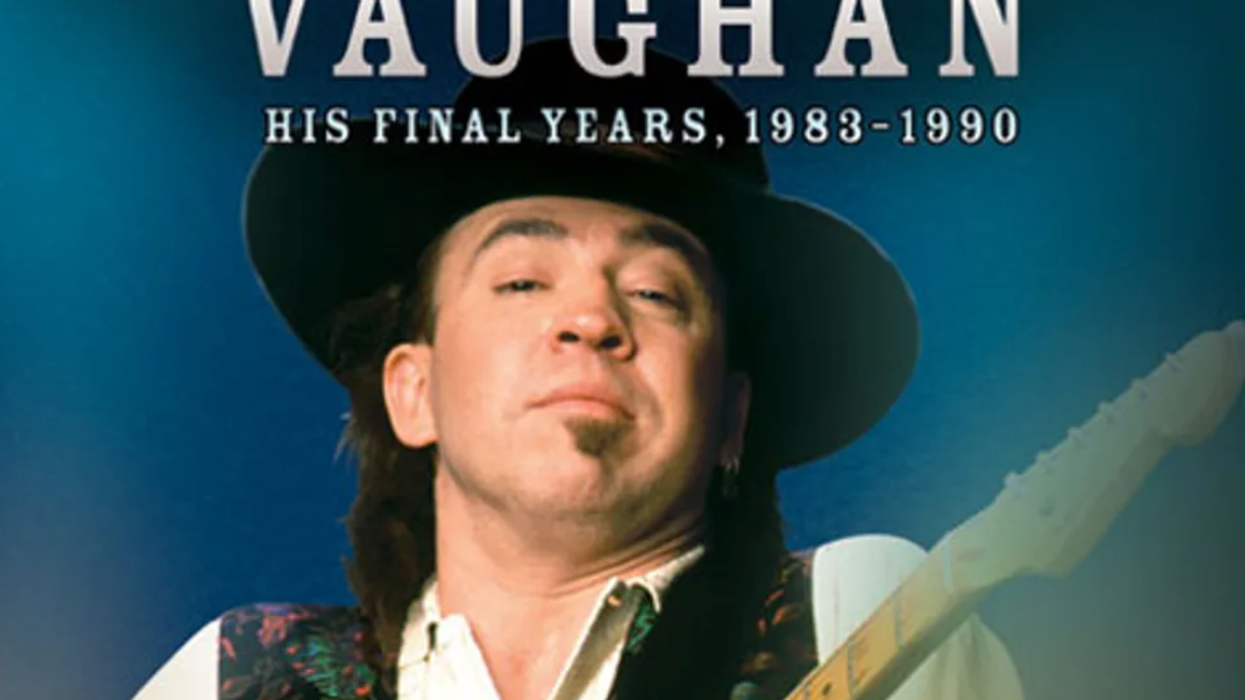

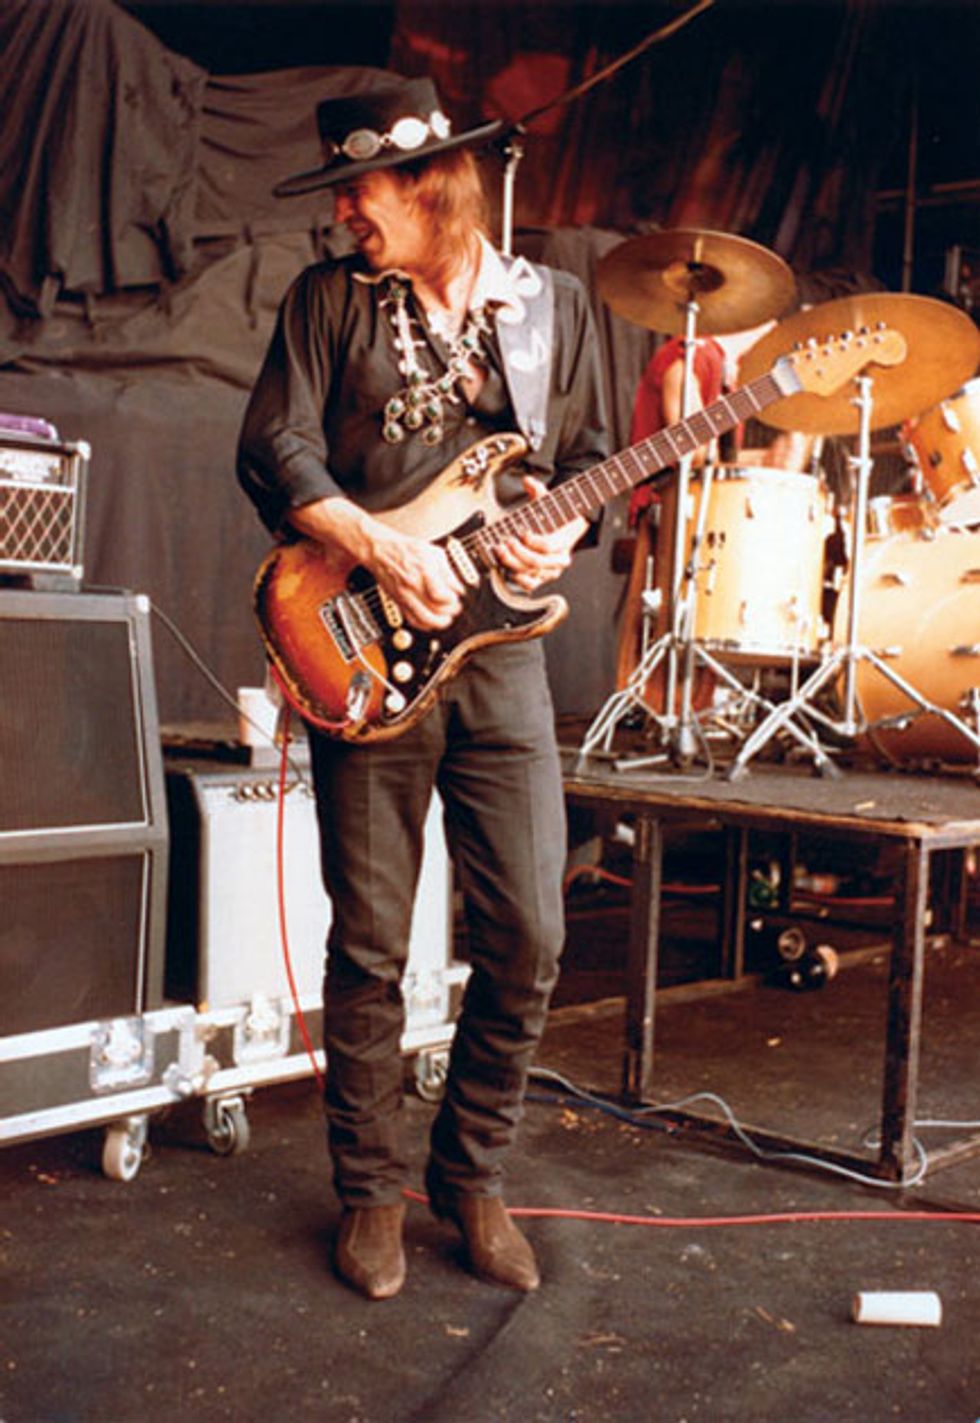
As one of the most influential guitarists to ever pick up a Strat, Stevie Ray Vaughan left a Texas-sized mark on guitardom that is still felt decades after his untimely passing on August 27, 1990. In the early '80s, his unique brand of Hendrix and Albert King-inspired wailing expanded outside his native Lone Star state, and soon he was on the road and rubbing elbows with his heroes.
Stevie Ray Vaughan: Day by Day, Night After Night—His Final Years, 1983-1990
In Craig Hopkins' new book, Stevie Ray Vaughan: Day by Day, Night After Night - His Final Years, 1983-1990 [Backbeat Books], you can see a virtual day-by-day account of highlights from the last seven years of SRV's life. Hopkins conducted several hundred interviews with many of Vaughan's closest friends and family in an effort to create the definitive work on Vaughan's legacy. Here, we present Hopkins' information on Vaughan's gear.
He says, "The first two secrets to Stevie’s tone are his soul and his hands, so you are defeated before you even begin in your quest for his tone. For those who are interested, the following is the best I can do for you in answering gear questions."
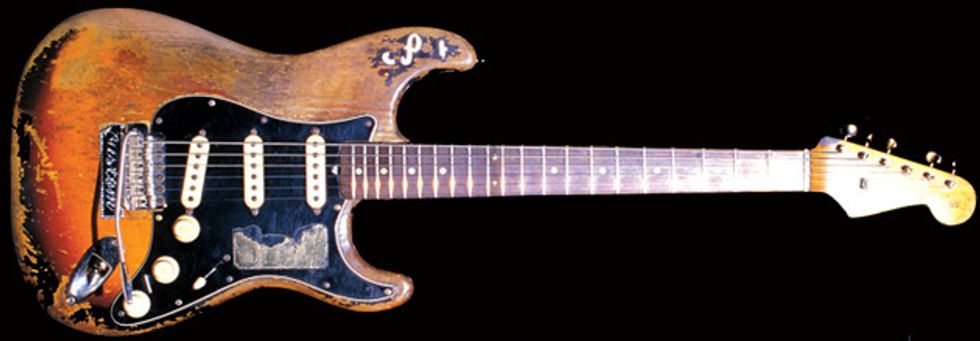
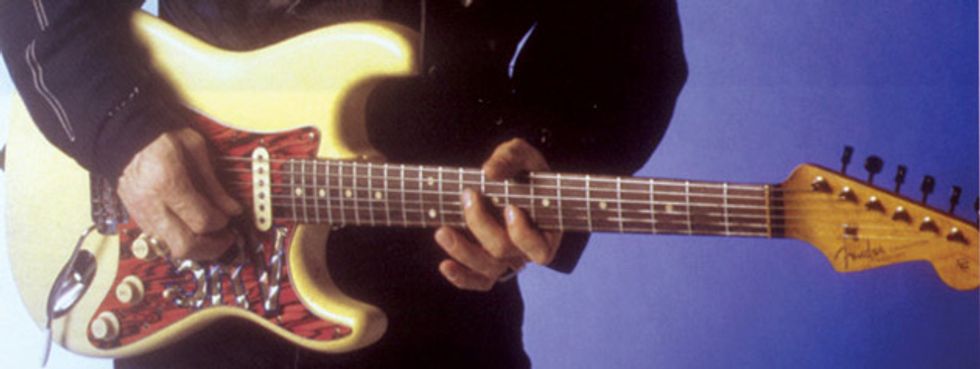
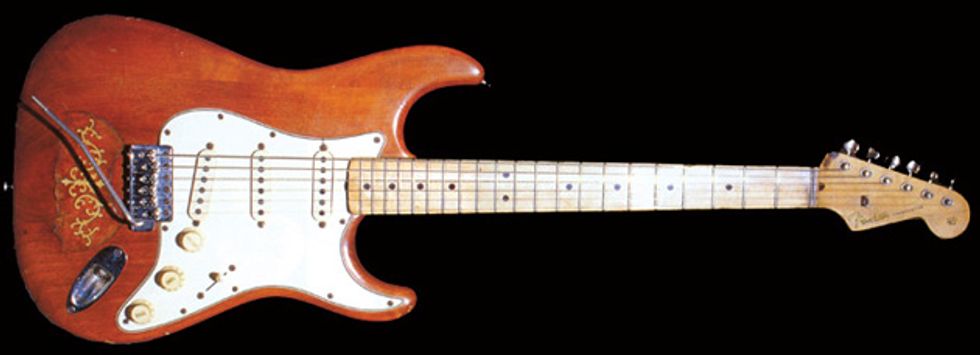
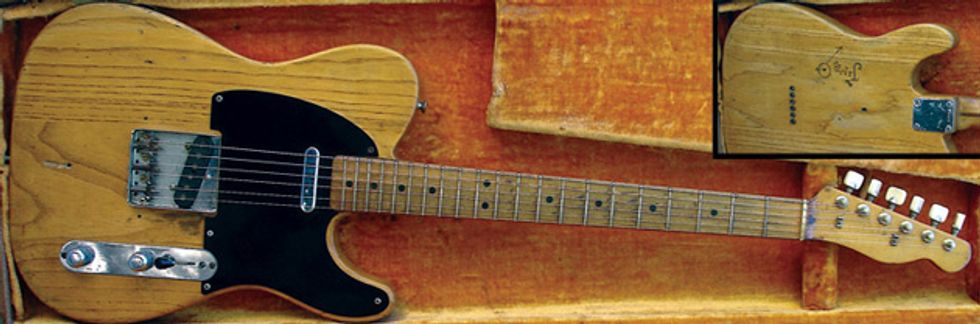
Acquired by Stevie in 1974 from Ray Hennig's Heart of Texas Music, Austin, Texas. Price: $0; value now estimated at $1,000,000.
Age: Number One was disassembled by Fender Custom Shop employees in 2003, and they stated that the neck is from December '62 and the body is a '63. So Number One can rightly be called a '63 Strat. Pickups are 1959, which is why Stevie referred to it as a '59.
Neck size: Nut width is the typical 1-5/8" and the neck profile is "D."
Neck adjustment: .012" relief at the 7th and 9th frets, leveling out for the remainder of the fingerboard.
Fret wire: .11" wide by .047" tall. Original height likely .055". No particular brand or size of fretwire the tallest bead and smallest tang that would fit in the fingerboard without damaging it. They were not bass frets. In the early to mid-80's the fret wire was Dunlop 6100.
Fingerboard: Veneer rosewood (most other rosewood fingerboard Strats of Stevie's had slab-boards). Radius is flatter than the standard vintage 7.25" radius due to at least two refrets, creating a 9" or 10" radius in the upper register.
String height: High action for clear, ringing tone. At the 12th fret: 5/64" on the treble E, 7/64" on the bass E. Each string with three full winds on the tuning machines for best angle at the nut.
String gauge: GHS Nickel Rockers .013, .015, .019 (plain), .028, .038 and .058. Stevie would use .011 Es when his fingers were sore. Always tuned down a half-step.
Saddles: vintage replacement saddles, not matched, modified to minimize the severity of the angle of the string break over the contact point to reduce string breakage. The strings were also run through a small piece of plastic tubing from inside the tremolo block hole beyond the saddle contact point, also to reduce string breakage. The block/bridge top plate is also ground to eliminate the sharp edge where the string contacts the metal.
Nut: Fender-style, but made of bone. (Brass nut on Scotch and Red for studio work)
Tremolo: stainless steel Fender tremolo bar (cotton at the bottom of the block hole to ease removal of broken bars). Graphite and grease lubricant on all moving parts and contact points. The lefty bar is non-original to the guitar. Stevie used all five springs on the tremolo. In photos from 1983-85 one can see a much heavier gauge tremolo bar on Number One. These were made by Stevie's roadie's father. Some were straight (as in the photos from the In Session recording with Albert King) and some were bent (as used at the El Mocambo in 1983). Approximately ten of these custom bars were made either to reduce the number of broken tremolo arms (Stevie still broke them), or merely because the threads in the left-hand trem block were stripped and retapped, requiring the larger gauge.
Pickup height: on the treble side - very high. Laying a metal rule on the frets, the bridge pickup touched the rule, the middle pickup almost touched it, and the neck pickup was 1/16" from the rule. On the bass side, bridge 1/32", middle 1/16", and 1/32" neck.
Tuners: started with original but were replaced at least twice.
Misc.: The gold-plated hardware was not added until late '85 or early '86. Five-way pickup switch is non-original.
Pots: stock Fender 250k. In the last tone position, a push-pull pot to cut down on hum, a dummy coil to prevent buzz, and different value capacitors to preserve the original tone.
Prior to July 1990, the original neck from Number One was retired because it couldn't take another refret job. The original '62 neck from "Red" was put on Number One (Red's neck was changed to a non-Fender left-handed neck in 1986). It was the "Red" neck that was broken into pieces by a falling sound baffle after a show in New Jersey. After that, Number One had a new Fender neck until after Stevie died, when the original Number One neck was reinstalled on it.
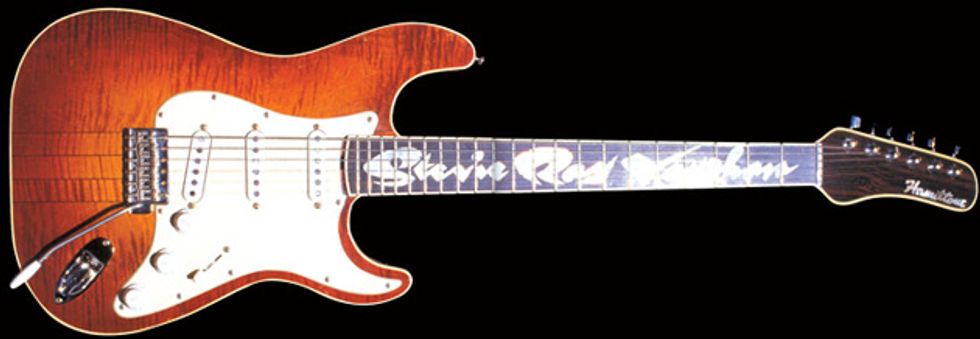
Acquired on April 29, 1984, a gift from Billy Gibbons (ZZ Top), crafted by James Hamilton. Two-piece maple body, neck through the body design. Originally with EMG preamped pickups, René installed vintage Fender pickups. Fingerboard is ebony with inlaid mother-of-pearl. The original active pickups were replaced (after they were damaged in the filming of the “Couldn’t Stand the Weather” video) with passive pickups. It is said that Stevie didn’t want to get Number One wet during the filming and didn’t like the pickups on Main, so it was used in the video. It is also said that the guitar was coated in beeswax to protect it from the water used in the video. Jim Hamilton made a few genuine copies of the guitar, but there are many imitations made overseas.
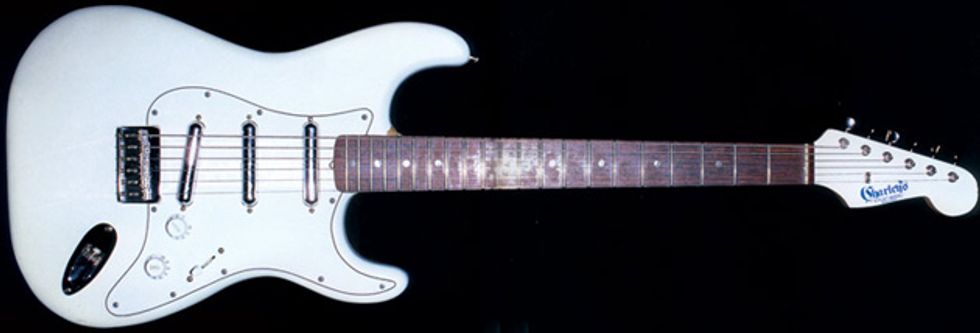
A gift from Charley Wirz of Charley’s Guitar Shop, Dallas, in 1984. A hula girl sticker was applied to the back of the guitar and can be seen in photos when Stevie plays behind his head. This guitar was originally called “Ol’ White,” and later called “Ol’ Pearl” after the addition of the hula girl, a reference to the paint color and the hula girl. Alder body, ebony fingerboard, maple neck and Danelectro “lipstick” pickups. Hardtail (non-tremolo), single tone and volume controls. White “trick” or “flip-flop” automotive paint, which gives an irrdescent blue tint, depending on the light and angle of view. Seen on the cover of Couldn’t Stand the Weather. In 2003, Charley’s and René Martinez made 23 numbered limited edition replicas of this guitar, selling for $2500. Owners of these replicas have included Carlos Santana, John Mayer and Kenny Wayne Shepherd. In 2005, ten more replicas were made by René and the former owner of Charley’s without the Charley’s logo.
A 1965 Fender Stratocaster Stevie found in a pawn shop in the early ’80s but didn’t have the $350 for. His wife Lenny and other friends bought the guitar for him. Original sunburst finish removed and brown stain applied. A butterfly tortoise-shell inlay in body, believed to be a 1910-era mandolin pickguard. It had a rosewood fretboard, later switched to maple neck that Billy Gibbons gave Stevie. It is reported that Stevie did the switch himself and used non-stock screws, screwing one through the fretboard. Used to record “Lenny” and “Riviera Paradise.” Lenny sold at the Eric Clapton Crossroads Guitar auction on June 24, 2004, to the Guitar Center for $623,500. In December 2007, the Fender Custom Shop produced 235 replicas of Lenny, with an original price of $17,000 each.
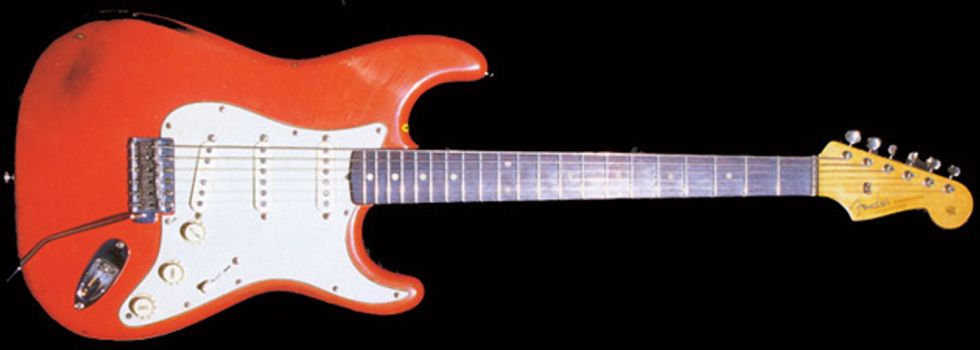
Acquired in about 1984 from Charley’s Guitar Shop, Dallas. Red was a stock 1962 until the left-handed neck was installed in 1986 and a new Fender neck installed in July 1990. The black color showing where the red has worn away is because the guitar was originally sunburst, then repainted red, probably at the factory for a special order.
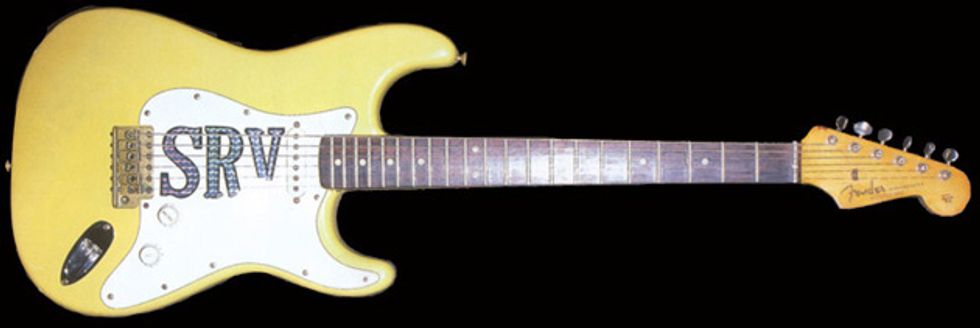
Stolen from Stevie in 1987 and never recovered. Previous owner was Vince Martell of Vanilla Fudge, who sold it to Charley’s Guitar Shop, Dallas, who painted it yellow and gave it to Stevie. The cavity had been hugely routed for four humbuckers. Charley gave it to Stevie in early 1981 with a single-coil DiMarzio neck pickup.

1961 Strat acquired in the fall of 1985 in either Baltimore or the Boatyard in Norfolk, it was to be a prize at a Stevie show, but Stevie bought it and they gave away some other guitar. Butterscotch-colored stock 1961 Stratocaster. Non-original pickguard made by René Martinez.
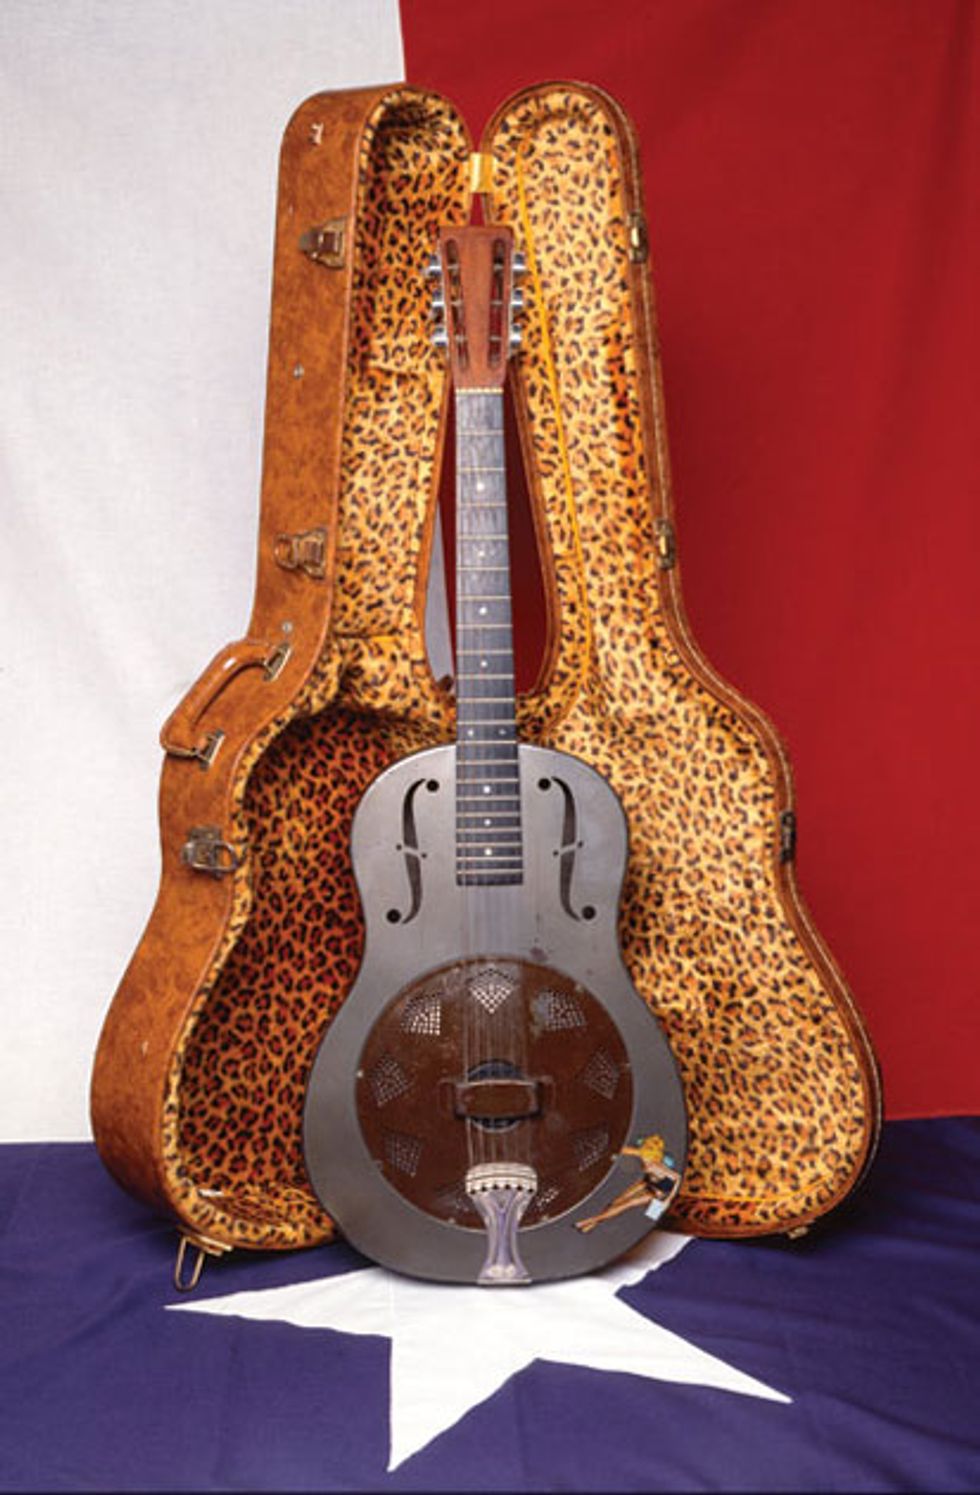
Acquired as a gift from roadie Byron Barr, the 1928 (or 1929) National Steel guitar seen on the cover of In Step. Rumors that it may have belonged to Blind Boy Fuller are unsubstantiated. Serial number said to be 0034. Acquired from Charley’s in 1981.
The 1951 Fender Broadcaster was a hand-me-down from Jimmie to Stevie in the late 1960’s. Presumably it was Jimmie who carved “Jimbo” on the back of the guitar. He also had a porcelain door knob on the guitar for a while. Stevie took it to shop class at school and sanded all the finish off. It is apparently this guitar that can be heard on the earliest known recording of Stevie, playing at the End of Cole Avenue club in Dallas in 1969. Stevie traded it for an Epiphone Riviera, and it changed hands again and is now owned by a private collector in California.
It’s a stretch to call the Diplomat one of Stevie’s guitars, but he definitely played it at least once. He purchased this guitar in New Zealand in late 1986 for his girlfriend Janna to learn to play on. The only markings visible without taking it apart are “Diplomat” in abalone on the headstock, and “Made in Japan” on the neck plate.
The Diplomat guitars were apparently made in Japan by the Aria company, which exported guitars under the names Diplomat, Diamond, Arbor and Conrad, among others. One fan says that he took the Diplomat badge off his guitar to find Ibanez underneath. I’m told The Cure’s early sound is from Diplomat single coil pickups installed in a Fender Jazzmaster guitar.
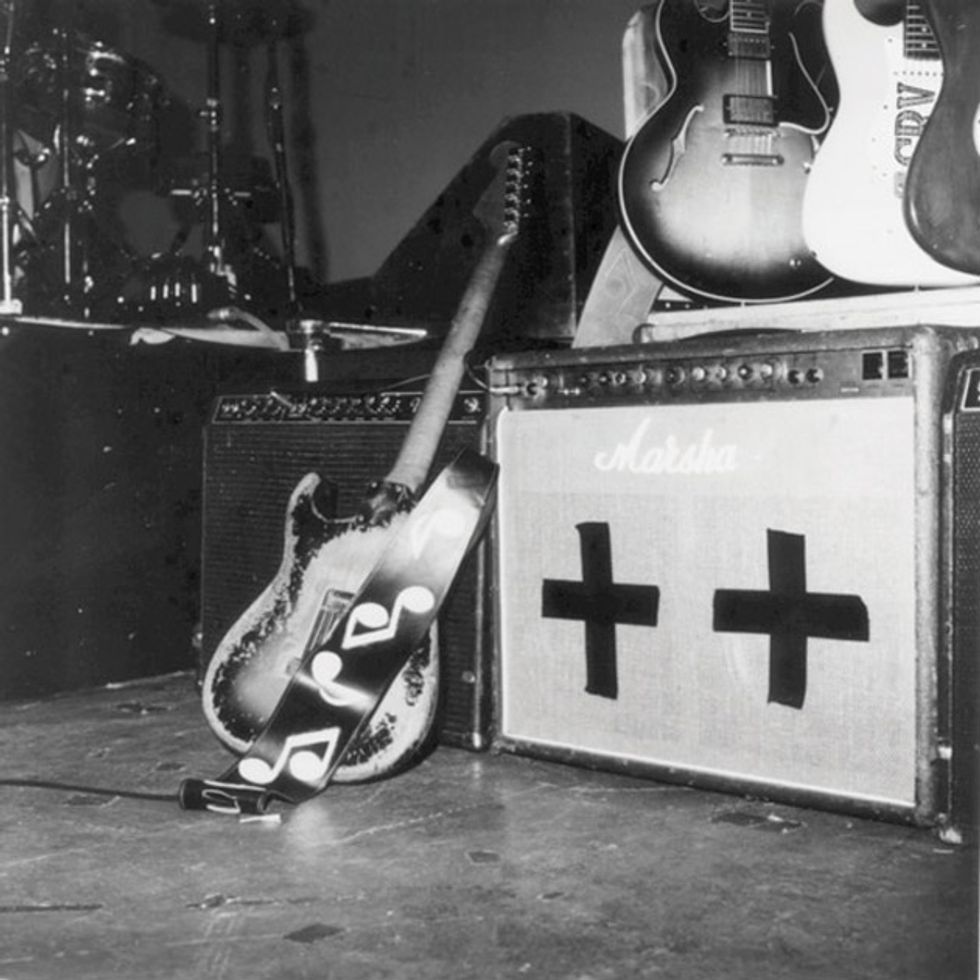
In the early 1980s, Stevie used a Marshall 4140 2x12 Club and Country 100-watt combo amp for clean tone and his two Vibroverbs for distortion. The Marshall’s factory test date was February 18, 1980. Photos from 1981 show two Celestion G12-80 speakers. It had brown “elephant” cabinet vinyl and tan basketweave grill cloth. In a 1983 interview, Stevie mistakenly suggested that this was a 200-watt amp that did not perform properly, peaking at 80-watts. It would not produce 200 watts because it was a 100-watt amp. In 1983 Stevie was preparing to go on tour with David Bowie but at the last minute dropped out. Before he did, however, Bowie’s crew took the Marshall amp and painted the vinyl black and the grill cloth grey, presumably to approximate the look of other amps that would be on stage. Stevie’s road manager, Cutter Brandenburg, recalls that after the paint job, the Marshall letters would not stay on and they would catch in the guitar strings when Stevie leaned Number One against it for feedback. Some of the letters broke off, so photos show the amp with “Marshall,” “Marsha” and “Marsh” before the remainder of the name was finally removed completely. All three of Stevie’s roadies/techs from this era recall this amp. Once Stevie started making some money, he upgraded to larger Marshall and Dumble amps and traded this one in sometime after the spring of 1983, possibly as late as 1984. It was then owned by another Texas guitar player for many years. It was then sold and pawned. In May 2003, the author purchased the amp. It still has the Bowie paint job and the Celestion speakers, though the broken knobs and logo have been replaced.
1985: two blackface Fender Super Reverbs (4x10 EV’s), a 150-watt Dumble Steel String Singer (4x12 with four 100-watt EV’s, and 6550 tubes), another Dumble 150-watt 4x12. The 4x12 cabinets were non-angled homemade cabs. Sometimes a 200-watt Marshall Plexi-Major was substitued for the second Dumble head. Stevie had two Fender Vibroverbs ca. 1963-64, (1x15) one often used to power a Fender Vibratone. The Vibroverbs and Supers had 3/4” plywood baffle boards to accommodate the weight of the speakers. The EVM’s larger magnets required repositioning some of the transformers in the chassis. In the later years, the Vibroverbs had Super Reverb-style transformers. The first channel from the phase inverter tube was disconnected and the tremolo disabled (by disconnecting the wires from the intensity control - don’t try this at home unless you want to turn yourself into a light bulb). In the summer of 1990, Stevie also took a couple of 4x10 Fender reissue Bassmans on the road, but the speakers were replaced.
The two Vibroverbs are often referred to as “sequentially numbered” 5 and 6, but the serial numbers were in fact 36 digits apart. 5 and 6 are references to the Dumble amps, which were numbers 005 and 006.
Tubes were typically Philips 6L6’s and 12AX7’s and GE 6550’s. Mesa Boogie STR415’s and STR387’s were also used when they could be found.
Volume settings on stage usually started at 7 or 7.5 but would end up at 10 for “Voodoo Chile.” Roadie Cutter Brandenburg recalls that Stevie would often run his hand down the bottom of the knobs, turning them all up as far as they would go.
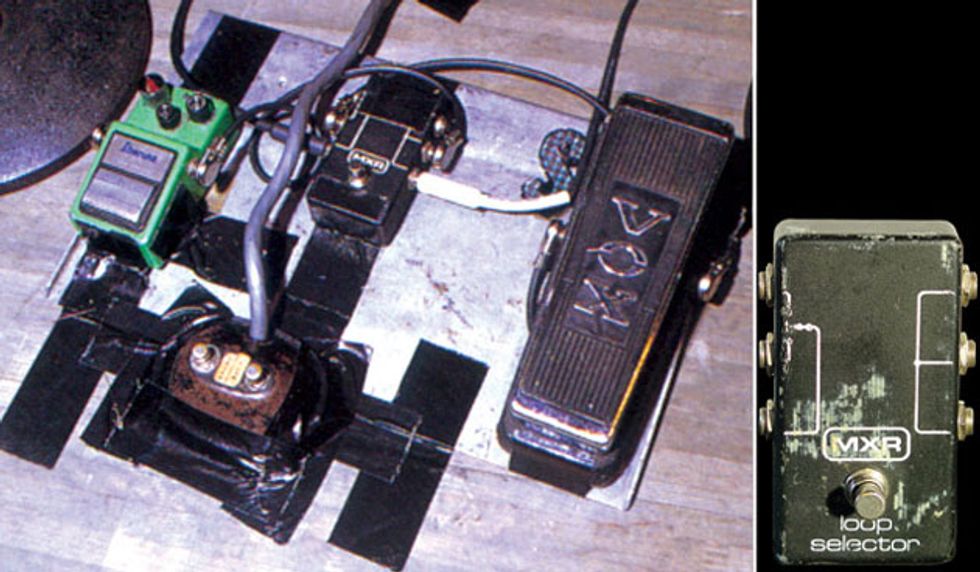
Ibanez Tube Screamer: Stevie upgraded as new versions came out - TS-808, TS-9, TS-10 Classic. A fan reports that the chip in Stevie’s pedals was probably the RC4558 chip for clean boost.
Wah-wah: Vox wahs from the ’60s. Occasionally connected two together.
The usual setup in the later years was Ibanez Tube Screamer TS-10, Vox wah, vintage Dallas-Arbiter Fuzz Face, and Tycobrache Octavia. For a brief time he used a Univibe. Roger Mayer Octavias were used prior to the Tycobraches. Cesar Diaz installed matching germanium transistors in the Dallas-Arbiter Fuzz Face body to increase transistor life.
Microphones in the studio for In Step were Shure SM57’s and Sennheiser 142’s. Occasional use in the studio of a Roland Dimension D for extra chorusing effect.
Loop Selector - Stevie had several MXR loop selectors in the early ’80s, one of which is in the author’s collection.
The splitter box which later replaced the loop selectors was one input and six outputs to the amps. No preamp, but resistors to cut down the noise. With the Vibratone he used a Variac AC power regulator.