Last month, I walked you
through the evaluation
process that precedes any restoration
work I do. The subject
of our evaluation was a ’72 Les
Paul Deluxe. This time around,
we’ll begin restoring the guitar
based on our previous diagnoses.
(If you missed that column,
check out “Evaluating a ’72Gibson Les Paul Deluxe” at
premierguitar.com.)
As you may recall, there was
an assortment of worn-out parts
and alterations to this Les Paul.
Knowing it had been heavily
played for several years, the new
owner did not have any delusions
about it being in mint condition
after work was completed.
He was enthusiastic about his
find and asked us to breathe life
back into the instrument.
Fret Condition.
This guitar’s frets had seen better days, and they were extremely low and flat, with some pitting. In this condition, there is no realistic chance of producing a properly intonated and bell-like sustained tone. Even the fretboard binding nibs were mostly nonexistent. Because the original frets couldn’t be resurrected by leveling and re-crowning them, I needed to extract and replace them with fresh fretwire.
Extracting the Frets.
Over the years, I’ve gravitated toward an assortment of tools and procedures for extracting frets smoothly with minimal or no tear-out to the fretboard wood. The first step is to condition both the frets and fretboard before starting the actual extraction. If you don’t take precautions, there can be catastrophic repercussions when the fret barbs pull up against the wood.
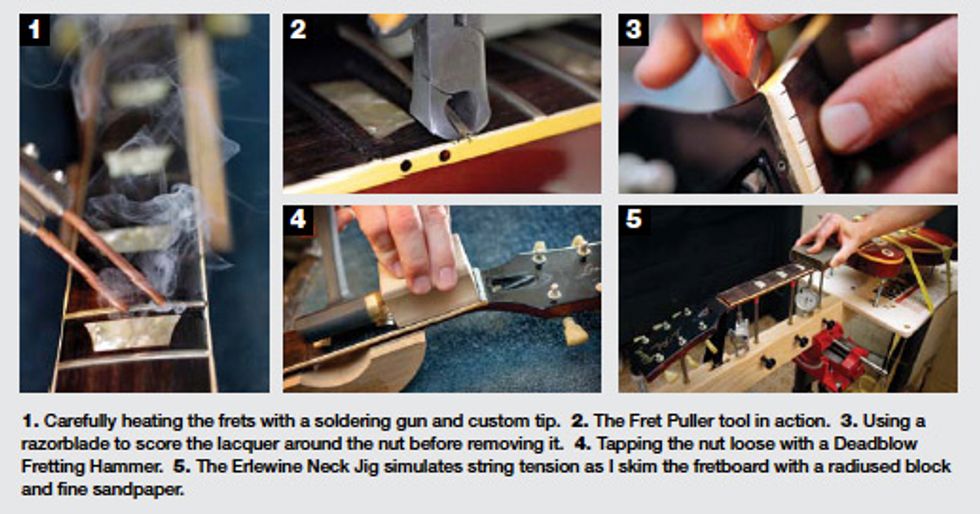
I conditioned each fret by placing a thin layer of water over its top and sides and then heating up the fretwire using a soldering gun with a custom tip. This tip consists of two brass rods that are radiused so their ends sit on the fret crown. When the rods contact the fretwire, the circuit is completed, and this generates heat between the rods throughout the fret. It’s important to pay close attention to the rods’ temperature, because excessive heat will melt the fretboard binding.
I use a special tool called a Fret Puller (available from stewmac.com, item #1637) for extracting the frets. During this operation, I rely on the Rock-n-Roller Neck Rest (#3722) to securely support the guitar neck.
On the ’72 Deluxe, all the frets came out smoothly and without damaging the fretboard. The quality of the Indian rosewood slab contributed to the smooth extraction. Occasionally, I come across fretboards that are extremely brittle, and no matter what I do it’s nearly impossible to avoid some chipping.
I should also note that, whenever possible, I protect guitar bodies with a thick leather skirt during restoration. I acquired this leather from my father, as these particular pieces were too thick for his needs— leathering accordion and concertina reeds. Thanks, dad!
Removing the Nut.
The original Gibson synthetic nut was coming off, and the string slots were worn and bottomed out to the point that they wouldn’t accommodate the height of replacement frets. When removing a nut on this type of headstock, the first step is to use a razorblade to score the lacquer around the nut at the seam lines. This limits any chance of damaging the finish around the nut when it pulls away from the fretboard. While doing this work, I clamp the neck in the Ultimate Vise (#3412). I apply feather-light pressure and just let the blade do the cutting.
After scoring around the nut, I try to gently tap it loose using my ergonomically designed wood block and Deadblow Fretting Hammer (#1296). Luck was on my side as the nut broke loose fairly well. There are times, however, that a nut is glued in too securely to tap loose. In that case, you need to cut the nut lengthwise down the middle with fine saws (#3600) or a Dremel tool (#0358), and then gently work the pieces out of the nut slot.
Using the Erlewine Neck Jig.
The Erlewine Neck Jig, ShopStand, and Angle Vise (#5392) has endless uses in our shop. This jig has various adjustment options, including dial gauges to allow for precise setups. For this project, I used it to simulate normal string tension after I removed the strings. Once I’d pulled out the frets, I used a 10" radius block (#0411) with 280-grit sandpaper to skim over the rosewood fretboard and eliminate any micro high spots.
A parting bit of info on this ’72 Deluxe: In last month’s column, I described how someone had added low-profile crème plastic rings to surround the original pickup rings. However, after reading this in PG, Dave Rogers of Dave’s Guitar Shop wrote me to set the record straight. “I just wanted to let you know,” he said, “that those goofy thin pickup surrounds were stock on that LP Deluxe. You don’t see them often, but they are original to that guitar.”
This little-known fact illustrates how there’s an endless pool of knowledge to be gathered throughout life. Next month, I’ll be back with more restoration techniques. See you then!
 John Brown is the
inventor of the Fretted/Less
bass. He owns and operates
Brown’s Guitar Factory,
a guitar manufacturing,
repair, and restoration facility
staffed by a team of talented
luthiers. His guitar-tool and accessory designs
are used by builders all over the world. Visit
brownsguitarfactory.com or email John at
info@brownsguitarfactory.com.
John Brown is the
inventor of the Fretted/Less
bass. He owns and operates
Brown’s Guitar Factory,
a guitar manufacturing,
repair, and restoration facility
staffed by a team of talented
luthiers. His guitar-tool and accessory designs
are used by builders all over the world. Visit
brownsguitarfactory.com or email John at
info@brownsguitarfactory.com.