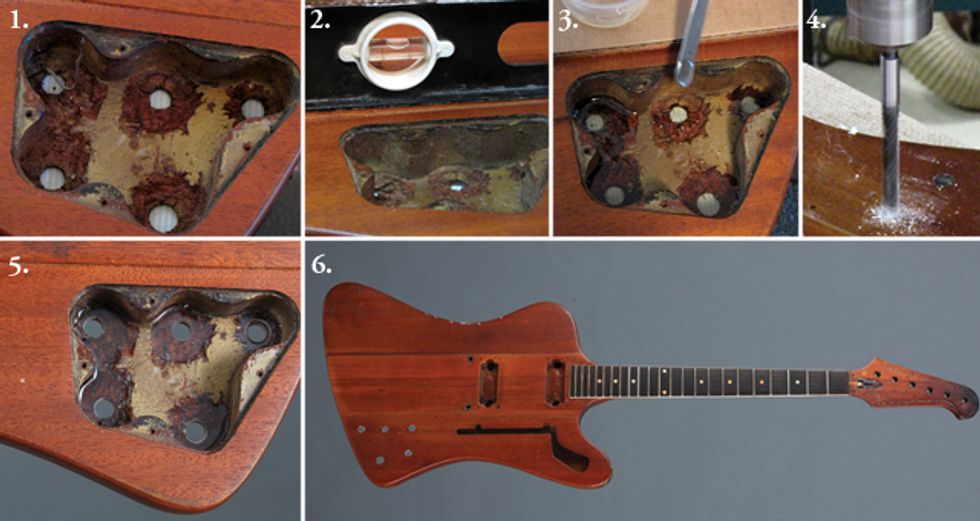
1. Inside the control cavity, the holes all showed evidence of chatter marks and missing wood. 2.
Using a carpenter’s level to ensure the guitar is perfectly level to the work surface. 3. Replacing
the missing wood with clear, high-strength epoxy. 4. Drilling out the epoxy-filled control holes.
5. Inside the cavity, the holes are now surrounded with solid, cured epoxy. Some of the original
golden mist paint is still visible here. 6. This Firebird is now repaired and ready for refinishing. The
guitar’s reverse body and non-reverse headstock makes it a rare 1965 transitional model.
This 1965 Gibson Firebird is a very rare bird indeed. For starters, it barely made it through a house fire. The temperature was so high, the guitar case began to melt, yet amazingly, the case protected the wood from turning to ashes.
Examining the guitar, I discovered that before the fire someone had removed the original finish and recoated the wood with a urethane finish. This non-original finish was now showing slight signs of melting and bubbling from extreme heat. There was one fretboard dot missing at the 21st position, but otherwise the remaining dots and plastic fretboard binding were in good condition.
But the fire was only part of the story. This Firebird has the model’s original “reverse” body shape, which was also paired with a reverse headstock when the instrument was introduced in 1963. What makes this guitar special is that it has the non-reverse headstock, but otherwise all the features of the ’63 Firebird—the original model. The transitional year for going to the non-reverse headstock, as well as other design changes intended to cut manufacturing costs (such as flat body with a more conventional doublecutaway design), was mid 1965.
After closely inspecting the body cavities, I concluded that the original factory finish was in fact Gibson’s golden mist—a custom color with a slightly yellowed clear overcoat added to the gold base coat. For you Fender fanatics, this acrylic lacquer is equivalent to Fender’s shoreline gold.
The headstock on this Firebird had two fractures that had been previously glued, but had found a way to separate over time. This is a common enough break for a 17-degree pitched mahogany headstock. The big, long protruding banjo tuners made for a neckheavy guitar, and let’s just say if it takes a fall, a vintage Firebird will not be as forgiving as some other guitars. Before re-gluing the fractures I thoroughly cleaned them by washing and flushing out dirt and old glue with acetone. Once they were clean, the seams clamped up nice and tight.
Inside the control cavity, I was surprised to see chatter marks of whittled away wood around each of the five holes. It looked like a chipmunk had been stuffed into the cavity with the backplate attached, and the hapless creature had then tried to dig its way out by following the light shining through the holes. Many times as I start a repair, I wonder just how and why a guitar got into its particular condition, but then I quickly catch myself and put my energy into solving the challenge before me. What happened here remains a mystery.
Often when I restore a guitar that has missing wood, I replace the missing material with wood. But because of the way this guitar was damaged and where the damage had occurred, I decided to use a slow-setting clear epoxy (item #5174 from stewmac.com). This highstrength, two-part permanent adhesive is activated when the resin and hardener are mixed in equal parts. This is a gap-filling epoxy for bonds that don’t require later disassembly.
From the outside of the guitar, I sealed off all holes in the control cavity using binding tape (#0677). With the body laying face down on my workbench, I used my aluminum carpenter’s level with its bubble vials to make sure the guitar was perfectly horizontal to the work surface. Then I slowly and evenly mixed the two-part epoxy to avoid any excess bubbling and provide a strong, consistent cure.
Carefully, I applied the mixed epoxy to the damaged areas, and let it settle flush to the wood surface. Because the instrument was level, the glue spread out to the surrounding wood very nicely. Once the epoxy had cured to full strength, I was ready to retap the holes for the pots and pickup switch using 3/8" brad point bit (#0339). To avoid any tear out inside when the drill bit cut through, I put a scrap of wood inside the cavity for support. After drilling these holes, I followed up with a 25/64" standard drill bit to allow for a light finish buildup.
I suggested to the owner that it would be a good idea to install the tuners and bridge, string up the guitar, and then have him play it with the neck under tension for a couple of months. This would make sure that everything has acclimated before I returned the Firebird to its original glory by spraying it with a vintage golden mist finish.
 John Brown is the
inventor of the Fretted/Less
bass. He owns and operates
Brown’s Guitar Factory,
a guitar manufacturing,
repair, and restoration facility
staffed by a team of talented
luthiers. His guitar-tool and accessory designs
are used by builders all over the world. Visit
brownsguitarfactory.com or email John at
info@brownsguitarfactory.com.
John Brown is the
inventor of the Fretted/Less
bass. He owns and operates
Brown’s Guitar Factory,
a guitar manufacturing,
repair, and restoration facility
staffed by a team of talented
luthiers. His guitar-tool and accessory designs
are used by builders all over the world. Visit
brownsguitarfactory.com or email John at
info@brownsguitarfactory.com.


![Rig Rundown: Russian Circles’ Mike Sullivan [2025]](https://www.premierguitar.com/media-library/youtube.jpg?id=62303631&width=1245&height=700&quality=70&coordinates=0%2C0%2C0%2C0)