Last month, I presented a general overview
of the pedalboard I use on tour and discussed
how to reconcile varying volumes
between guitars with different pickup outputs
in a live setting. In this column, we’ll
explore some important aspects of tone
that are often overlooked and have nothing
to do with effects at all.
Pickup Height
Pickup height makes a huge difference in
both your guitar’s tone and overall volume.
Every little change in pickup height will
change your guitar’s volume dramatically.
If you find yourself really liking the sound
of a guitar’s bridge pickup, but you don’t
really care for the neck pickup (or vice
versa), try adjusting the height of the pickup
you’re unhappy with. You’ll be surprised
at how much you can change the personality
of your instrument through pickup
height adjustments.
In general, you will want to get the volumes
of your pickups equal. Having your
pickups set at the same height does not
necessarily mean they will be the same
volume, so you will need to experiment
and listen closely. A few months ago, Paul
Reed Smith and I were having a conversation
about several different aspects of the
technical side of guitar tone, and he made
a really interesting analogy. He said, “The
guitar is the singer and the pickups are the
microphones.” Imagine how vocalists pull
the microphone away from their mouth to
create a drop in volume. You can apply the
same concept to a guitar by moving the
pickup further away from the strings.
Pickup height can also help cure a very
common problem associated with single-coil
pickups. Often times, if you play an E
chord in the bridge position on a single-coil
guitar with the volume cranked on
your amp, the treble strings will produce
an offensive, shrill sound that will make
listeners wince. I’ve solved this problem on
my single-coil bridge pickups by lowering
the height on the treble side just a touch.
The volume on the treble strings drops a
little bit when I do this, and I also notice
that a tiny amount of high end disappears
on the attack of the notes, but the shrillness
vanishes.
Why is this? If you look at a bridge pickup
on a Stratocaster or Telecaster, you’ll see
that it’s angled toward the bridge on the
treble side. This means that the pickup
senses the treble strings at a different
point than on the bass strings. The closer
the pickup is to the bridge, the twangier
the strings will sound. In addition, more
high end will be translated by the treble
strings because the string is tauter close
to the bridge and therefore moving less.
So before you roll the tone knob back
or dismiss your bridge pickup as “too
bright,” try adjusting the pickup height
and see if you can make its tone more
attractive to your ears.
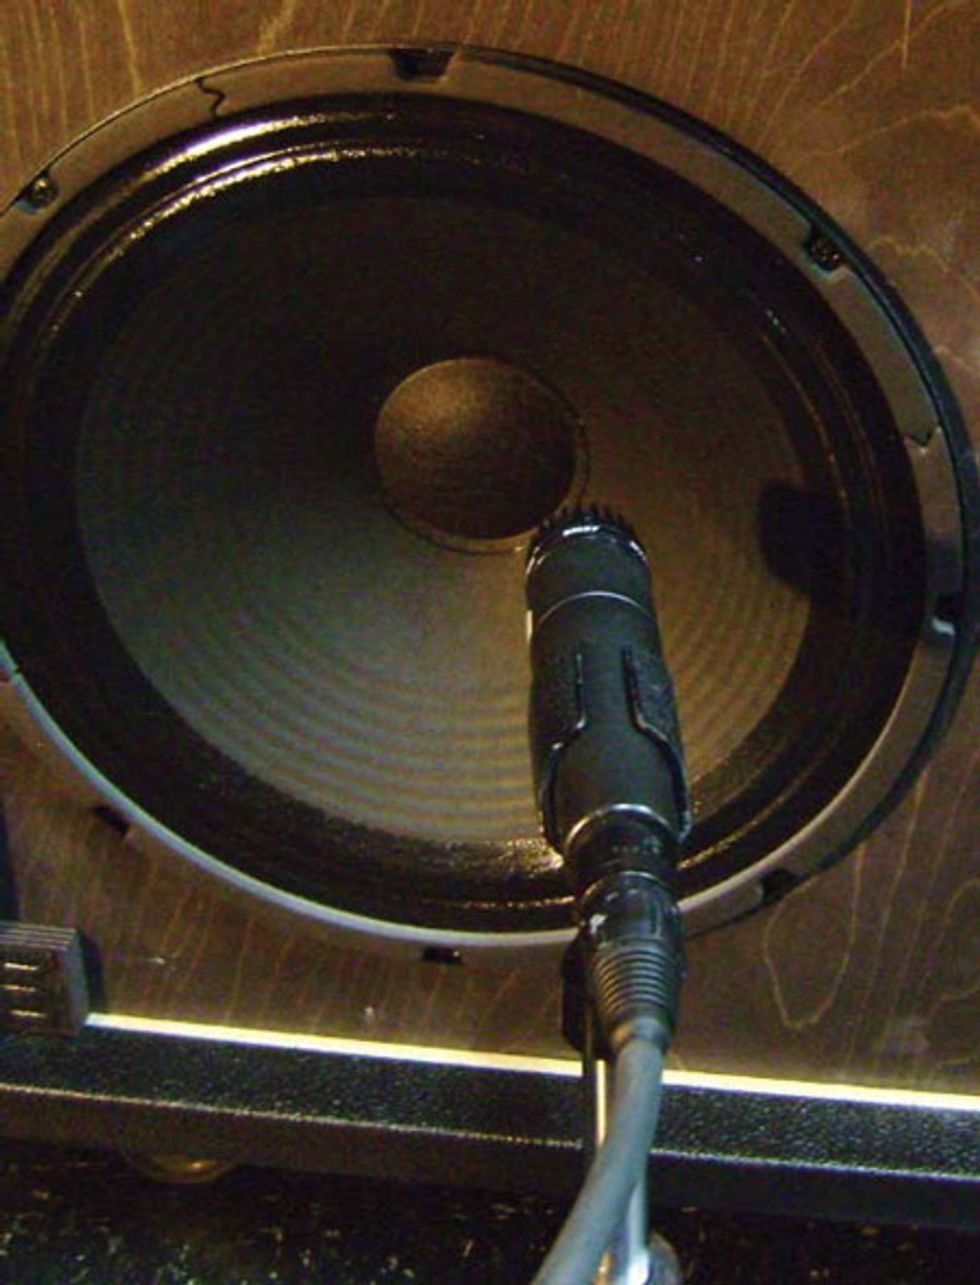
Position a Shure SM57 mic between the speaker’s dustcap and cone to capture the most energetic sound waves.
Speakers and Mic Placement
When it comes to speakers, I use Celestion Vintage 30s and Mesa/Boogie Black Shadows (the latter are 90-watt speakers). I like to place a Shure SM57 microphone between the speaker’s dustcap and the cone, as shown in the photo. This placement works well on both the 30s and Black Shadows. I asked Randall Smith, founder of Mesa/Boogie, why that particular location sounds so good. He explained that it was similar to creating a ripple in a pond. The most energy resides in the place of impact and the ripples get weaker the further they travel from that point. In the case of a speaker, the ripples are sound waves, which are created by the speaker’s coil. The coil is located behind the area where I place the mic, which produces the best tone, in my opinion.
Another tip you might find useful: The Shure SM57 is the industry standard for miking a guitar amplifier, but we must remember that an SM57 was created as a vocal mic, so aspects of its design have a singer in mind. If you remove the cap on the capsule, you’ll discover a piece of foam between the windscreen and the diaphragm. This foam is installed because it prevents moisture from a singer’s mouth from getting into the mic diaphragm. If you’re using the SM57 strictly for miking a speaker, you can pull the foam out. When you remove it, you’ll notice a little more clarity on the top end, as well as more definition in the notes’ attack.
As you experiment with mics and mic placement, remember that every player’s approach and playing style is different, so you will want to experiment with different techniques in different situations. If you have a wireless system or a long cable, go to the front of house during sound check and listen to how your guitar tone is translating. Then walk back onstage and move the mic an inch or two, or change the angle slightly, and go back out to the front of house and take note of the changes in your rig’s sonic character.
I hope you find some of these techniques useful. I’m constantly educating myself on how to control and improve my tone, and I encourage you to do the same.