Learn how to map out the fretboard and be able to play in any key using a few basic open-position chord shapes.
Beginner
Beginner
ā¢ Learn how to convert all open-position chords to moveable shapes.
ā¢ Identify the location of the root in each shape.
ā¢ Discover how to connect all five CAGED shapes to map out the entire neck in any key, starting on any one of the five shapes.
To get the most out of your guitar playing, you need to have a deep understanding of the fretboard. Wouldn't it be nice if the guitar was laid out in a logical fashion? Well, it is! Let me introduce you to the CAGED system and explain how it works as an organizing tool. Once you understand the CAGED system, I believe you'll be able to "crack the code" and see the fretboard's inherent logic.
Note: This system only works with standard tuning.
Instead of starting with a lengthy description of the CAGED system, I've found the best way to learn it is to immediately dive into the material. Think of this lesson as a hands-on tutorial. Step-by-step, I'll walk you through this time-tested approach while providing practical assignmentsāas if we were in a one-on-one lesson. We'll start with the basics and then work our way through more advanced applications. Grab your guitar and let's get to it!
The CAGED System
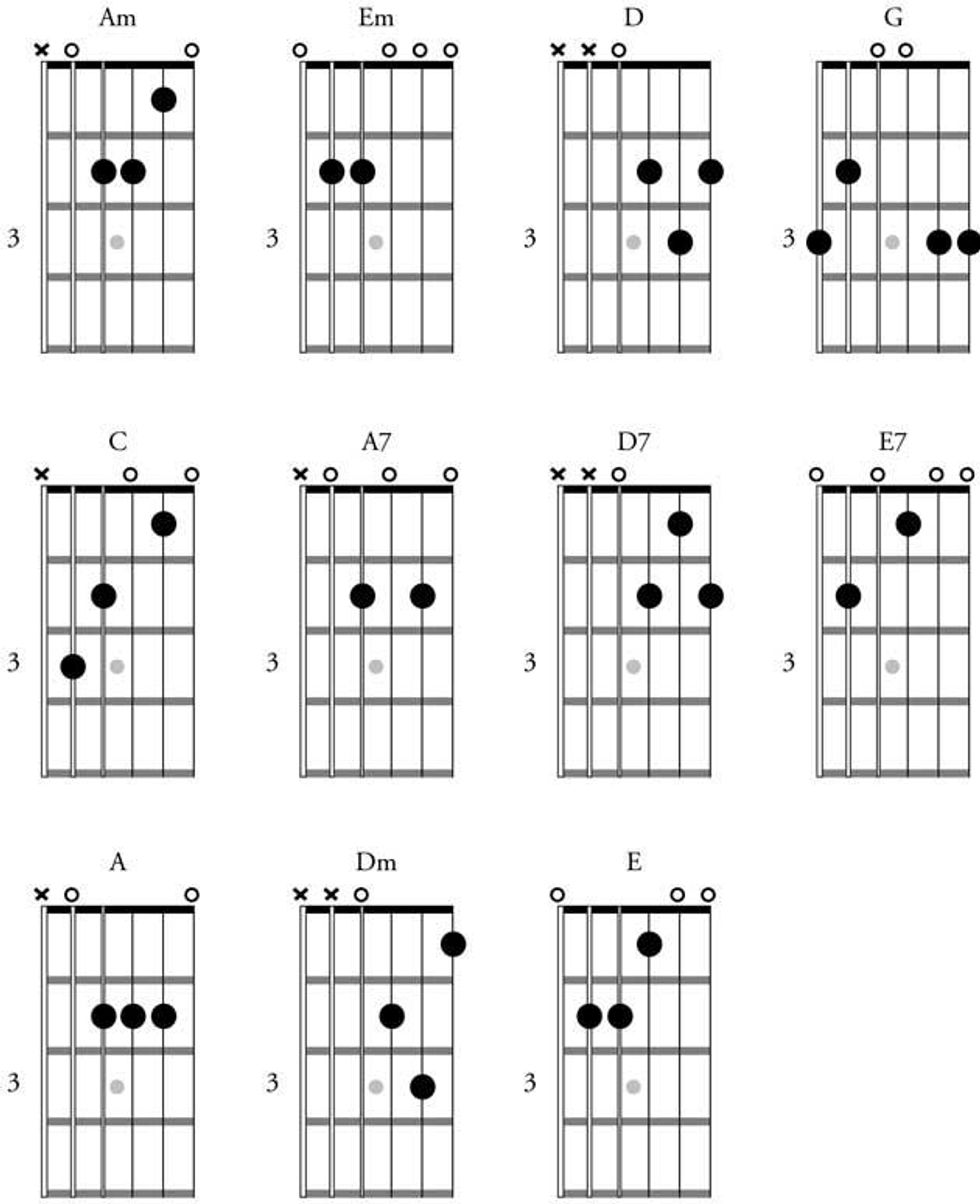
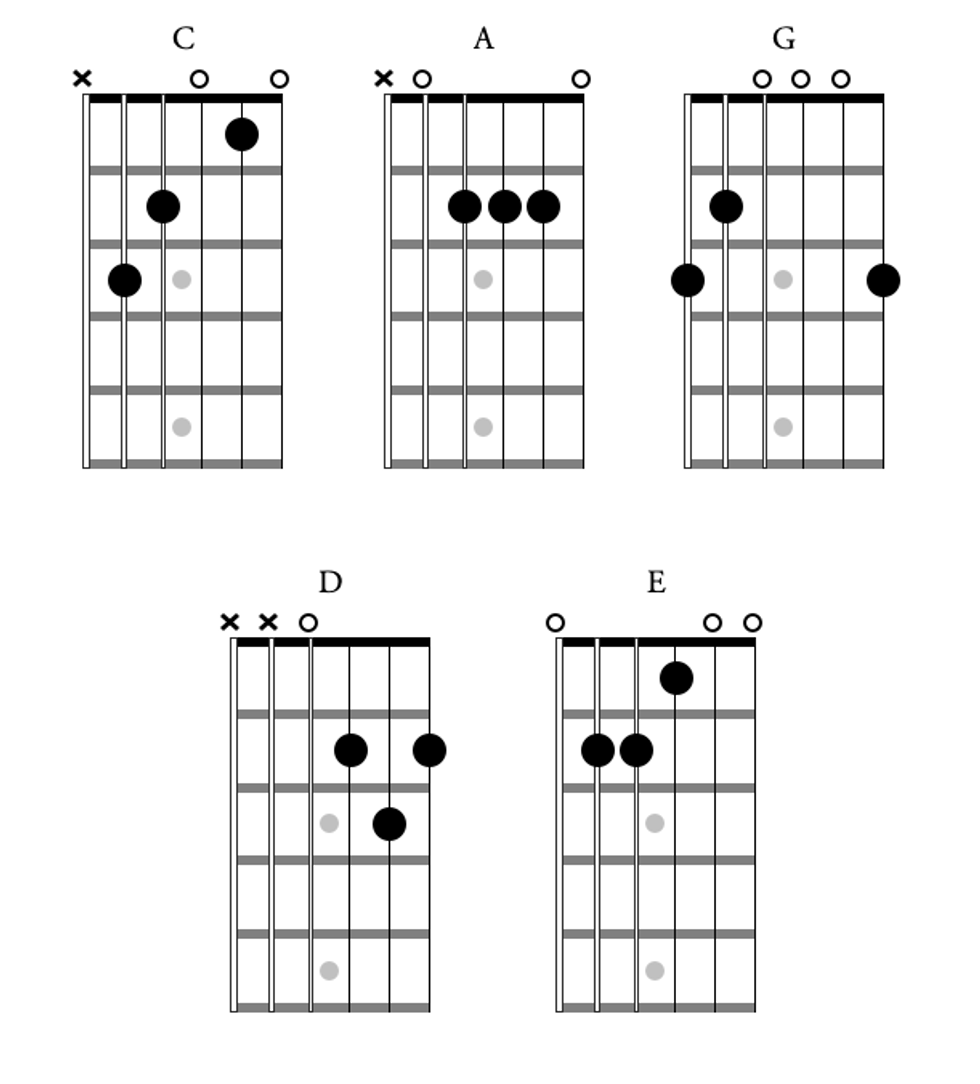
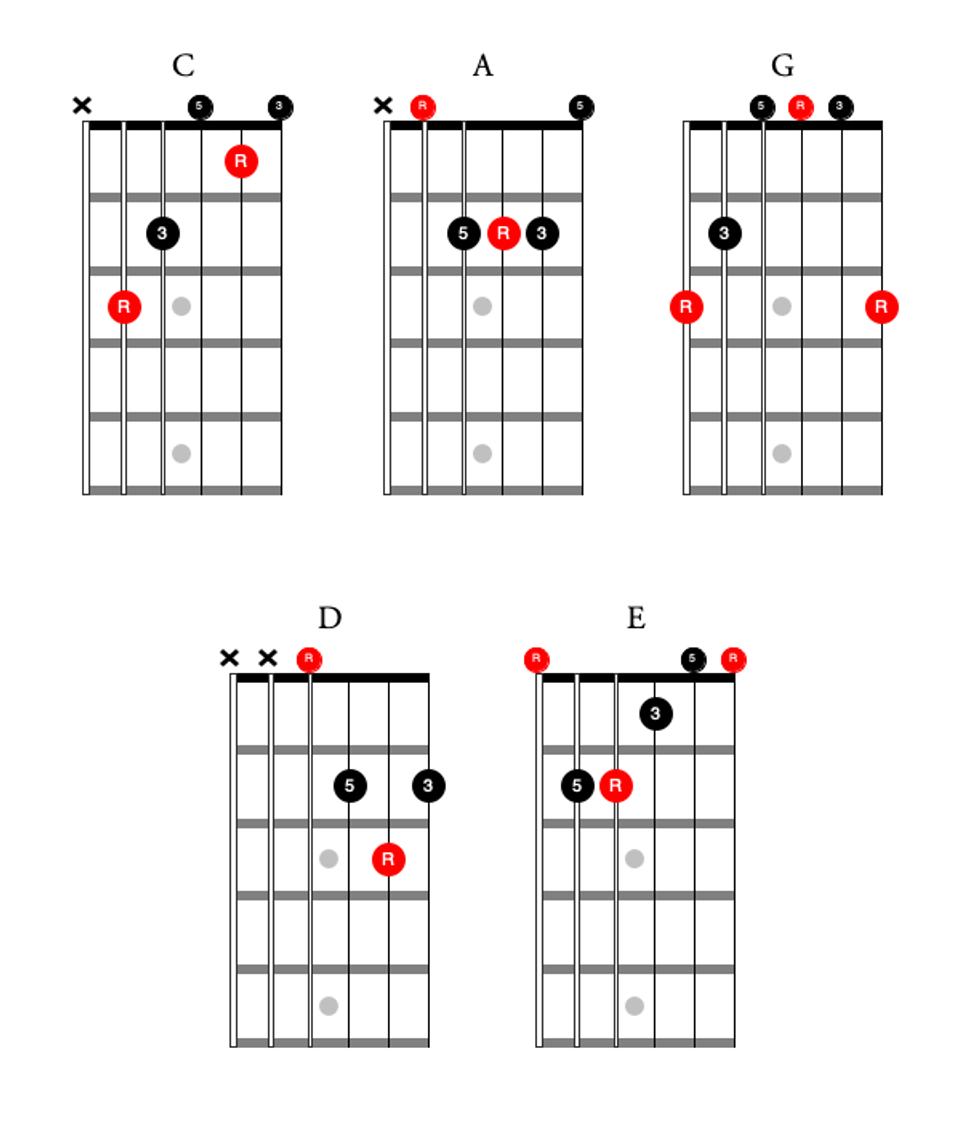
The CAGED system derives its name from five open-position chords: C, A, G, E, and D. To master the concepts in this lesson, you must know these five chords (Fig. 1).
CAGED Lesson Fig. 1
Next, you need to know where the rootāa chord's musical foundationāis located in each of the five shapes. The root of a C chord, for example, is C. Major chords, which we'll focus on first, are built by stacking the root, third, and fifth notes of their respective major scales. The notes of the C major scale are CāDāEāFāGāAāB. Therefore, the root, 3, and 5 of a C chord are CāEāG.
In Fig. 2, you'll find the five CAGED chords with the location of the root, 3, and 5 labeled in each chord diagram. To help you get visually oriented within each shape, the roots are marked in red. You'll notice that each shape contains more than one root. C, A, and D each have a low and high root; G and E each have three rootsālow, middle, and high.
CAGED Lesson Fig. 2
Assignment #1
Memorize the location of every root in each chord shape. For extra credit, memorize the locations of the 3 and 5.
Moving on Up
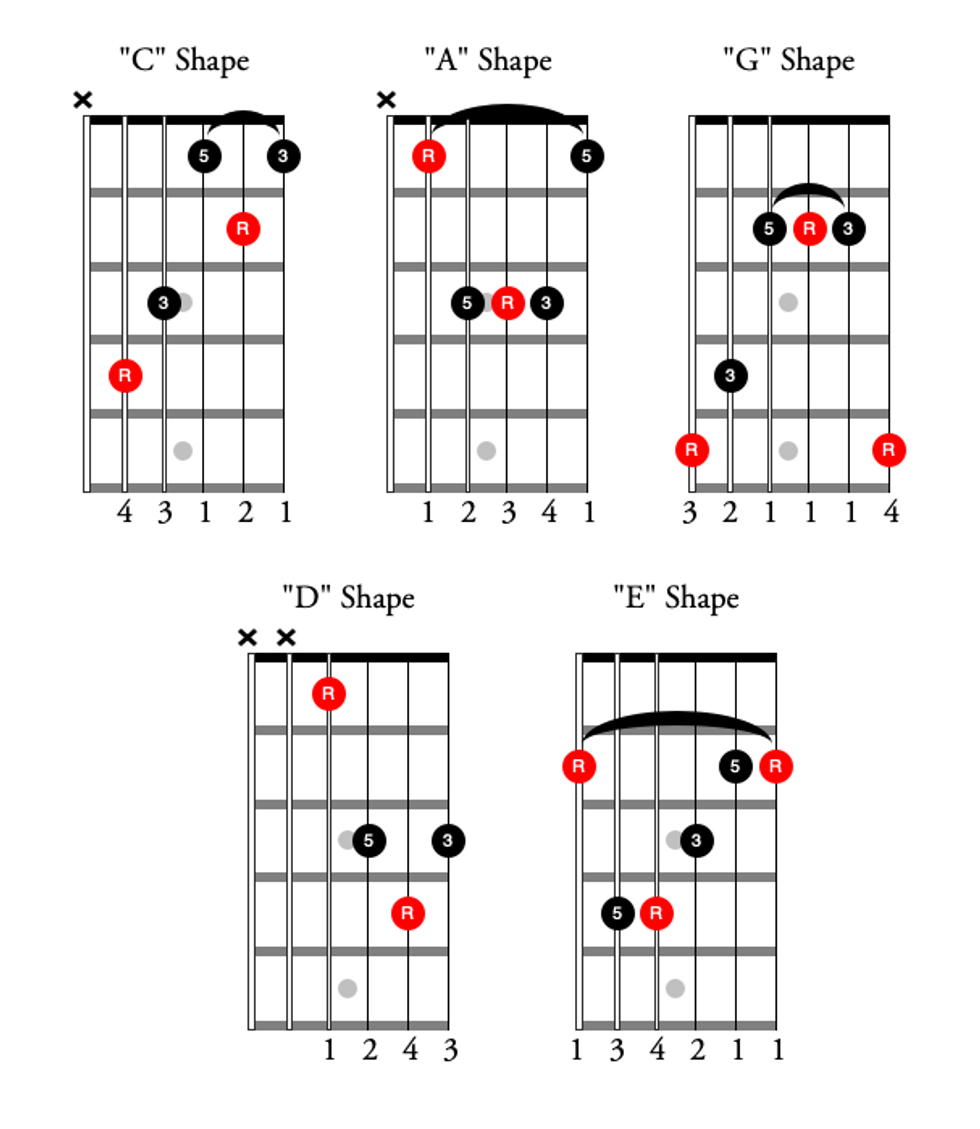
Now you know the shape of each chord in the basic CAGED system, as well as the location of their respective roots. The next step is to convert each open-position shape to a closed-position shapeāmeaning there won't be any open strings involved in playing the chord shape. To do this we must create barre chords out of each of the CAGED shapes.
Fig. 3 shows all the CAGED chords as barre chords. (Note: No barre is needed to play the "D" shape as a closed chord.) Some of these shapes may feel like old friends. The first barre chords most guitar players learn are the barre form of the "A" and "E" shapes.
CAGED Lesson Fig. 3
Two shapes that are less familiar and prone to spacing errors are the "G" and "D" shapes, and the common spacing error is to compress the fingering. Be sure to keep an empty fret between your first finger and the remaining fingers used to build the chord. Fig. 4 contrasts the incorrect, compressed fingerings with the correct ones for these two shapes.
CAGED Lesson Fig. 4
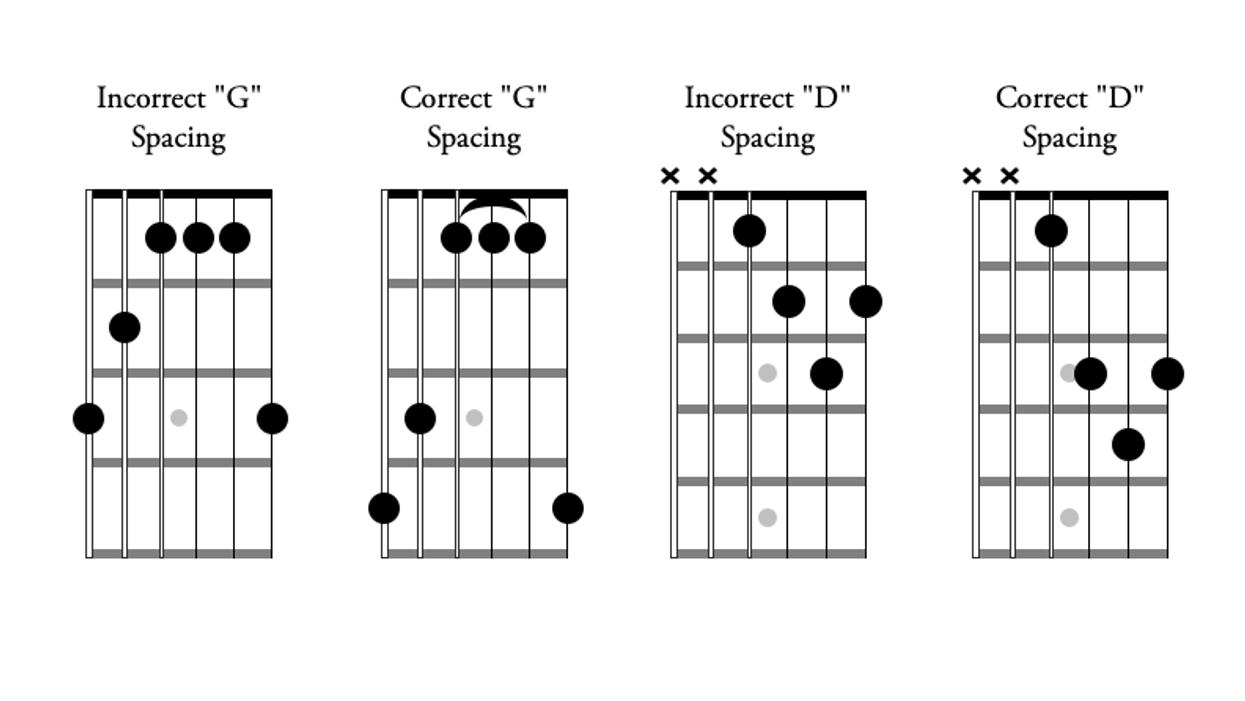
You may find a few of these shapes are difficult to grab due to the stretching involved. To minimize strain, don't wrap your thumb up and over the neck on the 6th-string sideākeep it behind the neck instead. Also, I encourage you to only barre the necessary notes. For example, when playing the "G" shape, don't barre across all six strings; you only need to barre the three notes found on the 2nd, 3rd, and 4th strings. Why create any extra work?
By converting each of the five CAGED shapes into barre or movable forms, you have exponentially increased your chord vocabulary. Each individual shape can become any major chord you need: Simply move the chord up or down the neck and place the shape's root on whatever note you wantāit's that easy. When you look at Fig. 5, you'll see that moving the "C" shape up one fret creates a C# chord, and moving it up one more fret creates a D chord.
CAGED Lesson Fig. 5
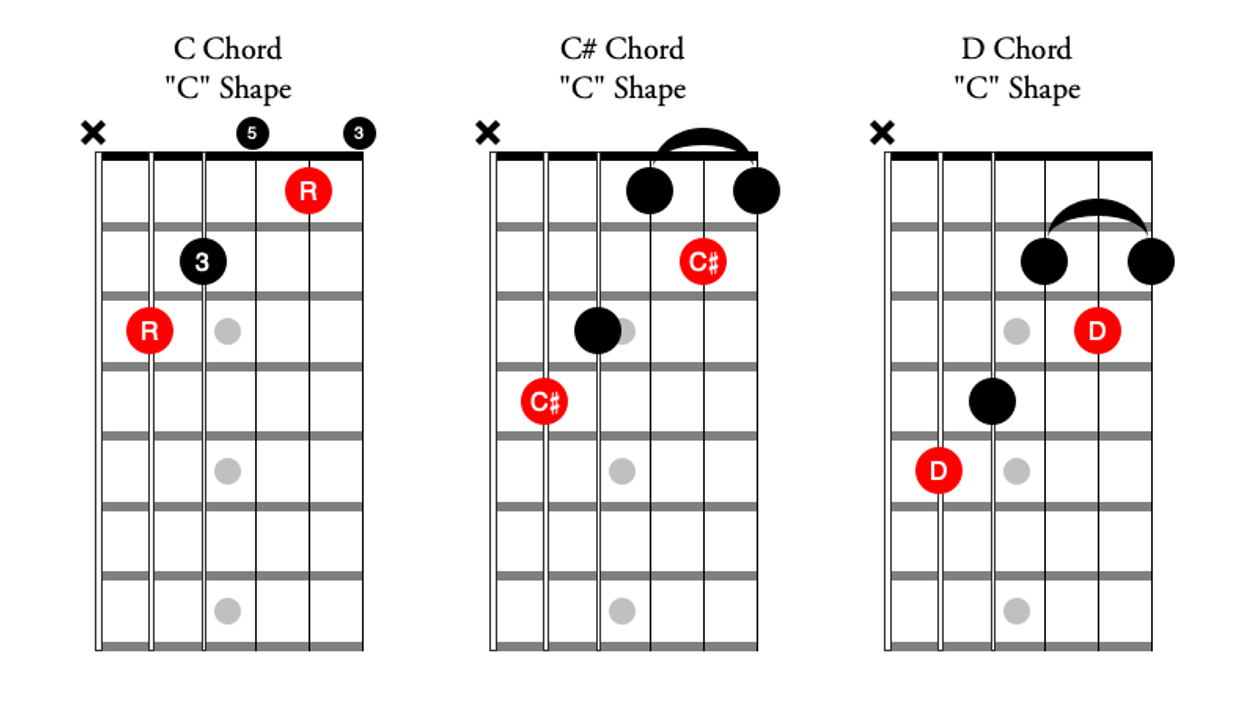
By knowing that the root is located on the 5th and 2nd strings in the "C" shape, and knowing the names of the notes on those two strings, I was able to correctly identify the actual chord I produced by shifting the "C" shape to these other locations. To do this with all five shapes, you need to know the location of the root within each shape and the names of the notes on the fretboard. Fig. 6 names all the notes on the fretboard.
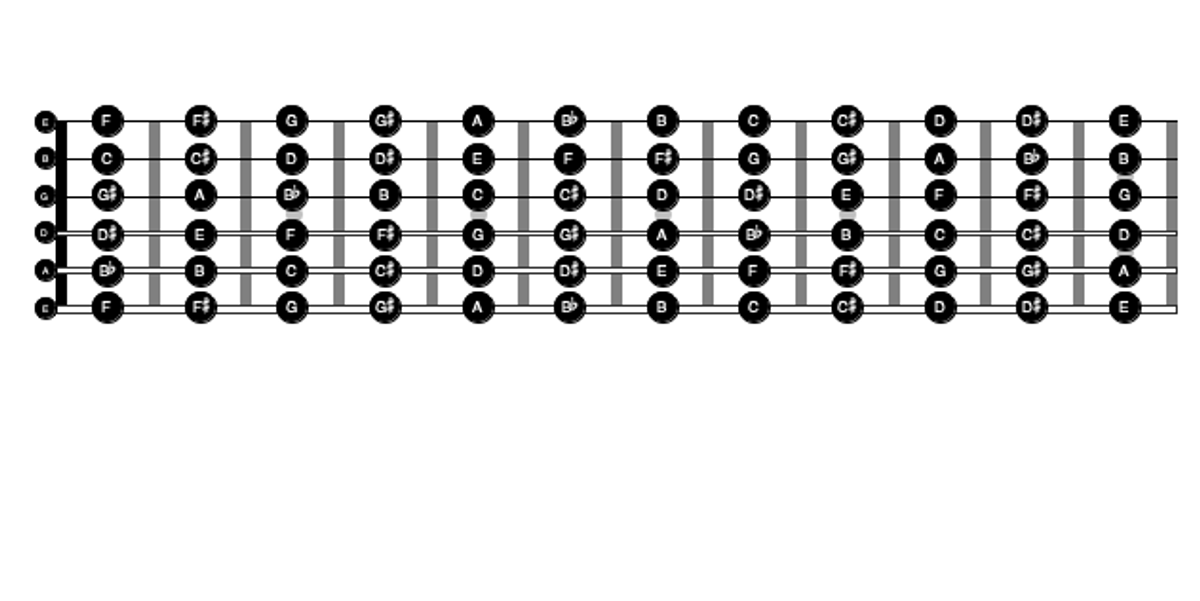
Assignment #2
Move each shape up and down in half-steps (in other words, one fret at a time), while focusing on keeping the shape together and not collapsing the "G" and "D" shapes. The goal is to correctly name the chord at any place along the neck.
Whatās in a Name?
Up to this point, we've focused on acquiring the chord shapes and laying the foundation for realizing the full potential of the CAGED system. Think of each shape in the system as a puzzle piece: When all the pieces are connected, you will have mapped the entire fretboard. Again, the best way to see how this works is to experience it on your guitar. Play each of the chords listed in Fig. 7, paying attention to the fret markers and spacing of the shapes.
CAGED Lesson Fig. 7
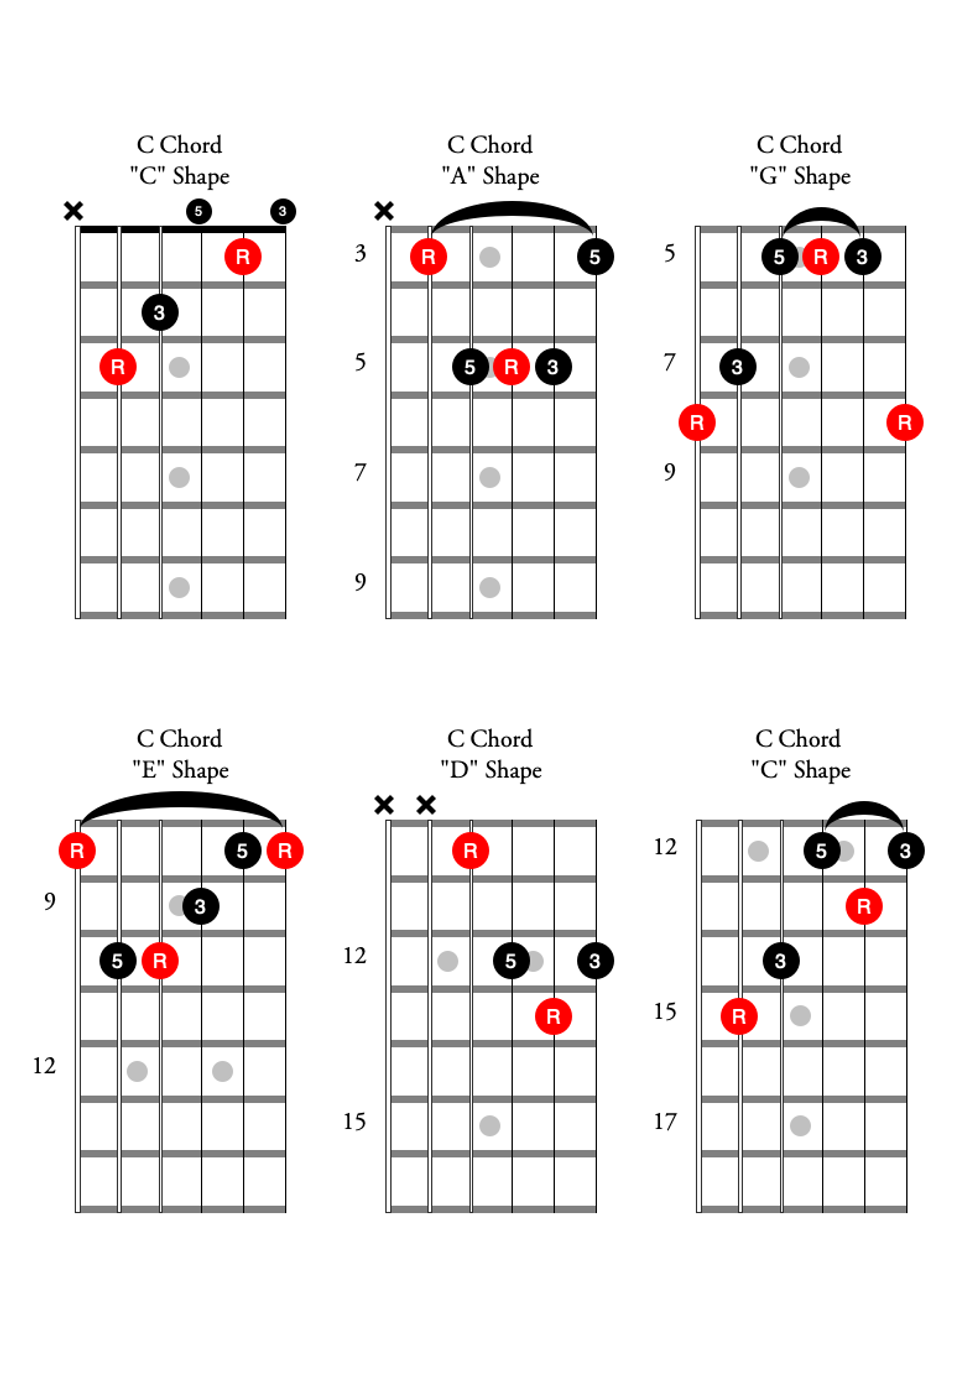
What did you notice? If you played this example correctly, you should have heard that they were all C chords. Hopefully you realized that you used all five shapes and you ended with the same shape you started with (assuming you have a cutaway on your guitar that allows you to access the higher frets).
By the way, did you notice the order of the shapes used in this example? The name CAGED not only tells you what chord shapes make up the system, but also the order in which the shapes connect to one another to map out the fretboard. Fig. 8 places all five shapes as C chords in one fretboard diagram.
CAGED Lesson Fig. 8
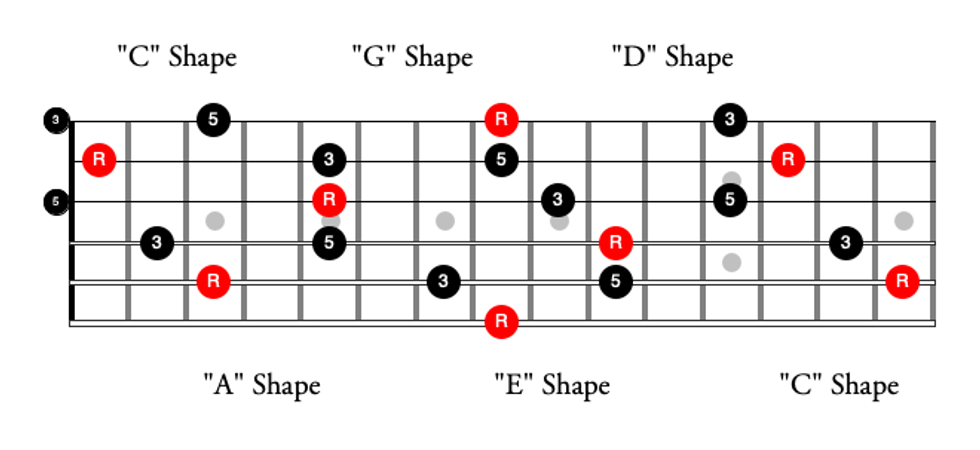
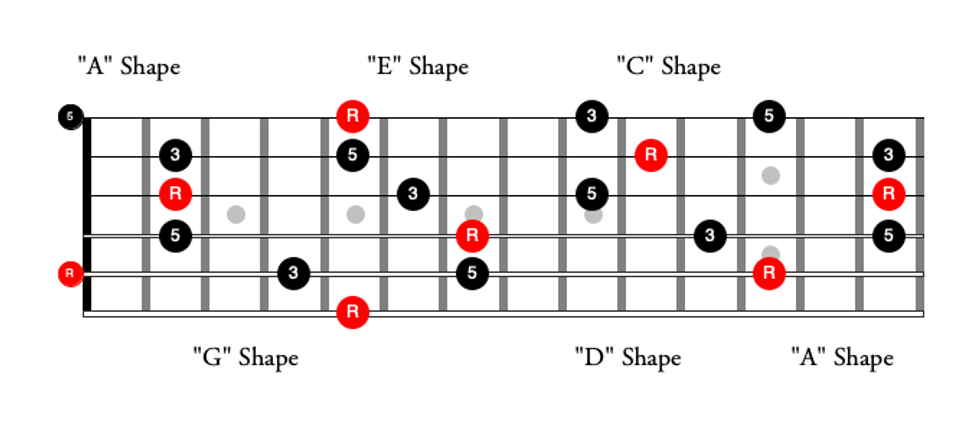
What if you want to map out the chords in the key of A the same way you did for C? To do this, start with the open position A chordāan A chord with an "A" shape. Then think of the spelling of CAGED and find the letter following A, which is G. So, play an A chord with a "G" shape. Then it's an A chord with the "E" shape, and so on until we return to the "A" shape. So in this example, our shape sequence is AGEDC. This sequence is mapped out in Fig. 9.
CAGED Lesson Fig. 9
Making Connections
Earlier I suggested you think of the CAGED shapes as individual puzzle pieces that, when connected, map out the entire fretboard. By playing through the above examples, you've experienced this. When mapping out a chord, it is important to be visually aware of how two adjacent shapes connect to each other. A general rule to keep in mind: Between two adjacent shapes, there will always be at least one note that's common to both. In Fig. 10, I've diagrammed all pairs of adjacent shapes for the C chord. Notes that occur in both shapes are indicated with a diamond.
CAGED Lesson Fig. 10
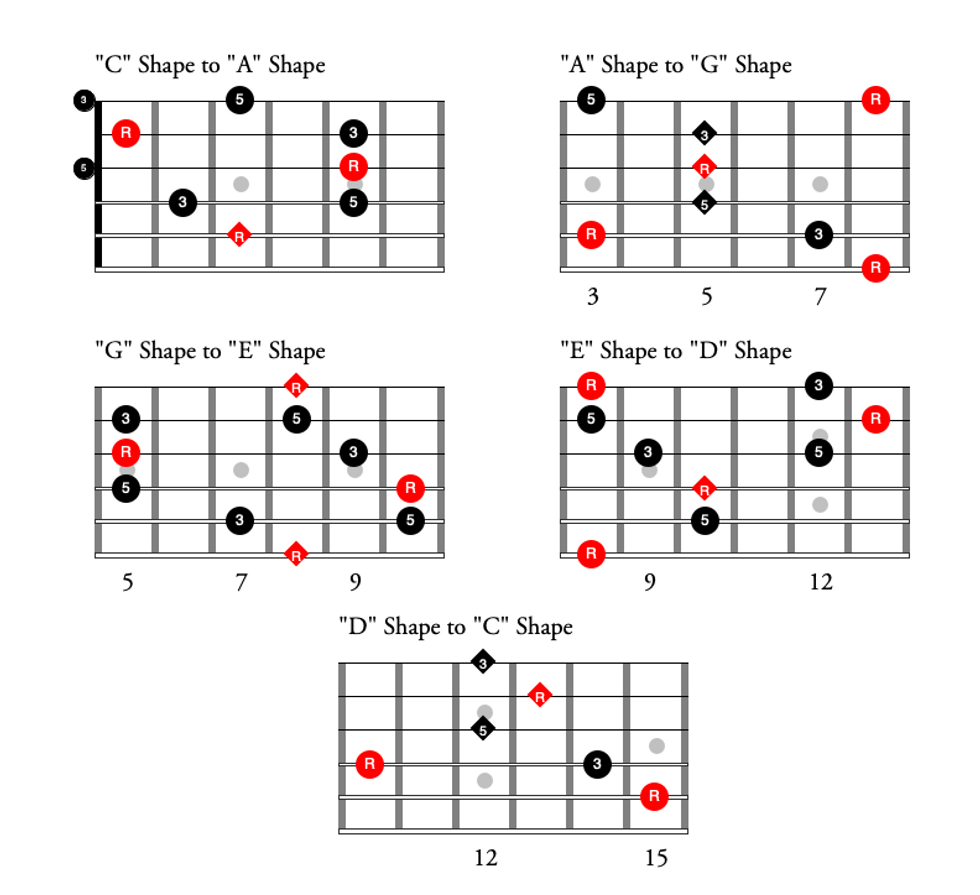
Assignment #3
Play through the CAGED sequence starting on each of the CAGED chords in open position (like we did in Fig. 8 and Fig. 9, using the "C" and "A" shapes, only this time complete the series by working through the remaining three shapesā"G," "E," and "D"). Once you're comfortable with this, play the sequence in all keys. For example, start with a Bb chord using the "A" shape barred at the 1st fret, then play the CAGED sequence in the key of Bb. Pay attention to the common note(s) between two adjacent shapesāthis will help minimize errors in shifting and connecting shapes.
Congratulations, you've mastered the fundamentals of the CAGED system and covered a lot of territory! The CAGED system provides a logical way of visualizing the neck using basic chord shapes you've most likely known for quite some time. But it doesn't stop there: The CAGED system is just as useful for scales and licks. In fact, I think of the CAGED system as five buckets where I can stash fretboard information. New chords, scales, licks, and melodies can all be related to one of the five shapes, and this allows you to integrate this information into your playing quickly and efficiently.
- Beyond Blues: Bridging the Gap Between Chords and Arpeggios ... āŗ
- Chromatic CAGED | Premier Guitar āŗ
- Beyond Blues: Understanding CAGED and the V Chord āŗ
- Dunlop Pivot Capo Review - Premier Guitar āŗ
- Beyond Blues: Bridging the Gap Between Chords and Arpeggios - Premier Guitar āŗ
- Can You Twang with CAGED? - Premier Guitar āŗ
- PG Explained: CAGED Guitar Chord System - Premier Guitar āŗ
- Rig Rundown: Lake Street Dive - Premier Guitar āŗ
- Learn the CAGED System in 10 Minutes - Premier Guitar āŗ
Want to know how tubes shape your tone? Join PG contributor Tom Butwin as he breaks down preamp vs. power tubes, tone tweaks, and biasing, in this ultimate beginner's guide to tube amps. From Fender cleans to Marshall grit, learn how to unlock the full potential of your amp!
Shop for tubes for your amp:
https://www.thetubestore.com/shop-by-amp/guitar-am...
https://www.tubeampdoctor.com/en/tubes-accessoires...
Want to know how tubes shape your tone? Join PG contributor Tom Butwin as he breaks down preamp vs. power tubes, tone tweaks, and biasing, in this ultimate beginner's guide to tube amps. From Fender cleans to Marshall grit, learn how to unlock the full potential of your amp!
The Tube Store Guitar Amp Tube Packages
Here you will find brands like Fender guitar amps, Marshall amps, Vox amps, Mesa Boogie guitar amps, Orange amps, and many other tube amps listed. You will find replacement tube sets in different option levels ranging from Value to Premium to Ultimate. Purchasing guitar amp tubes couldn't be easier.
Tube Amp Doctor Tube Sets
Go and see the doctor: Find all of our products here: our newest product line of high-end Redbase tubes, our famous premium selected tubes, and the equipment we manufacture like our Class A Converters, the Bias Master or the Silencer. Furthermore our TAD reverb cans, condensers and of course the amp kits on boutique level.
Dynamic and pitch control of delay textures pave roads to new compositional and playing approaches in another unusual effect from Latviaās foremost stompbox provocateurs.
Impressive control over parameters. Coaxes new playing and compositional approaches for players in a rut. High build quality.
Interrelationships between controls will be hard to grasp for many.
$329
Gamechanger Audio Auto Delay
gamechangeraudio.com
From the outset, it must be said there are easier ways to get a delay sound than using Gamechangerās Auto Delay. But if simple echoes were the sole objective of this pedal, I doubtGamechanger would have bothered. As you may have gleaned from a listen to the companyāsBigsby Pedal,PLASMA Pedal fuzz, orLIGHT Pedal reverb, the Riga, Latvia-based company rarely takes a conventional approach to anything they design or release. But what is āconventionalā from a guitaristās point of view, may be something quite different for musicians determined to bend notions of what sound and music are, how itās made, and by what means.
By Gamechanger standards, the digital Auto Delay (along with its stablemates the Auto Reverb and Auto Chorus) is almost straightforward in concept. It utilizes existing concepts of dynamic delay, control voltage, and modular synthesis as essential parts of its functional underpinningsāwhich are not exactly unusual in stompbox design. Yet the way the Auto Delayās functions interact make it feel and sound unique. And while not every player will want to take the time to explore the sometimes complex interplay between its functions, at its best, the Auto Delay prompts unorthodox thinking about the ways touch dynamics or pitch relate to the delay colors you can create, prompting unexpected compositional vectors and a kind of extra-dimensional relationship to the fretboard.
Beat of a Different Drum
Gamechangerās path to building such unusual sound manipulation machines might seem a curious one when you consider that founder Ilja Krumins and his fellow founders MÄrtiÅÅ” Meļķis and Kristaps Kalva are rockabilly heads with tastes that include the soulful earthiness of J.J. Cale. But the more accessible side of the Gamechanger design teamās musical interests likely informs the most approachable aspects of the Auto Delay. You can use it like you would any ordinary stompbox echo and take advantage of its three very distinct voices (tape, analog, and digital), copious 2-second delay time, and rangy tone control in order to fashion many compelling delay sounds. This is, needless to say, a vast underutilization of the Auto Delayās powers.
Routing, Rearranging, and Raging Like a Lunatic
Though you can get lost in the Auto Delay (in good ways and bad), it isnāt necessarily the headache that its patch bay, LEDs, and many switches and knobs suggest. The idea behind the patch bay is simple: Routing a cable from one of the two dynamics or pitch automation input sockets to the level, tone, repeat, or time input sockets means that a change in, say, your picking intensity (dynamics) or where you play on the fretboard (pitch) increases or reduces the value for the parameter you linked to the dynamics or pitch socket. Even if youāve not been indoctrinated in these methods via modular synthesis, itās not as complicated as it sounds, and trial-and-error experimentation yields intuitive understanding of these interactions quickly.
The tape, analog, or digital voice can drastically reshape the tone and response of interactions. But so will the fast, rise, and gate dynamics modes, which determine the nature of the dynamic response. Setting thresholds for the dynamic and pitch response is easy. You simply hold down the āautoā footswitch or the bypass footswitch and twist the respective knobs until you reach the desired threshold, which is indicated by the adjacent LED. Like the other functions, getting a feel for how these thresholds work within your playing style takes time. As you might guess, weāve really only discussed the most fundamental functions here. But in addition to these, you can use alt mode to assign different values to the secondary knobs and toggle between primary and secondary knobs using the auto switch. You can also manipulate the stereo spread or control the clock via MIDI.
The Verdict
The Auto Delay is not for the faint of heart or impatient. Grasping the interrelationships between the controls takes time. In fact, understanding how those interrelationships feel and respond musically will be more challenging for some than understanding how they work conceptuallyā which, while not elementary, can be sussed out with a careful read of the manual. But when you do find a rhythm and flow with the Auto Delay it can be richly rewarding and even meditative.
Because it can reshape your relationship with the fretboard and your sense of touch, this is a great tool for extracting yourself from ruts, whether in technique or mood. And if youāre a musical tinkerer, the Auto Delay can provide much of the same satisfaction and sense of discovery you experience working with a synthesizerāparticularly if you enjoy working in the hardware realm rather than on a computer screen. One should consider the scores here as especially subjective and on a sliding scale. The Auto Delayās many sonic and functional idiosyncrasies will be nectar to some and poison to others. And more than most pedals, you should probably have a firsthand experience with the thing before you decide how and if it fits your musical objectives. For many restless players, though, the Auto Delay will be a deep well of musical provocation and ideas.
Gator Cases offers custom cases for Flying V and Explorer style guitars in their Traditional Deluxe Series.
Constructed from plywood with a black Tolex exterior, both cases offer protection against bumps and dings during transit.
Each case features a custom-molded interior tailored to fit the unique contours of its specific guitar. The inside is lined with thick plush padding to gently cushion the instrument, ensuring its angular body shape is supported at every point. The precise fit prevents movement during transport, reducing the risk of damage.
For added convenience, the cases include an internal storage compartment for accessories, keeping essential items stored alongside the instrument. Both cases feature chrome-plated hardware with three latches, including one that locks for added security.
In addition to the Traditional Deluxe Series cases, Gator offers a wide selection of guitar solutions, including gig bags, instrument and patch cables, molded cases, guitar stands, and pedalboards.
For more information, please visit gatorco.com.