Click here to download a printable PDF of this lesson's notation.
This column is for pickstyle players hoping to improve their fingerstyle skills. It doesn’t matter whether you’re just starting out with fingerstyle, or simply want to hone your existing technique. There’s something here for every level.
Admittedly, these aren’t new ideas. I start with 200-year-old exercises from Italian classical guitar virtuoso Mauro Giuliani. But I offer suggestions for making these exercises more musically relevant and less … well, boring. We’ll also compare and contrast various picking-hand positions.
Opus 1
Mauro Giuliani (1781-1829) was the most renowned guitarist of his time. His career commenced in his native Italy, but flourished in Vienna, then the epicenter of classical music innovation. (Giuliani, who also played cello, may have performed in the debut performance of Beethoven’s Seventh Symphony.) He wrote a great deal of light and unremarkable music. (Sorry, classical guitarists—we ain’t talking Mozart here.)
Giuliani’s most enduring creation is his Opus 1, better known as the 120 Right-Hand Studies. Each of the exercises employs the same two-measure C–G7 progression, performed with right-hand patterns of escalating complexity. No matter how polished your fingerpicking, you’ll encounter challenges here.
This will be a study guide to Opus 1. We’ll only look at the first three exercises. But if you find this approach useful, you can tackle the other 117 studies in similar ways.
You can find the entire set online. It usually appears in standard notation, but it’s also been converted to tab. You can find the original version here. Meanwhile, there’s a tab version at this site. The latter includes a MIDI playback mechanism, so you can hear each example. (It sounds fake in that special MIDI way, but at least you can verify the notes and rhythms.) If these links are dead when you read this, just search for “guiliani 120 right hand studies” or “tab guiliani 120 right hand studies.”
Hope You Like C and G7!
Ex. 1 shows the very first exercise in notation and tab. Like the other exercises in this lesson, it employs only the top five strings, and only the thumb, index, and middle fingers of the picking hand. (The 6th string and picking-hand ring finger appear in subsequent exercises.)
Click here for Ex. 1
While the picking-hand tasks get increasingly complex over the course of Opus 1, the fretting hand’s role doesn’t vary much. But if you’re taking the time to practice these, why not give both hands a workout? I suggest changing the fretting-hand chords every time you practice these. You’ll challenge both hands, and probably come up with cool musical ideas while doing so.
Check out Ex. 2, my alternate version of Ex. 1 using cooler chords.
Click here for Ex. 2
I perform all these examples twice through, but consider repeating them ten or 20 times. Try to play as legato (smoothly) as possible, with no audible gap between chord changes. Pay close attention to the relative volume of each string. The smaller picking fingers are weaker by nature, so you probably need to apply extra force until consistent volume becomes intuitive.
Picking Procedures
Before trying a few more examples, let’s discuss picking-hand technique. I despise guitar teachers and guitar books that claim you’ll never get anywhere unless you follow the instructor’s recommended techniques. By that reasoning, Django, Wes, and Jimi never should have become great players, since none employed conventional technique. So instead of endorsing a particular method, I’ll just share some options.
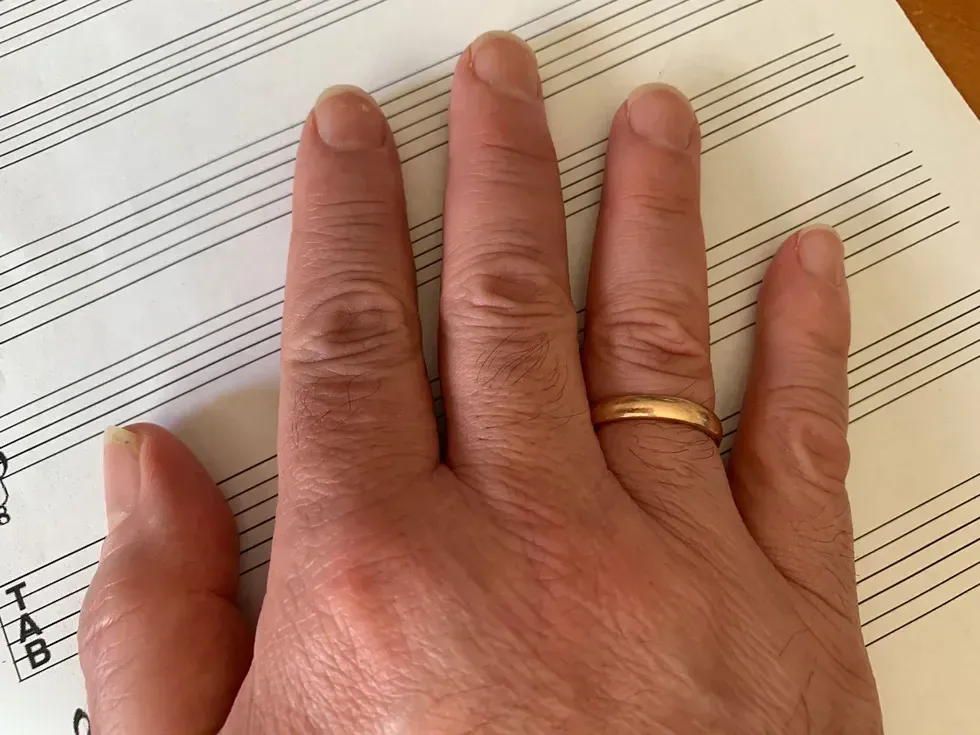
Photo 1 shows a typical classical guitar position. Viewed from above, the forearm, wrist, and hand are aligned in parallel. Thumb and fingers point in different directions, so you can see a little triangle of light between the thumb and index finger. It’s a logical and efficient technique.
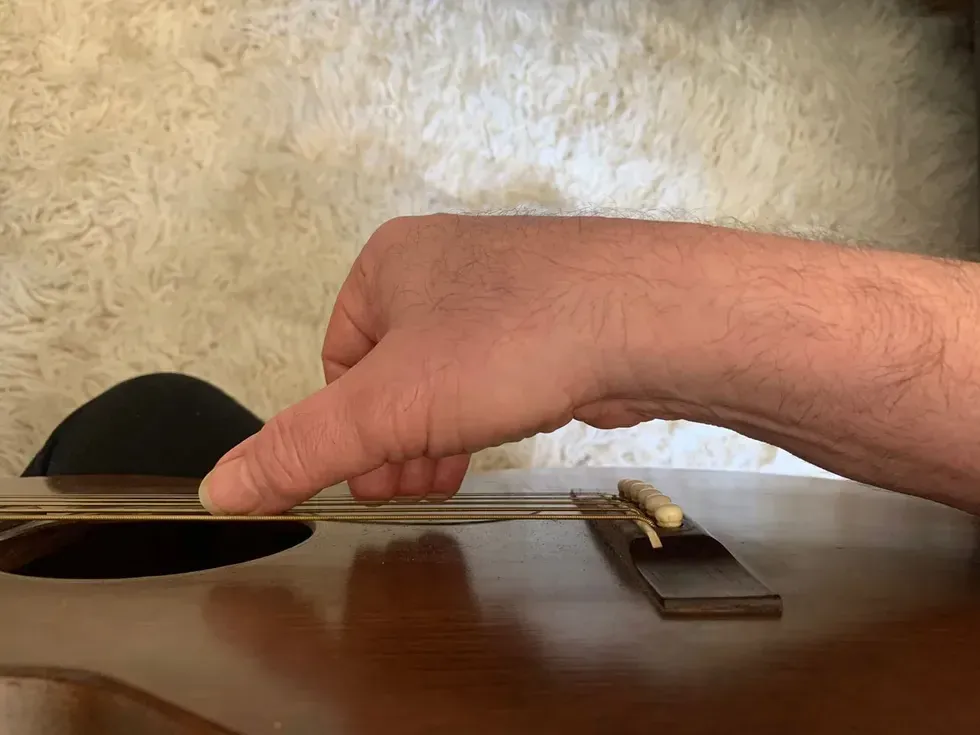
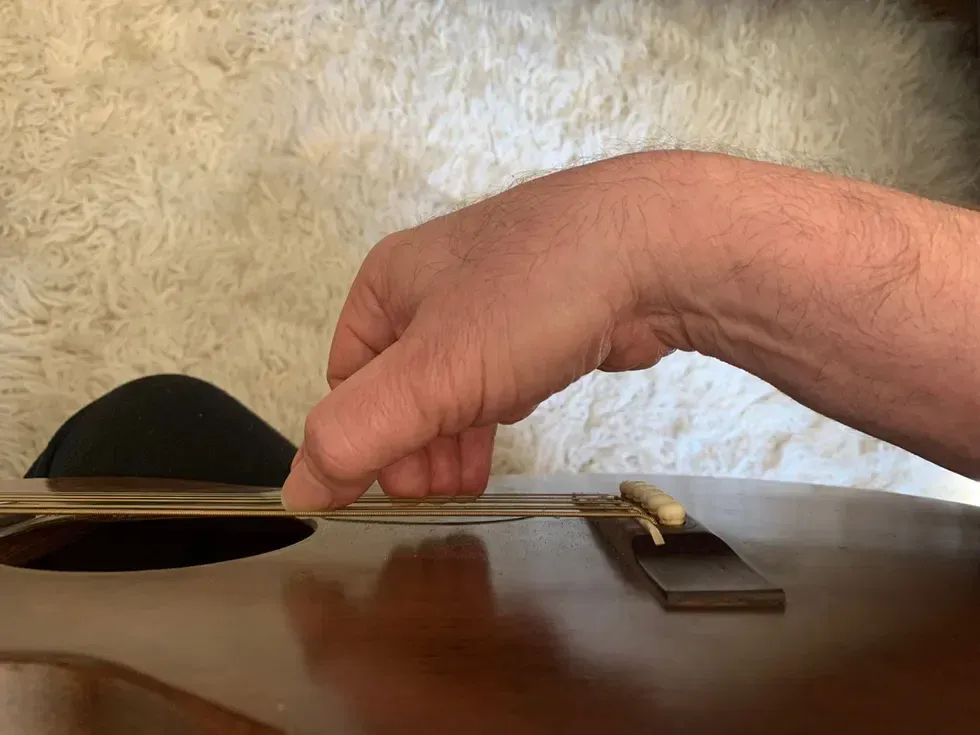
Photo 2 shows a similar position, but with a bent wrist. This lets your picking-hand fingers remain a bit straighter, possibly striking the strings with greater force. It may pay to experiment with different wrist angles as you play. That way, you can alter the exact point at which your fingertip strikes the string. You might, for example, alternate between bright fingernail tones and warmer notes played with your finger pads.
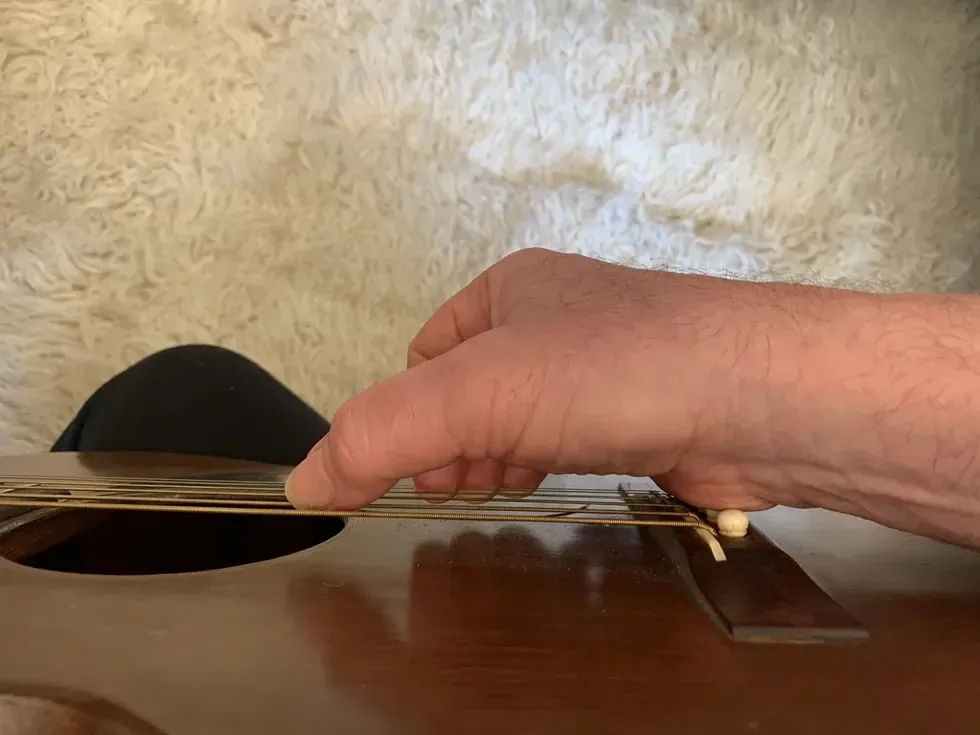
In Photo 4 I’m resting the outward edge of my palm on the bridge. This too provides stability while making it easy to damp strings as desired. The method’s disadvantage is that it can lock your hand near the bridge, when you could be varying your tones by picking at different locations between the bridge and soundhole.
Not that anyone asked, but I shift between all four positions on both electric and acoustic guitars.
A word about nails: Great fingerstyle guitarists have used fingernails, bare skin, and plastic or metal fingerpicks and thumbpicks. There’s no “best” method. I use nails myself, but I keep them short (Photo 5). That way I can shift my finger angle by a few centimeters for soft, nail-free tones.
Efficiency Expert
Many players prefer to fingerpick while gripping a flatpick between thumb and index finger. That’s no reason not to attempt these exercises—just play picking-hand index finger notes with your middle finger, middle finger notes with your ring finger, and ring finger notes with your pinky. (That’s the goofy way I was taught to Travis pick as a kid. Instead of alternating my thumb between low and high strings, I’d park the pick on the low strings and play high notes with my middle, ring, and pinky fingers. I don’t recommend that technique, but it’s your call!)
Whichever road you take, consider efficiency. It’s usually a good idea to minimize unnecessary picking-hand motion. Sure, you might adjust your wrist angle for contrasting effects, but your wrist probably shouldn’t move much while playing. Try restricting the picking motion to the finger joints. (Having said that, there’s no doubt some guitarist out there far more skilled than any of us whose wrist bobs like mad.)
Opus 1 and Beyond
Let’s conclude with a few more Giuliani exercises—and more examples of how you might vary and modernize them.
Ex. 3 is the next Giuliani exercise in its original form. Notice how it resembles a banjo player’s or country picker’s three-finger roll, even though the exercise was written 200 years ago.
Click here for Ex. 3
The same picking pattern appears in Ex. 4, but paired witha sequence of major 6/9 chords. I’ve also expanded the pattern from two measures to four measures. There’s no reason to restrict yourself to the original two-measure structure.
Click here for Ex. 4
The next Giuliani study (Ex. 5) is what a banjo picker would call a reverse three-finger roll.
Click here for Ex. 5
For the modern variation (Ex. 6), I’ve substituted a familiar chord progression with lots of pretty drone notes. Again, the new pattern is four measures in length. You can spin these out longer if you like. You might also alter the frequency of the chord changes. You could sustain a single chord for several bars, and then move between multiple chords within a single bar.
Click here for Ex. 6
This is just the tip of the Giuliani iceberg—we’ve only looked at 1/40th of Opus 1. You could spend years on these exercises. (I certainly have.) And if you introduce creative modern variations, you can exercise both hands simultaneously, along with your brain. Good luck exploring!