Chops: Intermediate
Theory: Intermediate
Lesson Overview:
• Learn how to target the 3 and 7 of each chord.
• Make your improvised lines more focused.
•Use motifs to create a more cohesive solo.
Click here to download a printable PDF of this lesson's notation.
We’ve looked at numerous ways to solo over a blues, and we’ve talked about methods for outlining chord changes, but none are more focused and to the point than guide tones. When we think of any seventh chord, we think of four notes (root, 3, 5, 7). The guide tones are the 3 and 7 because they give you the most information about the quality of the chord. The root establishes the chord’s overall tonality and the 5 is mostly padding. The 3 determines whether a chord is major (3) or minor (b3). The 7 defines the type of seventh chord—major 7 (7) or dominant 7 (b7). Even extended and altered chords build on this essential foundation. Here’s another way to look at it: Without the 3 and 7 you no longer have a major, minor, or dominant chord. Heck, you can play entire jazz standards using only the 3 and 7 of each chord and it will sound just fine!
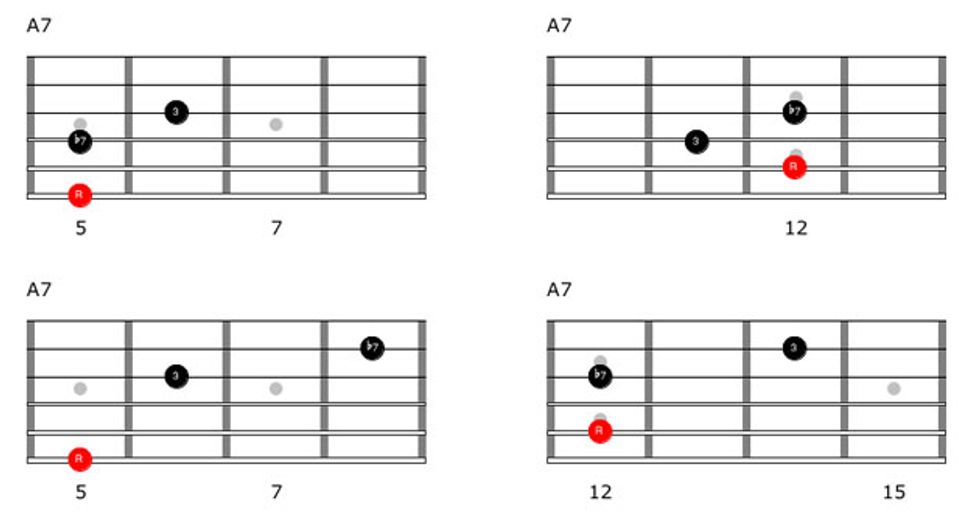
The first goal here is coming to grips with what guide tones look like on the fretboard, so you can play them as harmonic shapes. In theory if you’ve practiced your arpeggios, you’ll already know where the guide tones are, but I also think of these as chord shapes that I’ll use. I’ve put in the bass notes, but you don’t need to play them, just don’t lose track of where the root is.
In Ex. 1, we can see a few of these shapes over a I-V-V progression in the key of A. I put the root notes in parentheses for reference. On the recording, I played the bass notes so you can hear the shapes in context.
Click here for Ex. 1
Our first real example (Ex. 2) presents a chordal idea: We comp through a 12-bar blues using just the guide tones. This is a creative and authentic way to approach rhythm guitar on a blues, and it sounds much more interesting than playing big, boxy 6-string chords.
You may also notice I’m not simply playing guide tones like I’d play chords. For example, at the end of the third measure I move down a half-step before returning to the A7. The beauty of an approach like this is that when you’re just playing two notes it’s easy to treat your rhythm parts like a melodic improvisation. Simple little chromatic embellishments are just that—embellishments—and if they sound good, I say use them.
Click here for Ex. 2
Our next example is actually identical to the previous one in terms of pattern, but we’re imagining it around the shape based in 11th position. The main difference between this and the previous example is we’ve simply flipped the order of the 3 and 7. That’s the other beauty of this approach. When you play just two notes, they could be so many chords. Playing a G and C# could be an A7, or an Eb7, or a Bbm6, or it could work in a bigger setting—an A7b5#9 or even an Eb13b9, for example.
Click here for Ex. 3
I’ve also included a backing track of the click with the bass so you can try these ideas yourself.
When it comes to improvisations, guide tones can be either incredibly restrictive or a great indicator of what to target. Improvising with two notes a tritone apart could be very difficult, but once you understand the relationships between these guide tones, the technique turns into a powerful tool.
In our first lick (Ex. 4), we begin by sliding into the 3 and hitting the b7 of A. We then play the b7 and 3 of D before approaching the 3 chromatically. This does sound quite boring, but it has a place. When we go back to the A7 we repeat the idea before playing something a little more akin to the Mixolydian scale, but with the intention of targeting the 3 and b7 of the D7 chord when it changes.
Click here for Ex. 4
While you can see I’m using arpeggios and scales in Ex. 5, I want to draw attention to the fact that I’m still targeting the guide tones. The same thing happens when we move from the A7 to the D7 in the final two measures. I use the A minor pentatonic scale (A–C–D–E–G) before hitting some guide tones on the D7.
Click here for Ex. 5
Our next lick (Ex. 6) has a bit more to play, but the principal of the guide tones is still there. We start by hitting the 3 of the A7 (C#), then play a Mixolydian-esqe phrase that resolves to the b7 in D7 (C), and finally move down the scale to rest on the 3 (F#).
We then repeat the same idea for the A7 chord, but this time when we hit the b7 (G), we’ll play some notes from the A Super Locrian scale (A–Bb–C–C#–D–E–F#–G#) before landing on the guide tones of the D7 chord. The note choices may have been jazzy, but my road map was simply looking for a creative way to connect the guide tones.
Click here for Ex. 6
Our final lick (Ex. 7) sits a little higher on the neck and starts with a slide into the b7 of A7 (G) on the 3rd string. This resolves by hitting the b7 of D7 and walking down to the 3. The resolution to the b7 and subsequent 3 of A7 should come as no surprise, but now would be a good time to point out that when we use an approach like this, it should be part of a balanced diet, not something you restrict yourself to. In a real life, to keep your soloing fresh you might only use a concept like this for a few chords to maximize its effect before using another idea.


