Hello, and welcome back to Mod Garage. Last month, we started to talk about the new bridge and saddles for our guitar, so let’s continue where we left off. In general, the two contact points where the strings meet the guitar are crucial and very important regarding playability, comfort, and tone. It’s always worth taking special care of the bridge and the nut on any electric guitar, and this month, we’re focusing on the bridge. Let’s break down the details of our replacement bridge and what we can expect from it.
The new bridge is much lighter than the stock model, which is great for getting a lighter-weight guitar. The overall weight of a guitar is a major factor for comfortability—a heavy guitar will add nothing to your life besides shoulder and back pain. Contrary to what you might read on the internet, science tells us it won’t increase sustain, nor add any “heavy” tone attributes to the amplified signal.
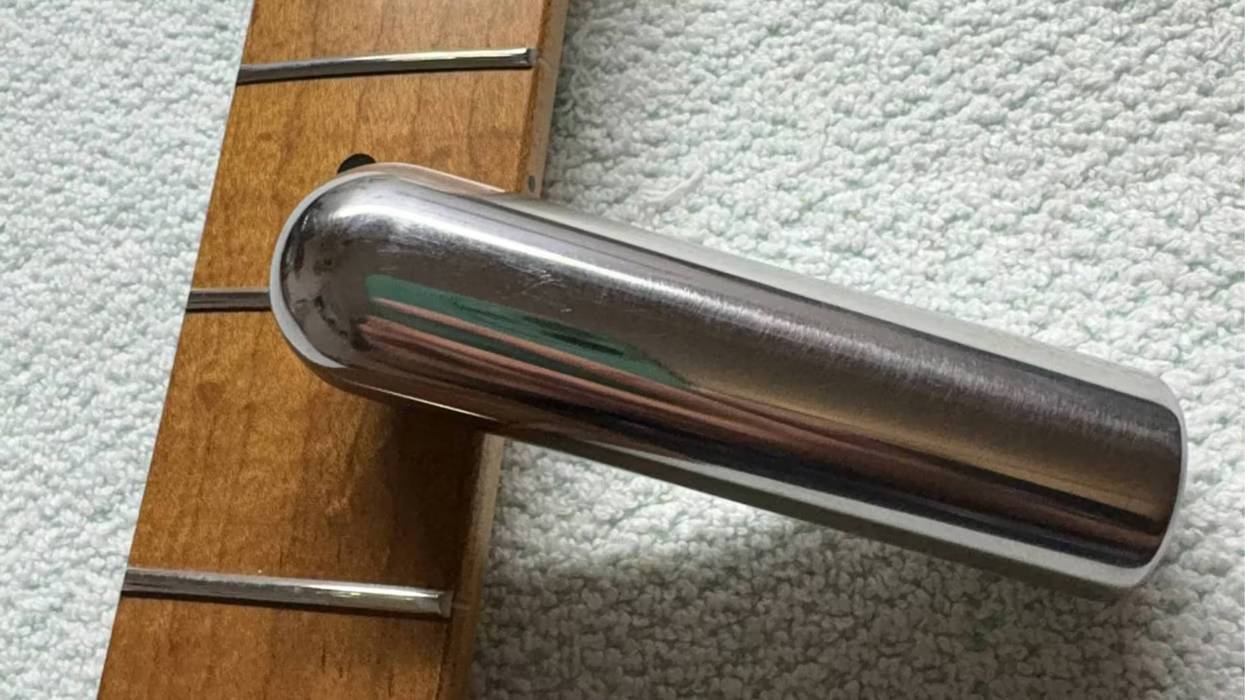
The thinner metal walls of the new bridge aren’t closed—a great attribute for reducing weight—and the double-cut “tapered walls” are a practical update, though some will disagree and prefer a bridge with vintage-style closed walls. There are countless bridge options for Telecasters, so find the best fit for your playing style. The edges of the short walls on my new bridge felt a little sharp, so I used some fine metal files and sanding paper to smooth them out. Your hand is resting on this surface, so you don’t want any jagged edges.
Our guitar's stock bridge
photo courtesy SINGLECOIL (https://singlecoil.com)
In addition to the classic string-through-body method, the new bridge also offers the late-’50s top-loading option, which means the strings are not running through the body but rather directly through the back of the bridge plate, giving you a gentler break angle. I recommend a bridge that provides you with both options. Top-loading your strings can give a feeling that some describe as “loose” and “rubbery,” but this route has its devotees, like the great Jim Campilongo, and it can make string bends a bit easier. Experiment to see if you like it or not. On my new bridge, all the holes for guiding the strings felt a bit gritty, so I spent some time taking care of any burrs.
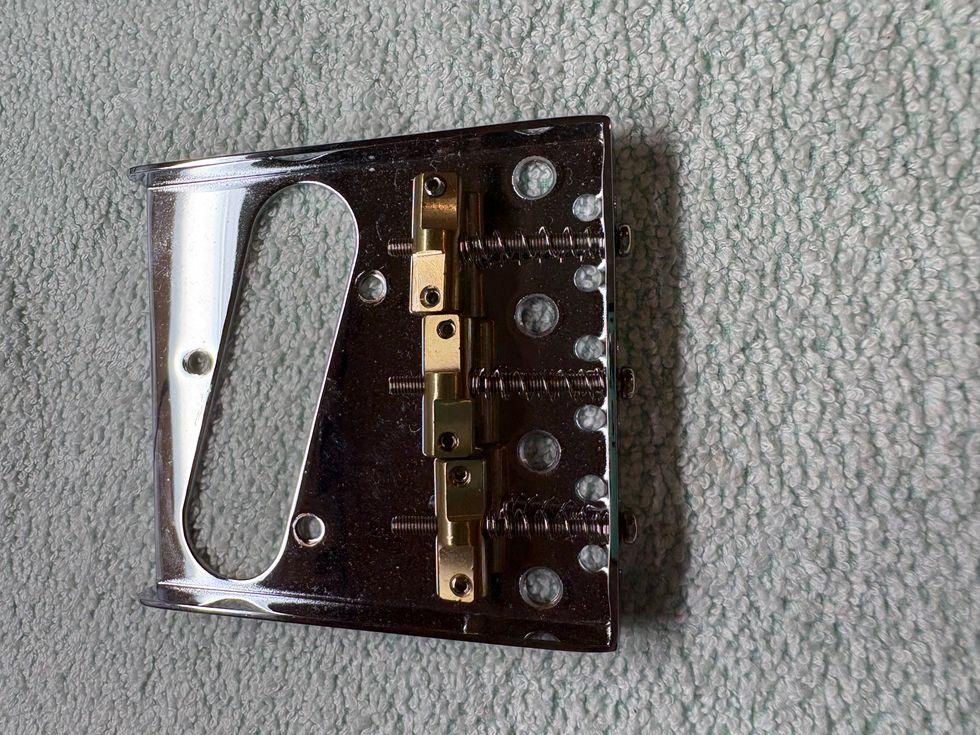
The new bridge has two additional screw holes at the front, which is a very clever upgrade—two extra screws there will help join the front part of the bridge to the wood of the body. Speaking of screws, the stock bridge was attached with tiny, soft screws, which I replaced with standard-sized stainless-steel ones.
So why are these two additional screws a boon for our guitar? One of the most common culprits behind unwanted Telecaster feedback is the typical bridge plate itself. The Telecaster bridge system was designed in the 1940s by Leo Fender, and it was a crude design at best. Its function was to position the strings and offer a rough and easy adjustment of intonation and string height. Today, they don’t make them like they used to—the current-production Fender vintage bridge plates, as well as most budget aftermarket versions, are made from thin, hot-rolled steel in a deep-drawn process. This process produces parts very quickly and cheaply, but at a severe cost in quality. The steel used must be soft and thin to allow it to fold and bend in the corners, but sadly, this process creates internal stress in the material, which can bow the plate so that it can’t sit flat on the body. This often creates unwanted feedback on Telecasters.
The early bridge plates Fender made used a cold-rolled steel procedure to avoid this problem. Using two additional screws at the front of the bridge plate to firmly attach it to the body can minimize this issue. Our new bridge is straight as an arrow anyway, but it doesn’t hurt to secure it extra tight. To test your own bridge plate for any bowing, simply place it on a flat surface and check for wobbles. To level things out even more, I sanded the backside of the bridge, starting with 150-grit sandpaper and working my way up to 1,000.
Now, let’s have a look at the saddles. The classic T-style bridge sports three barrel saddles for intonation and height adjustment. As I said before: Crude at its best! Since this vintage bridge has two strings on each saddle, you’ll always be compromising on intonation. If you’re looking for perfect intonation, you should go with a new bridge with six individual saddles, like on a Stratocaster.
My new bridge came with three compensated saddles made from brass, which is the material used in the very early Fender days. These saddles are available in a large selection of materials, including steel, stainless steel, aluminium, diecast, and titanium, and also in compensated, uncompensated, smooth, threaded, and other configurations. (Differences between saddle materials are often audible when playing the guitar unamplified, but nearly none of these subtleties will present in the amplified tone.) For example, if you’re looking to shave off even more weight, I’d go with aluminum, but the brass saddles with my bridge are great quality, so I decided to keep them.
Our brass saddles are compensated for intonation in the most pragmatic way possible: slanted drill holes for the intonation screws. This not only looks quite vintage—it’s effective, too. The stock bridge uses a different compensation technique, which I described in my previous column. It works, too, but the look irritates me, and usually comes with some sharp edges. No matter what system you choose, take care to put the saddles in the right spot on the bridge plate. Typically, you can find an imprint on the underside of the saddles to indicate their position.
Our barrel saddles have a flat underside rather than being completely round, which makes it easier to do a low setup and—you guessed it— saves some precious weight! To make the surface of the saddles as glossy as possible, I polished them in several steps: first with a Dremel tool, before breaking the shine again with some super-fine Micro-Mesh to get to a used look without losing our smooth surface.
Finally, let’s talk about the height adjustment set screws, which are key for comfortability and tone. Depending on your preferred string action and the length of the set screws, chances are good that they’ll stick out a little bit from the top of the saddles. I find this super uncomfortable; bloody palms are not unusual with this quirk! Luckily, this problem is easy to solve.
These set screws are available in different lengths, and since they can make life so much easier for just a few cents, I recommend that you start building a solid collection of short and long versions. Rather than trying to level off the top of the set screws sticking out of the saddles, simply swap in a shorter screw and you’re done.
Take special care of the underside of the set screws, where they make contact with the bridge plate. It’s important to have the flattest, smoothest possible surface here—this is a spot where you can absolutely influence the amplified tone of your guitar. To hold these tiny set screws in place while filing and polishing their ends, I screw them into an old Telecaster saddle so they stick out, and lock the saddle in a vice afterwards. This way, you can work on the underside of the screws with files, sandpaper, or a Dremel. This takes some time, but is very important: I spent roughly 30 minutes with my six set screws, but I’m very happy with the result!
Next month, we’ll continue with our guitar’s pickup, electronics, and wiring. Our $259 budget for future investments remains untouched this month, but not for long! Stay tuned.
Until then ... keep on modding!