My last column looked at mimicking retro-analog delay sounds and deploying them in unconventional ways. (Check out Part 1 here.) I’ve been using SoundToys’ EchoBoy delay, but you can get similar results with any number of full-featured delay plug-ins or stompboxes.
All wet. Last time we inserted a delay plug-in on a guitar track’s channel strip. But now we’re going to place the delay on an aux channel. That way we can process and pan the tracks independently, or use DAW techniques such as side chaining and automation.
Your DAW’s channel strips have a control to route sound to an auxiliary bus. (It might be labeled “aux,” “send,” “bus,” or “effect.”) Choose the post-fader option, which is probably the default. When applying aux effects, you usually set aux bus plug-ins 100 percent wet. Some plug-ins have a switch for this, and sometimes (as on EchoBoy) you simply turn the wet/dry control to 100 percent wet.
With the dry and wet signals on separate channels, you can do fun things with panning. In Ex. 1, I’ve panned the dry signal fully left and a clean delay fully right. The delay time is so short as to be imperceptible. (Try settings between 10 and 30 milliseconds.) Set the delay’s feedback control to minimum (one echo only). This yields an odd stereo effect. This stereo guitar has less impact than a mono track, but it clears space in the center of the mix, which can be helpful if a vocal track decides to move in.
For Ex. 2, I’ve raised the feedback on the delay plug-in. The delay time is so short that you don’t perceive individual echoes. Instead, you get resonant peaks on the delay channel, which can contrast nicely with the dry sound and emphasize the stereo spread. (Careful, though—high feedback settings cause runaway oscillation.)
This is a subtle type of flanging. If you pitch-modulate the delay sound, you get classic stompbox flanging. (Some delays, including EchoBoy, have built-in pitch modulation to mimic the slight speed variations of a funky analog tape device.) Reverse the phase of the delay track for a phase-shifter effect, or slow the delay time to 40 milliseconds or so for chorusing.)
In Ex. 3, I’ve slowed the delay time to approximately 200 milliseconds and raised the feedback setting. This is one of my favorite ambient sounds: a lo-fi faux-reverb that imparts an eerie sense of space without the muddiness of traditional reverb, especially when the effect is panned to the side. Image 1 shows my EchoBoy settings.
Disciplined dirt. Your delay may not include a distortion parameter, and if it does, options may be limited. But with an independent delay track, you can apply any distortion plug-in. In Ex. 4 I’ve added Logic Pro’s Clip Distortion to the delay bus. The result sounds an awful lot like a BBD-based delay pedal of the Boss DM-2 ilk. I returned the delay pan pot to its center position for stereo echoes, but you might switch the delay bus to mono for a truer BBD stompbox sound.
Total control. What if you like this color, but it’s too busy in the mix? Rein in the delay with side chaining. Add a compressor plug-in after the delay effect on your wet channel. Most DAW compressors let you control the compression threshold from other channels. I selected Audio 1 (my dry guitar track) as my source (Image 2).
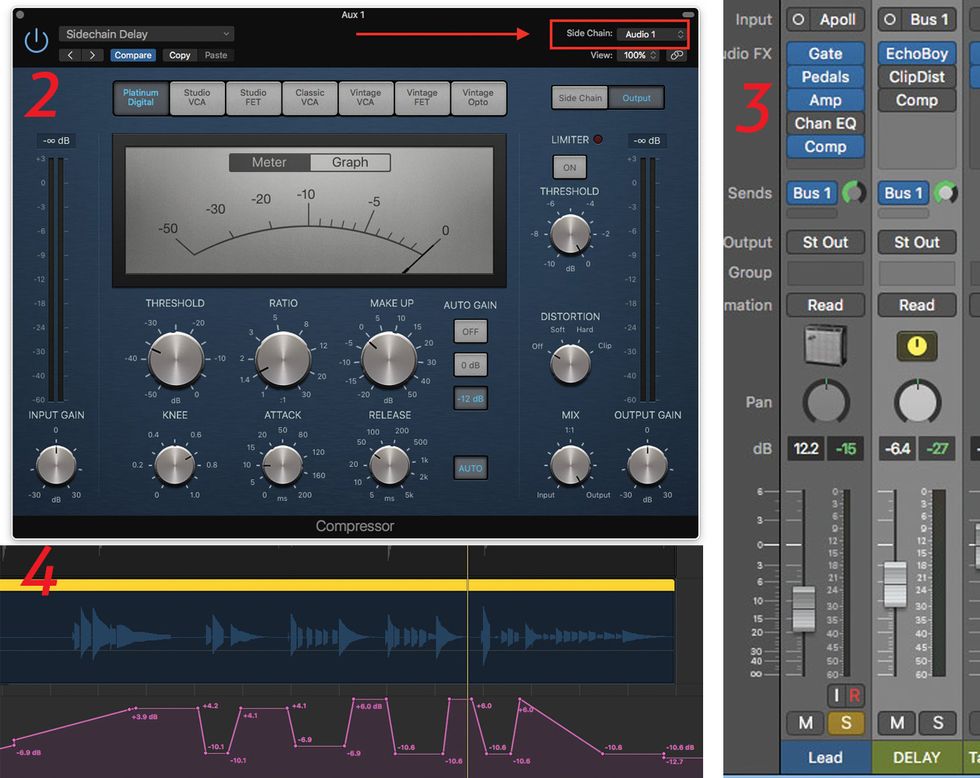
(Clockwise from top left) Image 2, Image 3, and Image 4
Now the dry track’s level regulates the wet track’s compression threshold. Adjust the plug-in’s threshold setting so the gain-reduction indicator jumps strongly when the dry guitar plays a loud note or chord. This lowers the delay level when the dry guitar is most active, but the delays swell when the dry guitar gets quiet. Now you can use relatively extreme effects without obliterating your mix, as in Ex. 5, where the echo has heavy feedback and distortion.
You can exert even greater control using track automation. You might write volume automation for the delay signal, raising and lowering the effect as desired. Another option is to rout the delay sound back into itself. Image 3 shows how this looks in Logic Pro.
My dry guitar track (labeled “Lead”) feeds Send 1, where the delay resides. But the delay channel also gets routed to Send 1, feeding itself. (Proceed with caution and low volume—high feedback levels produce ear-shredding shrieks.) You can now control the feedback amount using a fader controller or by manually writing automation (see Image 4). I used the waveform as a visual guide, keeping the feedback level low when the guitar is busy and raising it during the quiet bits. Combine this with delay level automation if desired.
Again, this technique permits relatively extreme delay effects that back off whenever the dry guitar has something important to say, as in Ex. 6.
These are just a few possible options when you assign your dry and direct tones to separate tracks. Experiment with various plug-in effects on both channels. Don’t fear extreme settings, since you can use side-chained compression or automation to rein everything in.
Okay, those are some of my favorite DAW delay tricks. Let’s hear yours! Please post tales of delay discoveries and disasters in comments.