We guitarists spend beaucoup bucks on shiny toys we hope and dream will make us better players and summon the muse. But we don’t always have to open our wallets to derive joy from music. Tinkering with our equipment, tweaking our instruments, discovering new uses for things we might have taken for granted—these are just some of the ways to stay engaged with guitar without making a trip to the gear emporium.
There’s a big overlap between the DIY and life-hacker cultures, and it can be fun to explore the intersection of these two mindsets from the perspective of guitar, so let’s give it a shot. Our ground rules are simple: We’ll look at ways to squeeze functionality out of items that cost no more than a burrito and beverage at your favorite taqueria. We’ll arbitrarily set this at $12, although all but one of our dozen hacks come in well below that.
I’m loosely defining “hack” as using an item for something other than its intended purpose. Often there’s some modification involved, but that’s not always the case. Sometimes a hack simply means seeing an object in a new light. Let’s begin with one of those.
Slide display rack. If you play slide guitar, no doubt you’ve discovered how much fun it is to collect the tools of your trade. So many materials, shapes, and sizes! Why hide these beauties in a shoebox? If you have a cool collection, it’s fun to display it. Having all your slides within reach will also inspire you to experiment with different sounds and techniques, and thus grow as a player.
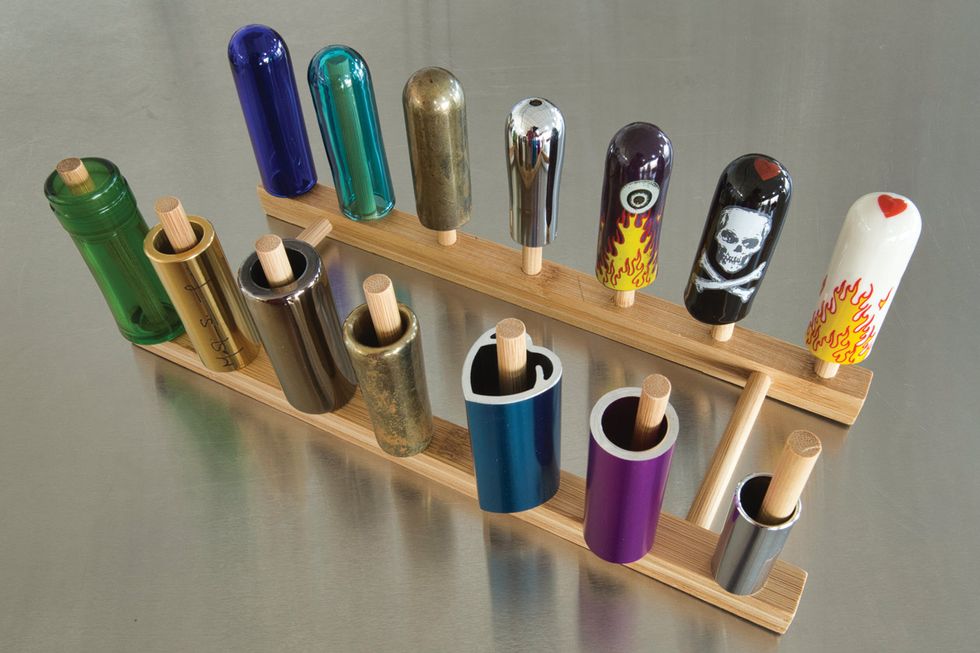
Photo 1
Maybe you’ve seen those bamboo racks designed to hold dishes vertically to air-dry after being washed. Guess what? They’re perfect for holding slides at attention (Photo 1). Readily available and priced at about $8, these racks do the job right out of the box.
Safe knob removal. When you want to replace a potentiometer or even just tighten its nut, the first step is to remove the knob. If it’s a press-on knob, don’t reach for a screwdriver! It will damage the pickguard or—worse yet—gouge your guitar’s top.
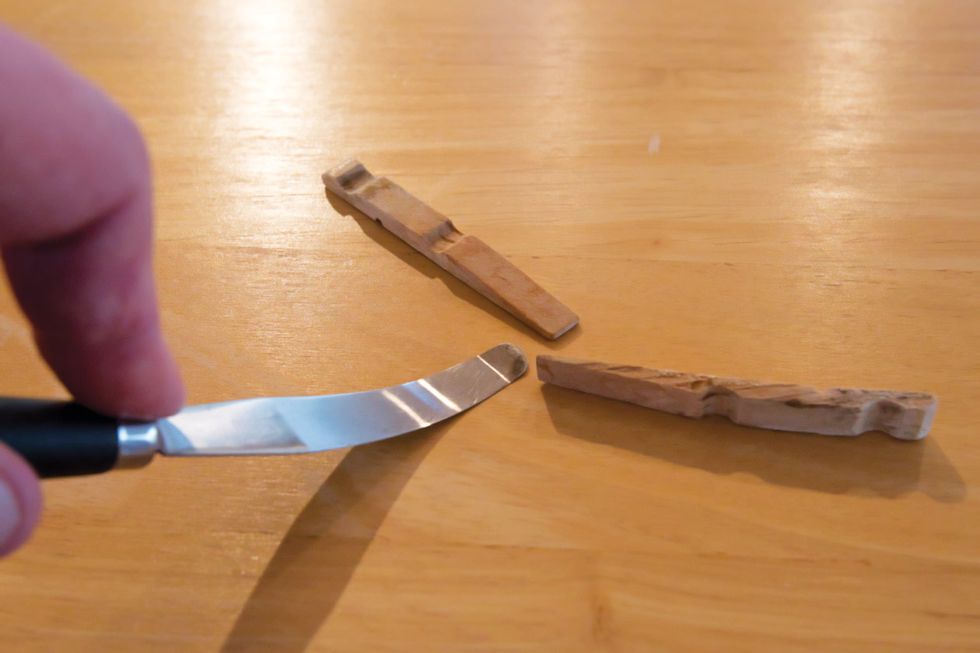
Photo 2a
Here’s an inexpensive alternative that won’t damage your beloved axe. You’ll need a palette knife—a $5 tool with a flexible steel blade that painters use to apply or mix paints—and a good ol’ wooden clothespin with its internal spring removed (Photo 2a).
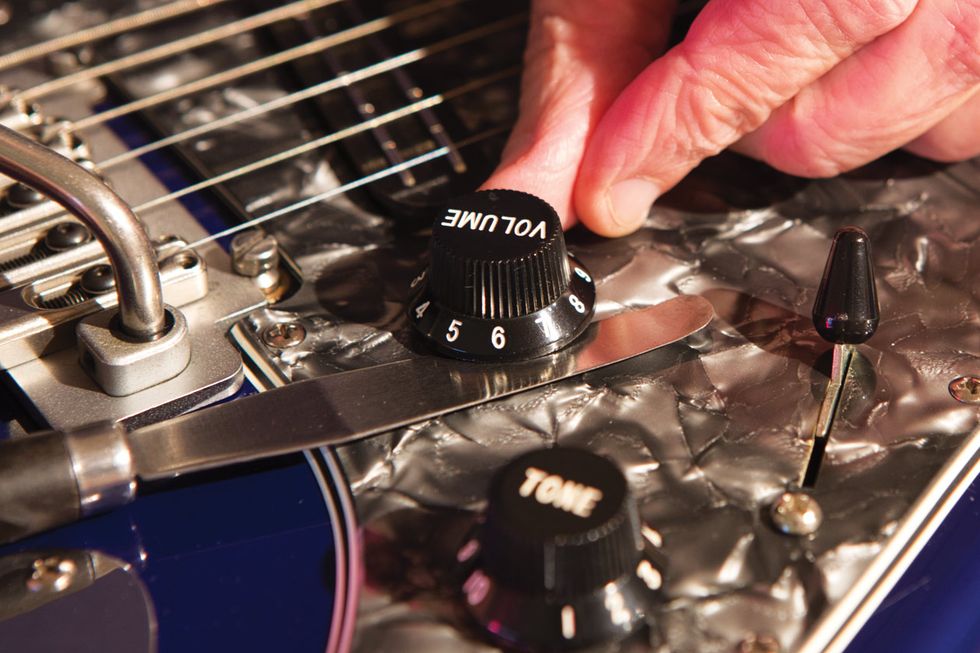
Photo 2b
Slide the thin blade under the knob, then carefully turn the knob as you slowly lift the palette knife straight up, gently flexing its blade as you go. Turn and pry, keeping the blade flat against the pickguard or top so it doesn’t mar the surface (Photo 2b).
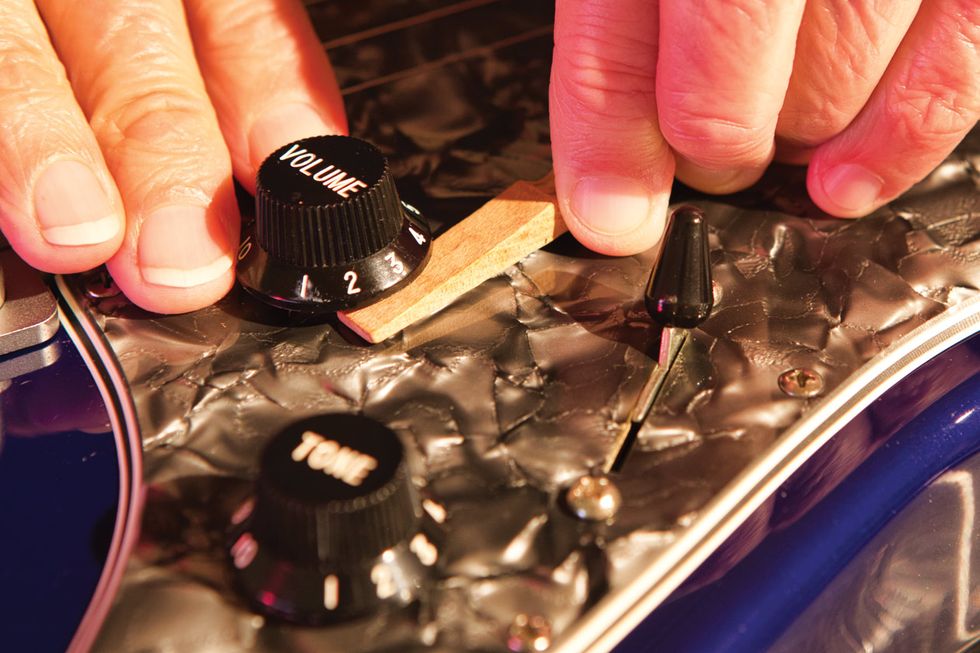
Photo 2c
Go easy—just work the knob up enough to allow you to replace the knife with one half of the clothespin with its flat side against the guitar (Photo 2c).
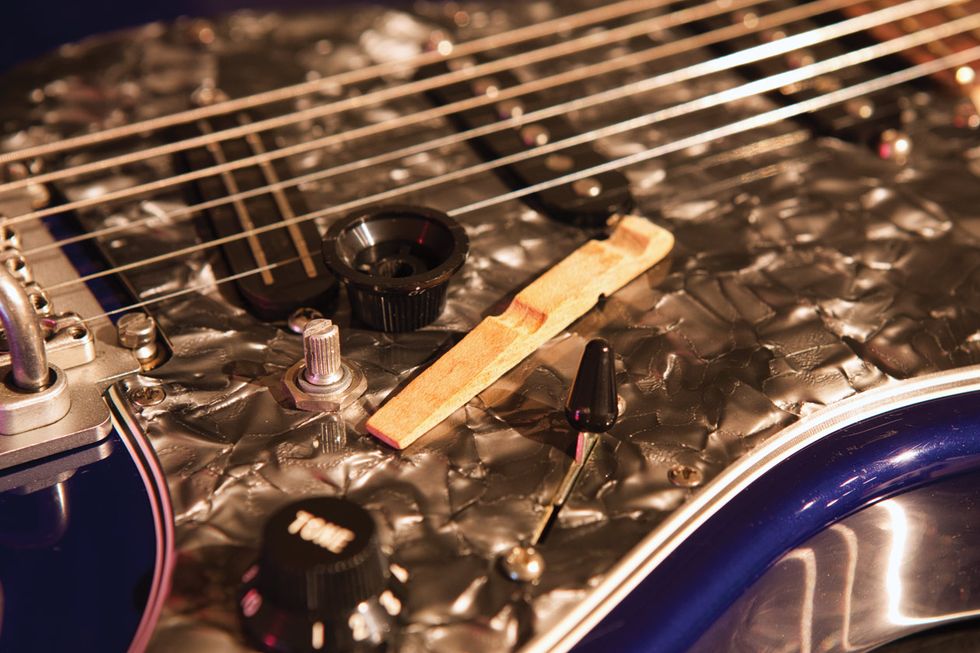
Photo 2d
Continue turning and prying, using the clothespin as a wedge. It won’t take long to coax the knob off its shaft (Photo 2d).
Split loom trim. A good acoustic guitar can last a lifetime, but if it’s equipped with onboard electronics, that technology becomes obsolete in a matter of years. Bummer. I have three acoustic-electrics, dating from the late ’90s to the mid 2000s, that came with preamps mounted in the bass side of the body. Though the guitars are still perfectly functional, their clunky old electronics have been sonically eclipsed by today’s sleeker systems that mount in or around the soundhole. Like any self-respecting tone freak, I removed the ancient beasts from my guitars and replaced them with more state-of-the-art pickups and preamps, but doing so left a gaping hole in the side of each guitar.
The hole itself isn’t a problem. No—it’s a soundport! Very handy. But while playing, I found myself staring at the edge of the hole that was cut into the side. It’s raw and ugly. The manufacturer never bothered to sand, smooth, and finish the edges because the preamp’s mounting flange covered all the sins. After pondering the many ways I could dress up these distracting holes, I finally hit on one that’s easy, cheap, and looks cool in a steampunk kind of way.
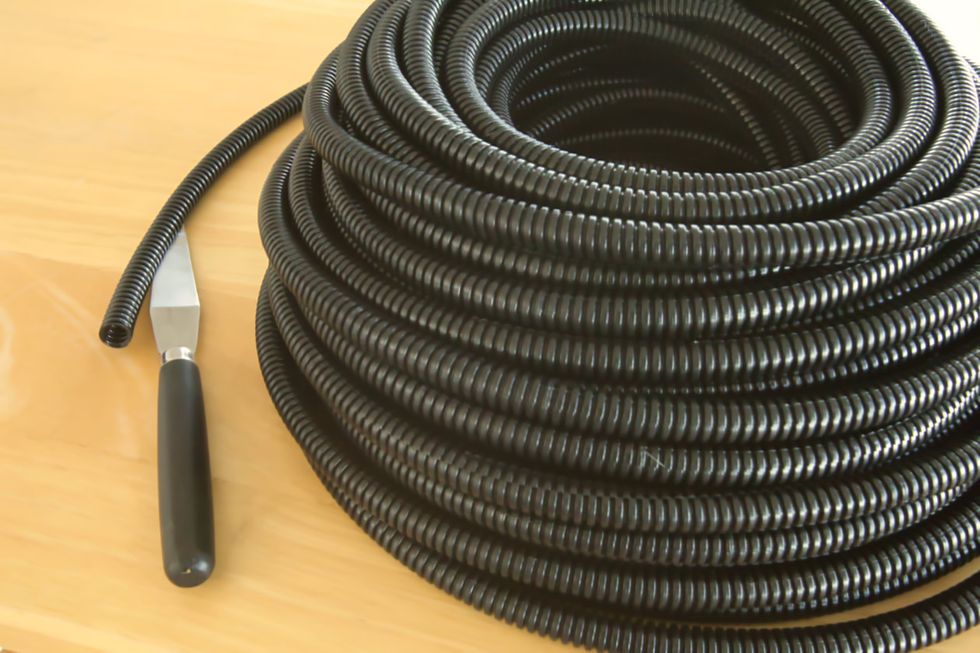
Photo 3a
If you’ve got a guitar with a similar hole in its side, I think you’ll dig this hack. It starts with something called “split loom”—a flexible plastic sheath used to surround wires in autos, computer installations, audio systems, and so on. It’s a black, ribbed, hollow tube that’s slit along one side (Photo 3a). Split loom comes in different diameters; the 1/4" size is perfect for this hack, and a 100-foot coil costs less than $7 on Amazon.

Photo 3b
First, measure the perimeter of the hole (Photo 3b). Then cut a corresponding length of split loom, pry it open, and gently press it around the edge of the hole, covering all the rough wood. The resulting trim (Photo 3c) looks like something from an H.R. Giger painting.
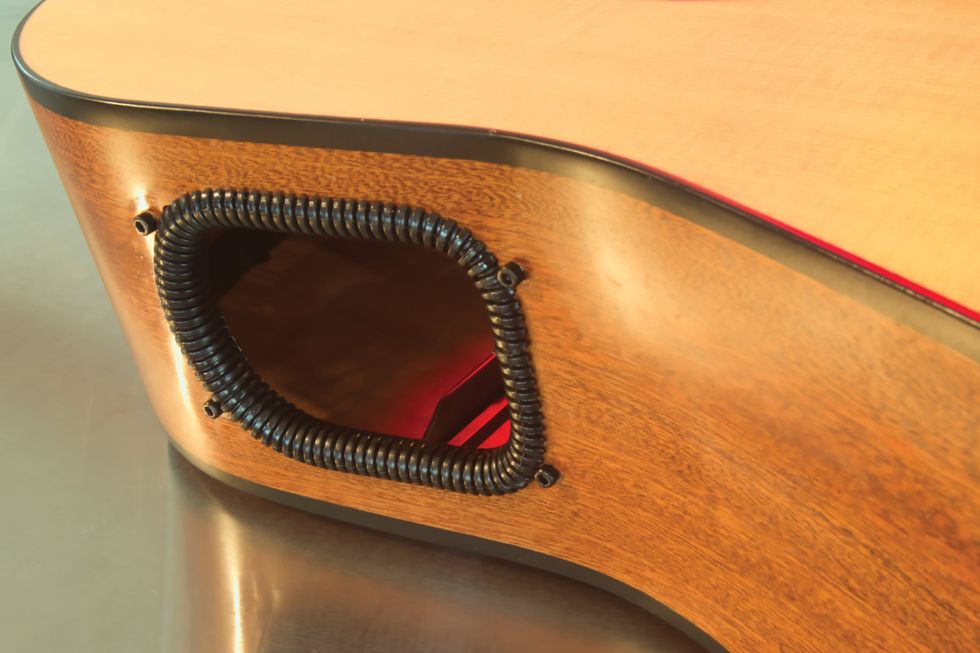
Photo 3c
Typically, you’ll also have four holes where the preamp was screwed onto the body. You could reinsert the original screws, but without the thickness of the preamp housing to hold the screws away from the wood, their tips will poke into the guitar’s interior. I wanted to avoid that, so I sought out four shorter screws—long enough to sit securely in the holes, but short enough that they wouldn’t protrude inside. Short hex screws did the trick and even enhanced the steampunk effect.
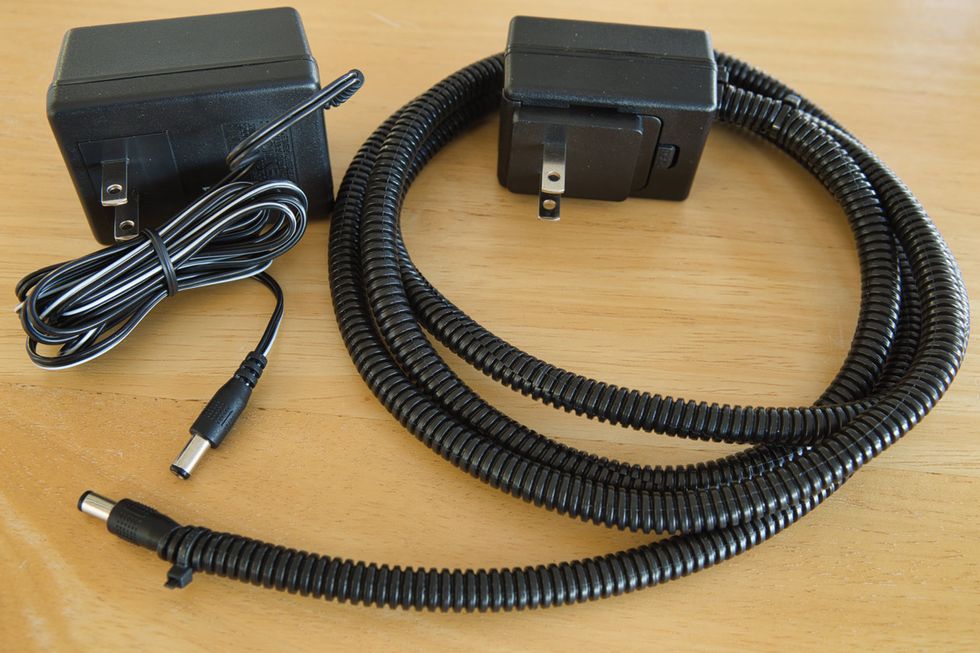
Photo 3d
Bonus! Another use for split loom is to protect the skinny wires on wall-wart power supplies. Onstage, these flimsy cables can break quicker than you can spell Yngwie, but sheath them in split loom and your drummer can drop a cymbal on the wire without cutting it. I suggest cinching a zip cable tie at each end to keep the loom in place (Photo 3d).
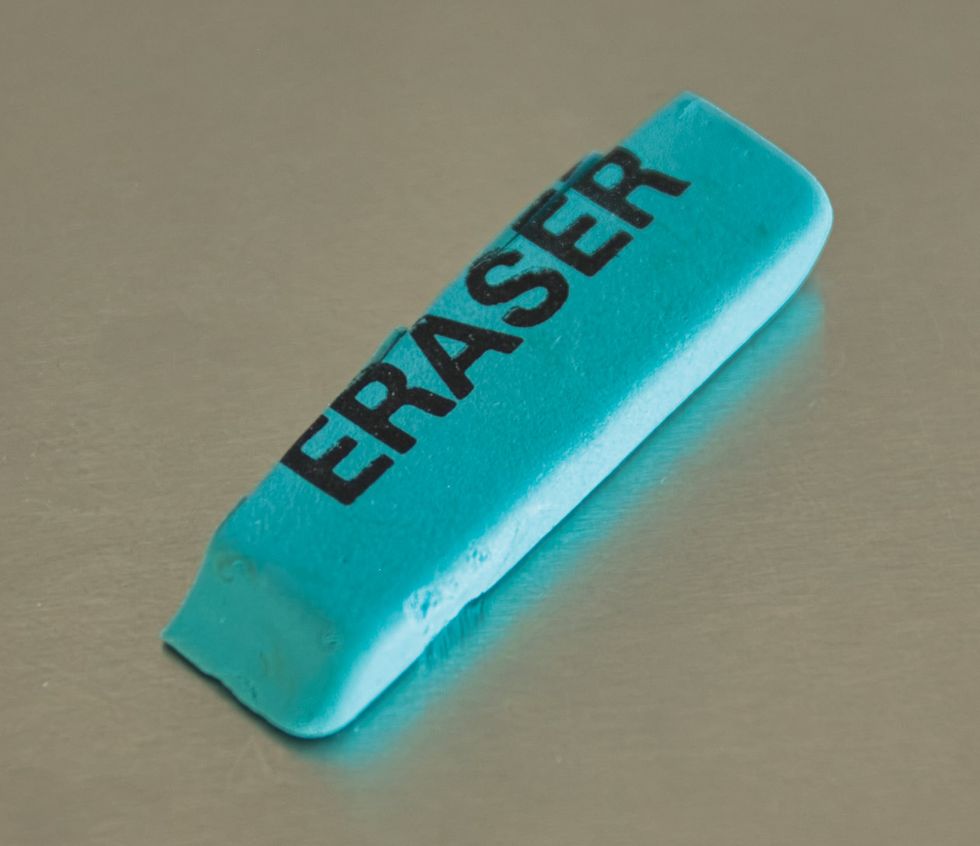
Photo 4a
Bigsby helping hand. I learned this trick years ago from a guitar tech who maintained a slew of Bigsby-equipped guitars for a rockabilly client. If you’ve ever restrung a Bigsby, you know the problem: You make a nice tight curl at the string’s ball end, wrap it over and then under the roller bar, carefully slip the ball end over the pin, maintain string tension with one hand as you valiantly try to guide the string across the nut and into the tuner post with the other, and then gnash your teeth as the ball end pops off the roller pin, forcing you to start over.
But you can avoid this frustration, and all it requires is an eraser with wedge ends. Cut the eraser in half lengthwise (Photo 4a) and jam one piece under the ball end to hold the string in place (Photo 4b). Now you have both hands free to guide, thread, and tighten the string. The eraser is soft and flexible enough not to damage your guitar, yet that ball end isn’t going anywhere.
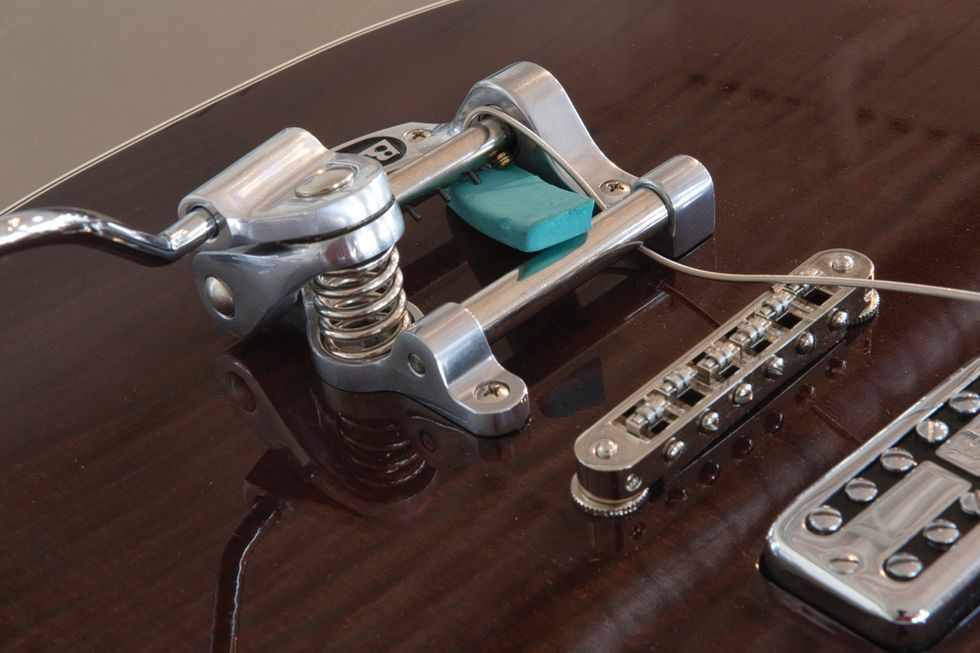
Photo 4b
Combo port-a-tilt. If you play clubs, surely you’ve heard the “turn it down” refrain, usually delivered by the manager or an irate bartender. (Hey, I’m just trying to hear my guitar over those damn drums!) The problem, of course, is that your amp is blasting your knees and seated customers’ eardrums, but not aimed at your ears. Leo Fender solved this problem with tilt-back hardware mounted on large combos and piggyback cabs, and we can adapt his trick to much smaller amps.
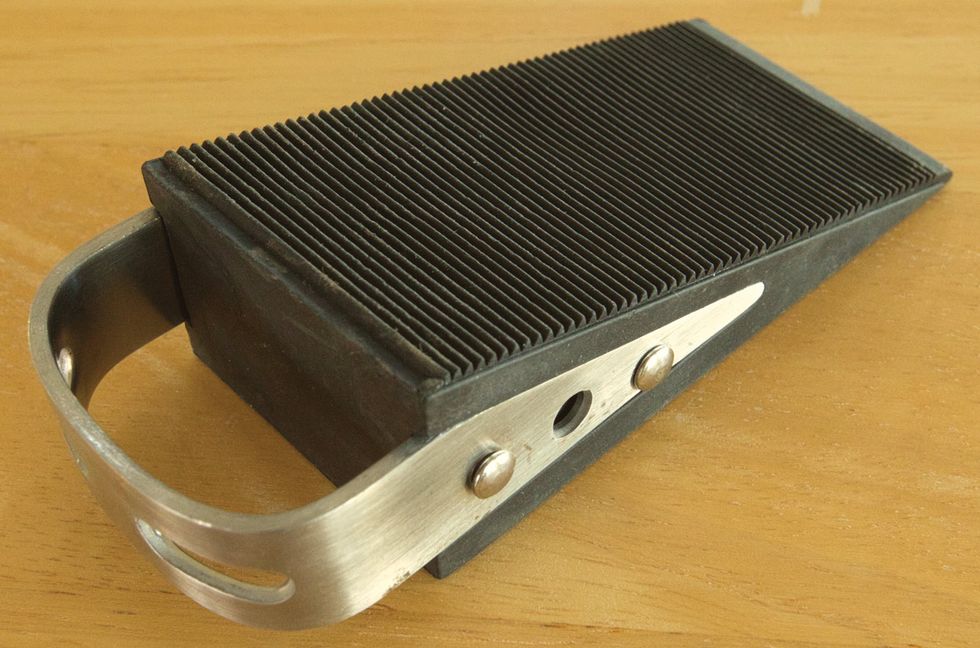
Photo 5a
The secret is to get your hands on a solid doorstop. I like the one in Photo 5a because its brushed steel handle provides extra rigidity and support. It’s sold on Amazon for $9 by a company appropriately called Everything is Play.
Photo 5b
I keep it in my gear bag—it’s about the size of a stomp tuner—and then wedge it under my amp (Photo 5b) when I set up onstage. With a low-profile doorstop like this, I’ve discovered that even if you push it all the way back to the cab’s rear bottom edge, the center of gravity works in your favor to keep the amp leaning forward. In other words, it remains stable. Position the amp a foot or two farther back on the stage than usual, and you’ll get a nice directional beam from the speaker. Now you can turn down and still hear your guitar, and everyone’s happy.
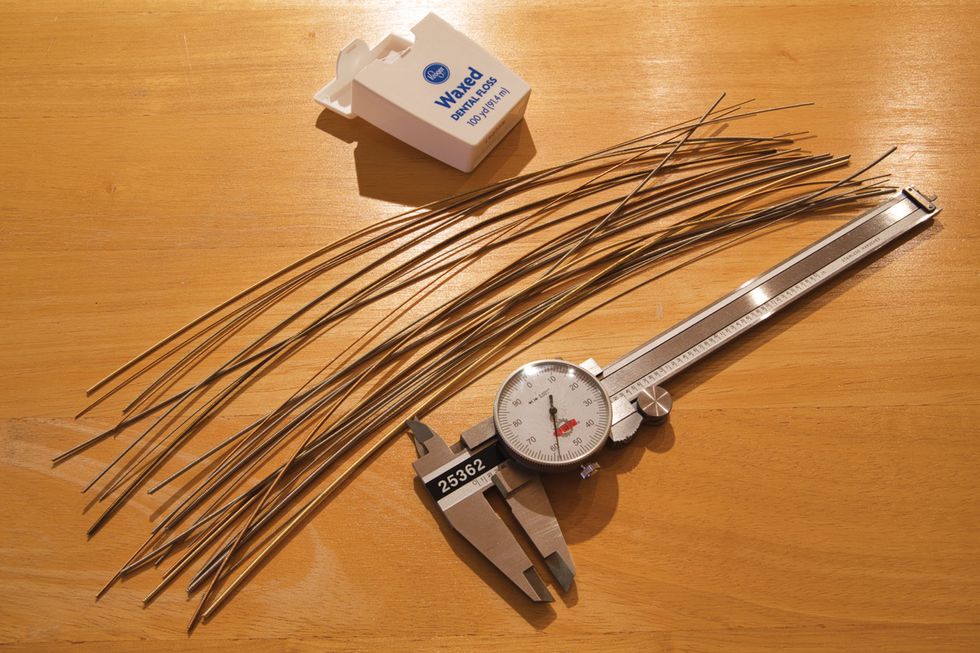
Photo 6a
Burnishing nut slots. If you hear a little ping when tuning one of your guitar’s wound strings, it could be a sign that it’s getting snagged on a little burr in the nut slot. In some cases, fixing this means taking your axe to a pro with the tools and knowledge to reshape the slots, but often you can solve the problem yourself.
Dan Erlewine—luthier and guitar guru extraordinaire—hipped me to this slot-burnishing technique. For starters, whenever you change strings, don’t immediately throw them away. Instead, clip out a section of each wound string—12" is about right—and save it.
in a matter of years.
If you play a lot and own several acoustic and electric guitars, it won’t take long to build up a stash of wound string sections you can use as burnishing tools (Photo 6a). Complete the kit with a roll of waxed dental floss. A dial caliper, a relatively inexpensive tool sold in automotive parts stores, is handy for measuring string gauges, but not essential.
The concept is simple: Clean out and burnish the offending slot using a piece of wound string that has a slightly smaller diameter than the one on your guitar that’s pinging. For example, if you’re using a .024 3rd string on your flattop, a .022 works well as a burnishing tool. You can eyeball this pretty easily. If the burnishing string drops down into the slot—don’t force anything—you’re good to go.
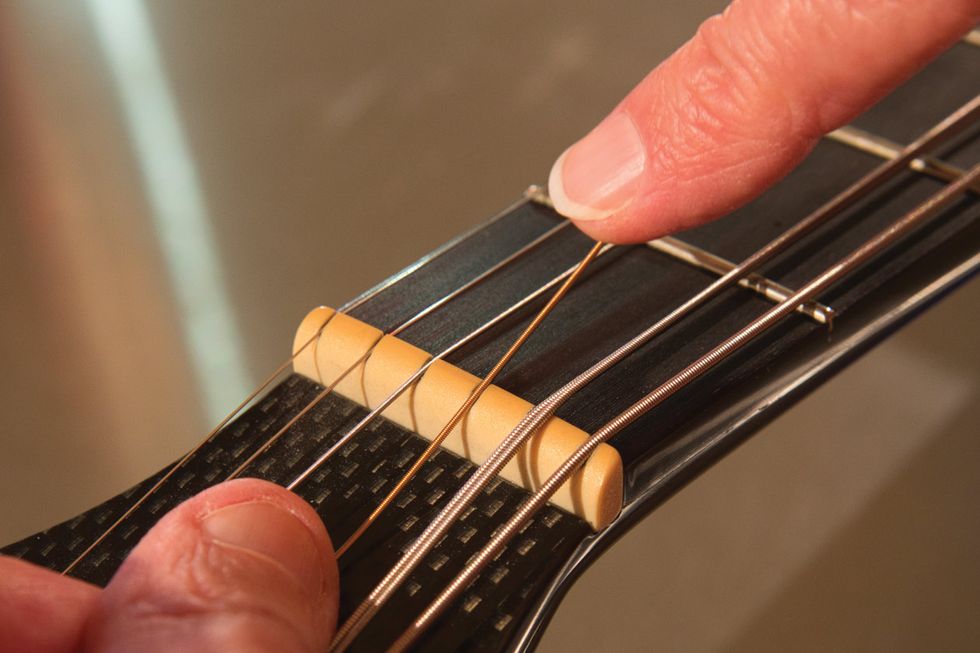
Photo 6b
But remember: When burnishing the slot, always maintain a downward angle toward the headstock (Photo 6b). The highest point of each nut slot must be the edge that faces the fretboard. Press the burnishing string lightly into the slot and run the string back and forth, using firm, steady strokes. A dozen passes should do the trick.
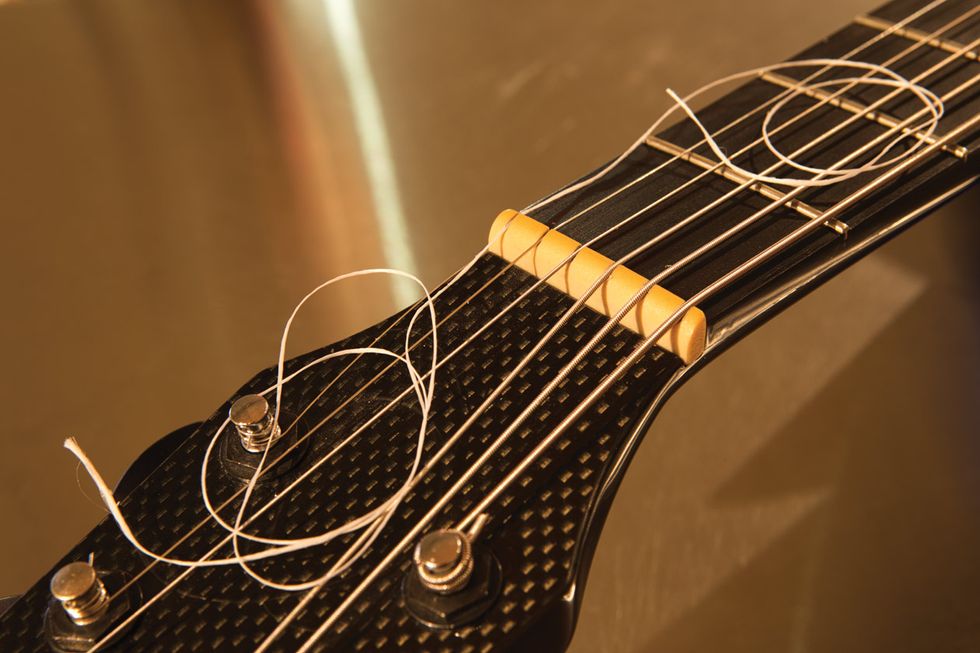
Photo 6c
Though you won’t be able to slip a wound string into a thinner plain string’s nut slot, you can polish it out with waxed dental floss (Photo 6c). The goal is to leave a slippery surface at the bottom of the slot. It doesn’t hurt to “wax out” the wound string slots, too, after you’ve burnished them.
By the way, hang onto all those pieces of string with ball ends. In a moment, we’ll see how to use them in another hack.
Hush pucks. If you practice electric guitar in an apartment, dorm, condo, or even a stand-alone dwelling, you know how low-frequency sounds can travel through the floor and disturb neighbors, roommates, or family members. Even if you’re playing no louder than folks might listen to TV, those low notes can travel far and wide through the building.
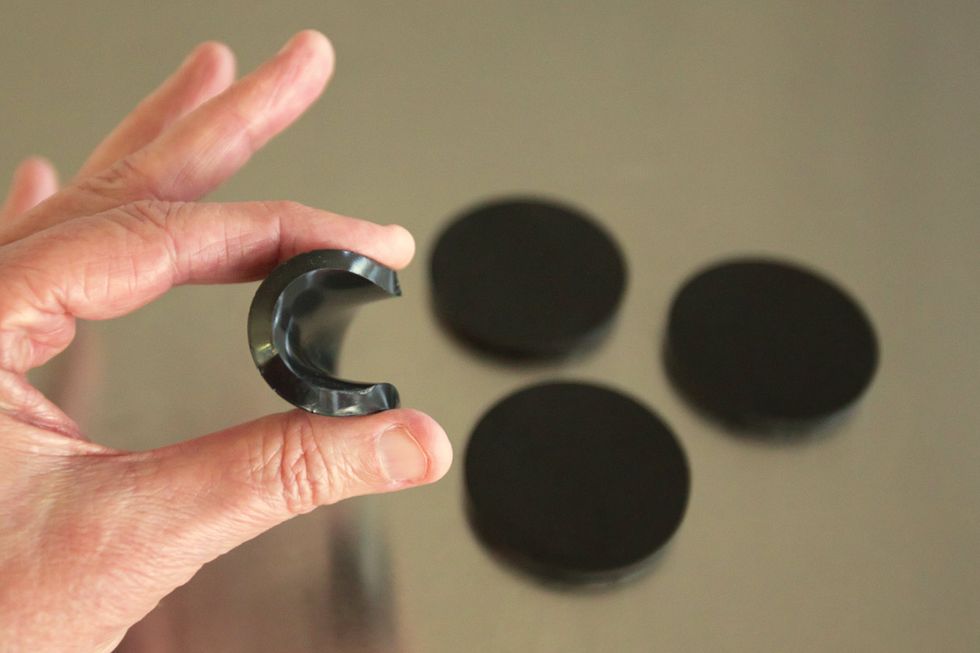
Photo 7
Fortunately, there’s a way to keep the peace, and it comes in the form of isolation pads. They’re available in many designs, but the sorbothane pads sold by Isolate It are perfectly sized for guitar combos (Photo 7). Measuring 1/4" thick and just over 2" in diameter, these high-tech, squishy discs will decouple your amp from the floor. Each pad is rated up to 320 pounds, and according to the manufacturer, they absorb almost 95 percent of equipment vibration. Designed to isolate air compressors and other heavy machinery from a factory floor, these are tough little buggers. A set of eight pads runs about $23 on Amazon, so that comes out to less than $12 per amp. (Whew, we didn’t blow our budget.)
Bonus! Have a home studio? You can also tuck these vibration-absorbing pads under your monitors to reduce low-frequency transmission into your studio furniture, and thus get cleaner, more accurate mixes.
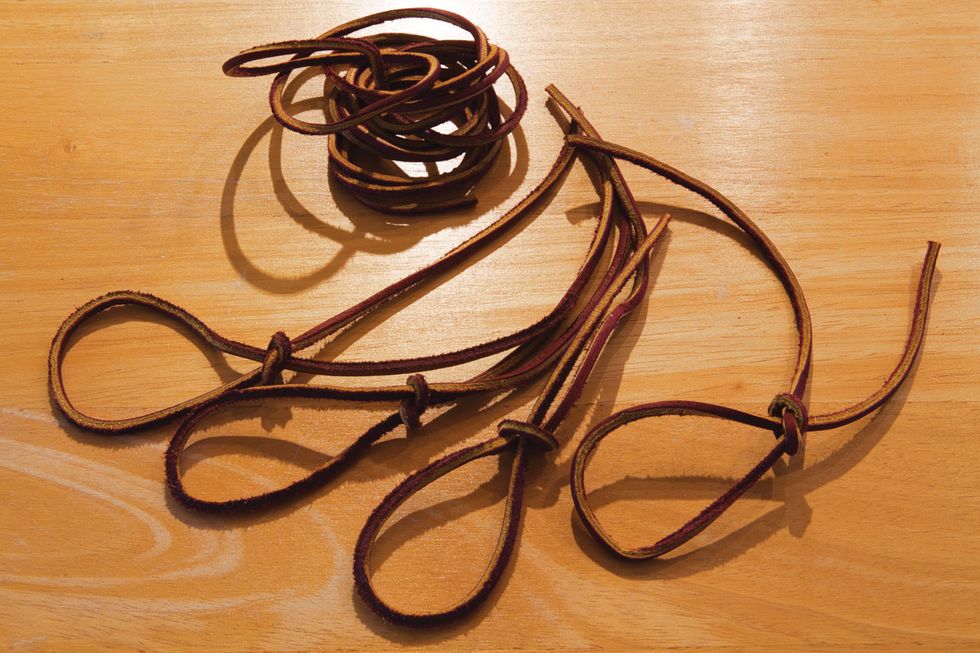
Photo 8a
Leather laces. I love to work on my guitars. Whether I’m trying out one of the projects from Dirk Wacker’s Mod Garage column or finding new ways to hot-rod a guitar, there’s always an instrument on the workbench. But one thing has bugged me for a long time: I hate gripping metal hardware with metal tools. The potential for scraping a potentiometer when you’re de-soldering its lugs, or scratching the sides of a Tune-o-matic bridge when you’re filing saddle slots, is just too great.
Ah, sweet relief. Leather laces—the kind found in heavy-duty work and hiking boots—can prevent metal-on-metal contact. Just master tying a slipknot (Photo 8a) and you’ll be in business. Whenever you need to protect a part, simply sling a leather slipknot over each of the tool’s gripping surfaces, pull the knots tight, and voilà—you have padded jaws. This can work with vise grips and bench vises (Photo 8b), pliers, wrenches, clamps, and other gripping tools. You can buy 12 feet of this handy stuff for less than $8. It’s thick enough to stand up to a cranked vise and tough enough to last years. Rawhide rules!
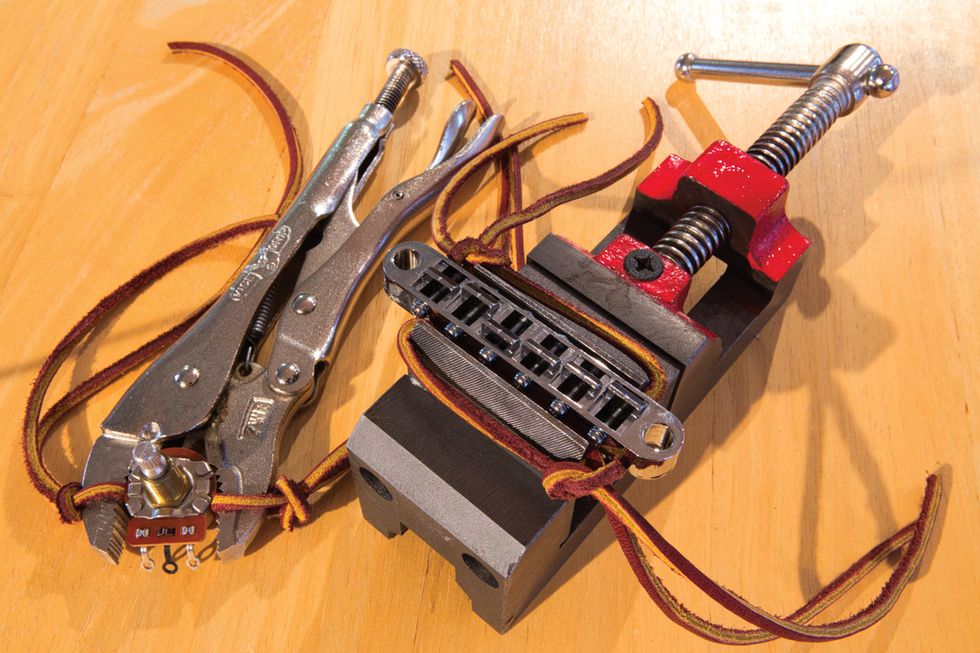
Photo 8b
“Paid my dues” bracelet. If you’re into declaring your guitar-tribe affiliation in a subtle way, here’s an idea you might like. Collect the ball ends from all those used strings you toss out each year—including bass strings—and make a bracelet that other guitarists will instantly recognize.
The cost is minimal. Other than the ball ends (start saving them now), you’ll need a roll of 1 mm elastic cord. This diameter threads perfectly through the ball ends of guitar strings, regardless of manufacturer. You can buy this stretchy stuff at hobby shops and online—98 yards cost me $7. That’s a lifetime supply.
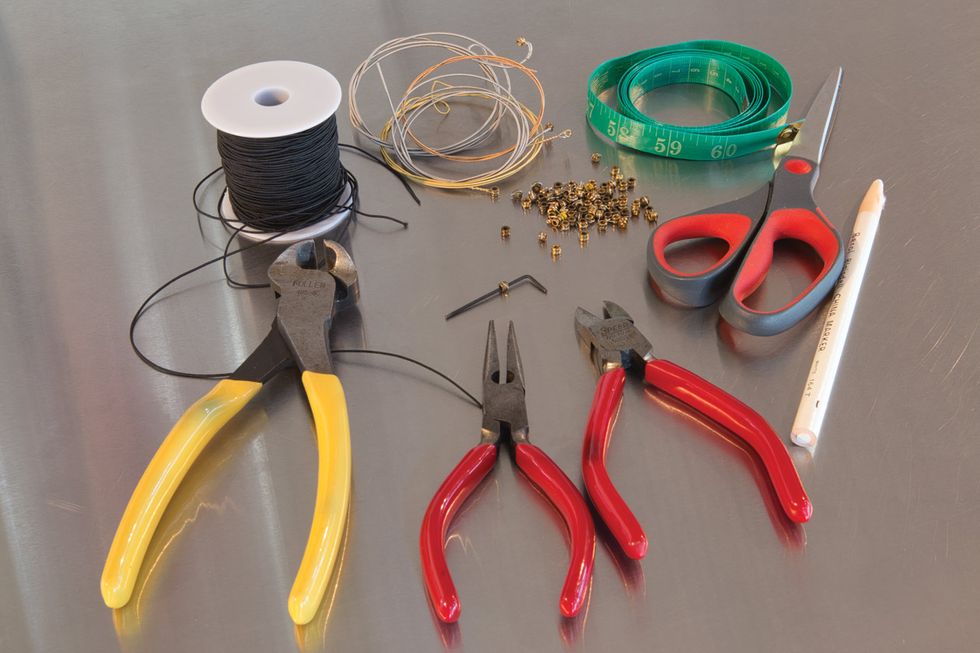
Photo 9a
Additional tools and materials? Measuring tape, scissors, a wire cutter to snip the ball ends from the windings, a tool to hold the ball end still while you snip, and a white grease pencil (Photo 9a).
Start by measuring your wrist (if you like your bracelet a bit loose, add 1/4" to this number). Now add 6"—this total is how much you’ll need to cut from the roll of elastic cord.
Use wire cutters to snip the ball ends from the strings. A small hex wrench inserted into the ball end works great to hold it steady while you snip it free from the winding.
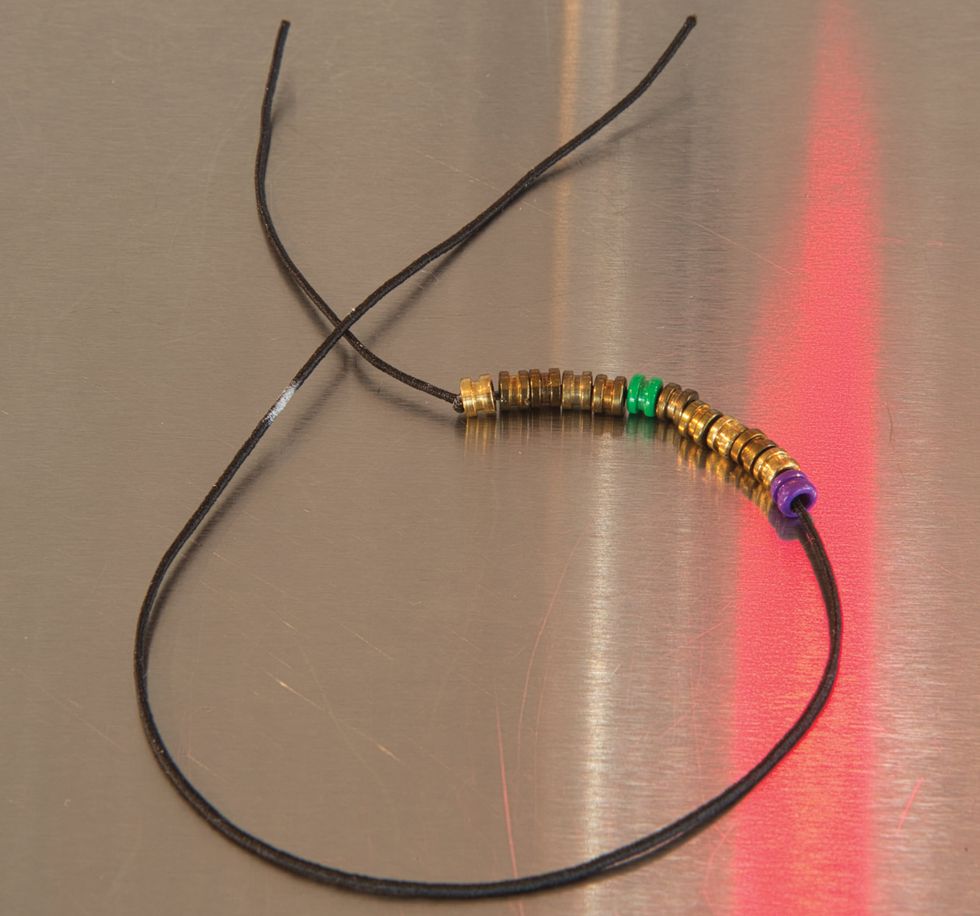
Photo 9b
With the grease pencil, mark the cord 3" from each end. At one end, make a single knot at the 3" mark—this will be a backstop for the ball ends you’ll be threading onto the cord from the other end (Photo 9b). Slip the ball ends onto the string until you reach the second white mark.
Tip: I suggest turning to bass strings for the final two ball ends. Their larger holes will slip over the final knot, covering it.
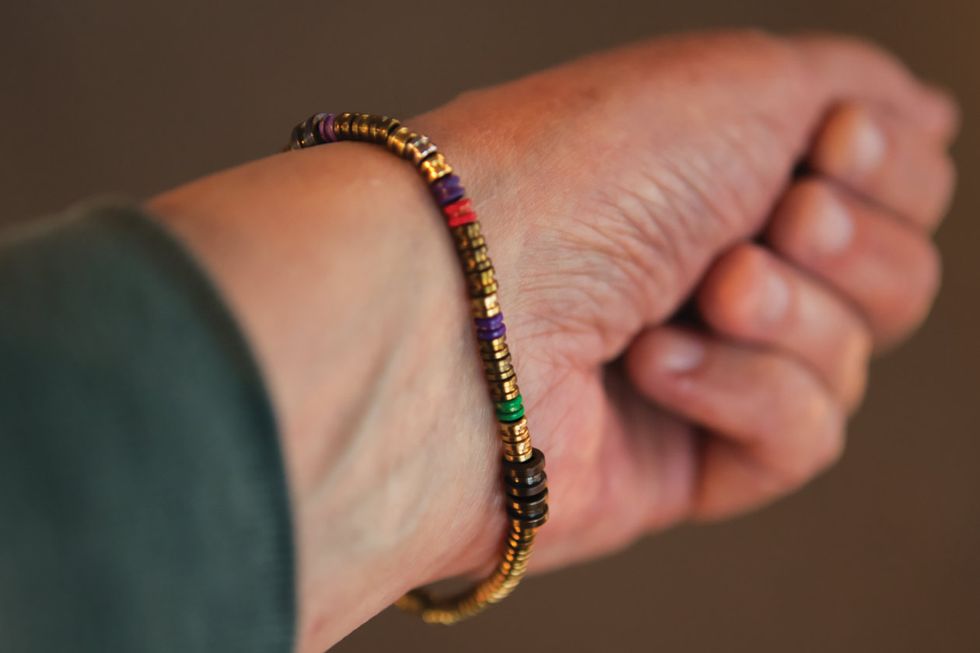
Photo 9c
Now grip the 3" ends, pull the cord semi-tight, and tie a square knot to hold the bracelet together. Snip off the extraneous cord, but leave a little at each end of the square knot—1/8" works great. Push the ball ends over the square knot, slip the bracelet on, and admire your work (Photo 9c). Wear it proudly—each ball end signifies hours of playing time. (Paid my dues!) This handmade bracelet makes a great gift for other guitarists in your life.
Gathering enough ball ends for a bracelet can take a year, depending on how much you play and how many guitars are in your petting zoo. (To help you estimate how many old strings you’ll need to collect to make a bracelet, six ball ends—one string change—equals about 3/4" when laid side-by-side.) Of course, you can accelerate the process by petitioning your guitar-playing friends—and even local techs or repair shops—for old strings. Then you’ll need to change the bracelet name to “paid our dues,” but that’s tribal too, right?
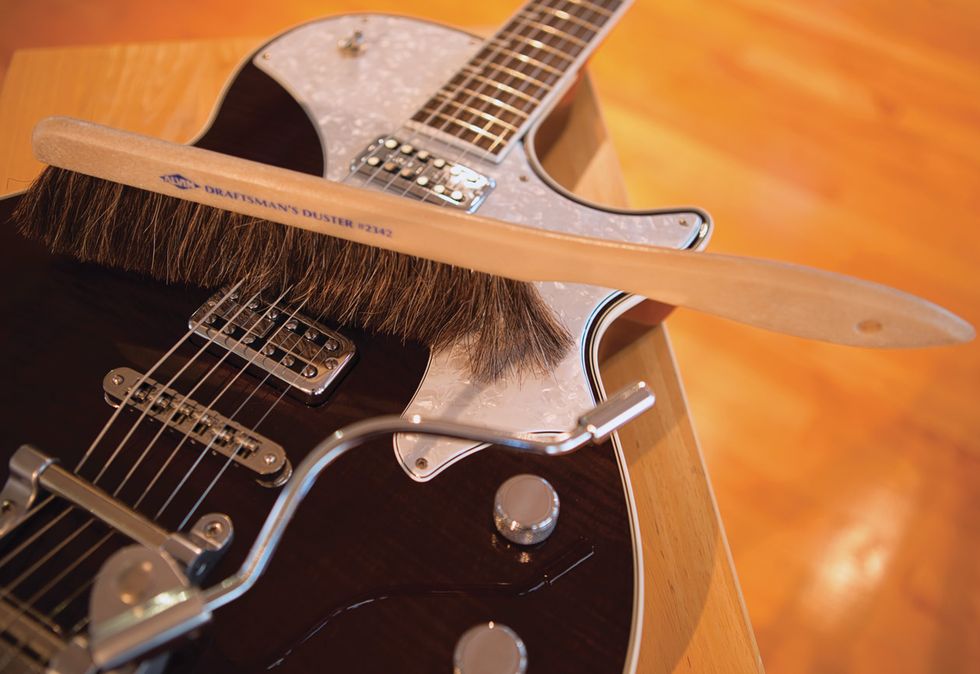
Photo 10a
The draftsman’s duster. Horsehair. It’s all about horsehair. Okay, let me explain: You know how dust and skin debris collects under the strings around the pickups and at the headstock, and drifts into the nooks and crannies at the bridge and tailpiece?
If you’ve tried to clean this off with faux-feather dusters or Swiffer cloths, you’ve probably been dismayed by how these synthetic materials seem to simply redistribute most of the schmutz and create static electricity that attracts even more dust. We need to turn to the art world for a solution … the draftsman’s duster (Photo 10a).
Long ago, illustrators figured out that horsehair had the perfect balance of stiffness and flexibility to remove eraser crumbs and chalk and pencil dust without smearing or smudging their work. Who knew that this is also the perfect tool for fastidious guitarists?
Check it out: The durable bristles are long enough to reach down through the strings to the body—even on an archtop. They’re soft enough not to scratch the finish, yet have enough inherent springiness to knock away any loose debris with a flick of the wrist. Best of all, horsehair doesn’t create static electricity.
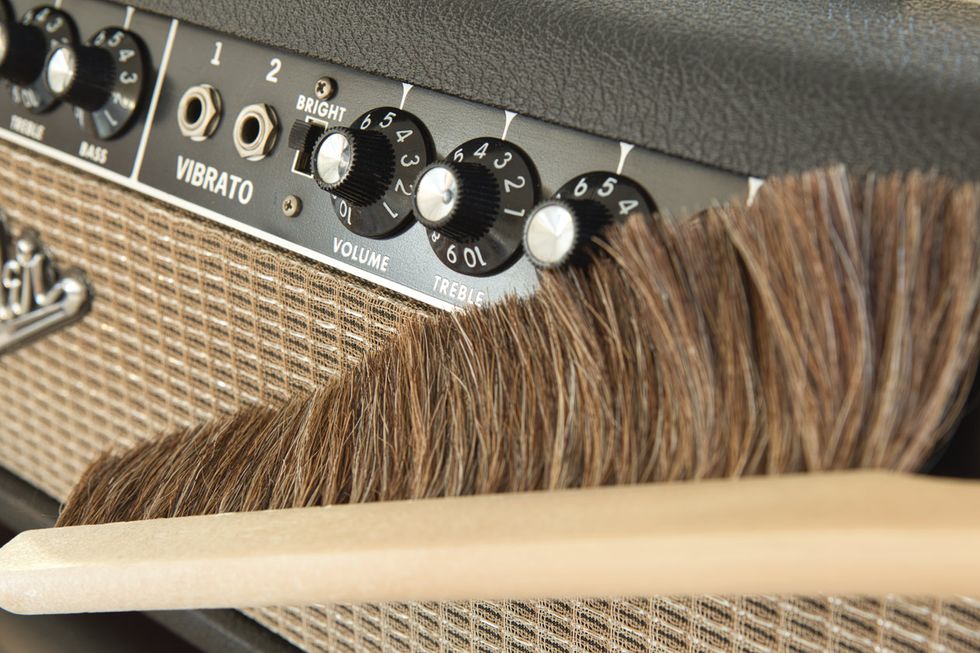
Photo 10b
The draftsman’s duster is perfect for cleaning off amp controls (Photo 10b), stompboxes and pedalboards, rackmount gear, mixer pots and faders, monitor speakers, mic stands, instrument cases, gig bags—basically all the gear you own. Do you have a keyboard or piano? Those bristles will reach down between the keys to brush out built-up crud. The Alvin Draftsman’s Duster #2342 shown here costs less than $8 and makes it easy to keep your equipment shipshape.
The chopstick probe. And speaking of shipshape gear, sometimes cleaning your guitar requires more than a good dusting, like when you need to scrape hardened sweat and dirt from frets, bridge hardware, and pickup screws and pole pieces. You don’t want to use a metal tool for this—it will do more damage than good. My search for a safe scraping tool first brought me to bamboo kabob skewers, but the ones I tried were so thin they’d bend or break under moderate pressure.
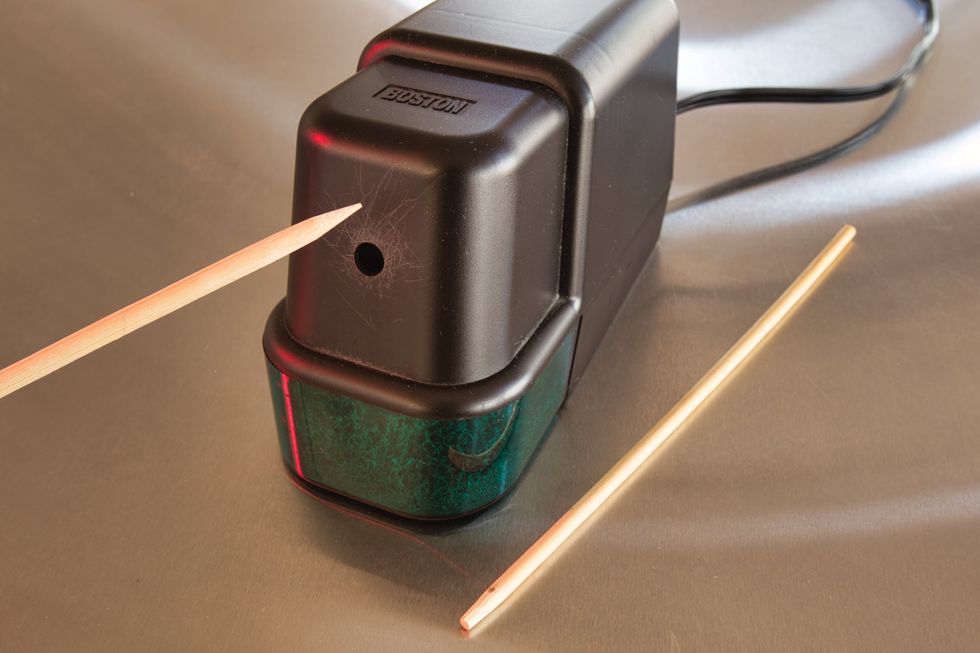
Photo 11a
Then I discovered you can put a sharp point on a bamboo chopstick with a pencil sharpener (Photo 11a). Now we’re talkin’! Here’s a tool that’s stout enough to use as a scraper, yet soft enough that it won’t gouge the fretboard or scratch metal hardware.
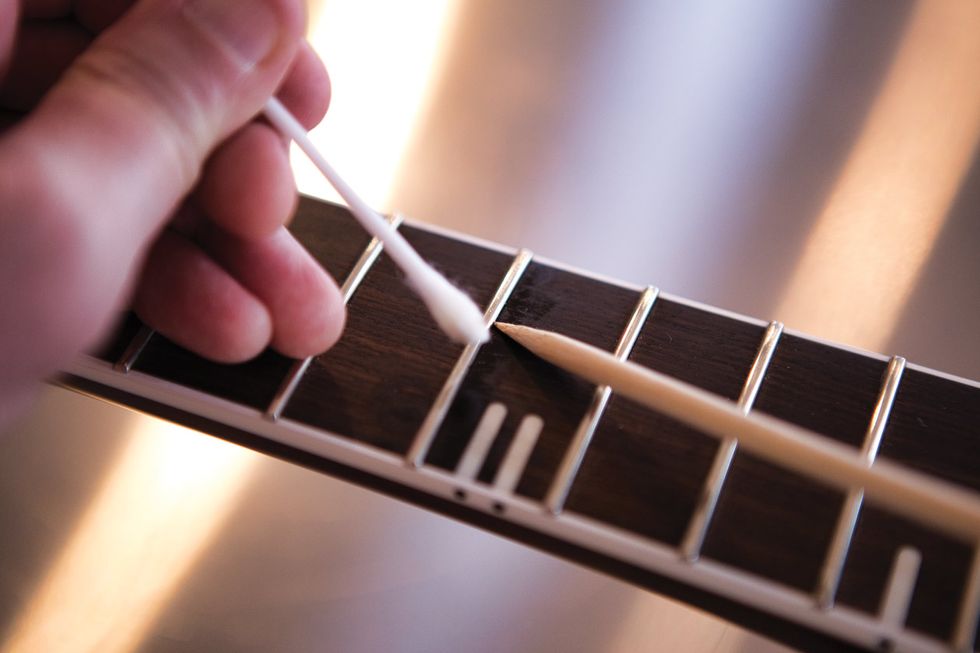
Photo 11b
To remove gunk from around frets, apply a drop of lemon oil to a Q-tip, moisten the hardened dirt, then gently work the sharpened chopstick in and around the fret (Photo 11b). To clean and protect metal parts, use a similar technique, but treat your Q-tip with WD-40 (Photo 11c).
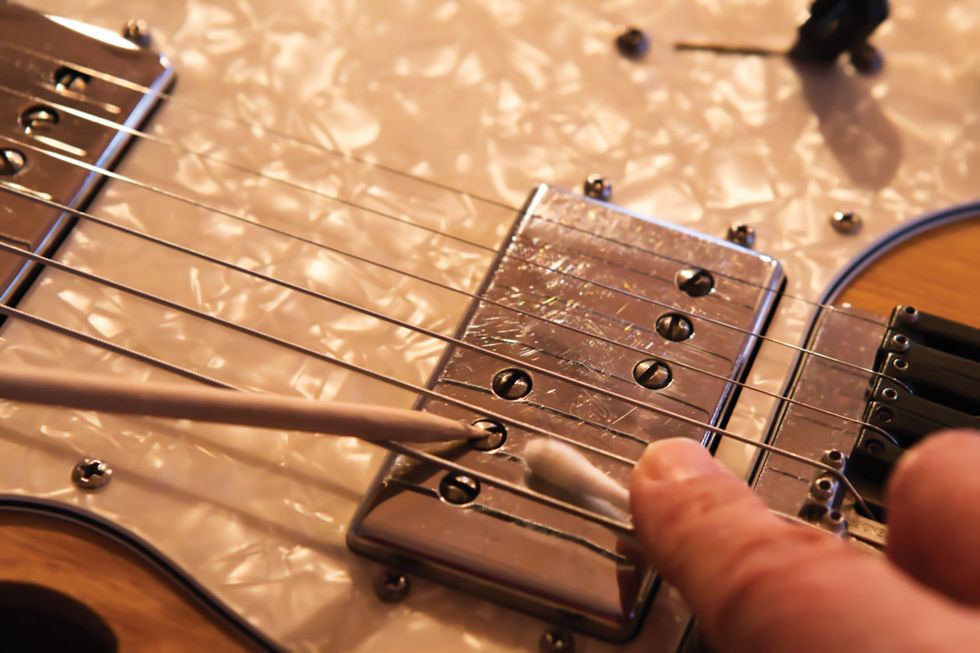
Photo 11c
Spare-string vault. Of course you bring spare strings to a gig—that’s a no-brainer. But as you may have discovered the hard way, even the slightest kink on a new string can render it unusable—it messes up the intonation and feels funky between your fingers and frets. If you carry spare strings in your gig or gear bags, they risk getting mashed and mauled by your guitar, pedals, or other equipment. The soft plastic string pouch just doesn’t offer sufficient protection against heavier items.
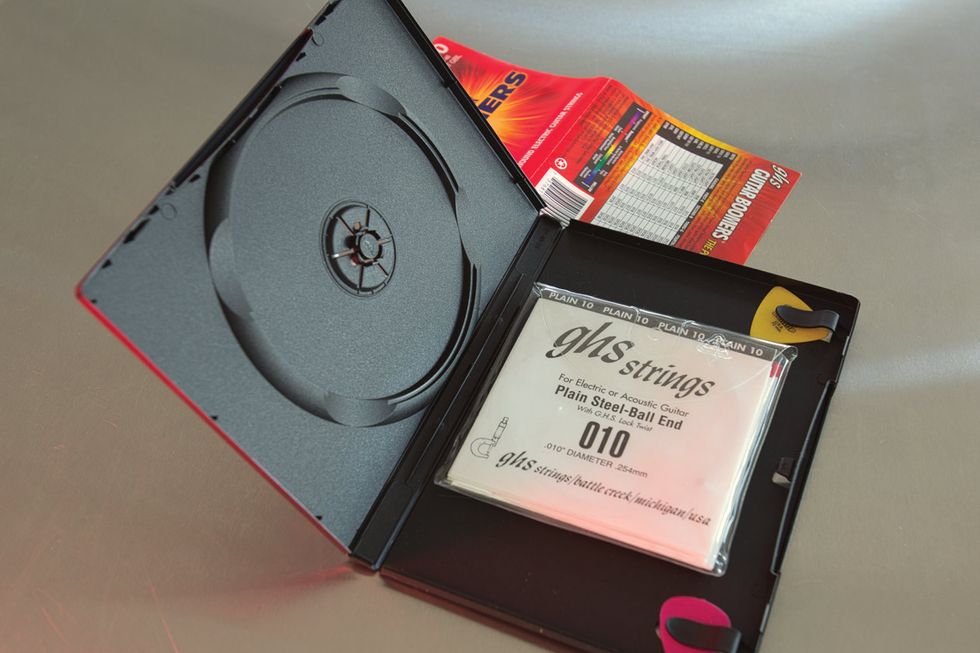
Photo 12a
There’s a simple fix: Find an unused DVD case. Remove the product-info wrap from your spare strings and then place the strings, still in their plastic pouch, inside the middle of the case. Center the pouch over the spindle—this will hold it firmly inside the case without touching the strings themselves. Most cases have two little clips, which will each hold a spare flatpick (Photo 12a). Slip the product-info wrap into the DVD case’s exterior sleeve (Photo 12b) and shazam—you can head to the gig knowing your strings are protected in their own lightweight, yet sturdy vault.
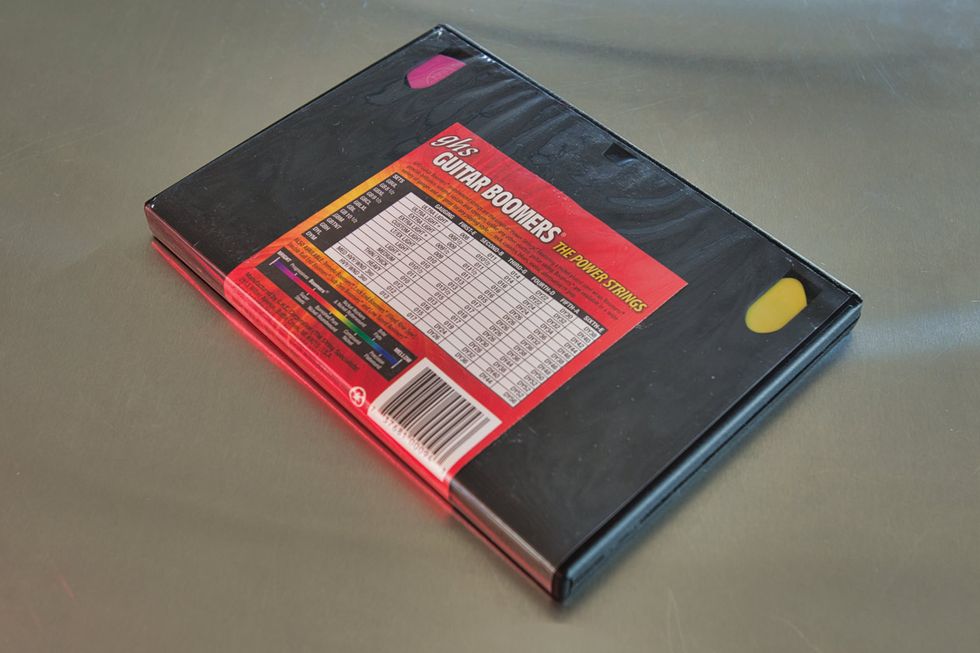
Photo 12b
Thinking sideways. All right! We’ve covered a dozen hacks, but there must be hundreds more. If you have favorite tips and tricks, please take a moment to share them with the PG community. We’re all ears.