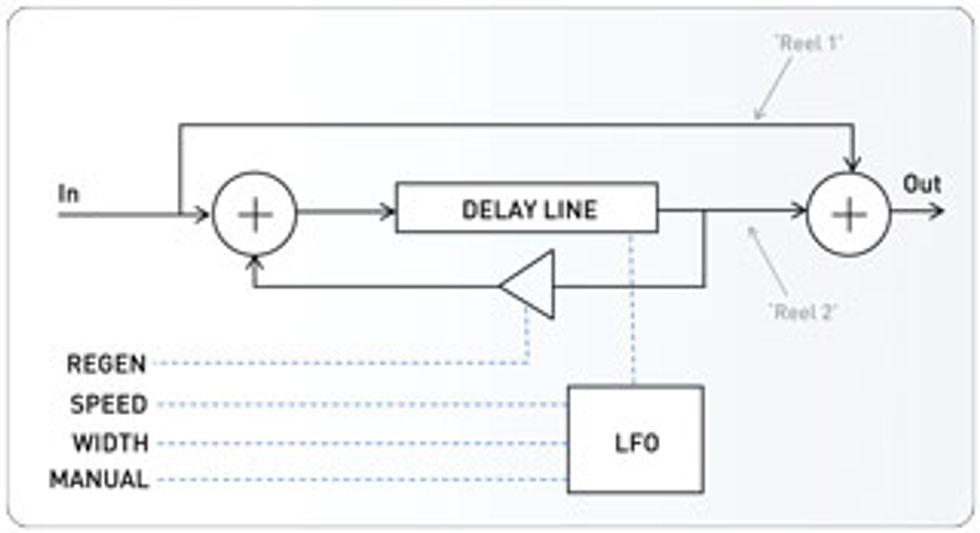
Block diagram of a flanger pedal.
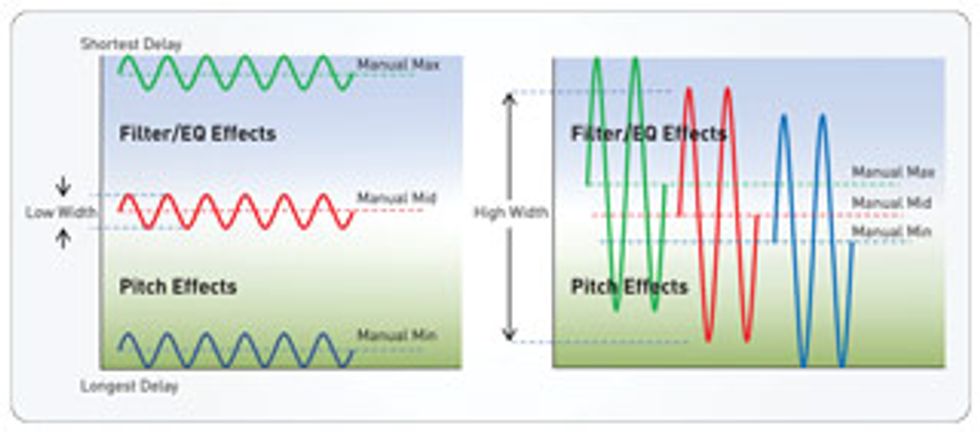
LFO curves: With a low width setting, the manual knob determines the filter/pitch nature of the flange effect. With a high width setting, the width sweeps through filter and pitch effects, and the manual setting has only a small influence.
As sonic chameleons, flangers can create lush chorus sounds, airy harmonic textures, moody frequency swirls, sweeping jet-airplane swooshes, seasick pitch warbles, or sci-fi ray-gun blasts. However, if you don’t have an understanding of what the pedal is actually doing, this tweakability can lead to frustration when you try to dial in a particular sound. Let’s take a look at the basics and break down some of the mystery.
First, a little history. The flanging effect originated from a studio trick involving two synchronized tape reels playing identical source material. The second reel was forced out of sync by applying pressure to the tape-guide “flange,” creating a varying delay relative to the unmolested first reel. When the two signals were combined, it produced a dramatic and chaotic sweeping effect. The introduction of bucket-brigade-delay (BBD) chips in the ’70s opened the door to capture this same effect in a stompbox, with the BBD chip taking the place of the “flanged” tape machine.
A low-frequency oscillator (LFO) replicates the varying delay time of the flanged deck. A typical flanger pedal has four knobs, and three of them—speed (or rate), width (range or depth), and manual—are related to the LFO (see the flanger pedal block diagram at right).
So what’s up with the fourth knob? The regen (intensity or enhance) knob feeds some of the delay output back into the input. This control may have originally been added to compensate for the fact that the studio tape flanger trick could produce some extreme sounds by speeding up the flanged deck ahead of the original signal (creating what’s sometimes called a “negative delay”), and then slowing it down to pass through zero delay time, whereas the pedal can only delay the signal by positive amounts. The regen knob doesn’t produce this particular sound, but it intensifies the flanging effect and adds a bunch of sonic possibilities. Later pedals obtained the “through-zero” effect of actual tape reels by adding a short delay in line with the input signal, but we’ll save that for another discussion.
The typical delay range of a flanger is about 0.5–10 ms. These delay times are heard as filter effects at the shorter end of the range (because frequency rises as delay times get shorter), and pitch effects (chorusing) at the longer times when combined with the input signal. This is the nature of comb filtering, which is what happens when a delayed version of a signal is added to itself. The three LFO controls determine how fast (speed), how much (width), and in what delay region (manual) the modulation occurs.
From a technical standpoint, the width knob sets the LFO amplitude, and the manual knob sets the LFO offset. Note that, as the width is increased, the manual control becomes less effective. When the width is at maximum, then the entire region of delay times is being used, so the manual control doesn’t do anything. At the other extreme— with width at zero—there is no oscillation, just a fixed delay time that is adjusted by the manual control, which allows a physical sweep of the entire delay range.
With this information in mind, we can formulate some general ideas about how to craft particular sounds. Below are some starting points to help you explore the diverse sounds that a flanger is capable of. To add more variables into the mix, the LFO sweep shapes can be linear or logarithmic, depending on the flanger—and some flangers allow polarity changes on the feedback. Luckily, the same basic principles still apply.
Chorus-like sounds: A chorus doesn’t have any regeneration, so set the regen to minimum. Set manual to its lowest setting for long delay times. Keep the width low, but not at minimum. (Remember, if the width is at minimum, the LFO is not oscillating—hence, there will be no modulation sounds.) If the effect is too pitchy, try reducing the width or the speed.
Jet flyby: Set a moderate speed. Turn the manual to halfway and crank up regen. Set width to the desired sweep range, then adjust manual to dial in the sweep region to taste.
Auto-wah: Set a reasonably fast speed and keep width low to stay in a limited region of delay times. Add some regen to enhance the filter resonance. Then, experiment with the manual control to tune the auto-wah frequencies.
Classic flanger sweep: A moderate speed with maximum width allows the delay line to sweep from the lowest to highest delay times, thus showcasing the underlying character of the flanger. Add some regen to taste.
Resonant filter: Set width to zero to “freeze” the LFO. Add a generous amount of regen to increase the resonance, and turn the manual knob to dial in the filter frequency.
Freq out: Set all controls to maximum. (As we mentioned earlier, with width at maximum, the position of the manual control is irrelevant.)
With this knowledge and a little practice, you should now be able to use your flanger to dial in a lot of different sounds with authority. And don’t forget the value of experimenting—turn knobs, play guitar, and have fun!
 Pete Celi
is the DSP Engineer
at Strymon.
Pete Celi
is the DSP Engineer
at Strymon.