While in high school, thinking about guitar rigs was a regular pastime. Before I had built my first rig, I had thought through a hundred. I often vacillated, sometimes violently, between entertaining practical and fanciful considerations, bouncing off of budgetary limits and preparing for a theoretical band’s imagined show to an imagined, but supportive, audience. Now, one of the main aspects of my day job at XAct Tone Solutions (XTS) in Nashville is helping others build their dream ’boards. Whether it’s Peter Frampton or Billy Strings, Tom Bukovac or Andy Wood, every guitar player has a unique set of pedalboard needs and wants dictated by the music they dream about creating.
How do we start making a dream ’board? I have often told clients that this stage is the best, as it’s all possibilities and no responsibilities. However, being able to do anything can lead to option paralysis, so it can be helpful to quickly apply some constraints. What material needs to be covered? What venues will we play? What is my budget? Sadly, the last question is usually the most restrictive.
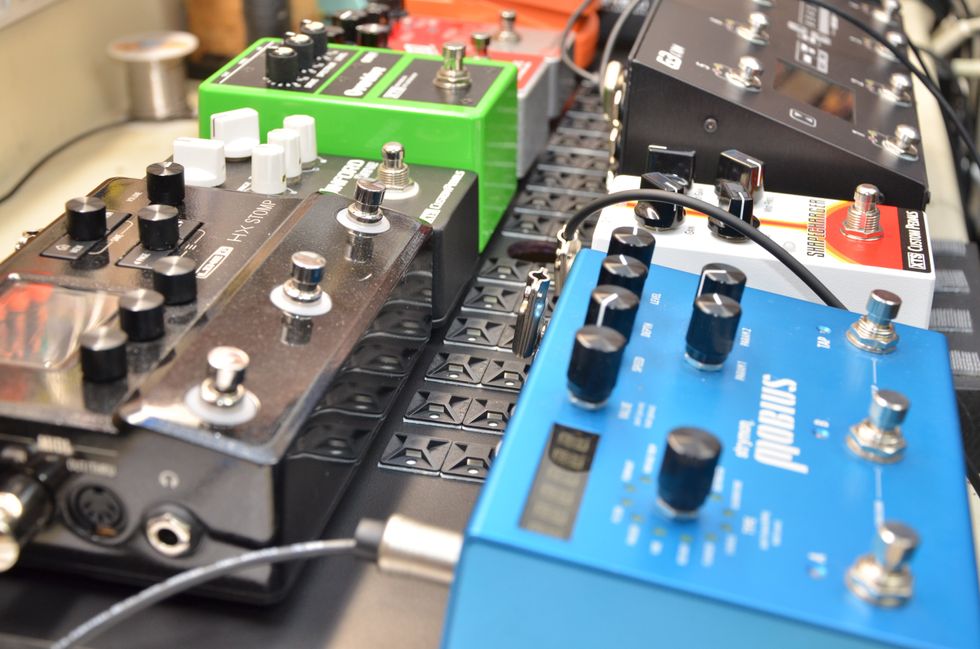
Testing the placement of pedals and the adhesive mounting is an important stage of organizing the overall flow of a ’board.
The songs to be played dictate the sounds to be played. The sounds to be played dictate the stuff to be played. For our pedalboard, we want to choose gear that, in combination, has the ability to round the required sonic bases. In general, increasing the quantity and diversity of sounds means increasing the amount of gear required to cover them. For example, your Hendrix rig will have more weight in coily cable than pedals, and your U2-inspired pedalboard will likely require the lead singer to begrudgingly help with load-in. For our dream ’board, we want to pick a set of effects that can cover most pop and rock sounds of the last 60 years well. This generality means abandoning the painstaking recreation of any specific sound and settling for evocative when exact is unavailable.
For many players, one of the first choices made is what sort of overdrive and/or distortion their rig requires. What sort of timbres are needed? Light overdrive or massive distortion? Will you use your amplifier’s gain to produce overdrive, or will you run your amp mostly clean, letting the grit come from pedals at your feet? It is a good idea to look at your overdrive elements as a system that works together, considering each pedal’s sonic signature individually, as well as in combination with other effect pedals on ’board. For this rig, I’ve made subjective choices that hit the fundamental food groups of pop and rock timbres when paired with a clean amplifier. It’s not cheap—but neither are dreams.
“The songs to be played dictate the sounds to be played. The sounds to be played dictate the stuff to be played.”
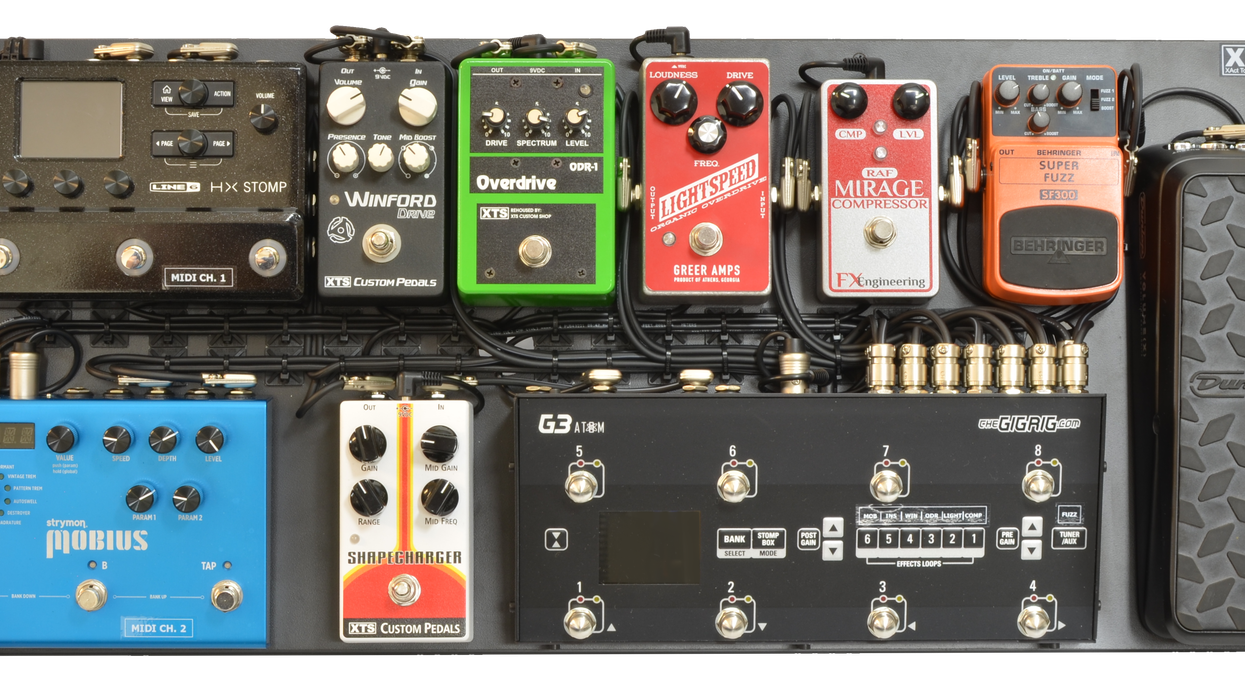
Greer Lightspeed
The Greer Lightspeed has become a nouveau-classic, regularly showing up on the ’boards of professionals and enthusiasts alike. A so-called transparent drive, it shapes and pushes your instrument's voice without making it unidentifiable. This pedal can serve as a light overdrive alone or be used to push pedals and amplifiers farther down the line. The Lightspeed on our pedalboard is a special—made by Nick Greer himself out of his very own mojo component stash. $229 street, greeramps.com
XTS Rehoused Nobels ODR-1
The original version of the ODR-1 has reached near-mythical status. Nashville session ace Tom Bukovac sowed these once-dirt-cheap overdrives all over the city like a late-’90s, guitar-playing Johnny Appleseed. The originals have since blossomed into $2,000-plus uber-vintage prizes. With a strong low-mid presence compared to something like a Tube Screamer, they are a great match for black-panel Fenders. More affordable reissues and clones are available and compete well with the real thing. This one was bought before the boom and rehoused to replace worn-out parts. Mechanical footswitches and jacks don’t appreciate in value, even if green overdrive pedals do. $119 street for current reissue, nobels.de
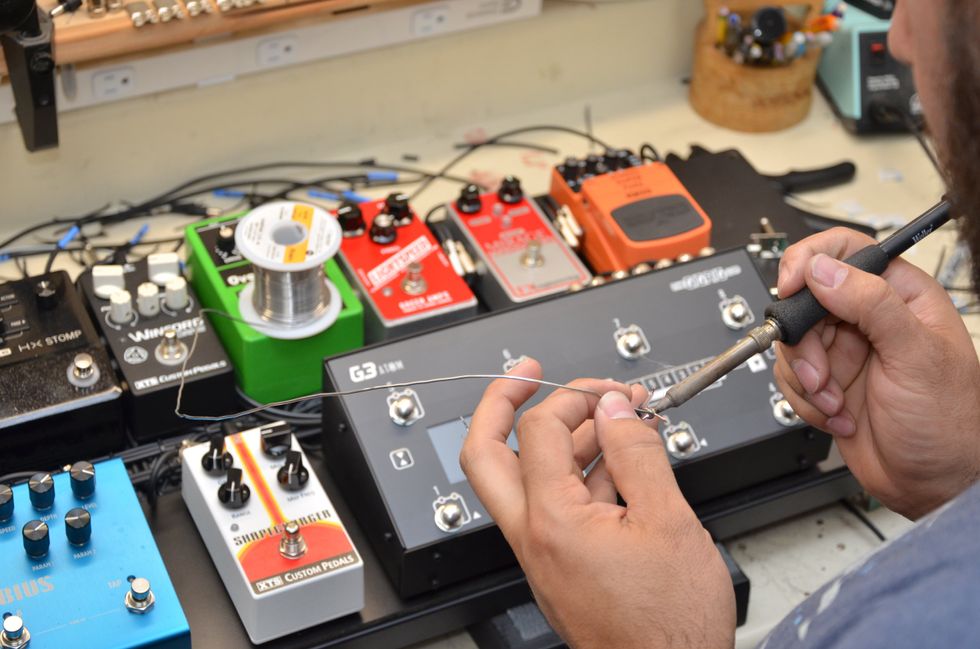
Soldered cables are preferable for the sake of longevity.
XTS Winford Drive
This pedal does both overdrive and distortion. Prototypes can be heard on Keith Urban records, and a great many Nashville session players use this pedal every day in the studio. It ranges from light gain to woolly fuzz sounds, and with the gain all the way down, the mid boost can be an effective boost for amps that are already breaking up in an upper-mid-forward way (think Matchless, Badcat, and Vox). It also stacks well with pedals pushing its input, adding more flexibility to the system. $249 street, xacttone.com
Behringer SF300 Super Fuzz
New fuzz pedals are seemingly born wherever transistors and hot soldering irons meet, and they produce a timbre ecosystem all their own. Fuzz is a sound that amps don’t often produce in and of themselves, so having a fuzz pedal can help round out a pedalboard, giving access to vintage and modern sounds. The SF300 may be cheap, but proves that listening is best done with your ears. When placed in a true bypass loop, it won’t need to be stepped on, mitigating the risks associated with its economical enclosure. $29 street, behringer.com
XTS Shapecharger
The Shapecharger gives this ’board a boost. Where you put your boost will depend on what function you want it to satisfy. Engaging boosts before overdrives and distortions will increase the level of saturation in your dirt pedals with a less pronounced level increase. Assuming your amp has sufficient headroom, engaging boosts after dirt boxes will result in an increase in level without a significant increase in saturation. The Shapecharger also has a separate, sweepable mid control to cut through a band mix, as well as a high-pass control to keep amps and pedals after it from becoming saturated with low frequencies. $199 street, xacttone.com
RAF Mirage Compressor
Compression is great for spanky R&B rhythm parts as well as country-style picking. The Mirage compresses in a natural-sounding way, squeezing your signal without overtly crushing it. Its relatively transparent response creates separation in arpeggiated parts and provides sustain without resorting to overdrive. $199 street, fxeng.com
After overdrive, players might consider modulation and time-based effects. Modulation effects change amplitude and/or frequency in a periodic way, like tremolo or vibrato. Time-based effects, like delay and reverb, store and manipulate your signal to create repeating or spacious effects.
Line 6 HX Stomp
The Line 6 HX Stomp is a multi-effect unit that models all sorts of classic and cutting-edge effects. From overdrive and distortion to reverb and delay, the Stomp does a great job of providing lots of options in a very compact package. The HX series is a significant evolution from the company’s M-series effects, as the increases in processing and algorithmic power are considerable and particularly evident in computationally-intensive effects like reverb. Additionally, if a song requires a sound not covered by the other pedals on ’board, the Stomp can pinch hit, providing access to esoteric effects you enjoy, but perhaps don’t want to carry—like envelope filters, synths, and pitch benders.
The HX Stomp also provides for the very real, if not preferred, possibility of needing to go direct on a gig. Many venues in Nashville and elsewhere have prohibited live amps being on stage. Because the HX Stomp has the ability to model amplifiers and cabinets, adding a DI to this ’board will allow it to function well on an ampless stage. $699 street, line6.com
Strymon Mobius
Why include the Mobius modulation pedal when, hypothetically, the HX Stomp can do all the same modulation types? There is some overlap, but adding the Mobius gives fast access to two great wobbly sounds per bank. The Mobius can also serve as a sort of placeholder. If some new effect comes on the market, it’s likely that it’ll fit in the same physical spacing as well as use the same type of power. Whether future change is driven by preference alone or a paying gig, it is helpful to have a pedal position that can serve as an escape hatch. $449 street, strymon.net
Placement is key to the exact sonic combinations you’re seeking on any pedalboard, and philosophies vary—although distortion, OD, and fuzz usually make up the first bank of tone tools. But with a device like the GigRig G3 Atom, all rules can be broken.
GigRig G3 Atom
We’ve spent a great deal of time picking out all of the widgets we will use to squeeze, pull, and twist our guitar sound. We could cable these together and have a fully functional guitar rig, but a dream ’board is more than what you want to use. It also encompasses how you want to apply those devices. When you spend a bunch of time developing sounds, it’s very nice to be able to save or index them for later use. A MIDI controller can send commands to MIDI-capable effects, recalling previously saved patches. Non-MIDI-capable effects, like typical overdrives, need external help to be accessed via presets. One solution is to put them in loop-switcher-controlled bypass loops. If chosen wisely, the loop switcher can both control our so-called “dumb” pedals and their MIDI-responsive siblings.
On our dream ’board, the effects we’ve selected will orbit around the GigRig G3 Atom. In the past, presetable switching systems had a tendency to get bogged down in the preset modality. Everything worked great when you were on a show with a predetermined setlist and cues, but when it came to improvising sounds, effects were often trapped and inaccessible inside of presets, unless the controllers expanded to include foot switches for every effect—at great monetary and volumetric expense. With a button-per-audio-loop interface, improvising different combinations of pedals on the G3 Atom is simple, and sonic-spelunking sessions are not impeded by a preset-only straightjacket.
The Atom can also send MIDI commands to both the Mobius and the HX Stomp, directing them to previously saved sounds for instant recall. The Dunlop Volume X connects to the Atom’s expression pedal port, meaning that changes in the position of the treadle can be translated to changes in the MIDI connected effects, controlling any number of effect settings including volume and effect levels.
The Atom can also reorder the effects in your signal chain. By default, the G3-controlled effects are ordered in a very traditional way: fuzz> dynamics> overdrive> distortion> modulation> boost> delay/reverbs. Being able to change where the Mobius is in the signal chain means that modulations like chorus can be post-dirt boxes and effects like phaser can be pre-dirt. The Shapecharger is run outside of the G3’s control. This means that the boost can be added at any point without setting up another preset or dedicating a controller button to do so. $995 street, thegigrig.com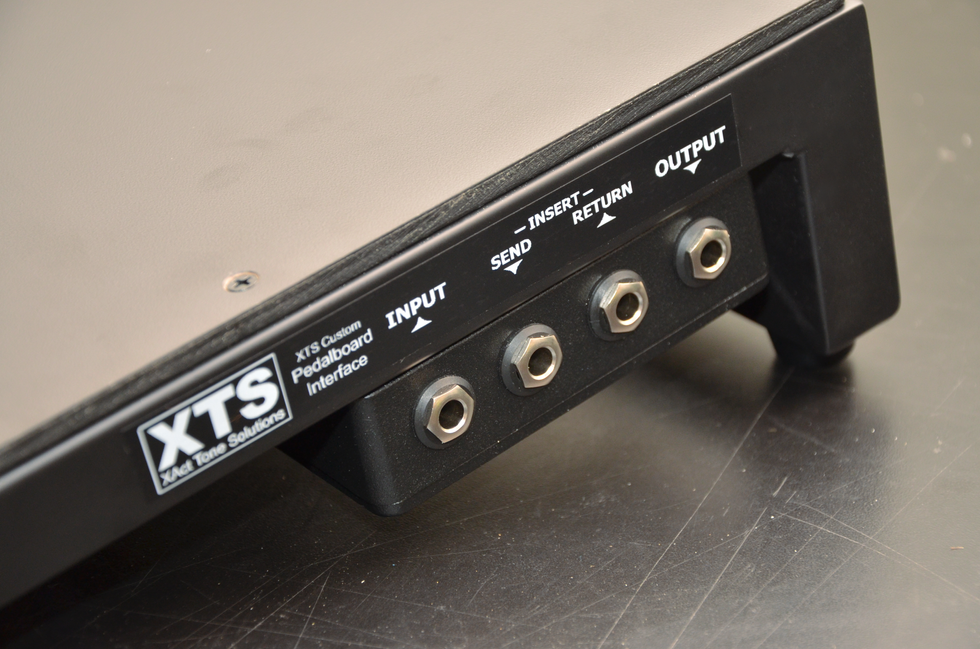
Barry’s custom interface is mounted below the frame of the Pedaltrain JR MAX ($189 street) that is the platform for his dream pedalboard.
Interface
A pedalboard interface can add ease of use and functionality. This one has an instrument input and an output for the amplifier. In addition, there is a normalling insert loop that allows a “pedal of the day” to be connected externally. The insert connects to the rig via a loop in the G3. If one part of one song in one show needs an effect, you can add it here without removing something else on the ’board, and pedals on trial can be connected and tested before permanent installation.
“A higher mA port rating will not damage your pedal; it will just leave some capacity untapped.”
Power
Powering pedalboards is getting trickier these days. When everything ran off of batteries, things were easy. Now, high-powered DSP-based effects and computer-controlled true-bypass loop switchers are power hungry, requiring high amounts of current. Each device needs to be powered by a power supply port that has the appropriate voltage and current ratings. Voltage should be exactly what the manufacturer calls for—no more, no less. Manufacturers publish how much current is needed for their devices in milliamperes (mA). Connect your stompbox to a port that has that mA rating or greater. A higher mA port rating will not damage your pedal; it will just leave some capacity untapped.
It is also a good rule of thumb to use a supply whose outputs are isolated, meaning there is not a shared ground path or means of conducting noise between pedals via their supplies. We’re using a Strymon Zuma as a supply for this build. At 9VDC at 500 mA, each port has enough power for most pedals on the market. If there’s ever a need to swap pedals, it’s likely the power supply is up to the job. This ’board does have some special power considerations. The G3 is powered by combining two ports in parallel, summing their individual capacities for a total of 1000 mA. The HX Stomp also requires ~1000 mA nominally, but its power-on surge can cause start-up issues when the Zuma gets up to operating temperature. Stomp powering duties are handed over to a CIOKS Crux, which converts the 24V DC expansion output of the Zuma into the 9V DC the HX Stomp requires.
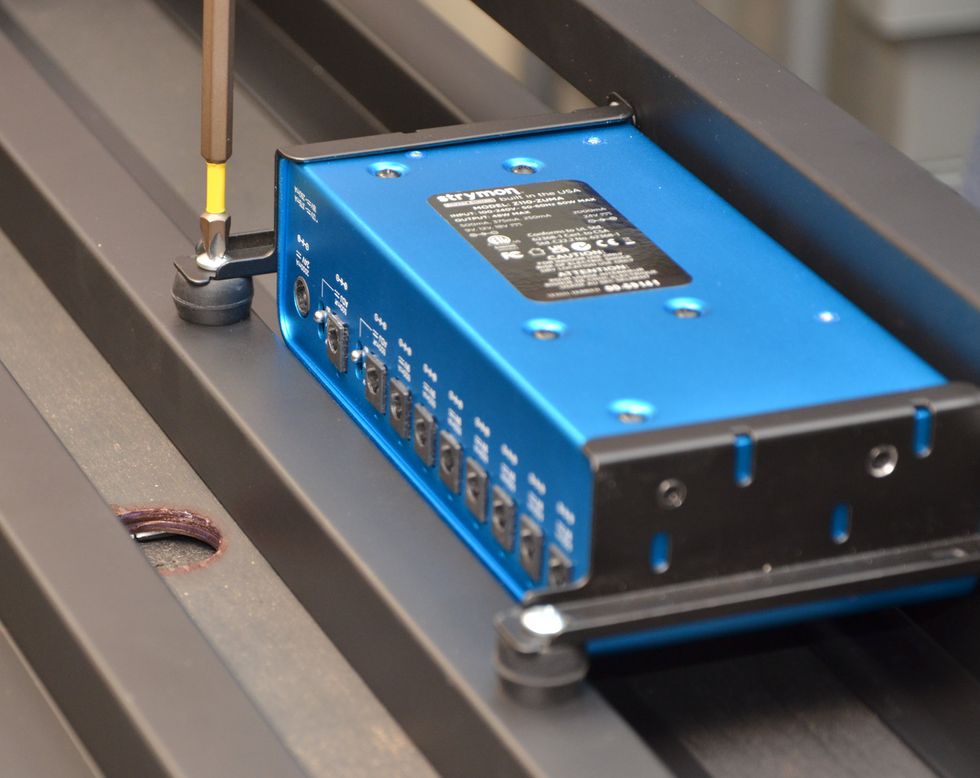
Mounting the power supply beneath the ’board—here, a Strymon Zuma mated to a CIOKS Crux—is an essential space saver.
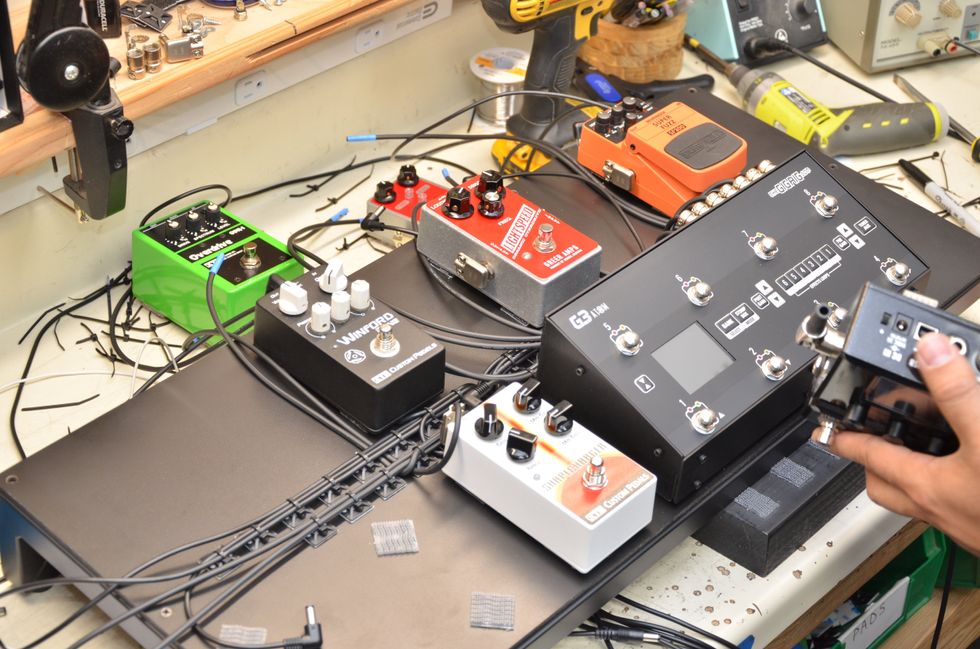
We’ve selected a Pedaltrain JR MAX for this build. It’s lightweight and, at 28" wide and 12.5" deep, has room for all the required pedals without being deeper than necessary. The power supply and interface can be mounted underneath, leaving the top of the ’board for the fun bits. We’ve given the ’board a laminate top, which looks great and allows us flexibility in pedal placement.
Wiring up a ’board like this can seem daunting. To keep things neat, we custom-cut every cable to length and stay them to the ’board with adhesive mounts and zip ties. Soldered cables are preferable for longevity's sake, but if available tools or skill sets demand an alternative, there are many sturdy solderless cable options.
“Just play. Your dream ’board should inspire you to dig in without getting bogged down.”
This ’board is a flexible tone platform. Setting up a new sound can be as simple as selecting which loops to include in a G3 preset and combining them with a set of bread-and-butter modulations, delays, and reverbs in the Mobius and HX Stomp. Alternatively, you can dig deeper and build bespoke effects in the Mobius and Stomp, and recall them via MIDI commands from the G3. So if a tune requires a very specific rhythmic delay and/or chorus, you can dial them in and recall them for a song-specific preset. The possibilities are nearly endless.
Even if you’ve built your dream ’board and made the choices that best suit you and your situation, finishing a personal build can lead to a feeling of “what do I do now?” If the materials and methods are fitting, the answer should be easy. Just play. Your dream ’board should inspire you to dig in without getting bogged down. Choose gear that inspires you, and put it together in a manner that does not impede your inspiration. Seeing your rig go from daydream to realization can invigorate the same creative drive that makes music. Go use the thing you made to make something greater!