
David Hidalgo and Cesar Rosas discuss the band's new album, Native Sons, their legacy of bringing Mexican folk music into mainstream rock, early days playing in the punk scene, and how the group's singular sound evolved along the way.
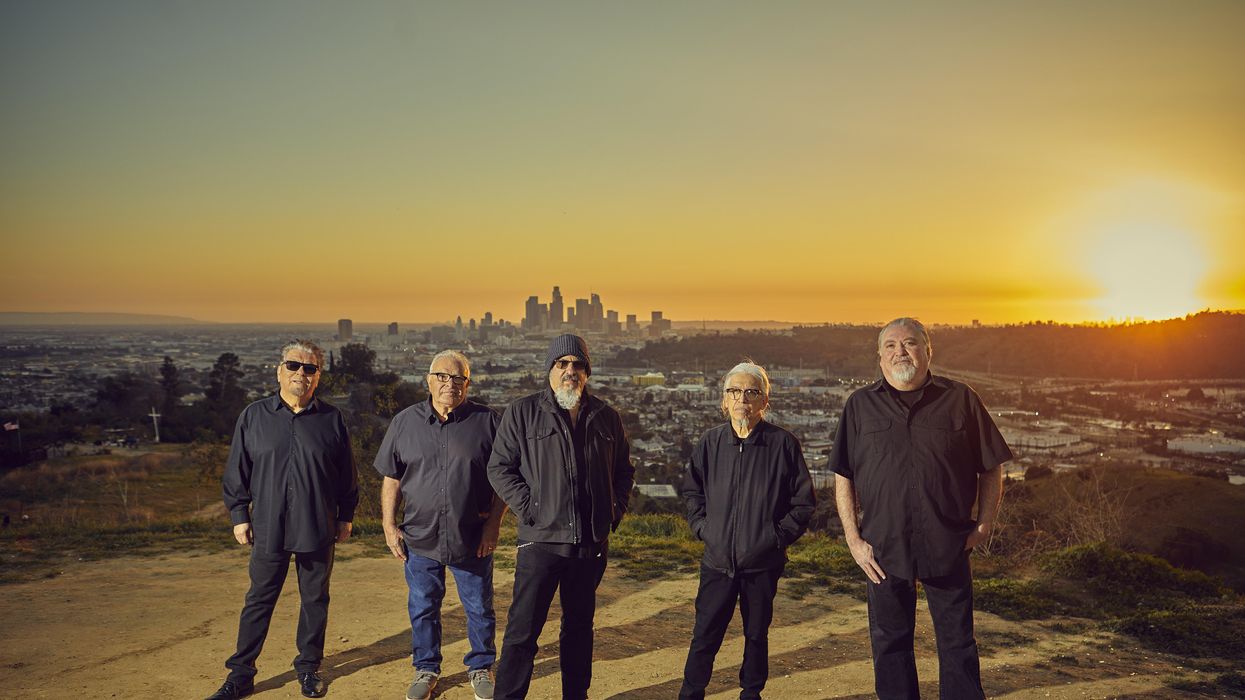
Few bands have had careers as charmed or as unlikely as Los Lobos, and even fewer have successfully laced together the number of disparate styles found in the band's music to make such a unique yet cohesive sound. Los Lobos' blend of traditional Mexican folk, soul, blues, and roots rock is a direct reflection of the diverse musical environment they were immersed in coming up in East Los Angeles in the late '70s and early '80s. The band's voice has always mirrored L.A.'s eclectic sonic tapestry in a beautiful and authentic way, and in an era where the internet can sometimes dramatically homogenize how we make art by removing geography and local interaction from the process, Los Lobos' uncanny story and locally shaped sound are a reminder of bygone days.
They are a living, breathing, culturally significant remnant of a fast-disappearing version of Los Angeles—and one with a legacy much bigger than just their brilliant work on the La Bamba soundtrack—elevated by a unique personality and rendered in fabulous songs. The diversity which shaped Los Lobos' music has always made L.A. fertile ground for guitar culture, and a deep passion for the instrument has always underpinned Los Lobos' work.
The group's pair of guitar and vocal anchors, David Hidalgo and Cesar Rosas, have earned no small number of famous friends and fans in the guitar space over the years—including heavies like Billy Gibbons and Eric Clapton—and when Hidalgo is brought up in guitar circles, the conversation inevitably turns to how underrated a player he is. Despite the stout, soulful chops and deceptively difficult rhythms that lurk within Los Lobos' songs, guitar heroism has never been this band's bag. Los Lobos' odyssey has been a decidedly blue-collar affair that always put the songs first, from performing traditional Mexican folk tunes for punk audiences while opening shows for bands like Black Flag, X, and the Blasters in the early '80s, to sharing the stage with roots-rock greats and jamming with their heroes. Most importantly, Hidalgo and Rosas have learned from it all, remaining dedicated students of the various musical traditions that have influenced their sound.
Los Lobos - “Native Son” (Official Music Video)
Check out the title track from the band's 17th album.
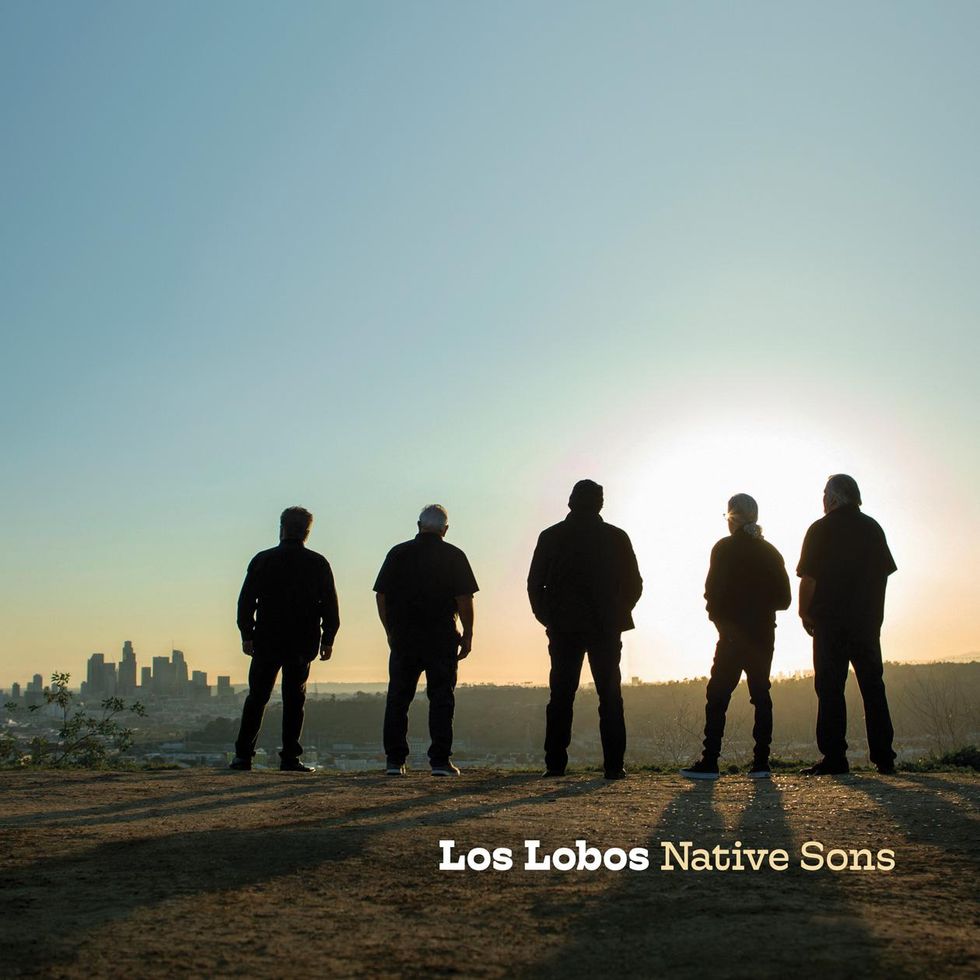
Now, Los Lobos is looking back. Their latest album, Native Sons, is an unsurprisingly varied collection of cover tunes, which traces the band's early education and love affair with Southern California's music culture. "We went through hundreds of songs when we were choosing the songs for the album, and we took it back to the basics," David Hidalgo explains. "Everyone chose songs that meant something to them, so a lot of these were our breakthrough tunes, you know?"
The resulting recording is not only a fantastic primer on California's best music as Los Lobos sees it, but a prime example of this band's ability to take on just about any tune and make it their own without sacrificing what made the song charming in the first place. Hidalgo and Rosas are all-too-happy to discuss the music that shaped them as players and songwriters while growing up in Southern California during the glory days of AM radio. Hidalgo sets the scene for us.
"Growing up in L.A., everything was everywhere," he says. "You'd drive through all these different neighborhoods and you'd hear different music. The AM radio back then was great—it was wide open. You had rock 'n' roll like Chuck Berry, the Beatles, the Stones, the Animals, the Yardbirds, but also you had Stax stuff, like Sam & Dave and Otis Redding, and Motown. Then you had the Mexican music that was everywhere, from the mariachis playing in restaurants to all these different styles. So, it all made sense to us. My older brother was a drummer and he'd play weddings, and his band had to play everything. They'd play 'Time Won't Let Me' by the Outsiders and then they'd play a cumbia, or they'd play some Chuck Berry before playing a bolero. That was the tradition we grew up in. L.A. had T-Bone Walker and its blues side, but surf guitar was also born in Southern California, and you had guys like Dick Dale, and the South Bay had bands like the Pyramids and the Belairs. So, it was always diverse. On top of that, Fender came out of Southern California and Semie Moseley started Mosrite in Bakersfield, so a lot of pioneering guitar makers were from the L.A. area and it was just part of the culture. The city was different back then, too. Neighborhoods that are Black or Latino now used to be ranches, and there was lots of country music. The Wagon Wheel was a place owned by Joe Maphis in Norwalk, and you had honky-tonks 10 miles away from blues clubs where Bobby Bland was playing."
"When they threw us in that pool with Black Flag and the Circle Jerks and all those flash bands, shit man, we had to swim out of there!" —Cesar Rosas
Considering that Rosas met Hidalgo in junior high school, the pair's early musical interests were always closely aligned. However, Rosas found himself particularly drawn to the soulful side of things, which informed the airtight and colorful rhythm guitar work he excels at.
"Before I became a guitar player, I always took to a lot of soul and R&B music," Rosas says of his days as a nascent music fan. "In the AM radio days, KGFJ was my favorite station, and they played all Black music. So, I grew up listening to Aretha Franklin and Sam & Dave and the Memphis stuff, Booker T. & the M.G.s. And that meant I grew up loving guitar!"
The majority of Native Sons was tracked at Nest Recorders, which brought most of the band back to East L.A. from their homes in the suburbs, adding an extra layer of emotional weight to the process. However, since the record was cut during the pandemic, Rosas' contributions were tracked from the safety and comfort of his home studio in his "stocking feet," as he says. Rosas brought in album opener "Love Special Delivery"—a killer '60s rocker by Thee Midniters, an East L.A.-bred group that was among the first Chicano rock bands to have a major radio hit—and a sweet Willie Bobo ballad called "Dichoso," which Rosas finished with layers of fantastic yet delicate guitar work.
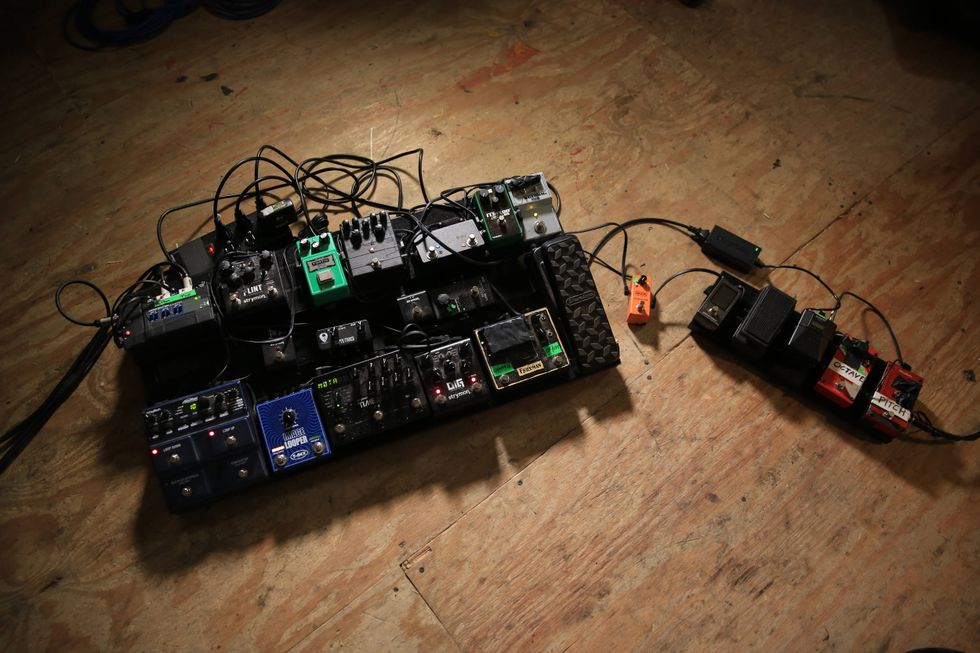
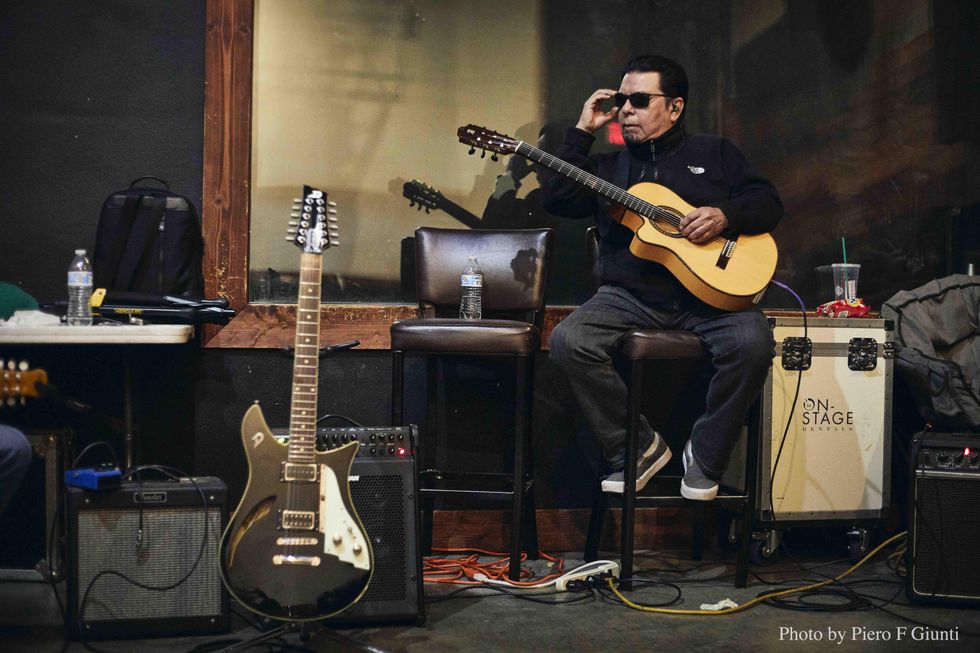
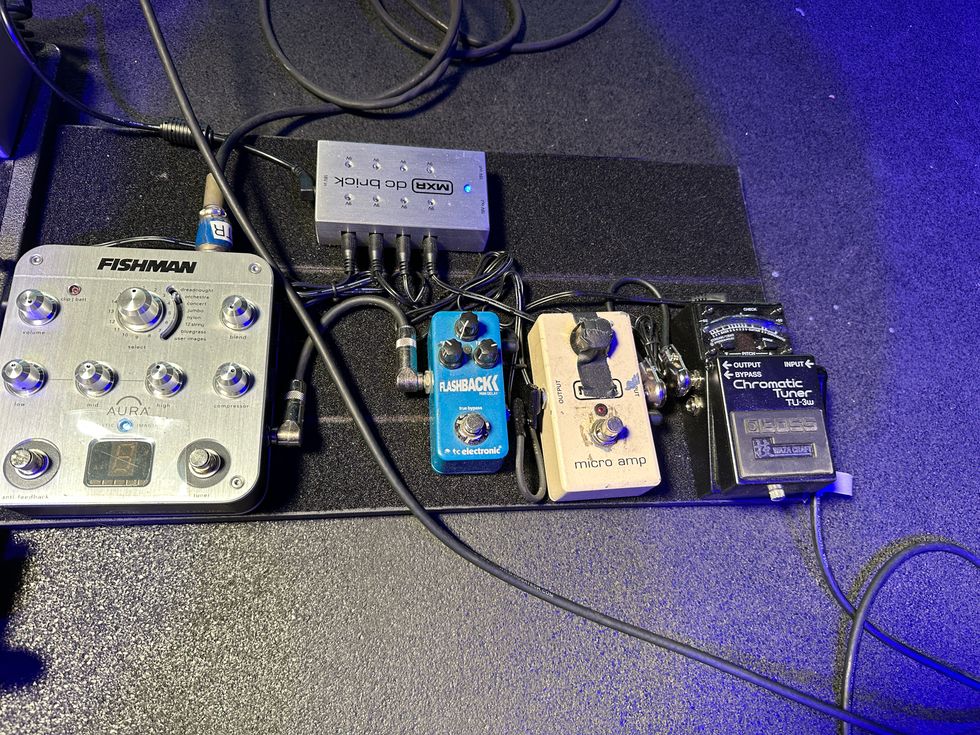
David Hidalgo's Gear
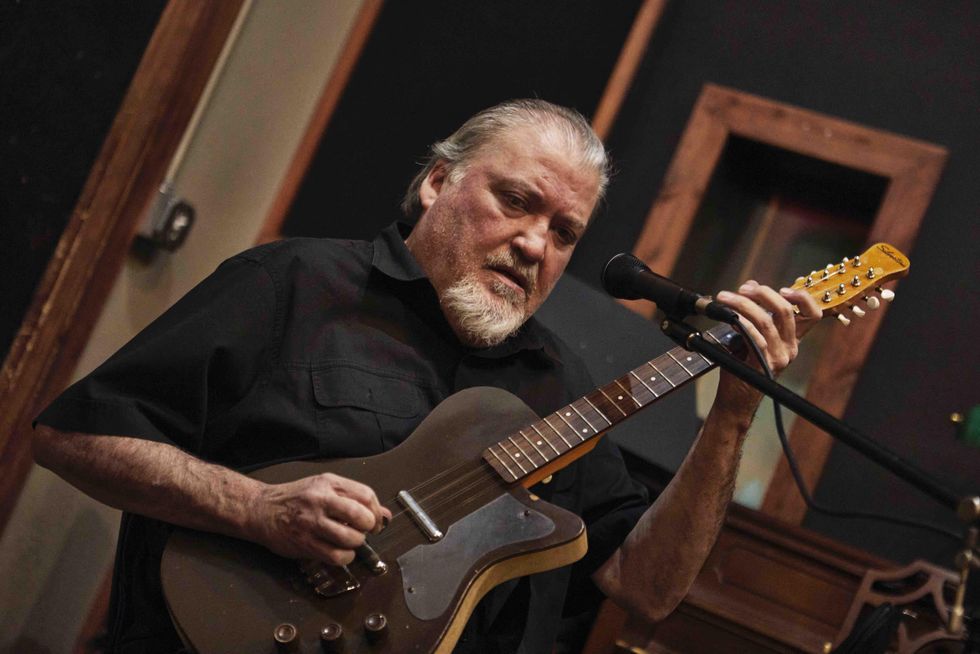
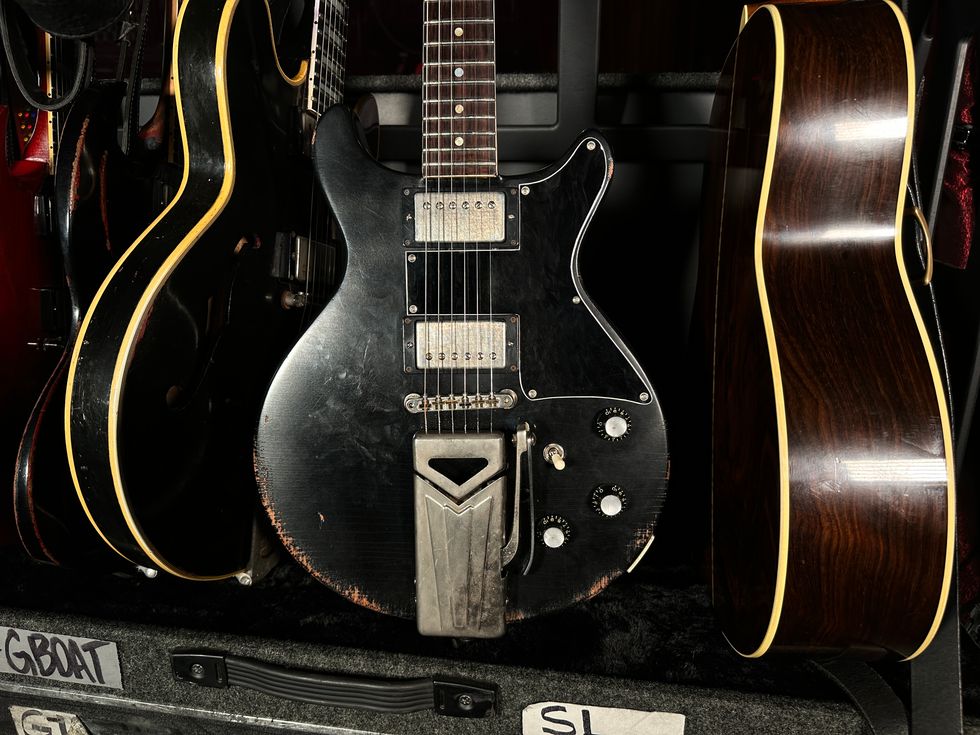
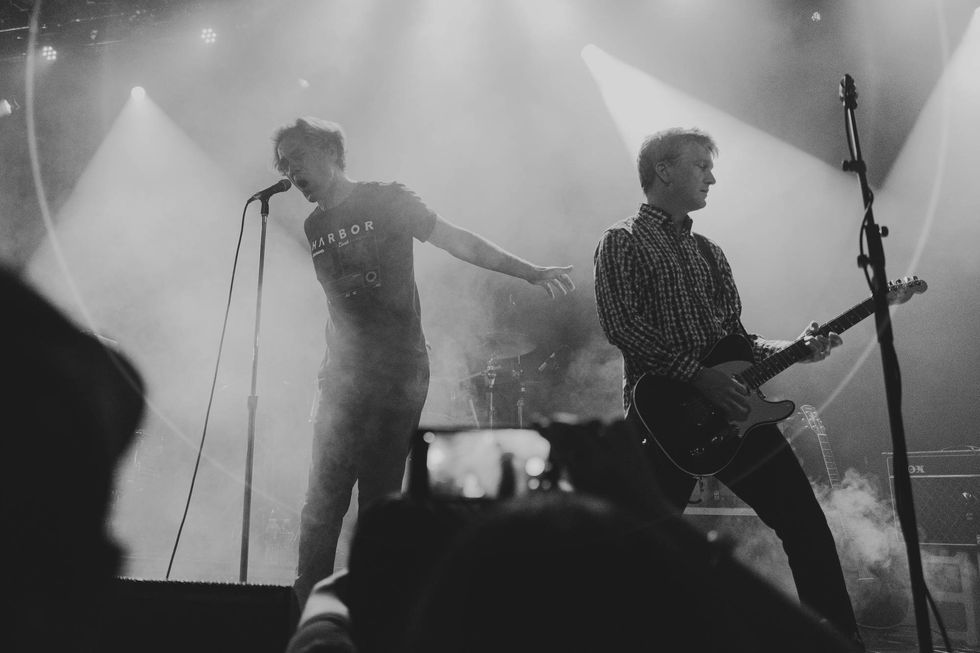
David Hidalgo plays a Silvertone during recent rehearsals for Los Lobos' Native Sons tour.
Photo by Piero F Giunti
Guitars
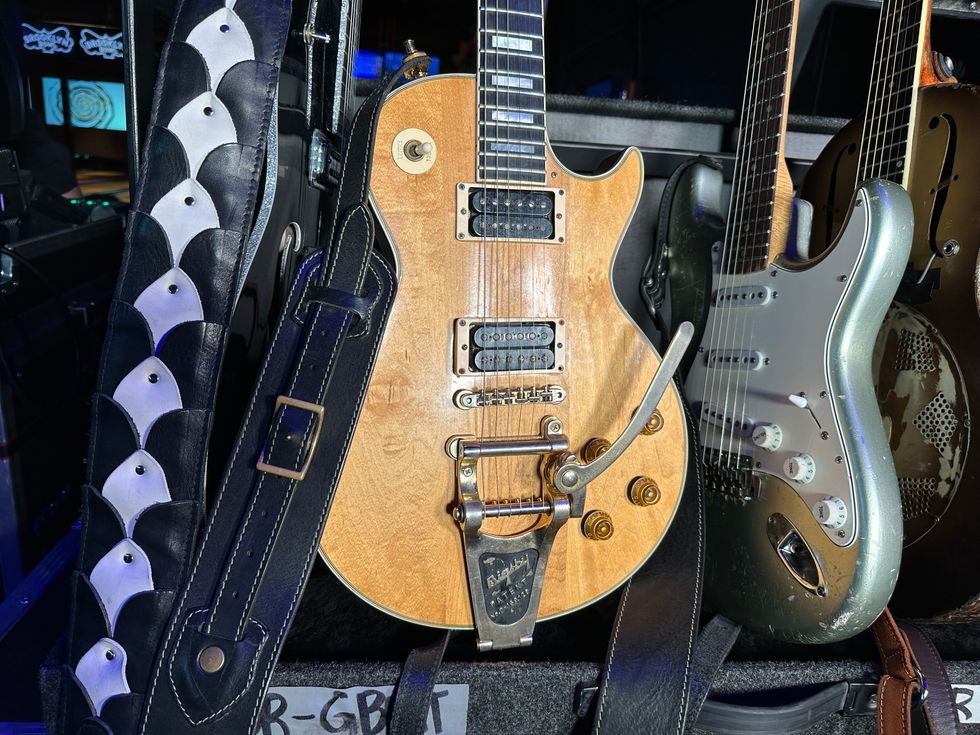
- Fender Custom Shop Nocaster
- Parts Telecaster with MIJ Body/MIM Baja Player Tele neck/TV Jones Filter'Tron in the bridge and humbucker in the neck
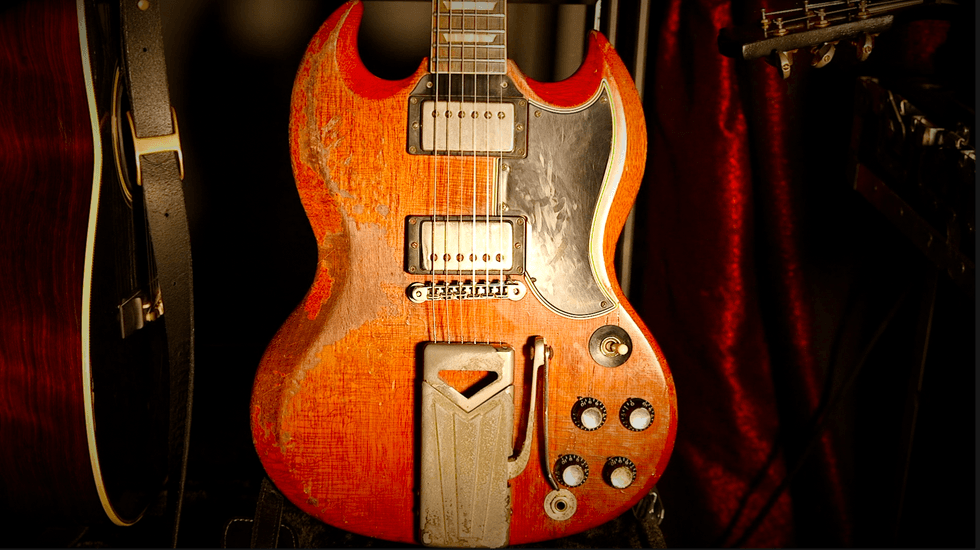
- '70s Les Paul Special
- '80s MIJ Fender Standard Strat
- Gibson Chet Atkins nylon-string solidbody
- 2000s Gretsch '59 Country Gentleman single-cutaway reissue
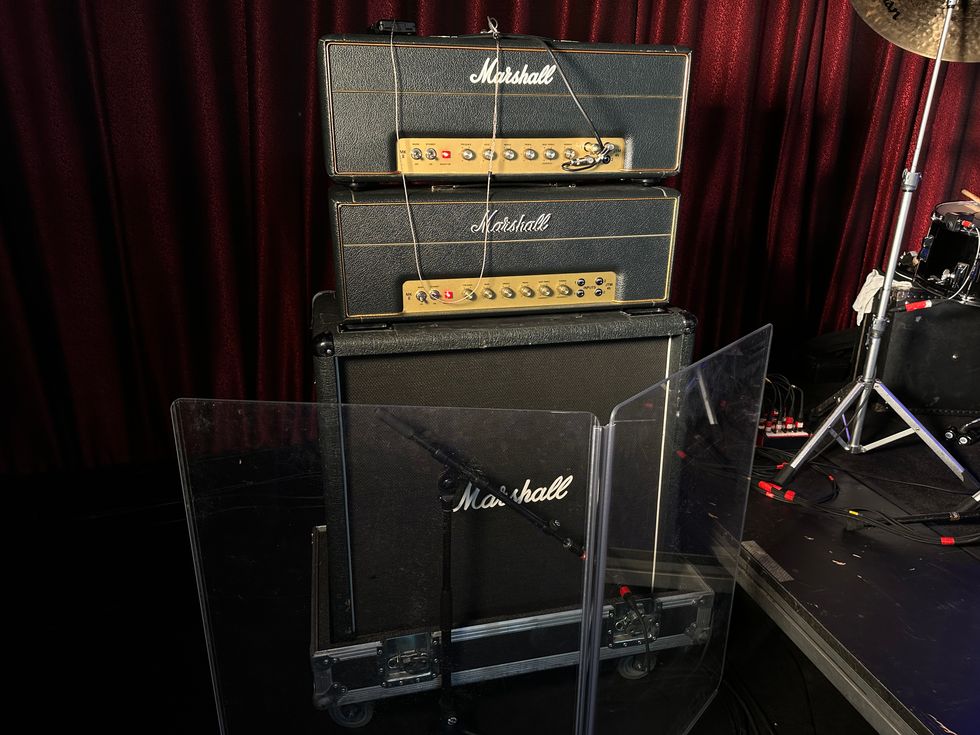
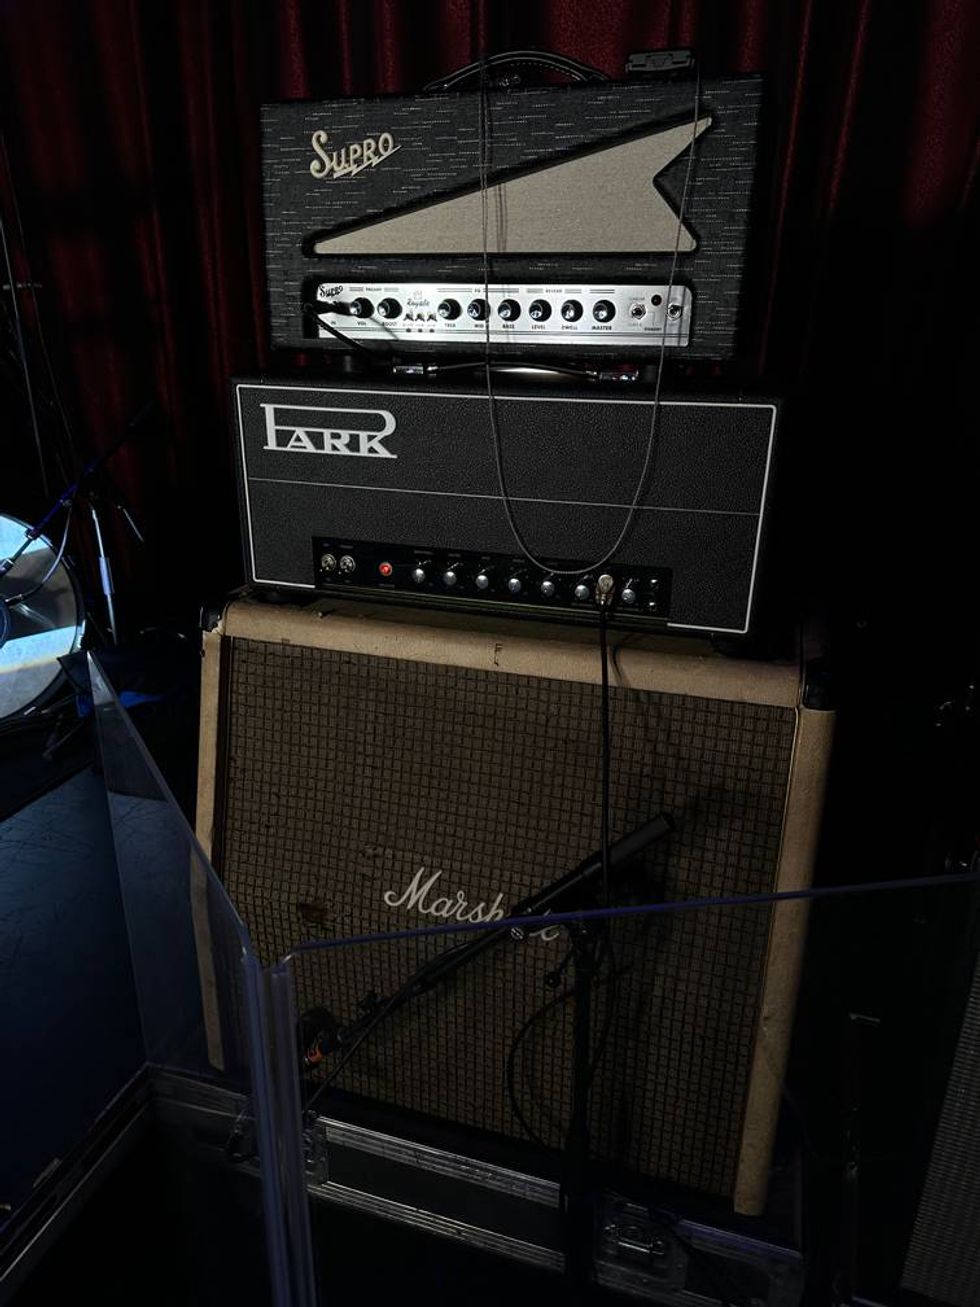
Amps
- Vintage Fender Deluxe Reverb
- Fender Pro Junior
- Modified Bell & Howell Projector amp
Strings & Picks
- Ernie Ball Slinkys (.009, .010, or .011 sets, depending on guitar)
- Herco .75 mm silver
Hidalgo's selections boast some of the album's standout guitar moments. He sought to honor the spirit of originals as closely as possible with his performances. "I've always been a guitar lover, so 'Bluebird' by Buffalo Springfield was one of mine. Between Neil Young, Stephen Stills, and Richie Furay, it has great guitar playing, great arrangements, and great tones. That was a song I've wanted to play since I was 16 years old, but it was always too hard."
The band's cover of War's "The World Is a Ghetto" features some of the finest guitar playing and tones on the album. Hidalgo claims it was a deceptively difficult track to get together, even for a decorated player such as himself. "It's one of those songs we grew up with, but you don't realize how intricate it really is until you start trying to play it," Hidalgo says. "Howard Scott's guitar playing is elusive. There's hard rhythms and he's riffing on it at the same time, and you can tell that band recorded that song live and in the moment, so they're not really set parts and they change throughout the song. So, I tried to at least cop that vibe."
TIDBIT: Los Lobos' 17th studio album, Native Sons, was recorded during the pandemic at L.A.'s Nest Recorders studio, except for guitarist Cesar Rosas' parts, which he tracked from the safety of his home studio in his "stocking feet."
The closing jam on the War cover flexes one of the rare moments on the album where the group allowed themselves to cut loose from an original arrangement. "The ending of that song always sounded like it went to the relative major to me, so we went into this almost Hendrix or Sonny Sharrock-like solo," says Hidalgo. "The end of that one was our chance to break it open and do our own thing a bit."
While the gear and amenities available at Nest were put to good use by his bandmates, Rosas had no shortage of killer gear at his disposal at home. The southpaw guitarist has amassed quite the collection of rare, vintage left-handed guitars over the years, many of which never leave his home studio, so the circumstances presented a rare opportunity to put them to work.
Cesar Rosas' Gear
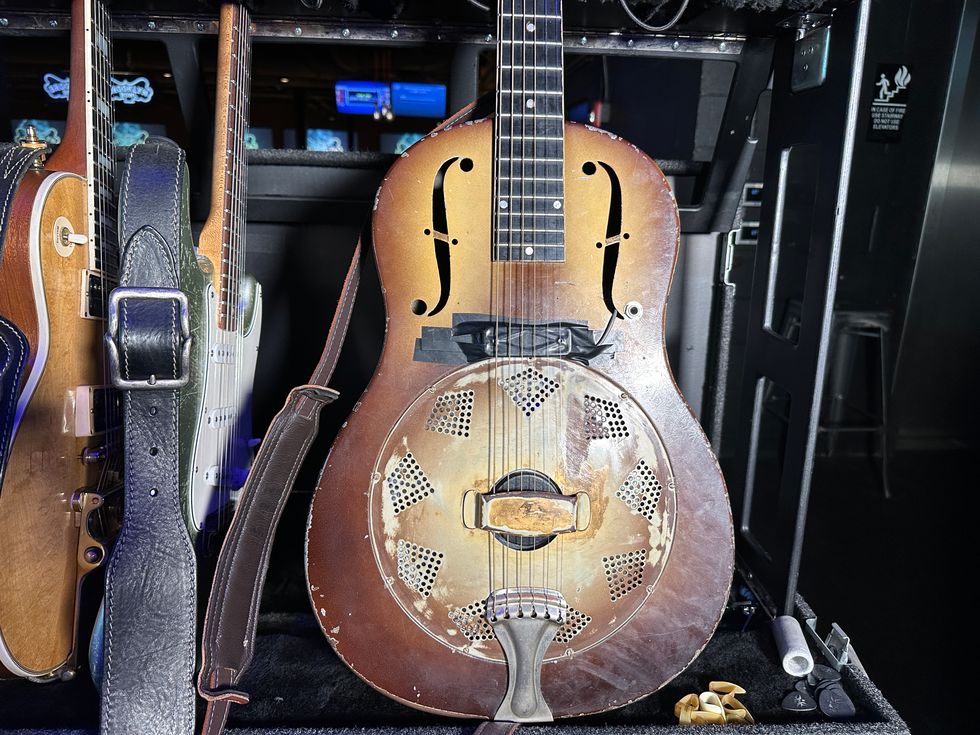
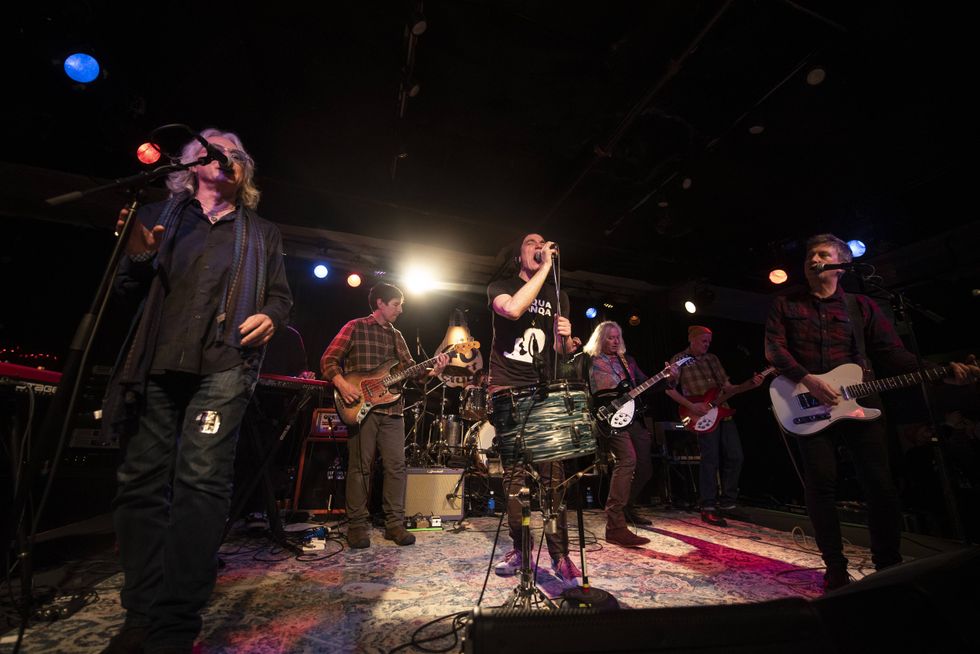
Cesar Rosas stands by with a southpaw Candelas nylon-string during recent rehearsals for Los Lobos' Native Sons tour.
Photo by Piero F Giunti
Guitars
- 1952 Gibson ES-295
- 1960 Fender Stratocaster
- 1966 Fender Telecaster
- 1960s Gretsch Country Gentleman
Amps
- 1950s Fender tweed Deluxe
Strings & Picks
- Ernie Ball Slinkys (.009–.042)
- Clayton Triangle 1.0 mm
"I have my special gear that I keep at home, my vintage guitars and vintage tweed Fender amplifiers that I only use at home for recording," Rosas says. "'Dichoso' has three or four guitars overdubbed on it. I used a 1952 Gibson ES-295 and a 1960 Strat that's very dear to me. I recorded 'Love Special Delivery' with a Gretsch Country Gentleman and a 1966 Fender Tele. And I used an old '50s tweed Deluxe for those songs."
Hidalgo and Rosas have always brought their own unique playing styles and gifts as guitarists to Los Lobos' music, but one thing that's unified the duo is a love of gear and the endless hunt for tone. When asked if there's still tonal experimentation in the process after this many records, Hidalgo is emphatic about how much he enjoys that side of things. "Oh yeah! That's the fun of it and that's what keeps you doing it! It's gotten a lot simpler. We used to take 30 guitars and a bunch of amps to the studio, but we got it down to a hollowbody, a Les Paul or an SG, a Strat, a Tele, and a couple of old amps, like a Deluxe Reverb. There are ways to get a lot of sounds out of minimal gear. For amps, I used Deluxe Reverbs for cleaner sounds and I'd combine it with a Fender Pro Junior a lot, which sounds like an old tweed amp to me."
For Rosas, he'll take the real deal over hybrids any day. The self-proclaimed purist says, "Sometimes somebody throws an oddball guitar at me and I play it for a little while—like I had a Strat with a humbucker in it—but I eventually go, 'What's the point? I'll just play a Les Paul.'"
"We were playing a college in Madison, Wisconsin, once and there were a lot of young punk kids and they were having fun slamming, so we broke into this Mexican ballad and they started doing the same thing in the pit, but in slow motion." —David Hidalgo
The story of how Los Lobos fell in with L.A.'s emerging punk scene when the band was still performing traditional Mexican folk songs is more than just an unexpected detour. It's a tale that underlines how truly open-minded the early punk scene was. And it's a story that proves there are things to learn from all types of music if you're paying attention. Hidalgo and Rosas both look back on those days fondly. "There was no posing with those guys, and if it was real, people in that scene were open to hear what you had to do or say," Hidalgo remembers. "The sense of community, too. In the '80s, all the bands in L.A. supported each other. The Blasters asked us to open a show for them at the Whiskey a Go Go, and that was the stepping-stone that got us going, really. There was friendship, camaraderie, and respect for each other that made the L.A. scene special. We just kind of sped everything up a little bit so you could slam to it! We were playing a college in Madison, Wisconsin, once, and there were a lot of young punk kids and they were having fun slamming, so we broke into this Mexican ballad and they started doing the same thing in the pit, but in slow motion. It was fun and most of us were on the same page: If it was real and authentic, it didn't matter what it was. Everything is connected for me and that's what I draw from."
For Rosas, the way the punks approached guitar was powerful. "Just the way those guys played—they were fuckin' on fire! A lot of them just plugged straight into the amp and that hit home for me, and it rubs off on you," Rosas says. "It's just sick stuff and we could relate to that. When they threw us in that pool with Black Flag and the Circle Jerks and all those flash bands, shit man, we had to swim out of there! But we were into it with everybody and it was really cool! We're very lucky and very proud of our time in the punk scene. Those were very special times for us."
Native Sons' nostalgic spirit presents an opportunity to reconsider the band's journey, including the impact of their artistic breakthrough, 1992's Kiko. "That album was a turning point and a good time for us," Hidalgo recalls. "We had come so far, and on the album before, The Neighborhood, which I think is a great album and we did some good work on … but we had issues with the record company which soured the end result. It ruined the feel of the album because it ruined the enjoyment that we had doing it.
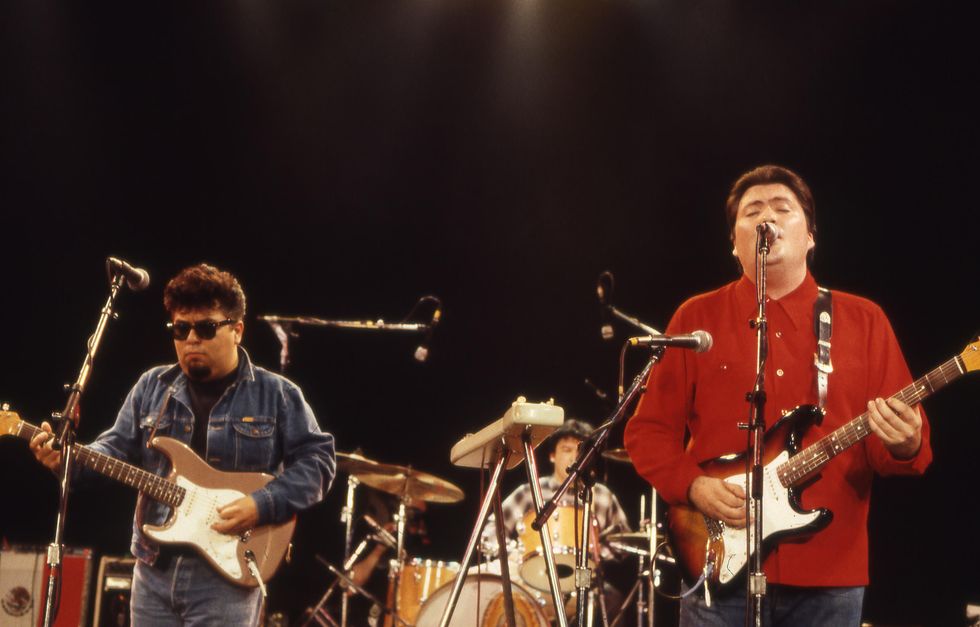
In this vintage photo, Los Lobos guitarists Cesar Rosas and David Hidalgo both play Strats at a gig circa 1984.
Photo by Debra Trebitz/Frank White Photo Agency
"So, when we did Kiko we needed something to fire us up again, and that's when we started working with Mitchell Froom and Tchad Blake, and they were in the same boat and wanted to shake loose from what they had done before with something they were excited about," Hidalgo continues. "That album means so much because we really learned how to use the studio with those guys. Kiko was the first time we went in the studio, wrote most of the songs in the studio, and changed the instrumentation and arrangements as we went. It really helped us get to the next destination as a band."
With so many years, critically acclaimed records, and wild experiences in the rearview, there's a lot for Los Lobos to be proud of, but the thing that brings both Rosas and Hidalgo the most pride is bringing Mexican folk music to new audiences and the tradition they've honored with their contributions to the form.
"The Wagon Wheel was a place owned by Joe Maphis in Norwalk, and you had honky-tonks 10 miles away from blues clubs where Bobby Bland was playing." —David Hidalgo
"The Mexican folk music we play is really challenging, and I'm really proud of when I can make that stuff happen," Hidalgo says. "You can compare it to bluegrass: Those players are so far advanced and you have to know that whole library of songs, but you have to have the chops for them. It's the same way with Mexican folk music, where it's a tradition and you have to be respectful to it, but at the same time, there's room to add your own voice and take it further. Folk music was made to evolve, you know?"
Rosas feels the same way, adding: "The legacy of the Mexican folk music that we carry is important. All of those rhythms and tough songs that we play—I'd like to be remembered for what we've done with that stuff."
Los Lobos - Kiko and the Lavender Moon (video)
This classic music video for "Kiko and the Lavender Moon," from Los Lobos' Kiko album (1992), showcases the group's unique fusion of Mexican folk music, rock, jazz, and other disparate styles.
- Rig Rundown Best-Ofs: Gargantuan Pedalboards Pt. 2 - Premier ... ›
- Weirdest Guitars: Rig Rundown Best-Ofs - Premier Guitar ›
- Deep Cuts: David Hidalgo's Sophisticated Blues-and-Beyond Moves ... ›
- Calexico's Joey Burns on El Mirador - Premier Guitar ›
An easy guide to re-anchoring a loose tuning machine, restoring a “lost” input jack, refinishing dinged frets, and staunching a dinged surface. Result: no repair fees!
Pardon my French, but I’m about to misethe hell out of some en scenein this article about do-it-yourself guitar repair. Buckle-vous up.
The Guitarist is in the middle of double-tracking a solo. It’s not quite right. Creative juices are flowing, but at any moment, the gate could slam shut. Their social media feed is stagnant, and the algorithm thirsts for content. The studio is 80 bucks an hour. That new boutique fuzz pedal would sound great on this track, surely? It would, of course, as these things are the cure for all problems, but it rests just out of reach.
Desperate for a solution, the Guitarist rests their perfect new guitar against the warm tube amp–only for a moment … but a horrible amplified bwaang from wood, string, and concrete’s violent meeting breaks the temporary silence as gravity muscles potential into the kinetic. The Guitarist breathes a defeated “aw, man,” like a loosened balloon farting hopelessly across an empty room. The gate closes, juices no longer loose, locked, impenetrable by any transistor-based effect. And it’s time to assess the damage.”
I bet you saw yourself in the opening scene of Twenty-Four-and-Three-Quarter-Inches of Woe, which may be the title of the screenplay I just started to write, most likely due to the fact that you’ve made a similarly boneheaded mistake with your instrument.
Unfortunately, my storytelling skills didn’t save a nice new Epiphone Casino from sliding off my amp, meeting the floor, and earning some damage on the way down. Yeah, that’s a true story, and I’m sure something similar has happened to you as well. It can happen to anyone who plays guitar for long enough, but there’s no need for despair yet.
If you’ve been victimized by gravity like I have, as long as the damage isn’t major, you can fix a lot of things yourself. I’ll use my felled Casino as an example. It suffered a loosened tuner, an input jack that fell inside the guitar, a damaged fret, and a few dents in the finish. While I work, I’ll provide some suggestions for supplies and tools to keep in your home repair kit, just in case you ever need them.
Tools for the Tasks
We ordered all of the tools we used in these repairs, excluding the painter’s tape and the toothpicks, which we picked up during lunch at Jack’s Bar-B-Que, from StewMac.
The essentials:
• ESP Multi Spanner
• Archtop Guitar Helping Hand
• Guitar Tech Screwdriver Set
• 3 Corner Fret Dressing Files
• Ultra Thin Master Glue
• GluBoost Fill n’ Finish
• Rectangular Sanding Kit
Can’t Tune It like That
First, let’s take care of the loose tuner, since it’s currently in no shape to reliably hold string tension. The tumble knocked it sideways, which loosened the screws holding in the key, which caused the wood around the screws to strip. It’s alarming to see, but this is a very simple fix.
Add to Repair Kit: Round toothpicks, water-thin CA glue, glue applicator tips, safety goggles
[Note: For the unfamiliar, CA is short for cyanoacrylate. It’s commonly referred to as “Super Glue,” but since that is a brand name, not the generic, I’ll refer to it here as “CA glue.”]
First, remove the tuner by backing the screws out, then pull the tuner from the headstock. My Casino’s tuning keys use a press-in bushing to hold the post straight in the headstock, so no further disassembly is required. However, if you experience this issue with a guitar with more modern-styled tuning keys, you’ll need to use an appropriately sized wrench or socket to remove the screw-in bushing before removing the key.
Next, break a toothpick in half, insert the thicker end into the hole where your mounting screw used to be. Break it off flush with the surface, and repeat the process with the other hole.
Safety goggles on: It’s CA glue time. Trust me, you do not want to squirt this stuff into your eye. Fit an applicator tip to the glue bottle and practice your squeeze on a scrap piece of paper or wood, far away from anything you don’t want glued to your guitar or yourself. This stuff is magic—it will bond things you never intended if you aren’t careful.
All you need is a very small drop, so practice until you can confidently flow out just a small controlled amount. Once you’ve mastered that, drop a small amount of water-thin CA glue into each filled hole. It will soak through the toothpick into the surrounding wood just enough for this quick fix. Let it cure for at least 15 minutes, but longer is even better.
Pop the tuner back in and drive the screws straight into the toothpick-filled holes. The screw will compress the toothpick into the existing wood and create new threads strong enough to hold your tuner in place.
Congratulations! You fixed it well enough to at least make it through a session. I’ve done this on several guitars that lasted years with no issues, so you should be confident in your work.
Hit the Road, Jack
Look, there’s no way to sugarcoat this. Fishing an output jack out of a hollowbody guitar is a pain. You can do this. All you need is patience and a few handy gadgets.
Add to Repair Kit: flashlight, multi-spanner, small drywall anchor, “helping hand,” small screwdriver
Your first task is to locate the jack inside the guitar. Odds are it didn’t fall far away from where it needs to be, since it’s probably wired to one of your control potentiometers. Use your flashlight to shine some light inside the f-hole to help find it.
I found mine wedged against the treble side of the rim, a little farther away than I can reach with my fingers. This is not zesty. I am unhappy but equipped and determined.
The tool I described as a “helping hand” becomes useful here. It’s essentially just a bent hook at the end of a handle made out of pliable heavy wire. Several guitar parts suppliers sell something similar. I got mine from StewMac for a reasonable price, but if you want to be thrifty about it, there’s no reason why you can’t cut and bend a wire coat hanger.
Take a few deep breaths, and working through the f-hole, use the hook end of your helping hand to gently pull the output jack back toward where it was mounted. Bend the helping hand however needed to reach the jack as easily as possible.
I managed to pull the jack back enough to put a small screwdriver through the jack’s mounting hole and then through the jack itself. That screwdriver will act as a guide while I lift the jack back into place with the helping hand.
You should expect this will take several attempts. Try not to get frustrated. With enough patience, you’ll be able to get the jack back where it belongs. Once you have the jack in place, carefully thread the washer and nut back onto the jack. It shouldn’t take much effort to thread it back on. Just be careful not to cross-thread the nut.
Now that the nut is threaded on enough so it won’t fall back in, the challenge is to tighten it without twisting the jack itself to avoid breaking any wires. I’ve seen and used a few different methods to accomplish this, but I came across one recently that I really like.
This is where you’ll use your drywall anchor. Get one small enough to fit inside the jack without using too much force, then tighten the screw in the anchor so that it spreads to fit tightly inside the jack. This will hold it steady enough to tighten the nut with a multi-spanner tool or an appropriately-sized wrench.
I like a multi-spanner for this job, because it’s always the right size and is slim enough to not be clumsy for operations like this. Like the helping hand, lots of suppliers sell something similar using different names. Mine is made by ESP and also arrived in my StewMac tool box. I use it all the time for all sorts of tasks.
Once the nut is tightened, unscrew the drywall anchor, remove it, and test the jack for sound by plugging your guitar into an amp. A positive result should be obvious at this point, but if you don’t hear any signal, or an excessive consistent buzz, get in touch with your local repair tech.
Got a Dent In My Fret, Man
Honestly, face-first is probably the best way a guitar like my Casino could have hit the ground. The damage could’ve been far worse. Check any forum for endless complaints about Gibson/Epiphone headstock breaks. But I do need to address some damage to a fret caused during the fall.
The issue here is that plain steel electric guitar strings—like your G, B, and E strings—are considerably harder than most frets (my stainless steel fret contingency, put your hands down and let me finish), so it’s possible for a string to leave a small sharp dent in a fret if you hit it with enough force. This specific issue might go unnoticed until it’s time to bend a note at that fret, then you’ll feel and hear the string catch it. No good.
Before we get started: Having allof your frets carefully levelled, recrowned, and polished is alwaysa better solution than partially levelling just a few frets. But considering the entire premise we’ve constructed, which is a situation where we just want the guitar back in action relatively quickly, a partial fret level on the upper frets is perfectly fine as long as it’s done carefully.
Add to Repair Kit: Crowning file (three-corner or rounded), assortment of sandpaper (400 grit to 800 should be fine), 0000 extra-fine steel wool (optional), fretboard conditioner, permanent marker.
First thing we need to do is identify which frets need the work. Let’s say you have a nick in your 17th fret on the treble side under the B string. The goal is to bring the height of that damaged fret and all the frets past it down until the nick disappears. After that, remove the strings before you begin working.
To accomplish this, mark the damaged frets and all frets past it with a permanent marker. A trusty black Sharpie works great for this, but any darker color works fine. For this repair, we only need to work on the treble side of the frets, so that’s all you need to focus on. Also, use some blue painter’s marking tape to protect the area of the guitar near where you will be working. Small slips of a file or sandpaper can cause some nasty injuries to the guitar’s surface.
Next, level the damaged fret and all frets past it (moving toward the bridge) with something stiff enough to not flex under pressure. I keep an old credit card—a nice sturdy one—with a bit of 400-grit sandpaper glued to one side along the shorter edge, 800 grit on the other side. Start with the 400 and work your way down, being careful not to use too much pressure. Let the sandpaper do the work.
You’ll notice the ink is removed as you sand. The way to make sure you’re keeping everything level is to stop frequently and observe the new clean areas on top of each fret. Each one should be about the same width.
This will take a while. A 400-grit sandpaper does not remove material quickly, 800 grit even less so. I’m suggesting this technique because working slowly makes it more difficult to get yourself in trouble. Several suppliers sell mini files for spot leveling, but I don’t recommend starting there because they remove fret material pretty aggressively.
Eventually you’ll notice the little divot in your 17th fret is almost gone. Now’s time to switch to 800 grit to finish the job. You guessed correctly: This will take even longer, but it’ll leave a nice finish without removing any more material than necessary.
Great! Now you have five flat-topped frets. That won’t sound very good, so now you need to re-crown them, giving them a rounded profile to match the other frets. I like to use a 3-corner file to slowly round over each side of the fret, working from the fretboard up, but if you feel like dropping some serious flow on a specialized crowning file, this job can be a lot easier. Be sure to get the marker back out, ink up each fret, and stop filing when just a tiny sliver of ink is left on top of each fret.
Use a piece of 800 grit paper to remove any file marks and smooth out each fret. If you have finer grits, you could work your way up to 1200 or so, but don’t go too hard or you could undo your work. You just want the frets clean and smooth. At this point, I like the way frets feel after a quick buff with 0000 steel wool, but the mess left behind does rightfully deter a lot of repair techs. If you opt in for this, be sure to tape off your pickups and consider finding a second location for this step.
Work in some fretboard conditioner if you like (skip it if you have a maple or synthetic board; no need for that here), put some new strings on, and check your work. Play every note on these frets, to make sure they ring out without any buzzes. It may not look perfect, but as long as the guitar sounds good, you’re okay until it’s time for a full level/crown/polish job.
Not Finished Until It’s, Uh, Finished
Now for the last souvenir from my Casino’s short journey to the floor. I noticed a few spots along the rim of the guitar where the finish was damaged. Specifically, it looks like the guitar hit something with an edge on the way down hard enough to put a couple of jagged dents in it, right along the binding.
Funny, that’s actually what binding is intended for–protecting edges and corners from damage. Anyway, we need to discuss a few things about guitar finishes.
For the purpose of this article, I’m only going to discuss repairs to the clear coat, since that’s where my damage is. Most guitars now are finished using polyurethane or lacquer for the top clear-coat layer.
Speaking verygenerally, lacquer finishes are softer and less durable, which makes hiding repairs a lot easier if you have the skills and patience. Polyurethane finishes are hard and tough in every way: hard to damage and tough to hide repairs regardless of skills or patience.
I happen to know that my formerly mint-condition Casino has a polyurethane finish, which means I’m going to lower my expectations with this repair. Instead of trying to make it look like it never happened, which will take a lot of work, I’ll just try to keep it from getting worse over time, which will take considerably less work.
It also means I won’t be discussing how to repair lacquer finishes, which is a bit more in-depth, requires a lot more patience and practice, and is therefore not really recommended for the average DIY’er—at least not in the scope of this piece. So if your guitar has a lacquer finish, I don’t think this part applies. Let someone else take care of it, or maybe skip this part and learn to love your guitar as is. The latter is still an admirable move.
Add to Repair Kit: Nothing! You already have what you need from the previous repairs. Feel good about that.
Since the damage is a pronounced dent with sharp edges in the clear coat, all I really need to do is seal it with an appropriate material. And the material appropriate for repairing polyurethane finishes is—you guessed it—CA glue, because it dries hard, clear, and quickly, much like polyurethane.
Step one: Use painter’s masking tape around the area of the damage, just in case the glue runs when applied. Step two: Put glue on the dented finish. CA glue will fill in all the small cracks within the damage and seal the existing finish. Be careful; use the smallest-drop-possible technique you perfected when fixing the tuning peg, and give it plenty of time to dry.
That’s it. That’s all I need to keep the finish from continuing to chip the more I play it. Yes, I saved the easiest one for last, as a little treat.
Obviously, this isn’t a particularly beautiful repair, so I could go above and beyond by using thicker CA glue—for example, GluBoost Fill n’ Finish—to fill it in completely, sand it level, and polish the area back to the original mirror gloss. Dan Erlewine has a few excellent YouTube videos outlining this exact method that are easy to find, and I encourage you to try if you’re so inclined. But for my purposes, this will do.
Accidents will happen if you’re actually playing your guitar, but they’re no cause for panic when they do. Even though the guitar isn’t perfect anymore, it’s perfectly playable, and I can get by with it for now. I broke it, so I fixed it, which is something I hope you feel empowered to do should you break yours.
Next time, I’ll use a good guitar stand.
The least exciting piece of your rig can impact your tone in a big way. Here’s what you need to know.
Hello, and welcome back to Mod Garage. This month, we will have a closer look at an often overlooked part of our guitar signal chain: the guitar cable. We’ll work out what really counts and how your cable’s tonal imprint differs from your guitar’s tone-control function.
Today, the choice of guitar cables is better than it’s ever been, and you can choose between countless options regarding color, stability, plug style, length, diameter, bending strength, shielding, etc. A lot of companies offer high-quality cables in any imaginable configuration, and there are also cables promising special advantages for specific instruments or music styles, from rock to blues to jazz.
Appearance, stability, longevity, bending stiffness, and plug configuration are matters of personal preference, and every guitarist has their own philosophy here, which I think is a great thing. While one player likes standard black soft cables with two straight plugs, their buddy prefers red cables that are stiff as hell with two angled plugs, and another friend swears by see-through coiled cables with golden plugs.
“We often want to come as close as possible to sounding like our personal heroes, but we fail because we’re using the wrong cable for a passive guitar.”
Regarding reliability, all these parameters are important. Who wants a guitar cable making problems every time you are on stage or in the studio? There are also technical parameters like resistance, capacitance, transfer resistance on the plugs, and more. Without making it too technical, we can summarize that, sound-wise, the only important technical parameter for a passive guitar circuit is the capacitance of the cable. Sadly, this information is often missing in the manufacturer’s description of a guitar cable, and there’s another thing we have to keep in mind: Most manufacturers try to offer cables with the smallest possible capacitance so the guitar can be heard “unaltered” and with a “pure” tone. While these are honourable intentions, they are self-defeating when it comes to making a guitar sound right.
Let’s take a trip back to the past and see what cables players used. Until the early 1980s, no one really cared about guitar cables—players simply used whatever was available. In the ’60s and ’70s, you could see a lot of ultra-long coiled cables on stage with players like Clapton, Hendrix, May, Townshend, Santana, and Knopfler, to name just a few. They used whatever was available, plugged in, and played without thinking about it. Ritchie Blackmore, for example, was famous for notoriously using incredibly long cables on stage so he could walk around. Joe Walsh and many other famous players did the same. Many of us have these players’ trademark sounds in our heads, and we often want to come as close as possible to sounding like our personal heroes, but we fail because we’re using the wrong cable for a passive guitar. So what are we talking about, technically?
It’s important not to look at the guitar cable, with its electrical parameters, as a stand-alone device. The guitar cable has to be seen as part of the passive signal chain together with the pickups, the resistance of the guitar’s pots (usually 250k or 500k), the capacitance of the wires inside the guitar, and, of course, the input impedance of the amp, which is usually 1M. The interaction of all these in a passive system results in the resonance frequency of your pickups. If you change one of the parameters, you are also changing the resonance frequency.
”Ritchie Blackmore, for example, was famous for notoriously using incredibly long cables on stage so he could walk around.“
You all know the basic formulation: The longer the cable, the warmer the tone, with “warmer” meaning less high-end frequencies. While this is true, in a few moments you will see that this is only half the truth. Modern guitar cables are sporting a capacitance of around 100 pF each meter, which is very low and allows for long cable runs without killing all the top end. Some ultra-low-capacitance cables even measure down to only 60 pF each meter or less.
Now let’s have a look at guitar cables of the past. Here, capacitances of up to 400 pF or more each meter were the standard, especially on the famous coiled cables. See the difference? No wonder it’s hard to nail an old-school sound from the past, or that sometimes guitars sound too trebly (especially Telecasters), with our modern guitar cables. This logic only applies to our standard passive guitar circuits, like those in our Strats, Teles, Les Pauls, SGs, and most other iconic guitar models. Active guitars are a completely different ballpark. With a guitar cable, you can fine-tune your tone, and tame a shrill-sounding guitar.
“No problem,” some will say. “I simply use my passive tone control to compensate, and that’s it. Come on, capacitance is capacitance!” While this logic seems solid, in reality this reaction produces a different tone. “Why is this?” you will ask. Thankfully, it’s simple to explain. You might be familiar with the typical diagrams showing a coordinate system with "Gain/dB" on the Y-axis and "Frequency/kHz" on the X-axis. Additional cable capacitance will shift the resonance frequency on the X-axis, with possible differences of more than one octave depending on the cable. A cable with a higher capacitance will shift the resonance frequency towards the left and vice versa.
Diagram courtesy Professor Manfred Zollner (https://www.gitarrenphysik.de)
Now let’s see what happens if you use your standard passive tone control. If you close the tone control, the resonance frequency will be shifted downwards mostly on the Y-axis, losing the resonance peak, which means the high frequencies are gone. This is a completely different effect compared to the additional cable capacitance.
Diagram courtesy Professor Manfred Zollner (https://www.gitarrenphysik.de)
To summarize, we can say that with different cable capacitances, you can mimic a lot of different pickups by simply shifting the resonance frequency on the X-axis. This is something our passive tone control can’t do, and that’s exactly the difference you will have to keep in mind.
So, let’s see what can be done and where you can add additional cable capacitance to your system to simulate longer guitar cables.
1. On the cable itself
2. Inside the guitar
3. Externally
In next month’s follow-up to this column, we will talk about different capacitances and how you can add them to your signal chain with some easy-to-moderate modding, so stay tuned!
Until then ... keep on modding!
Do you overuse vibrato? Could you survive without it?
Vibrato is a powerful tool, but it should be used intentionally. Different players have different styles—B.B. King’s shake, Clapton’s subtle touch—but the key is control. Tom Butwin suggests a few exercises to build awareness, tone, and touch.
The goal? Find a balance—don’t overdo it, but don’t avoid it completely. Try it out and see how it changes your playing!
An ode, and historical snapshot, to the tone-bar played, many-stringed thing in the room, and its place in the national musical firmament.
Blues, jazz, rock, country, bluegrass, rap.… When it comes to inventing musical genres, the U.S. totally nailed it. But how about inventing instruments?
Googling “American musical instruments” yields three.
• Banjo, which is erroneously listed since Africa is its continent of origin.
• Benjamin Franklin’s Glass Armonica, which was 37 glass bowls mounted horizontally on an iron spindle that was turned by means of a foot pedal. Sound was produced by touching the rims of the bowls with water-moistened fingers. The instrument’s popularity did not last due to the inability to amplify the volume combined with rumors that using the instrument caused both musicians and their listeners to go mad.
• Calliope, which was patented in 1855 by Joshua Stoddard. Often the size of a truck, it produces sound by sending steam through large locomotive-style whistles. Calliopes have no volume or tone control and can be heard for miles.
But Google left out the pedal steel. While there may not be a historical consensus, I was talking to fellow pedal-steel player Dave Maniscalco, and we share the theory that pedal steel is the most American instrument.
Think about it. The United States started as a DIY, let’s-try-anything country. Our culture encourages the endless pursuit of improvement on what’s come before. Curious, whimsical, impractical, explorative—that’s our DNA. And just as our music is always evolving, so are our instruments. Guitar was not invented in the U.S., but one could argue it’s being perfected here, as players from Les Paul to Van Halen kept tweaking the earlier designs, helping this one-time parlor instrument evolve into the awesome rock machine it is today.
Pedal steel evolved from lap steel, which began in Hawaii when a teenage Joseph Kekuku was walking down a road with his guitar in hand and bent over to pick up a railroad spike. When the spike inadvertently brushed the guitar’s neck and his instrument sang, Kekuku knew he had something. He worked out a tuning and technique, and then took his act to the mainland, where it exploded in popularity. Since the 1930s, artists as diverse as Jimmie Rodgers and Louis Armstrong and Pink Floyd have been using steel on their records.“The pedal steel guitar was born out of the curiosity and persistence of problem solvers, on the bandstand and on the workbench.”
Immigrants drove new innovations and opportunities for the steel guitar by amplifying the instrument to help it compete for listeners’ ears as part of louder ensembles. Swiss-American Adolph Rickenbacker, along with George Beauchamp, developed the first electric guitar—the Rickenbacker Electro A-22 lap steel, nicknamed the Frying Pan—and a pair of Slovak-American brothers, John and Rudy Dopyera, added aluminum cones in the body of a more traditional acoustic guitar design and created resophonic axes. The pedal steel guitar was born out of the curiosity and persistence of problem solvers, on the bandstand and on the workbench.
As the 20th century progressed and popular music reflected the more advanced harmonies of big-band jazz, the steel guitar’s tuning evolved from open A to a myriad of others, including E7, C6, and B11. Steel guitarists began playing double-, triple-, and even quadruple-necked guitars so they could incorporate different tunings.
In Indianapolis, the Harlan Brothers came up with an elegant solution to multiple tunings when they developed their Multi-Kord steel guitar, which used pedals to change the tuning of the instrument’s open strings to create chords that were previously not possible, earning a U.S. patent on August 21, 1947. In California, equipped with knowledge from building motorcycles, Paul Bigsby revolutionized the instrument with his Bigsby steel guitars. It was on one of these guitars that, in early 1954, Bud Isaacs sustained a chord and then pushed a pedal down to bend his strings up in pitch for the intro of Webb Pierce’s “Slowly.” This I–IV movement became synonymous with the pedal-steel guitar and provided a template for the role of the pedal steel in country music. Across town, church musicians in the congregation of the House of God Keith Dominion were already using the pedal steel guitar in Pentecostal services that transcended the homogeneity of Nashville’s country and Western clichés.
Pedal steels are most commonly tuned in an E9 (low to high: B–D–E–F#–G#–B–E–G#–D#–F#), which can be disorienting, with its own idiosyncratic logic containing both a b7 and major 7. It’s difficult to learn compared to other string instruments tuned to regular intervals, such as fourths and fifths, or an open chord.
Dave Maniscalco puts it like this: “The more time one sits behind it and assimilates its quirks and peculiarities, the more obvious it becomes that much like the country that birthed it, the pedal steel is better because of its contradictions. An amalgamation of wood and metal, doubling as both a musical instrument and mechanical device, the pedal steel is often complicated, confusing, and messy. Despite these contradictions, the pedal-steel guitar is a far more interesting and affecting because of its disparate influences and its complex journey to becoming America’s quintessential musical instrument.”