Learn to solder like a pro in this easy-to-follow demonstration.
Given the DIY nature of this issue, we thought it would be appropriate to address good soldering technique. If you’re willing to invest a few bucks in some modest tools and spend a little time practicing the basics, you can learn to wire up guitars, stomp kits, speaker cabinets, and even do some simple amp mods. Once you understand the fundamentals, you can save money and derive a lot of satisfaction from working on your own gear.
The tools.
You’ll want a decent soldering pencil (a small type of soldering iron) rated at least 25 watts, but no more than 60 watts. (Many guitar techs like a 30-watt soldering iron for working on guitars and amps, and a 15-watt iron for working inside stompboxes and on delicate printed circuit boards.) You’ll also want a stand to hold the hot iron when not in use, a damp sponge, and some rosin core solder made for electronic work (Photo 1).
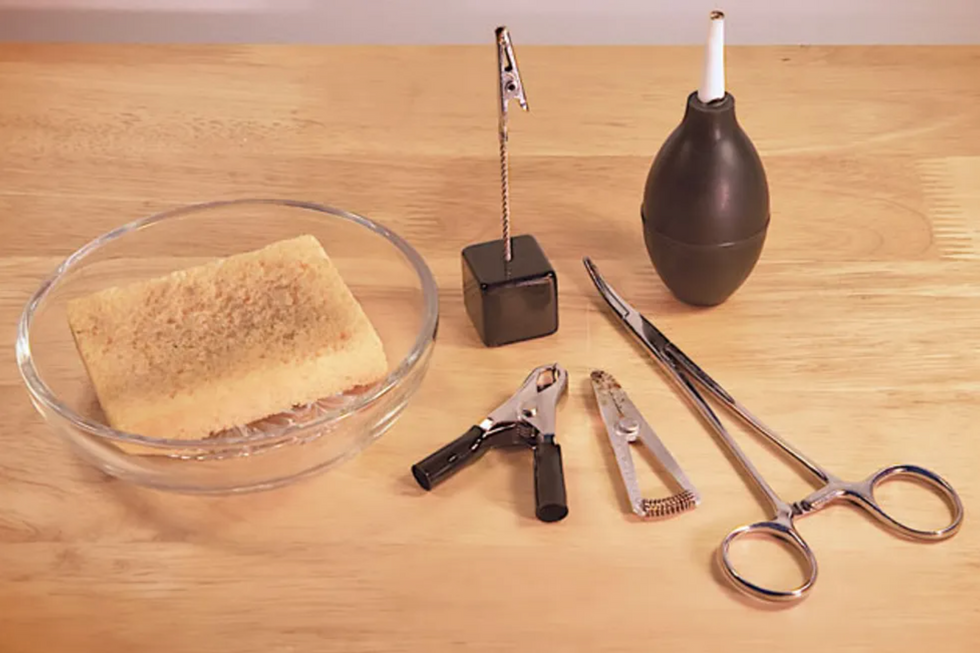
Photo 2 — If your soldering stand doesn’t house a sponge, just put a damp household sponge in a glass or ceramic dish. Other helpful tools: a hemostat and small clamps to hold parts still as you solder them, and a “solder sucker” bulb for removing solder.
You should also have some basic hand tools, such as wire strippers, needle-nose pliers, wire cutters, and something to hold the wire in place while a solder joint cools (Photos 2 and 3).
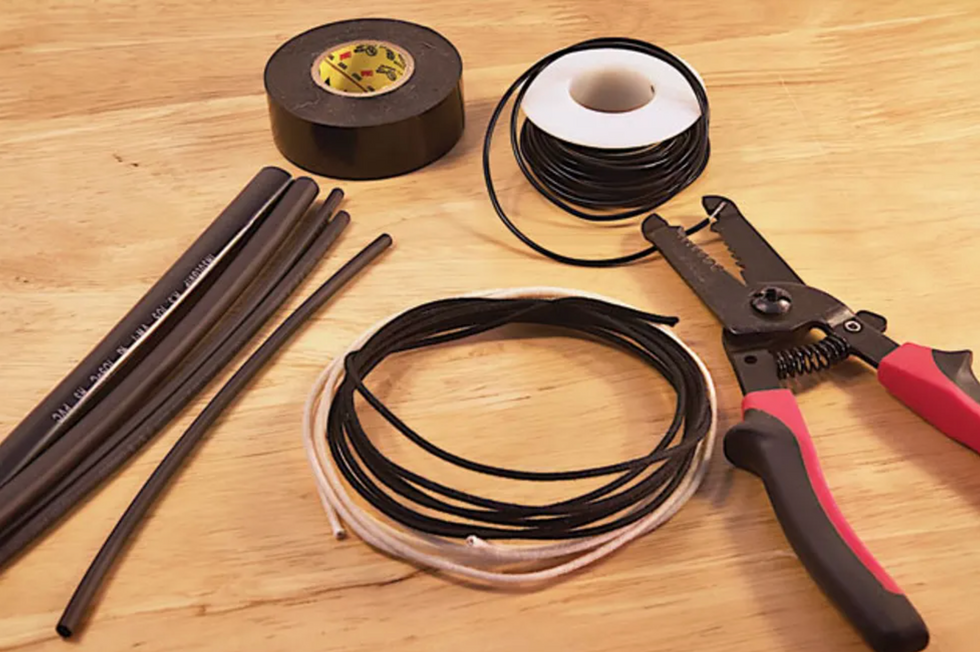
Photo 3 — In addition to hook-up wire, you’ll want wire strippers. Alternatively, luthier suppliers offer old-school “push-back” wire with a waxed cotton jacket (center) that eliminates the need for stripping off the plastic insulation from the end of the wire. Electrical tape and heat shrink tubing come in handy when you need to protect or insulate your work.
There are tools sold specifically for holding wires and parts, available through an electronics supply house.
Step 1: Prepare the Joint
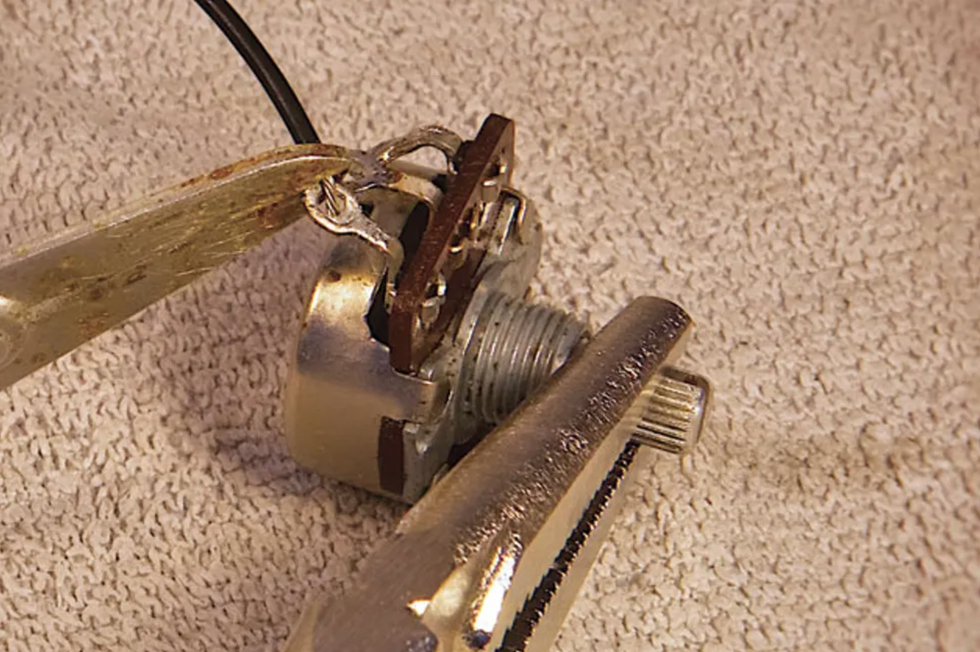
Photo 4 — Before you attempt to solder a connection, the wire and component must be secured to assure they remain absolutely motionless. Here, a spring-loaded heat-sink clamp holds the wire in place while a vice grip gently clamps the pot shaft.
For every joint, you need to find a way to hold the wire in position without using your hands (Photo 4). Wrap the wire through the solder lug once to make it hold tightly on its own, use tape to hold it in place, lay a pair of pliers on the wire to hold it firmly where you want it, or use a mechanical soldering aid to hold it. Use whatever works, except holding the wire manually. When you make a solder connection and rely on your hands to hold the soldered wire steady while the joint cools, you will fail—no human hands are steady enough to hold anything perfectly still, and you want the wire to remain absolutely motionless while it cools. If there is movement, the result will be internal fractures in the solder.
Step 2: Clean the Tip
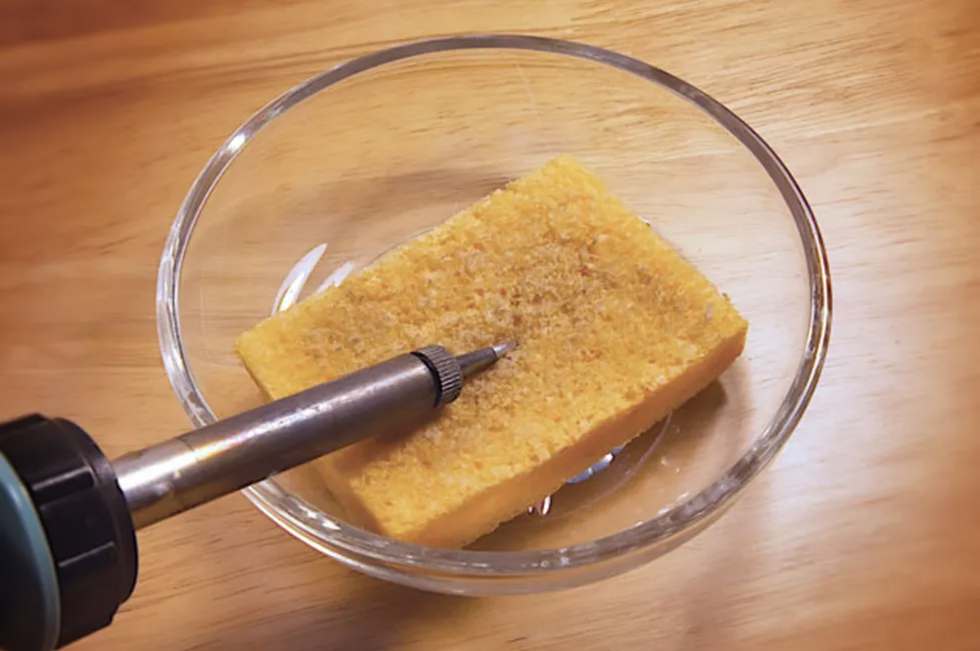
Photo 5 — Wipe the hot tip with a damp sponge to keep it clean.
The tip must be cleaned before each and every joint—you can use the damp sponge for this (Photos 5 and 6).
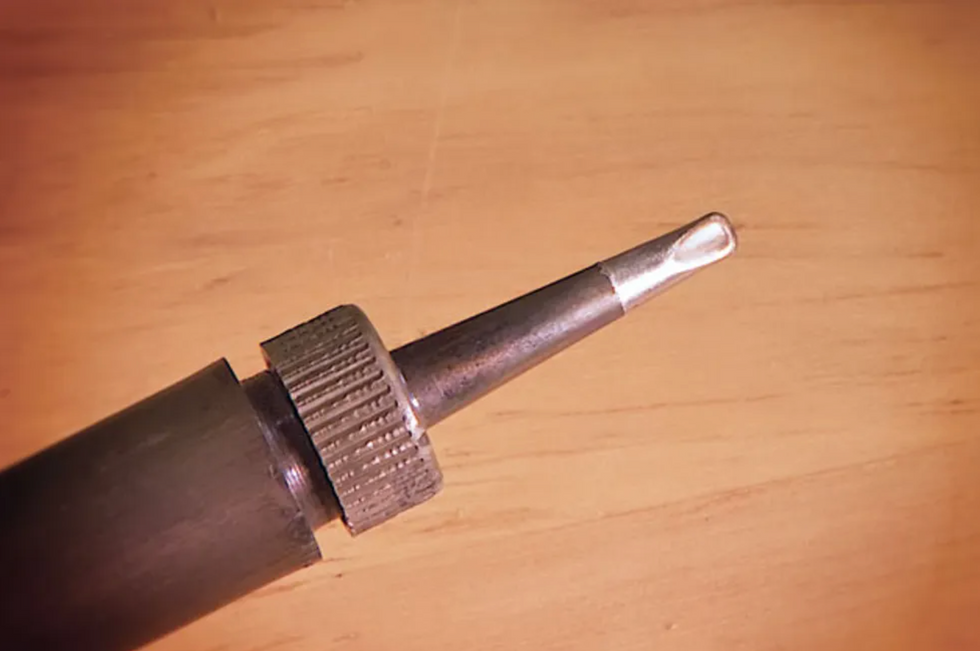
Photo 6 — A clean, dross-free tip looks smooth and shiny.
Solder produces a by-product called dross very, very quickly, and the dross fouls the tip, preventing good heat conduction and introducing waste material into your solder joints.
Step 3: Tin the Tip
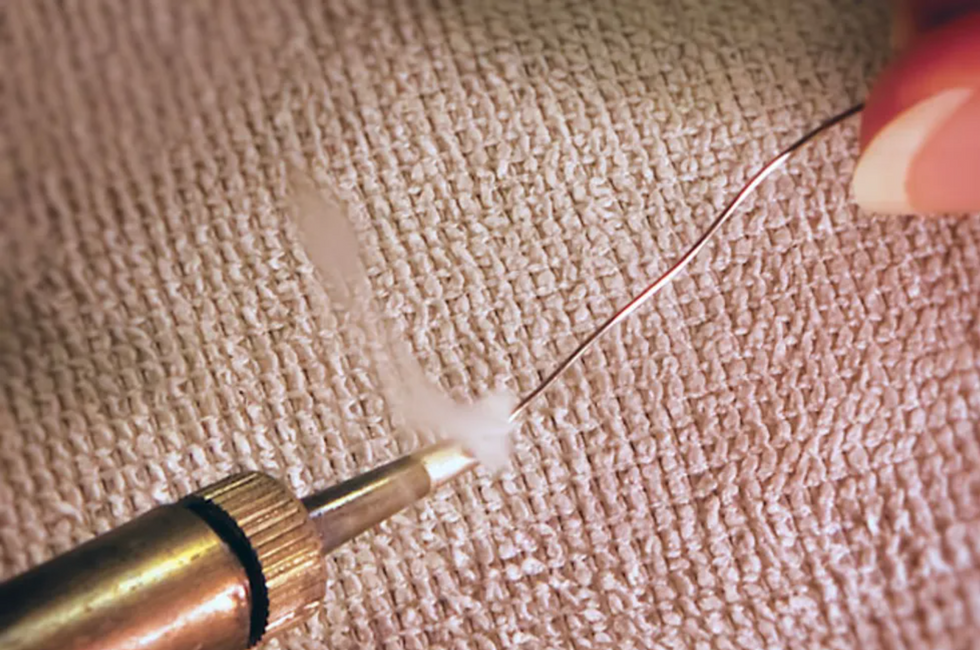
Photo 7 — Add a small amount of solder to a freshly cleaned tip just before you solder a connection. When you see this telltale puff of smoke, pull the strand of solder off the tip, shake off any excess, and then move quickly to the joint.
Immediately before you get on the joint with the heat, add fresh solder to the tip of the iron to “tin” it. Simply feed solder directly onto the tip so it’s completely coated (Photo 7). A tinned tip will provide much better heat conduction than a tip that’s clean but not tinned.
Step 4: Remove the Excess Solder
Shake off the excess solder after tinning—you want the tip coated, but not dripping. I have a fire-resistant container beside my soldering bench, and after tinning I tap the barrel of my iron on the edge of the container to knock excess molten solder into it. You can use any fire-resistant container for this, such as a tin can or ceramic bowl, but use care not to start a fire. Because solder melts at such a low temperature the risk of a fire is very low—molten solder is unlikely to ignite even highly flammable materials like paper—but use care anyway!
Step 5: Get on the Joint Right Away
As soon as you’ve removed the excess solder from the tip, get right on the joint. By “joint,” I mean the wire and the solder lug, or the wire and the back of the pot, or whatever it is you’re soldering. Dross will start to form on the tip very quickly, so as soon as the tip is prepared, get to work.
Step 6: Heat the Joint
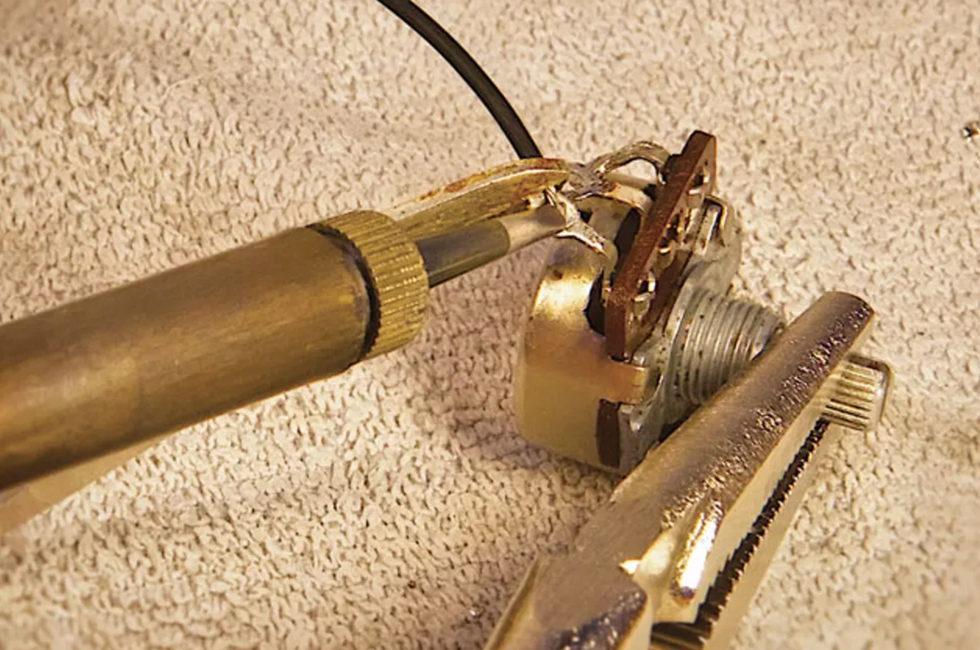
Photo 8 — Gently press the iron’s hot tip against the joint to heat it before you bring the solder into the equation. The goal is to make the joint itself hot enough to melt the solder.
Heat the joint, not the solder (Photo 8). You want the joint to be hot enough to melt the solder. It’s a given that the iron is hot enough to melt it—just feed a little onto the tip and you’ll see—but you also want the joint itself to be hot enough to do the same.
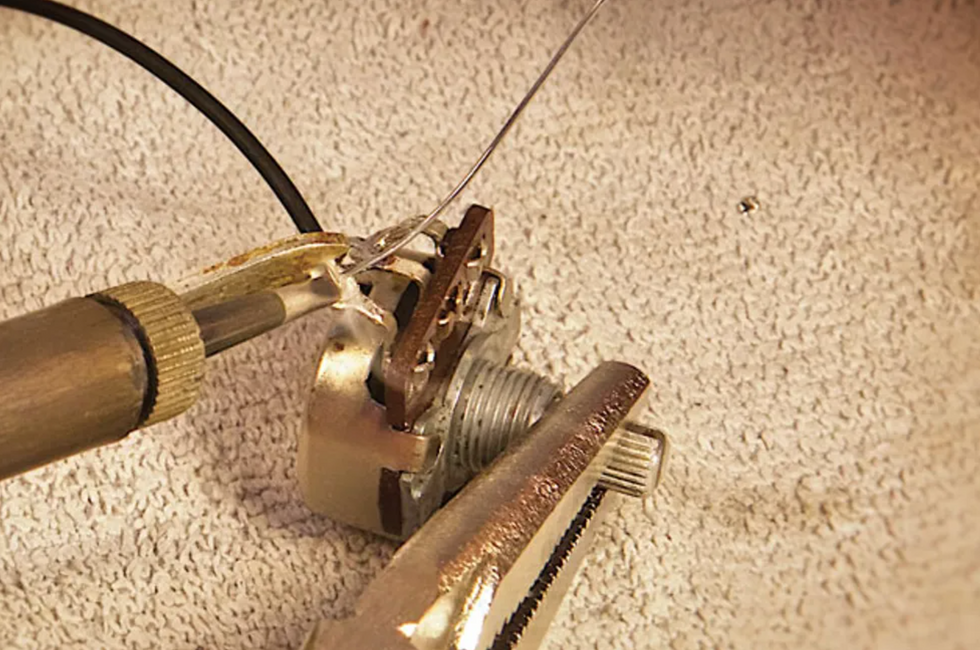
Photo 9 — While holding the tip against the joint, feed the solder onto the heated joint, not the soldering iron tip. Here the emerging puff of smoke indicates the solder is melting.
If you feed solder onto the joint without it touching the iron (Photo 9), the solder will melt and be attracted right to the joint. You can watch the solder actually wick out onto the surface you’re soldering to—this is what you want.
Step 7: Get off the Joint
As soon as the solder has flowed onto the joint properly, remove the heat from the joint. Most components can stand a fair amount of heat, but some are more susceptible to damage than others, so there’s no need to push your luck. Pots are fairly durable (unless it’s a cheap pot), so it’s highly unlikely you’ll damage one by trying to solder a wire to its back. But again, there’s no need to push your luck, so as soon as you’ve completed the joint, pull the iron away and let the joint cool with the components remaining motionless.
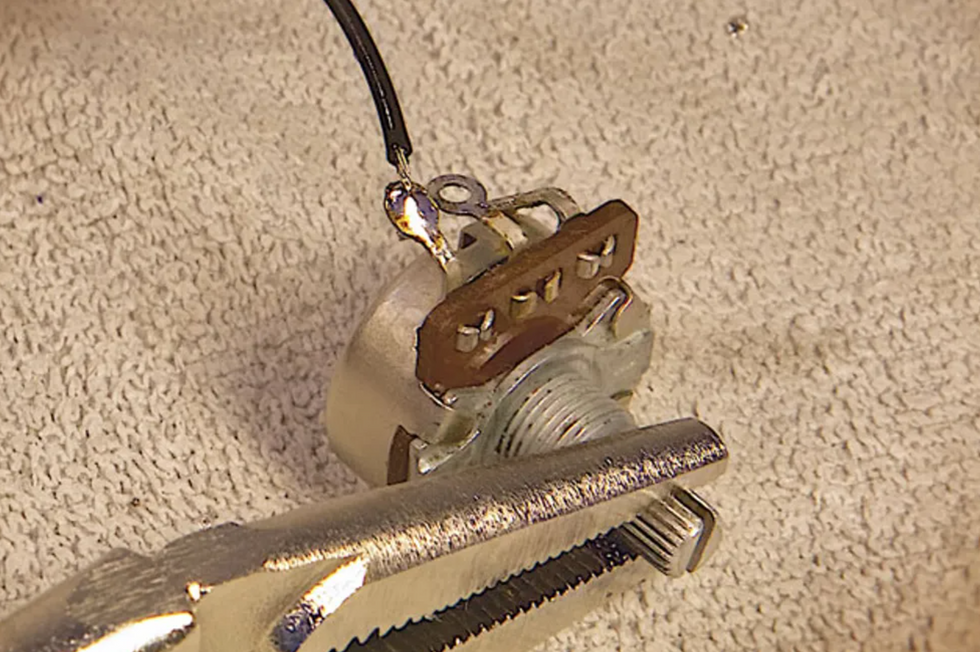
Photo 10 — When the molten solder has flowed into the joint, pull away both the solder and iron. Keep the joint motionless as it cools and don’t blow on it—the moisture in your breath will enter the cooling connection and potentially cause it to fail.
If you’re soldering to a ring-shaped solder lug, then you’ll want to fill it completely with solder (Photo 10). This will maximize the mechanical strength of the joint.
Like most skills, soldering proficiency is acquired through practice. Employing good technique will allow you to become competent all the more quickly, so follow these steps, and you’ll be soldering like a pro in no time. You should probably practice on projects that aren’t expensive or mission critical—you might want to think twice about rewiring your only guitar before that gig with Clapton tonight. But if you keep at it, you’ll be one step closer to being a consummate DIY’er.
Two Ways to Improve Your Soldering Projects
After you master the basics, there are two more skills to add to your bag of tricks: removing old solder and installing heat shrink tubing. There are plenty of occasions where you’ll wish you could remove old solder and re-use a part. For example, you might have rescued a volume or tone pot from a previous mod or project. If it’s a high-quality pot, like those from CTS, why toss it and buy a new replacement when you can put the old one back into service? It’s easy to reverse the soldering process and remove old solder and bits of wire. You simply need a solder removal tool. There are several types, including disposable braided wire that’s designed to wick molten solder away from a joint, and various vacuum pump tools and “solder suckers.” I prefer a simple rubber bulb with a heat-resistant Teflon tip.
Photo 11
Here’s how it works: Stabilize your component, in this case, a pot (Photo 11). See how one lug is filled with solder? Let’s make that go bye-bye. Apply heat to the lug with a freshly cleaned soldering-iron tip.
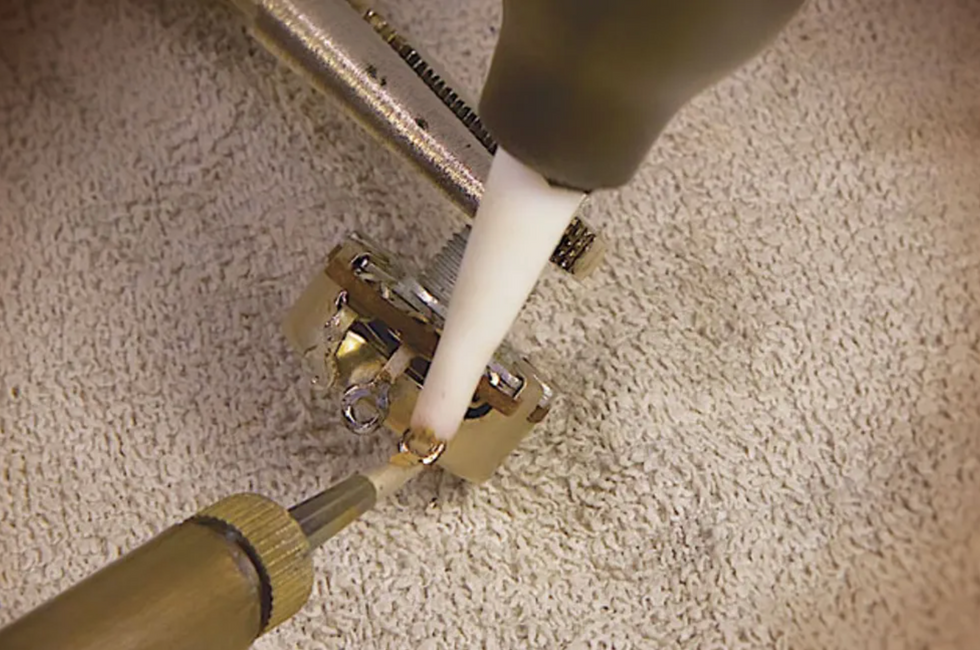
Photo 12
When you see the solder turn shiny and molten, hold the bulb away from the lug, squeeze and hold the bulb, and then bring its tip to the lug and release the bulb. Fffffft! The molten solder goes up the tip and into the bulb (Photo 12).
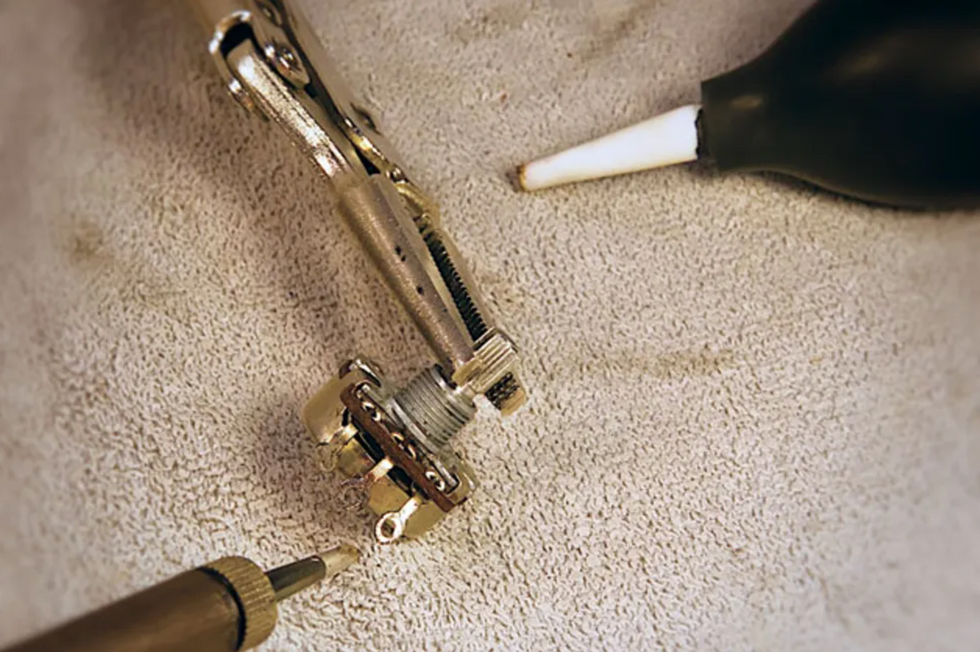
Photo 13
Look at that—a nice clean lug ready for its next mission (Photo 13).
Tip:It’s good to recycle pots and parts, but never try to reuse old solder. Clean it off and start fresh.
In case you’re wondering what happens to the old solder, every few months you simply work the tip out of the bulb, shake the collected cold solder beads into the trash, and reinsert the tip into the bulb. Good to go.
When you’re working with wire and electronics, you’ll often encounter instances where you need to insulate a connection from other wires or components. For example, you want to install a favorite old pickup into another guitar. However, the pickup leads have been cut back over the years and now they won’t reach the intended switch or pot, which means it’s time to splice short extensions to the pickup leads. No problem, except if the exposed wires touch each other or other components, they’ll create a short and you’ll hear only silence (or an annoying hum).
Electrical tape will do the job to insulate the splices, but heat shrink tubing—aka heat shrink—offers a more elegant solution. To make this work, you’ll need a heat source. Some folks use a lighter, but I prefer a heat gun because I like to avoid open flame in my workshop. Heat guns aren’t expensive and they get the job done efficiently and safely.
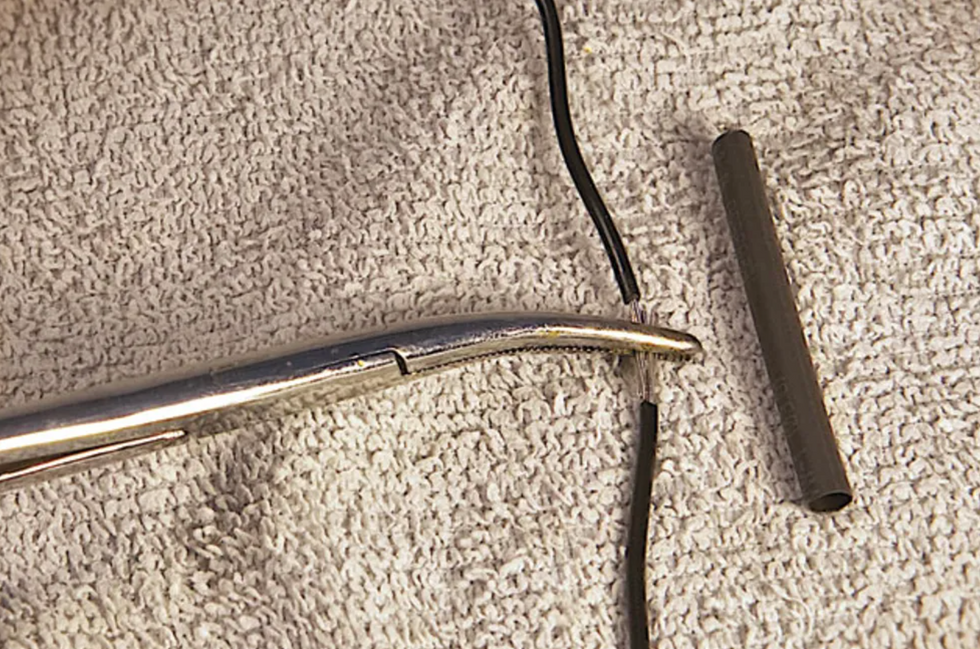
Photo 14
The details: Designed to slide over wire of different gauges, heat shrink comes in various diameters. After you select the right diameter to comfortably slip over your wire, cut off a piece that will straddle the solder splice or joint you plan to cover. The pros suggest a length that’s about three times as long as the exposed section. Use hemostats or a clamp to temporarily hold the ends together while you gauge the length you’ll need to cut (Photo 14).
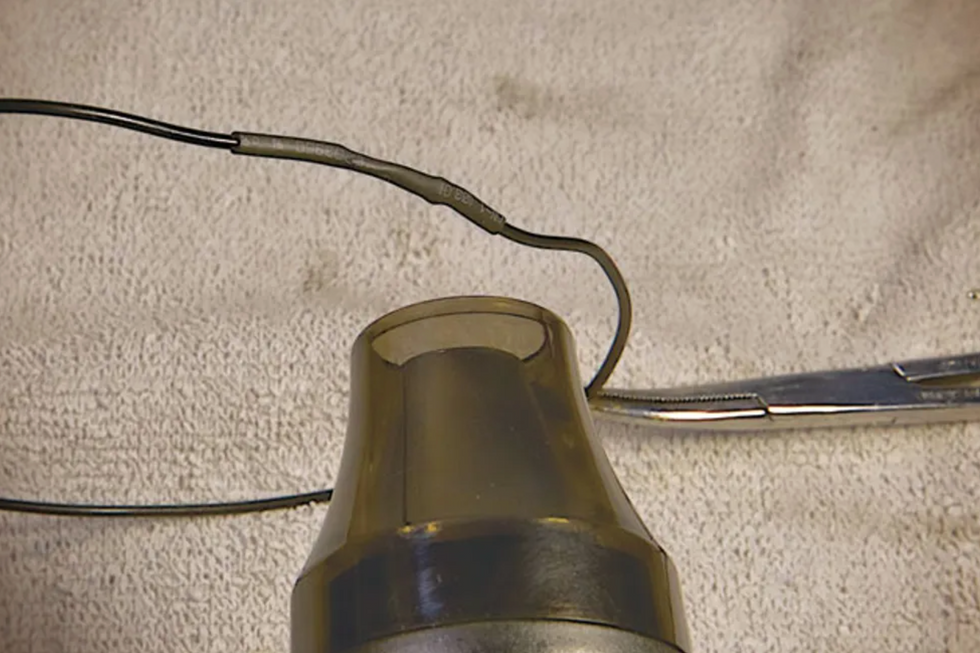
Photo 15
Next, remove the clamp, slide the heat shrink over one end of the wire (keep it far away from your hot iron) and solder the wires. When the solder has cooled, slip the heat shrink over the new joint, center it, and fire up the heat gun. The tubing will start to immediately contract around the joint (Photo 15). Don’t worry, air from the heat gun doesn’t get hot enough to compromise the solder joint. Once the tubing has completely closed up around the wire, you’re done. The joint now has a tough, new skin to protect it. —Andy Ellis
[Updated 1/13/22]
- Three Must-Try Guitar Wiring Mods - Premier Guitar ›
- The ABCs of Output Jacks - Premier Guitar ›
- The Stompbox-Builder's Secret Weapon - Premier Guitar ›
Some of these are deep cuts—get ready for some instrumental bonus tracks and Van Halen III mentions—and some are among the biggest radio hits of their time. Just because their hits, though, doesn’t mean we don’t have more to add to the conversation.
Naturally, every recording Eddie Van Halen ever played on has been pored over by legions of guitar players of all styles. It might seem funny, then, to consider EVH solos that might require more attention. But your 100 Guitarists hosts have their picks of solos that they feel merit a little discussion. Some of these are deep cuts—get ready for some instrumental bonus tracks and Van Halen III mentions—and some are among the biggest radio hits of their time. Just because their hits, though, doesn’t mean we don’t have more to add to the conversation.
We can’t cover everything EVH—Jason has already tried while producing the Runnin’ With the Dweezil podcast. But we cover as much as we can in our longest episode yet. And in the second installment of our current listening segment, we’re talking about new-ish music from Oz Noy and Bill Orcutt.
A dual-channel tube preamp and overdrive pedal inspired by the Top Boost channel of vintage VOX amps.
ROY is designed to deliver sweet, ringing cleans and the "shattered" upper-mid breakup tones without sounding harsh or brittle. It is built around a 12AX7 tube that operates internally at 260VDC, providing natural tube compression and a slightly "spongy" amp-like response.
ROY features two identical channels, each with separate gain and volume controls. This design allows you to switch from clean to overdrive with the press of a footswitch while maintaining control over the volume level. It's like having two separate preamps dialed in for clean and overdrive tones.
Much like the old amplifier, ROY includes a classic dual-band tone stack. This unique EQ features interactive Treble and Bass controls that inversely affect the Mids. Both channels share the EQ section.
Another notable feature of this circuit is the Tone Cut control: a master treble roll-off after the EQ. You can shape your tone using the EQ and then adjust the Tone Cut to reduce harshness in the top end while keeping your core sound.
ROY works well with other pedals and can serve as a clean tube platform at the end of your signal chain. It’s a simple and effective way to add a vintage British voice to any amp or direct rig setup.
ROY offers external channel switching and the option to turn the pedal on/off via a 3.5mm jack. The preamp comes with a wall-mount power supply and a country-specific plug.
Street price is 299 USD. It is available at select retailers and can also be purchased directly from the Tubesteader online store at www.tubesteader.com.
The compact offspring of the Roland SDE-3000 rack unit is simple, flexible, and capable of a few cool new tricks of its own.
Tonalities bridge analog and digital characteristics. Cool polyrhythmic textures and easy-to-access, more-common echo subdivisions. Useful panning and stereo-routing options.
Interactivity among controls can yield some chaos and difficult-to-duplicate sounds.
$219
Boss SDE-3 Dual Digital Delay
boss.info
Though my affection for analog echo dwarfs my sentiments for digital delay, I don’t get doctrinaire about it. If the sound works, I’ll use it. Boss digital delays have been instructive in this way to me before: I used a Boss DD-5 in a A/B amp rig with an Echoplex for a long time, blending the slur and stretch of the reverse echo with the hazy, wobbly tape delay. It was delicious, deep, and complex. And the DD-5 still lives here just in case I get the urge to revisit that place.
Tinkering with theSDE-3 Dual Digital Delay suggested a similar, possibly enduring appeal. As an evolution of the Roland SDE-3000rack unit from the 1980s, it’s a texture machine, bubbling with subtle-to-odd triangle LFO modulations and enhanced dual-delay patterns that make tone mazes from dopey-simple melodies. And with the capacity to use it with two amps in stereo or in panning capacity, it can be much more dimensional. But while the SDE-3 will become indispensable to some for its most complex echo textures, its basic voice possesses warmth that lends personality in pedestrian applications too.
Tapping Into the Source
Some interest in the original SDE-3000 is in its association with Eddie Van Halen, who ran two of them in a wet-dry-wet configuration, using different delay rates and modulation to thicken and lend dimension to solos. But while EVH’s de facto endorsement prompted reissues of the effect as far back as the ’90s, part of the appeal was down to the 3000’s intrinsic elegance and simplicity.
In fact, the original rack unit’s features don’t differ much from what you would find on modern, inexpensive stompbox echoes. But the SDE-3000’s simplicity and reliable predictability made it conducive to fast workflow in the studio. Critically, it also avoided the lo-fi and sterility shortcomings that plagued some lesser rivals—an attribute designer Yoshi Ikegami chalks up to analog components elsewhere in the circuit and a fortuitous clock imprecision that lends organic essence to the repeats.
Evolved Echo Animal
Though the SDE-3 traces a line back to the SDE-3000 in sound and function, it is a very evolved riff on a theme. I don’t have an original SDE-3000 on hand for comparison, but it’s easy to hear how the SDE-3 bridges a gap between analog haze and more clinical, surgical digital sounds in the way that made the original famous. Thanks to the hi-cut control, the SDE-3’s voice can be shaped to enhance the angular aspect of the echoes, or blunt sharp edges. There’s also a lot of leeway to toy with varied EQ settings without sacrificing the ample definition in the repeats. That also means you can take advantage of the polyrhythmic effects that are arguably its greatest asset.
“There’s a lot of leeway to toy with varied EQ settings without sacrificing the ample definition in the repeats.”
The SDE-3’s offset control, which generates these polyrhythmic echoes, is its heart. The most practical and familiar echos, like quarter, eighth, and dotted-eighth patterns, are easy to access in the second half of the offset knobs range. In the first half of the knob’s throw, however, the offset delays often clang about at less-regular intervals, producing complex polyrhythms that are also cool multipliers of the modulation and EQ effects. For example, when emphasizing top end in repeats, using aggressive effects mixes and pitch-wobble modulation generates eerie ghost notes that swim through and around patterns, adding rhythmic interest and texture without derailing the drive behind a groove. Even at modest settings, these are great alternatives to more staid, regular subdivision patterns. Many of the coolest sounds tend toward the foggy reverb spectrum. Removing high end, piling on feedback, and adding the woozy, drunken drift from modulation creates fascinating backdrops for slow, sparse chord melodies. Faster modulations throb and swirl like old BBC Radiophonic Workshop sci-fi sound designs.
By themselves, the modulations have their own broad appeal. Chorus tones are rarely the archetypal Roland Jazz Chorus or CE type—tending to be a bit darker and mistier. But they do a nice job suggesting that texture without lapsing into caricature. There are also really cool rotary-speaker-like textures and vibrato sounds that offer alternatives to go-to industry standards.
The Verdict
The SDE-3’s many available sounds and textures would be appealing at $219—even without the stereo and panning connectivity options, a useful hold function, and expression pedal control that opens up additional options. The panning capabilities, in particular, sparked all kinds of thoughts about studio applications. Mastering the SDE-3 takes just a little study—certain polyrhythms can be dramatically reshaped by the interactivity of other controls and you need to take care to achieve identical results twice. But this is a pedal that, by virtue of its relative simplicity and richness and breadth of sounds, exceeds the utility of some similarly priced rivals, all while opening up possibilities well outside the simple echo realm
With a few clicks on Reverb, a reptile-inspired shred machine was born.
With this guitar, I wanted to create a shadowbox-type vibe by adding something you could see inside. I have always loved the Yamaha Pacifica guitars because of the open pickup cavity and the light weight, so I purchased this body off Reverb (I think I am addicted to that website). I also wanted a color that was vivid and bold. The seller had already painted it neon yellow, so when I read in the description, “You can see this body from space,” I immediately clicked the Buy It Now button. I also purchased the neck and pickups off of Reverb.
I have always loved the reverse headstock, simply because nothing says 1987 (the best year in the history of the world) like a reverse headstock. The pickups are both Seymour Duncan—an SH-1N in the neck position and TB-4 in the bridge, both in a very cool lime green color. Right when these pickups got listed, the Buy It Now button once again lit up like the Fourth of July. I am a loyal disciple of Sperzel locking tuners and think Bob Sperzel was a pure genius, so I knew those were going on this project even before I started on it. I also knew that I wanted a Vega-Trem; those units are absolutely amazing.
When the body arrived, I thought it would be cool to do some kind of burst around the yellow so I went with a neon green. It turned out better than I imagined. Next up was the shaping and cutting of the pickguard. I had this crocodile-type, faux-leather material that I glued on the pickguard and then shaped to my liking. I wanted just a single volume control and no tone knob, because, like King Edward (Van Halen) once said, “Your volume is your tone.”
T. Moody
I then shaped and glued the faux-leather material in the cavity. The tuning knobs, volume knob, pickguard, screws, and selector switch were also painted in the lemon-lime paint scheme. I put everything together, installed the pickups, strung it up, set it up, plugged it in, and I was blown away. I think this is the best-playing and -sounding guitar I have ever tried.
The only thing missing was the center piece and strap. The latter was easy because DiMarzio makes their ClipLock in neon green. The center piece was more difficult because originally, I was thinking that some kind of gator-style decoration would be cool. In the end, I went with a green snake, because crocodiles ain’t too flexible—and they’re way too big to fit in a pickup cavity!
The Green Snake’s back is just as striking as the front.