The condition of your frets will determine how well your guitar plays.
The condition of your frets will determine how well your guitar plays. Every time you press your strings against the frets, the friction between them subtly changes the shape of the frets, causing them to wear out. Over time, this metal-against-metal contact can lead to string rattle and intonation issues. The greatest fret damage is caused by capos—especially under the plain strings.
Fret wear is a normal by-product of playing your instrument. As a guitarist, it's important to know how to evaluate fret damage and understand what options you have to correct it. The big question is, can I refurbish my frets or is it time to replace them? Let's explore the subject starting with the fretwire itself.
What are frets made of?
Though fretwire is frequently called "nickel silver," it doesn't actually contain silver. Rather, it's typically composed of 18 percent nickel, 80 percent copper, and small amounts of such other materials as zinc, lead, and cadmium. Really good fret wire has more zinc and less copper. One of my favorite brands is Jescar, and their NS formula is 62 percent copper, 18 percent nickel, and 20 percent zinc. Because it's harder than traditional fretwire, it lasts longer.
Another option is stainless steel. Stainless steel is very difficult to work with, but it lasts dramatically longer than traditional fretwire. However, stainless steel frets come with a hefty price tag. Most luthiers will charge more than double to re-fret a guitar with stainless steel because it nearly destroys their tools and the job takes much longer to do. In the long run, it could be the perfect solution for your guitar since you may never have to replace the frets again!
How are frets sized?
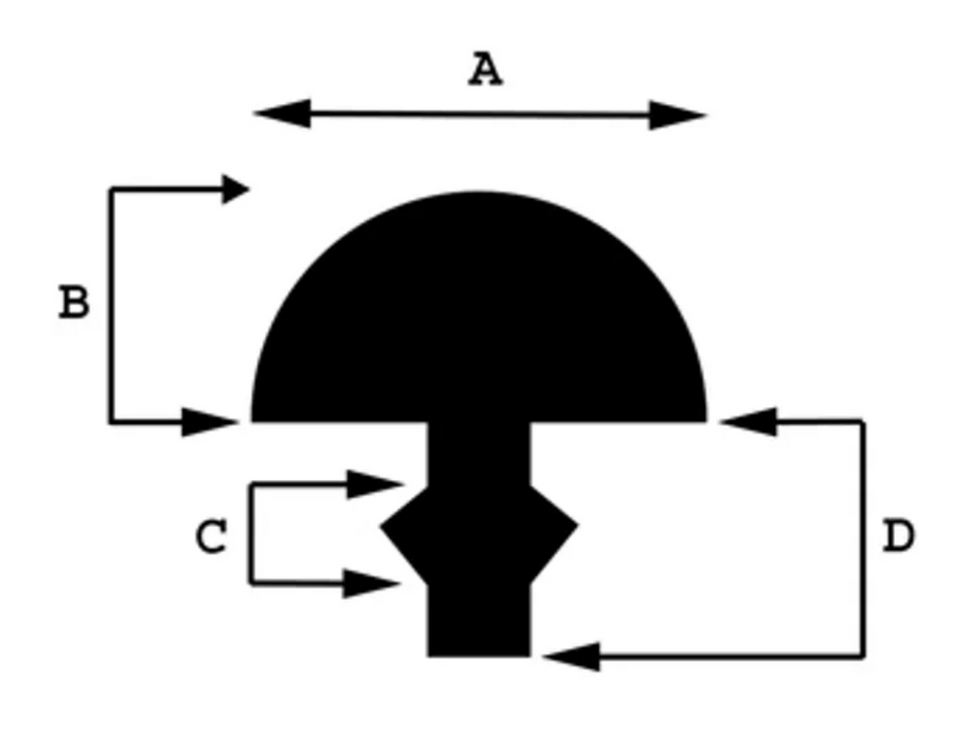
Fig. 1. Fretwire is measured by the crown's width (A) and height (B), as well as the size of the barb (C) and depth of the tang (D).
Fretwire comes in a variety of sizes and shapes. Fig. 1 illustrates the four elements that determine a particular style of fretwire. They are the width and height of the crown, the size of the barb, and the depth of the tang.
The crown is the exposed part of the fret. When you fret a note, you're pressing the string to the very top of the crown. Like a row of hooks, barbs secure the fret to the fretboard. Barb width determines the width of the fret slot and the tang determines the depth of the fret slot—i.e., how far the fretwire penetrates into the fretboard.
The size and shape of each of these four elements are specifically designed for different playing preferences and types of guitars. The crown width can vary from ultra narrow (.053") to super jumbo (.118"). The fret height can be anywhere from a short .032" to a tall .060". The width of the barbs and depth of the tang also vary from .019" to .040".
All these dimensions have a specific purpose and are important considerations when choosing fretwire. For example, wider frets can produce a stronger tone, but as they wear, the guitar's intonation "drifts" farther than with narrow frets. But narrow wire has its drawbacks, too: Narrow frets won't cause your intonation to drift as much, but they wear down faster than wide frets.
Tall frets will last longer before they need to be replaced. However, I don't recommend them for someone who plays with a strong grip. If you grip the neck tightly while playing or use a capo, the strings will pull sharp as you play. On the other hand, shorter frets wear out faster (especially if you use a capo) and need to be replaced more often.
The size of the barbs and tang have a profound effect on a guitar neck, and if you decide to install new frets, it's very important to use the correct size. If the barbs and tang are too narrow or shallow for the slots, the frets won't seat securely in the fretboard. This causes them to lift out when the weather changes and yields uneven frets and a lot of buzzy or dead notes. When the barbs and tang are too wide, they can crack and chip the fretboard, or even cause the neck to back-bow. In the case of a back-bow, you have to re-fret the guitar.
To summarize: A neck must have the correctly sized frets to match the fretboard and player. Otherwise, you'll end up with a very expensive mess!
Can the dents in my frets be repaired?
Dents always create problems with frets. But does discovering dents mean you need to replace your frets or is re-crowning an option?
It can go either way, and the answer depends on the depth of the dents. When the dents are deep, your tech would have to remove too much material from all the frets to correctly repair the problem ones. When the height of the fret is below .038" and it has deep pits and dents, chances are a re-fret is in order.
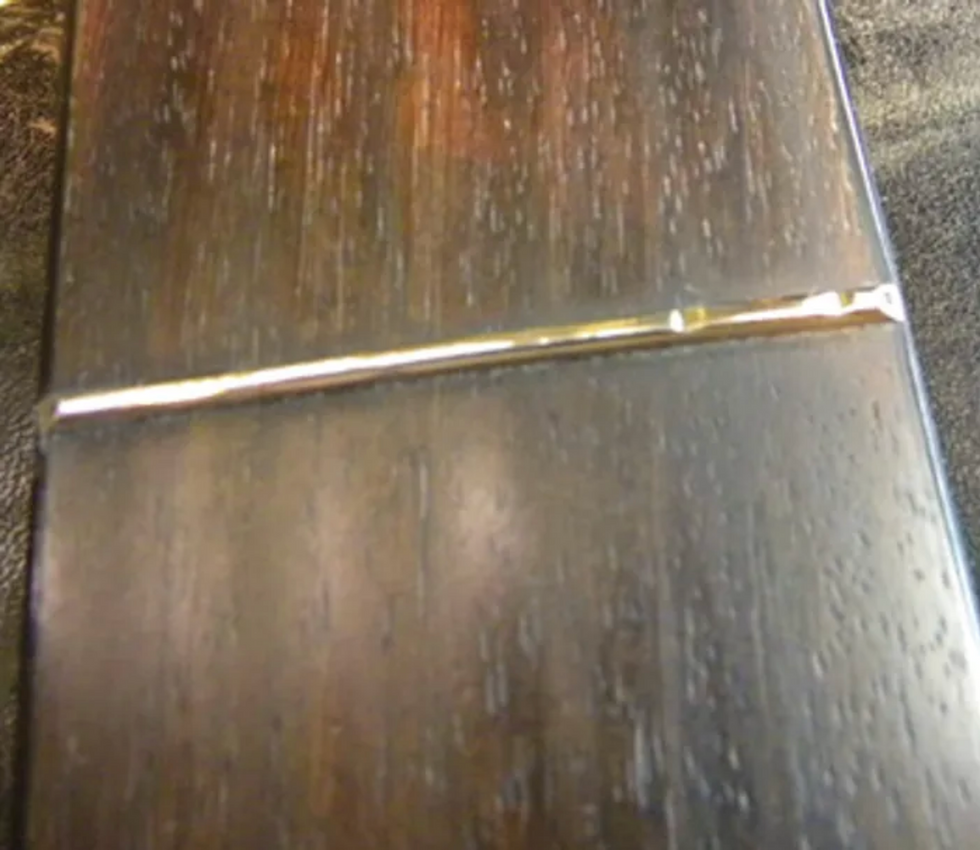
Fig. 2. A dented and pitted fret causes intonation problems, creates string rattle, and impedes smooth string bends.
Look at Fig. 2 and notice the deep pits in these frets. These dents are too deep to repair, so the frets must be replaced.
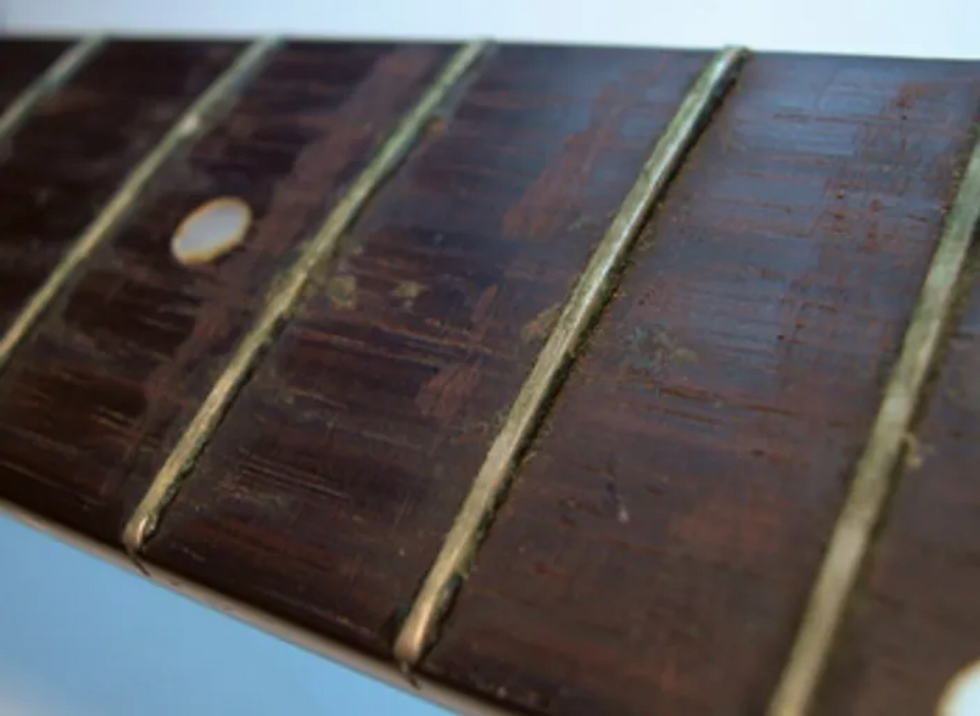
Fig. 3. A flat fret also creates rattle and intonation problems.
Dents and pits are not the only reason to replace frets. Flat spots in the frets are another culprit. For a fret to function properly, it must have a domed crown. If the crown is flat, as in Fig. 3, it will cause string rattle and intonation issues. Much like dents and pits, if the fret has a flat crown and is too short, it will need to be replaced.
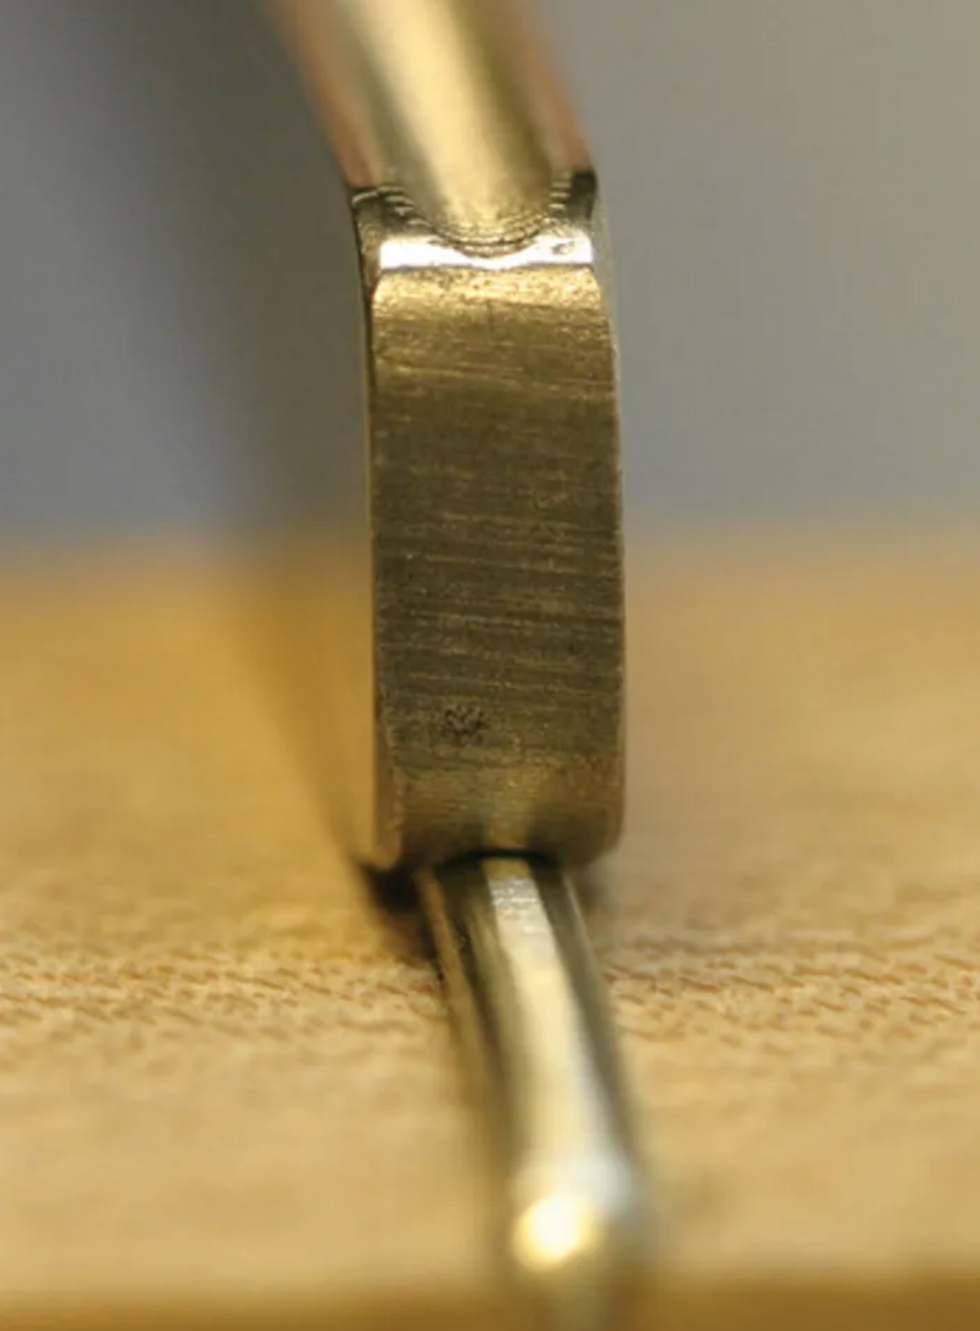
Fig. 4. Re-crowning a fret with a specialized tool.
If the frets are tall enough to repair, they are first leveled and then re-crowned. To level a fret, your tech grinds and sands the frets to an equal height. This leaves the frets with a flat crown. The next step is to re-crown the fret by removing material from its sides until the crown offers a narrow point of contact for the string Fig. 4. This is a very painstaking process and it takes years of practice to develop the proper skills—definitely a job for a pro.
What's involved with a re-fret?
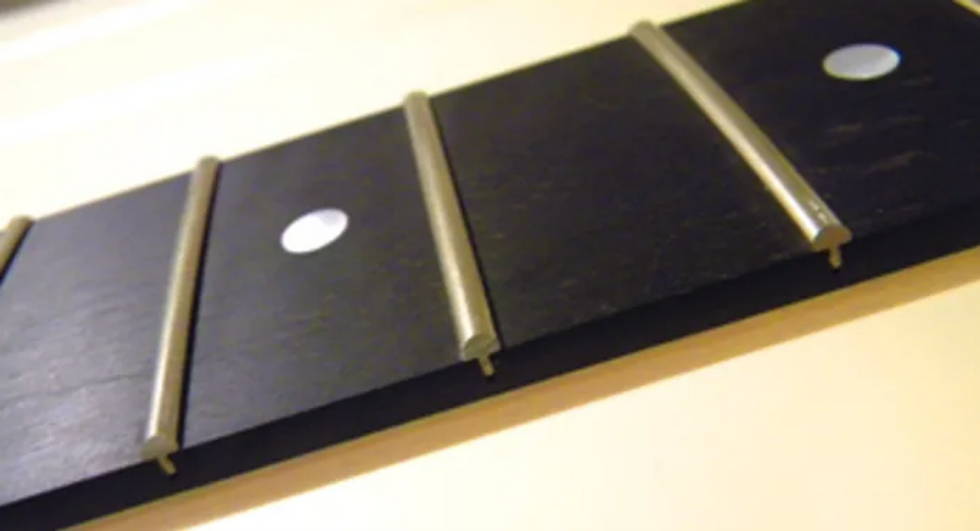
Fig. 5. A complete re-fret gives a guitar a new lease on life.
In a re-fret, all the frets in the neck are replaced. The process is very precise and requires expensive tools and great skill. The basic steps include disassembling the guitar, removing all the old frets, planing the fretboard, radiusing the fretboard, cleaning out the fret slots, installing the new frets and then leveling and re-crowning them, cleaning the fretboard and polishing the frets, and finally reassembling the guitar Fig. 5.
And this is just a basic overview of the process. There are many, many more steps—enough to fill an entire book. Re-fretting is expensive and time consuming, but generally worth the cost.
Over the years, I've had clients who choose to replace an old bolt-on neck with a new one, rather than opt for a re-fret. This can be a great choice, but beware—almost every new neck needs a fret level and re-crowning. Most guitar parts factories don't take the time that a luthier would to ensure that the frets are level. So keep in mind that by the time you pay for a new neck and the additional fretwork, you could have re-fretted the original neck and had some leftover change!
What about a partial re-fret?
Sometimes simply replacing several frets, rather than all of them, gets the job done. This is usually preferable for a neck that only has wear on the first six or seven frets and has a level fretboard. If the fretboard is in good condition and the rest of the frets are tall enough, a partial re-fret is a great way to save money. Not all guitars can qualify for this operation. If the fretboard has a twist or wave in it, a total re-fret is required.
Capo is a four-letter word.
The capo is a fret's worst enemy. Of course, I love capos because I love to do fretwork! If no one used capos, my income from fretwork would drop at least 60 percent. The more you use a capo, the more damage it does to the frets. As the capo clamps down on the strings, it smashes the strings into the frets and much harder than if you were to play a chord. As a result, frets begin to flatten and develop pits and dents. This is great news for a guitar tech, but not so good for the player.
To avoid unnecessary "capo-inflicted" fret damage, I suggest you use a capo with a tension adjustment. Many capos simply press the strings down to the fretboard without offering a way to adjust the tension. If you use a capo with a tension adjustment, you can clamp the device with just enough force to prevent string rattle, yet reduce additional fret wear.
Another great benefit to using a capo with adjustable clamping tension: It will help avoid tuning issues versus a nonadjustable capo. There are several great capos on the market that will diminish fret damage and tuning problems, including Planet Waves Dual Action capo and all the various Shubb models. If your capo doesn't offer a tension adjustment, buy one that does. This will save you a ton of money in fretwork.
[Updated 8/10/21]
- Understanding Frets and Fret Wear - Premier Guitar ›
- Jol Dantzig's Esoterica Electrica: Perfect Intonation and Other Myths ... ›
- Mod Garage: Fighting Fret Wear - Premier Guitar ›
- Guitar Shop 101: Squeezing More Life Out of Worn Frets - Premier ... ›
- The Recording Guitarist: Should You Change Your Electric's Strings Before Tracking? - Premier Guitar ›
- Dunlop Introduces the Pivot Capo - Premier Guitar ›
- Dunlop Pivot Capo Review - Premier Guitar ›
Along with a demented Jim Root partscaster, the metalcore guitarists ride ESP warhorses into battle on a recent tour with elijah.
Philadelphia-raised metal guitarist Xander Raymond Charles has built himself quite a following on YouTube—his subscribers now number over 120,000. But when he’s not YouTubing, he’s playing live, and earlier this year, he went out on a national tour with metalcore artist elijah. Charles formed half of elijah’s brutal dual guitar section, along with Brandon Kyle. Ahead of a recent Nashville gig, the two shredders sat down with PG’s Chris Kies to share what they packed for the road trip.
Brought to you by D’Addario.
Rooting Around
Charles’ go-to metal machine is this Fender Jim Root partscaster with a 2014 Strat body and 2018 neck. He put in a pair of Root’s signature EMG Daemonum pickups, then pulled out the neck one out of “boredom” while on tour. He’s also replaced a lot of the factory hardware with odds and ends from Lowes or Home Depot. Like most of the duo’s guitars, the partscaster is tuned to drop C, and this one rocks a set of Nashville-made Stringjoy .012–.062 strings.
From the Bench to First String
Kyle’s main ride is this ESP LTD TE-401, which started its life as a backup but has graduated to be Kyle’s No. 1. It’s an affordable model from ESP’s line that Kyle maintains is one of the best-sounding guitars he’s ever played. He loves the playability and feel, which are similar to the Fenders he grew up playing. Obviously, the EMG pickups give it more gas than other T-styles.
Backup Warhorse
This single-humbucker, JM-style ESP LTD XJ-1 HT is another warhorse in Kyle’s stable and serves as a backup during elijah’s current set. It’s equipped with D’Addario XL .012–.056s.
Low and Long
This stunning Squier Vintage Modified Baritone Jazzmaster can handle all of Charles’ low-end demands with its 30" scale length.
Fresh from the Lab
Charles was gifted this 7-string Cerberus prototype, which is geared up with locking tuners, a single Guitarmory Pickups humbucker, and a 30" scale length.
Quad Power
Both Charles and Kyle are running Neural DSP Quad Cortexes, and after some testing, both decided to roll with a profile of an EVH 5150 loaded with EL34s. For clean sounds in the set, they lean on a Friedman profile. Sennheiser wireless systems let both guitarists cut loose onstage.
Shop Elijah's Rig
D'Addario XL Strings
EMG JR Daemonum Pickups
Stringjoy Strings
ESP LTD XJ-1 HT
Fishman Fluence Pickup
Neural DSP Quad Cortex
The Warg is a modern revamp of the Ace Tone “Fuzz Master” FM-3, designed to offer uniquely aggressive high-gain options.
"Despite its feral exterior, the Warg is refined under the hood, with several quality-of-life improvements, like silent soft true-bypass switching, top-mounted jacks, high-end German-made hardware and premium internal components."
Features:
- EQ profile switch toggling between the scooped wall of fuzz tones of the original circuit, and a flat profile with a fuller and punchier midrange
- Versatile tone control and broad gain range allows for anything from chunky riffage to searing leads
- Silent soft touch switching system via an internal relay
- Art by the talented Jordan from Pine-Box Customs
Like all Evil Eye FX pedals, the Warg features a lifetime warranty and is hand-built one-at-a-time in Philadelphia, PA.
Street price of $149.
Available now at www.evileyefx.com, or through any of our fine retailers.
Evil Eye FX is a joint venture from childhood friends and bandmates Sean and Ben, building their brand around their love of DnD and other tabletop RPGs, video games and fantasy. In 2019, the pair began modding BOSS pedals to meet the needs of their band, and quickly fell in love with the craft. In 2023, they founded Evil Eye FX with the vision of providing unique handmade pedals at working musician-accessible prices.
Check out Jackson Brooksby’s look at the history of the FM-3 and demo of the Warg.
Our columnist makes an argument against the usefulness of tap tempo footswitches. Should we really be bothering with them?
The ability to tap in a tempo on pedals is a fairly new concept, especially compared to the amount of time that stompboxes have existed in our world. I would venture to guess that this is due in part to the availability of, and need for, digital ICs. Then, being able to code them and apply them to effects circuits appropriately.
Piece of cake! … If you’re good at baking cake. This process isn’t exactly easy to implement, but these days, I feel like some players are almost expecting this modern commodity—to the point where a great delay pedal might be overlooked due to not having tap tempo.
Setting aside the history and design applications, I’ve been pondering if tap tempo even makes sense or is achievable in a band context. For this thought experiment, I’d like to run through a few scenarios, while also shedding light on a few software/hardware aspects for you to consider. To put it plainly, “Why would you need tap tempo on a pedal?” The most compelling argument I’ve thought of is the “band” aspect: being part of a band where the rhythm section has laid down the tempo and you’d like to add delay to the song. Now, if you set the knobs on your delay pedal and started playing to that tempo, your bandmates could join along with your delay line acting as the group’s metronome. However, in this scenario, you didn’t start the tempo. That’s no problem! You’ve got a footswitch on your delay that allows you to tap your foot to the beat of the drummer and you’ll be all set! But will you?
Let’s assume, for argument’s sake, that the drummer is playing to a click track at 120 bpm. Your foot starts tapping along and you press that magical tap footswitch on your favorite delay three to six times. Boom! Now you’ve set the delay line to 120 bpm. But what are the chances that you tapped 120 exactly? Is it likely that you tapped in 122 bpm? Or 121.3 bpm? Absolutely. This discrepancy may not be very noticeable for a couple bars, but every subsequent bar you play will start to become more noticeable. So what do you do? You can keep tapping in the tempo to the best of your ability every few bars. Seems cumbersome given that you still have to play the guitar parts and focus on other things that are inherently involved in a band setting.
Pulling the curtain back for a second here, let’s call the part of the pedal that handles the tap tempo “the brain.” The brain of the delay sees you pressing the tap footswitch multiple times and processes this in a couple ways (that I’m aware of). One, it measures the distance between all the consecutive taps and spits out an average. Two, it takes the last two distances in the string of taps and makes that the bpm. That’s not even going into whether the brain is floating point (121.3 bpm) or fixed point (121.32 bpm).
“You’ve got a footswitch on your delay that allows you to tap your foot to the beat of the drummer and you’ll be all set! But will you?”
Your drummer is still waiting for you to get the tempo dialed in. So what can you try next? Well, if your delay pedal has an insert jack for tap tempo, we can try to connect something like the Disaster Area SMARTClock. The tap footswitch on it won’t help here. It’ll be the same as the bpm discrepancy we discussed previously. However, there’s an encoder knob that allows you to scroll through the output tempo in bpm or millisecond increments. Yes! Not all is lost! You just have to make sure to sync it up exactly on the downbeat of the tempo—crap!
Another more intricate and exact option would be to have the drummer’s click track send a MIDI signal to your SMARTClock that then connects to your delay. At this point, I’d change my question to, “Is this level of tap tempo necessary?” Perhaps if you’re the Edge and/or the song is predicated on the delay.
If you’re adding a lead part to a song and the delay isn’t exactly “on” with the bpm, I would argue that it can stand out better, be more easily heard, and be more interesting. I would also argue that an amplitude-style tremolo makes more sense to require exact bpm. I’m thinking about the Smiths’ “How Soon is Now?”
Tap-tempo options on modulation have been fun and we’re seeing more of it nowadays, but we’ve been playing and listening to the Phase 90 for decades without needing tap. Ultimately, if having certain options inspires you and brings you joy, go for it! Enjoy! But I’d ask you, “Did you actually tap in the correct bpm?” and “Did it matter?”Orianthi joins forces with Orange Amplification for her signature combo, the Oriverb, based on the classic Rockerverb MKIII 50 NEO Combo.
"Seeing this whole amp come to life has been a dream come true," said Orianthi, "it’s a beautiful amp and it really reflects my eccentric personality!"
The platinum-selling virtuoso guitarist has gained a reputation as a multi-faceted artist, singer, songwriter and first-call collaborator. With roots planted firmly in hard rock, her latest single "First Time Blues" featuring Joe Bonamassa and "Ghost" are a combination of blues-based riffs and memorable melodies. She is currently on tour in the USA and working on a new album to be announced soon.
The Oriverb, inspired by the Rockerverb 50 MKIII Combo Neo, is voiced to embody Orianthi’s unique sound. It has a cleaner mid-range warmth that reflects her classic blues and rock tone, whilst retaining all of its desired variable distortion.. A tweaked EQ gives the Oriverb creamy, sparkly cleans and saturated screaming overdrives.
Fitted with a pair of lightweight, British-made Celestion Neo Creamback speakers and EL34 valves, the Oriverb has that definitive British flavour with incredibly versatile tone shaping abilities. The new combo also boasts a much-loved footswitchable spring reverb, built-in attenuator for maxed out textures at neighbour-friendly volumes, switchable power options and a near-transparent, valve-driven effects loop. The cabinet is crafted using the highest quality 15mm Baltic birch plywood, making it one of the lightest 2 x 12” speaker cabinets on the market and is finished in an embossed white Tolex, selected by Orianthi.
"We created this to be something very special, unique, something that when people plug into it, whatever guitar they are gonna use through this, it is going to amplify their personality," explained Orianthi, "being able to bring something to life that I feel a lot of people are really going to enjoy has been a real honour. I am so proud of this amp and I can’t wait for people to check it out."
To find out more about the new Oriverb, plus all the other Orange Amplification
products, please go to orangeamps.com.