I know guitar players of all kinds: bedroom shredders, hobbyists, semi-pros, and pro players, and they all have something in common: They all have more than one guitar. With that in mind, we're presenting three mods—divided into beginner, intermediate, and advanced levels—for three common guitars: Telecaster, Stratocaster, and Les Paul.
These three circuits are very different and require very different work to mod them. But they are versatile, and once you get the basic knowledge down, you can apply it to other guitars. For example, you can use the Telecaster circuit mods for all electric guitars with two pickups and a master volume/master tone configuration. The Les Paul circuit can also be used for SG, 335, 339, and many more guitars with two pickups with a volume and tone control for each pickup.
We'll kick this off with beginner mods, requiring only some basic soldering skills (click here if you need a primer on this). Vintage wiring, or '50s-style wiring, is a good starting place for anyone interested in dipping their toes into DIY modding. Parts-wise you'll only require some basic soldering equipment and some small pieces of wire. Let's get started!
The Mod: '50s Wiring
The Gibson '50s wiring is sometimes also called "Vintage Wiring" or even "'50s Vintage Wiring," but it all refers to the same thing—the way Gibson wired up their electric guitars in the late '50s, including the legendary 'Burst Les Paul guitars as well as SGs and 335s of the era. Though it was forgotten for many decades, the method seems more popular now than ever before, garnering a lot of attention in forums and with plenty of myths and urban legends surrounding it.
Electronically, there is nothing too special about this wiring. It simply connects the tone pot to the output of the volume pot (middle lug) instead of the input. So what is so special about it then, you ask? The '50s wiring will have three major influences on your tone:
1. The overall tone gets stronger and more transparent. It's difficult to describe, but it's more “in your face." The tone of late-'50s 'Burst Les Pauls has been described as having a “bloom"—the way the notes open up after leaving the guitar—that is hard to achieve without this wiring.
2. The typical treble loss that occurs when rolling back the volume is lessened and both the volume and tone controls react smoother and more evenly, without the typical hot spots. As a result, it's easier to clean up an overdriven amp by simply rolling back the volume on your guitar a bit.
3. The tone and the volume controls interact with each other in a way similar to some Fender tube amps. When you change the volume, the tone changes a little bit as well, and vice versa. It may feel strange in the beginning, but it doesn't take long to get used to.
As with any of the mods we'll be doing, it's a matter of personal preference, but this one is easy to do—and invisibly reverse—so it's worth a try. Though the wiring is based off of vintage Gibsons, you can rewire any guitar this way to similar effect.
Telecaster (click for standard Tele original wiring diagram)
This is, by far, the simplest mod I can imagine—swap one wire and you are done! If you've never worked in your guitar before, this is a great place to start. There are no special considerations or quirks, just swap the wire marked in red below and your Tele is converted to '50s wiring.
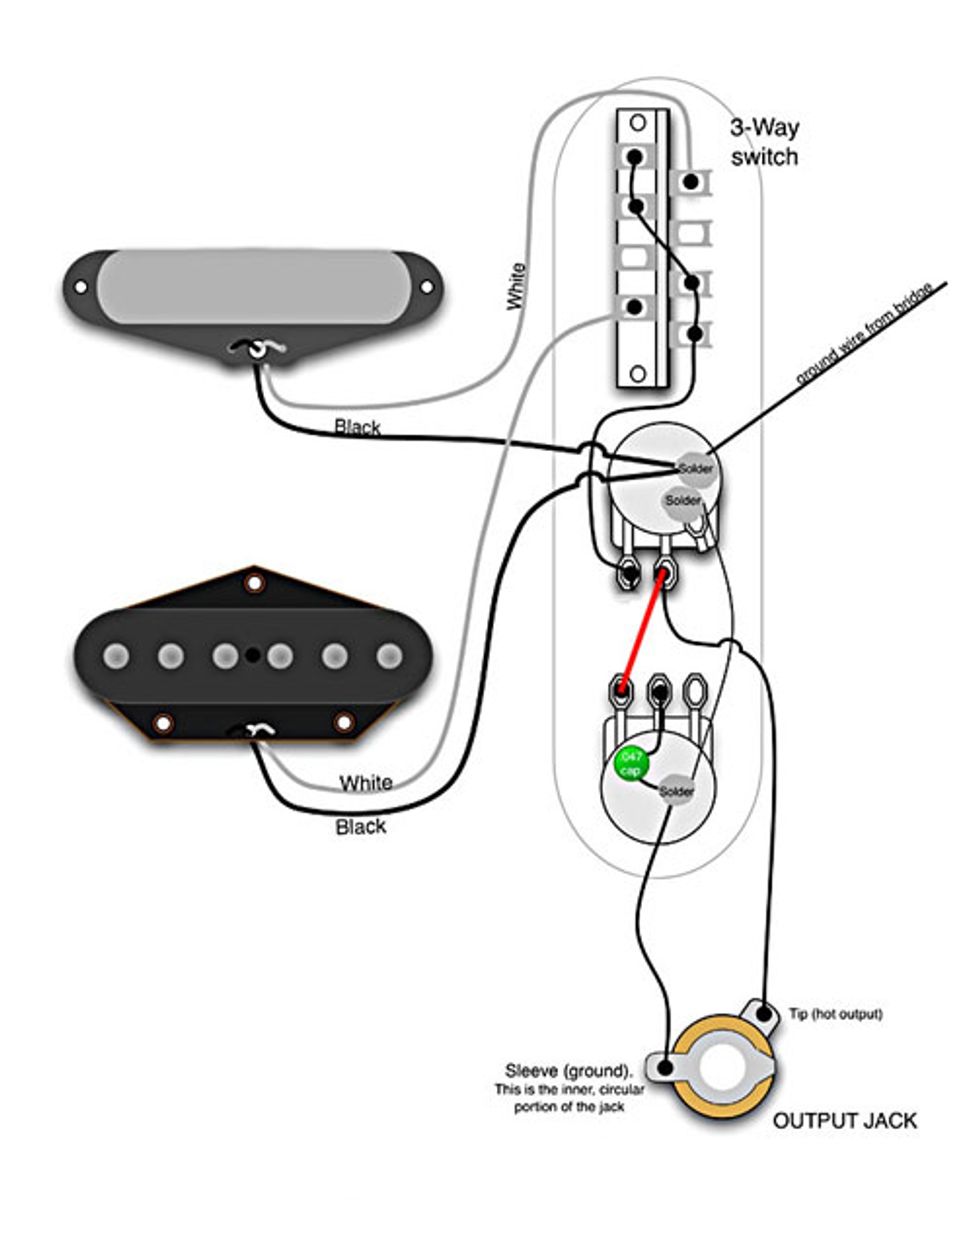
Wiring diagram courtesy of Seymour Duncan Pickups and used by permission. Seymour Duncan and the stylized S are registered trademarks of Seymour Duncan Pickups, with which Premier Guitar magazine is not affiliated.
Stratocaster (click for standard Strat original wiring diagram)
Setting up the '50s wiring on a Stratocaster is not much more complicated than on a Telecaster, but because of the somewhat special arrangement of a master volume plus two tone controls, it requires changing an additional wire. Again, there are no special considerations, so solder along and enjoy the new tones from your Strat.
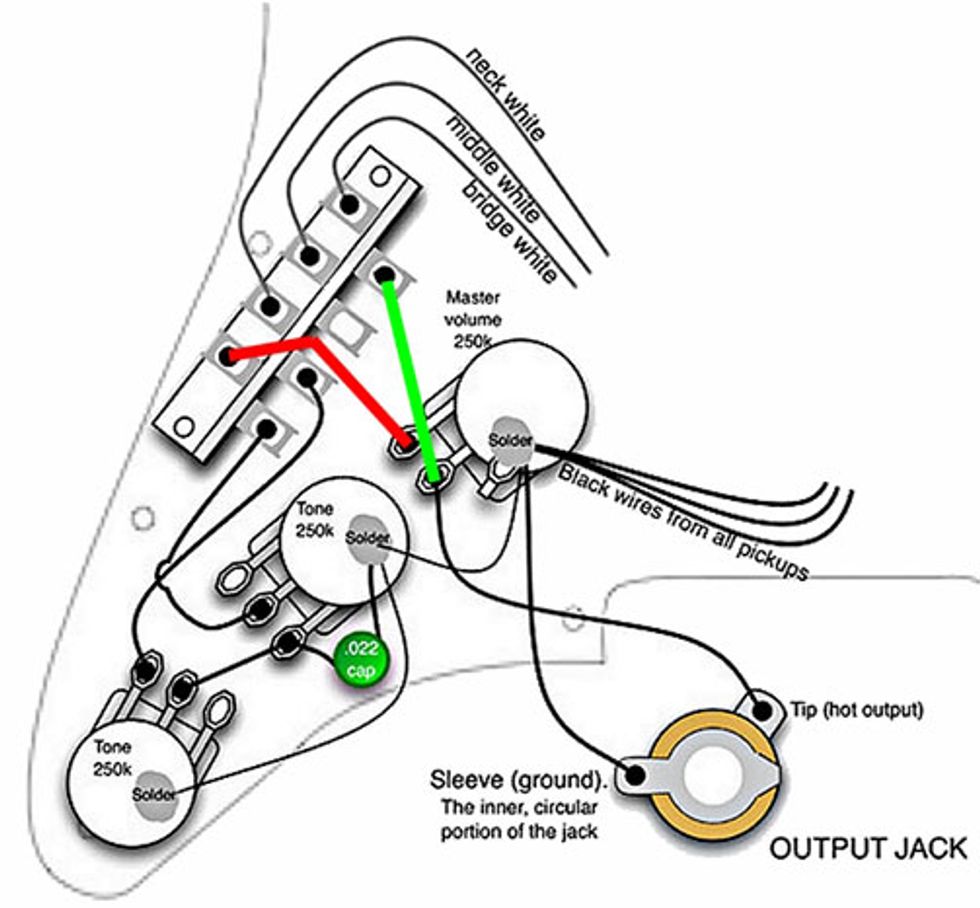
Wiring diagram courtesy of Seymour Duncan Pickups and used by permission. Seymour Duncan and the stylized S are registered trademarks of Seymour Duncan Pickups, with which Premier Guitar magazine is not affiliated.
Les Paul (also SG or ES-335) - Click for standard Les Paul wiring diagram
The original '50s wiring on a Les Paul is basically identical to the Telecaster mod, with each pickup sporting a volume and a tone control. Because you have two pickups with this arrangement, you'll have to swap two wires instead of one, but it's still pretty simple. Most Les Paul, SG, and 335 players with PAF or PAF-flavored pickups prefer this wiring because it gives a more vintage tone and it is one of the key components for the so-called "bloom" we talked about earlier. Give it a try: I wouldn't be surprised if you never converted back to the modern wiring you had before.
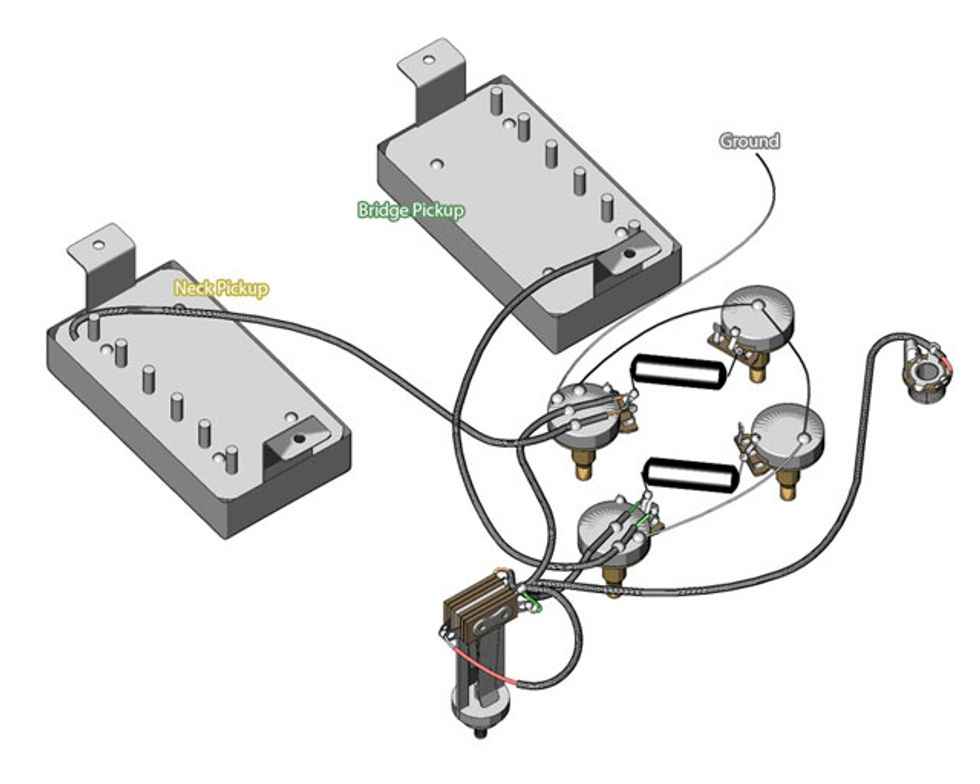
Diagram by Nick Boogers
I hope you were able to test the modding waters successfully and unlock some new tones from your favorite axe. Check back next week for our intermediate mods for Tele, Strat, and Les Paul. We'll be setting up an additional “out of phase" pickup setting, so stay tuned!
Dirk Wacker lives in Germany and is fascinated by anything related to old Fender guitars and amps. He plays country, rockabilly,
and surf music in two bands, works regularly as a session musician for a local studio, and writes for several guitar mags. He's also a hardcore guitar and amp DIY-er who runs an extensive website—singlecoil.com—on the subject.
Now that you've gotten your feet wet with a dead-simple guitar mod, let's move on to the intermediate level. For this mod, we'll be adding an out-of-phase option to Strat, Tele, and Les Paul. In addition to the wire and soldering equipment required for our previous mod, you'll also need a 2PDT switching device like a mini toggle or a push/pull or push/push pot with a 2PDT switch. There are additional considerations for this mod depending on which guitar you're looking to mod, so we'll address those in each proper section.
The Mod: Out-of-Phase
The out-of-phase mod is most common on Strats, and there are a lot of misunderstandings about exactly what the term “out-of-phase" means. When we are talking about "out-of-phase" sounds on a Strat, we are not talking about positions 2 and 4 of the 5-way pickup selector switch. It's a common misunderstanding that these positions are out-of-phase, but they're still in phase. Another common misunderstanding is that physically rotating a pickup 180 degrees (think Jimi Hendrix) will put it out of phase. You will achieve a different tone, especially with a pickup with staggered pole pieces, but it's not out of phase.
My favorite misunderstanding is about the basic structure of an out-of-phase sound: it is important to understand that on a guitar with two pickups you don't have to use two phase switches because reversing the leads of both pickups would put them back in phase again, and you will receive the stock sound. And putting a single pickup out of phase will also have no audible result—playing a bridge pickup alone out of phase will sound the same as in phase. You can only get an out-of-phase sound when you use two pickups together, one of them out of phase—period!
When two pickups are in phase, they work together and reinforce each other. When they are out of phase, the two pickups are working against one another and the resulting sounds are the "leftovers" from these cancellations. The closer the two pickups are, the greater the cancellations, and the sound is thinner and has less volume, so the neck and bridge pickups are usually the best choice for setting an out-of-phase mod.
What does it sound like? Basically, it's a thin, inside-out, squawky kind of sound—two pickups that normally sound full and rich turn into a thin and shrill-sounding couple. You may think, “Why would I want that?" Well, it's great for reggae or funk, where you need a thin sound, and it will cut through a lot of effects or distortion that would otherwise muddy up your tone.
A great example of this sound is Brian May's Red Special. His guitar offers individual out-of-phase switches for each pickup, and he used the sound on a lot of the Queen recordings. James Burton is another famous guitarist who said once that he discovered the sounds on accident on his late '50s Tele while playing with Ricky Nelson. He found out that he could move the 3-way selector switch between the bridge and neck position to get a thin out-of-phase sound from his Tele that can be heard on famous Nelson recordings like “Travelin' Man" and “Fools Rush In." Peter Green is another musician who made use of out-of-phase sounds, but on his famous Les Paul.
When we are talking about out-of-phase options here, we are always talking about electrical out-of-phase. There is also magnetic out-of-phase, but most of the time this is a factory accident or the result of a sloppy repair work on a pickup. Don't confuse magnetic out-of-phase with reverse-wound/reverse-polarity either—this is yet another configuration!
So let's heat up the soldering iron and put some pickups out of phase. In order to achieve this sound (and to return to a regular sound), use a DPDT phase reversal switch (see diagram below). Wiring the phase switch is fairly simple: unsolder the two pickup leads, solder the phase switch "out" leads (hot and ground) to the exact same spot where the pickup leads were, and solder the pickup leads to the "from pickup" terminals on the phase switch as shown below. Mount the switch, close up the guitar, and start enjoying the new sound you have just created! Naturally, you can also use a push/pull or push/push pot for this.
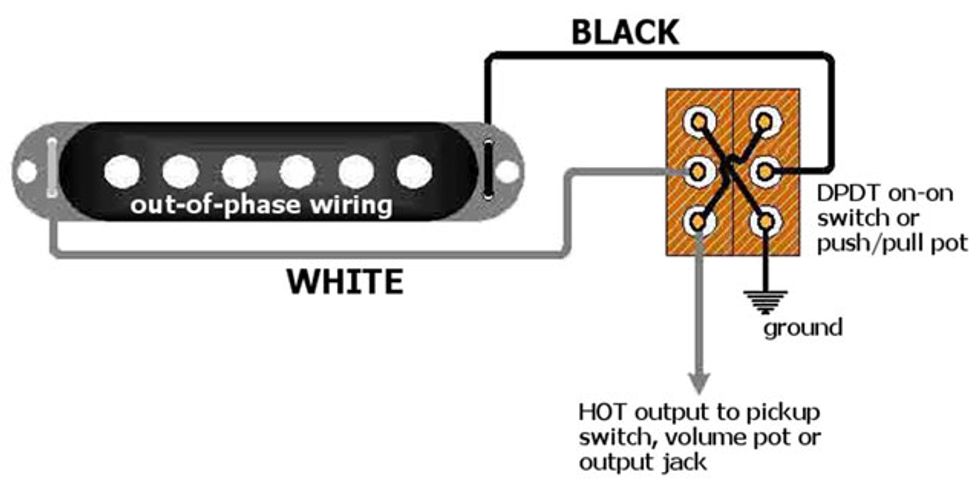
Wiring diagram courtesy of Seymour Duncan Pickups and used by permission. Seymour Duncan and the stylized S are registered trademarks of Seymour Duncan Pickups, with which Premier Guitar magazine is not affiliated.
This is the basic structure for out-of-phase wiring on all guitars: the pickup you want to put out of phase is connected to the DPDT phase reversal switch the way shown above, running the two output wires from the switch to ground and to the pickup selector switch, volume pot or directly to the output jack, depending on the guitar. So the phase reversal switch is additionally inserted in the normal wiring of the pickup.
There are some things to consider when setting up a phase-reversal option, and here are some guidelines.
Stratocaster
There really aren't many special considerations on a Strat—you should connect the middle pickup to the phase-reversal switch, simply because the middle pickup is always involved when two pickups are used together on a Strat, so you will receive two new sounds with only one switch: bridge and middle pickup together out of phase or middle and neck pickup together out of phase. If you also have the "7-Sound" mod on your Strat and you want the bridge and neck pickup together out-of-phase, there is no way around a second phase-reversal switch. One is for the middle pickup, and the other for the bridge or neck pickup, it doesn't matter what pickup you decide on.
Telecaster
Setting up the out-of-phase option on a Tele is fairly straightforward as well, but there are a few additional considerations. In general it does not matter if you connect the bridge or the neck pickup of a Telecaster to the phase-reversal switch, but you will have to unground and reground one of the pickups.
If the pickup's negative wire has continuity with any metal parts—say, the cover or the frame—you must break this connection to separate the metal cover or frame from the coil's negative wire. When you put a pickup out of phase, the negative side of the pickup's coil is now on the positive side of the guitar's circuit. This means that a metal cover or frame (mounting screws, springs, pole pieces, etc.) will have continuity with the hot side. This will make the pickup more susceptible to hum, and it will have the potential for unexpected and unwanted noises if you touch the pickup or its screws while playing. If you accidentally hit it with the strings (that are grounded through the bridge), it can also mute the whole guitar, so you should perform the out-of-phase mod always with the neck pickup of a Telecaster, simply because most players are less likely to touch the neck rather than the bridge pickup while playing. Another benefit is that normally the neck pickup of a Telecaster is also easier to mod—most Tele bridge pickups have a bottom plate with continuity to the negative wire, and you would have to remove the strings and the entire bridge to work on this pickup.
On typical Telecaster neck pickups, there is a metal cover. One of its mounting tabs, folded under the coil, usually has a small, short jumper to the eyelet on the pickups chassis that connects the coil to the negative wire. To unground and reground the cover, all you need to do is carefully clip that little jumper, breaking the connection, and then add a new insulated wire from the cover's tab into the control cavity, where you can attach it to any given ground spot, like the back of a pot. After this little mod, the cover will always stay on the shielded/grounded side of the circuit, providing protection against hum and noise.
Les Paul (or SG/335)
An out-of-phase wiring for Les Paul guitars is a very popular and common modification. The difficulty level depends on the pickups installed in your axe. A lot of humbuckers have four-conductor wiring (beginning and end of both coils) plus a fifth conductor, typically a bare wire running inside the insulated cable that is the ground/shield connection to the chassis of the pickup, which is completely independent and insulated from any wires from the coils. If this is the case with your pickups, simply follow the color code from the manufacturer and solder along.
Many traditionally made humbuckers sport only a two-conductor wiring with a braided/external shield—hence the term “braided shield wire." The external braided conductor is typically soldered to the pickup's metal chassis and used as the ground/shield plus the coil's negative wire together. Now you have a pickup where the metal chassis, cover, screws, and also the entire length of the exposed braid on the wire has continuity with the ground of the guitar. This is not desirable at all. If it's a humbucker without a metal cover or a P-90, you can simply use some heat-shrink, latex, or cloth tubing to insulate the entire length of the exposed braid. While the mounting screws and pole pieces are still connected to the hot side, it's better than stock.
If you have a pickup with a metal cover, it becomes more complicated. The only way to completely fix the problem is to replace the stock wiring with a four-conductor wiring. This is far more complex than we can get into here, and there's a high likelihood you will destroy your pickup if you're not very experienced. Luckily, many pickup companies are offering this service at a decent rate. Alternately, you could simply replace the stock pickups with replacement pickups that already offer the four-conductor wirings from the start.
Now that we've gotten through our beginner and intermediate mods, we've finally made it to the fun stuff. We'll be talking about series/parallel switching in general and how to implement this feature in your Strat, Tele, and Les Paul. Many considerations for this mod were covered in the previous mod, so you'll benefit from what you learned last time. All you need for the series/parallel switching mod is a DPDT switching device and to move some wires. Sure, it's more wires than the previous mods, but you can do it.
The Mod: Series Wiring
This parallel/series switching mod is about wiring two pickups, regardless of what type they are, together—not parallel/series switching of humbuckers, so take care not to mix it up.
On most guitars with more than one pickup installed, you have the choice to play through any one pickup by itself or through combinations of the pickups. The standard way to connect multiple pickups together is to wire them in parallel, which is the industry standard today. This is also the tone our ears know from countless records, when someone uses the in-between pickup positions—bridge and middle or middle and neck—of a Strat. Only a few guitars use series wiring for their pickups as a standard, the most popular examples are the Brian May “Red Special" and, of course, almost all Danelectro guitars.
Why would you want to wire your pickups in series? There are a lot of good reasons for this. If you're looking for more volume and midrange out of your pickups, the parallel/series switching may be the perfect option for you. As mentioned before, parallel wiring of two pickups is what you are used to by now. It's used in most guitars to add transparency and clarity to the tone. Series wiring of two pickups produces a longer path with increased resistance, adding volume and preventing the highest frequencies from getting through, allowing more low- and midrange to pass through the circuit. With series wiring the output of one pickup goes into the input of another pickup, while with standard parallel wiring each pickup takes its own path to the output. So the series wiring will be noticeably louder, with prominent low- and midrange—a perfect combination to drive any tube amp into saturation without any external help of a booster. Series wiring on a Telecaster is a standard mod, but series wiring is not very common on Strats and Les Pauls.
Please note that series wiring has no effect when one pickup is played alone. In this case, parallel and series wiring will sound the same. The series wiring only takes effect when a pickup combination is engaged—same as with the out-of-phase wiring from the intermediate mod.
Here is an example, to show the difference between standard parallel and series wiring of two pickups:
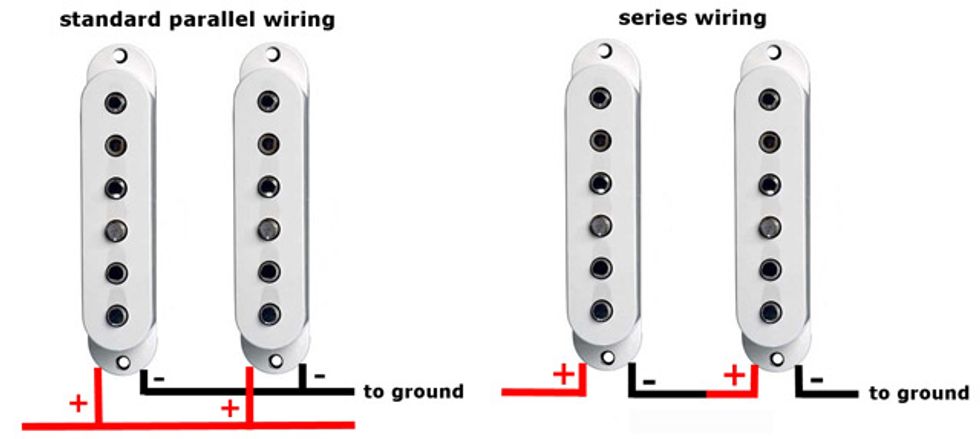
In the first diagram the two pickups are wired in parallel, so all of the pickup inputs are connected together, and all of the outputs are connected together. This is one of the main reasons why a Strat or Tele usually has a very bright tone—this wiring allows the signal from each pickup to reach the output jack by the shortest possible route. The result is that the high frequencies reach the output jack almost unchecked, giving your Strat and Tele the sparkling sound qualities we all love so much.
In the second diagram, the two pickups are wired in series. The theory behind series wiring is that the ground wire of one pickup is connected to the hot wire of the other pickup. They become a kind of compound-pickup, one ground and one hot for both. When wired in series, the pickups' impedance (resistance) is added together and the output is very high. If one of the involved pickups is a reverse wound/reverse polarity type (aka “RWRP") you will receive the same humbucking effect as with the pickups wired in parallel, so you won't notice a change.
When pickups are wired in series, a good portion of the treble frequencies are lost because the long pickup wire works like a resistor. As you know from guitar cables, the longer the wire, the higher the resistance, and the more treble gets lost. Any resistor in the signal path will suppress the signal. In addition, higher frequencies are attenuated more by a resistor than lower frequencies. This is the reason for the prominent low and midrange when pickups are wired in series. The signal has to travel through twice as much pickup wire to reach the output jack compared with parallel wiring.
Now you know why series wiring produces a different tone with less high-end, but why is it louder, ending up in a beefy, meaty tone? Let's have a look at the output signal of your guitar and assume that each pickup puts out 100 percent of its power. When wiring two pickups in parallel, each pickup loses 3/4 of its output! The total parallel output of the two pickups will be 25 percent plus another 25 percent from the second pickup, resulting in a total of 50 percent. This is the reason why pickup combinations don't sound as loud as a single pickup played individually. With the same pickups wired in series, the output of the first pickup will be the full 100 percent plus another 100 percent from the second pickup, resulting in a total of 200 percent. Because the two pickups are wired one into another, the output from the first pickup is added to the output from the second one, resulting in a much louder tone.
But don't worry—this doesn't mean that the two pickups wired in parallel are only half as loud as a single pickup, or that the two pickups wired in series are double as loud as one pickup. Our human hearing doesn't work this simple way, but I don't want to bore you to death with all of that theory.
Here is a general schematic of how to wire two pickups in parallel, with the option to put them together in series as well.

The switch is a normal DPDT (aka "2PDT"). In the down position, both pickups are connected together in standard parallel wiring for maximum chime and twang. With the toggle in the up position, the ground of pickup No. 2 is lifted and no longer connected to ground, instead it is connected to the hot output of pickup No. 1, with the red jumper-wire on the toggle switch making the connection. It's the same principle as in the intermediate mod with the out-of-phase switch. The pickups have to be connected via the additional series/parallel switch and from there to the rest of the circuit, where everything else stays the same.
Stratocaster
There is really nothing special to consider on a Strat, you will have to decide which of the two pickups you want to connect in series: the bridge plus the middle or the middle plus the neck pickup. Usually this mod sounds best with the bridge and the middle pickup on a Strat. With the middle and the neck pickup, the sound on many Strats can get muddy and boomy—something you don't want for a solo part. If you want to have the possibility to use both pickup combinations in series and parallel wiring, the easiest way is to use two switches, but as I said, the middle plus neck combination in series is not very desirable on a Strat.
Telecaster
Setting up the parallel/series option on a Telecaster is not too special either, but there are a few more things to keep in mind. As shown in the intermediate part for the out-of-phase switching, you will have to unground and reground one of the pickups, preferably the neck pickup. We described this in detail previously, but to summarize: on a typical Telecaster neck pickup, there is a metal cover. One of its mounting tabs, folded under the coil, usually has a small, short jumper to the eyelet on the pickup's chassis that connects the coil to the negative wire. To unground and reground the cover, all you need to do is carefully clip that little jumper, breaking the connection, and then add a new insulated wire from the cover's tab into the control cavity, where you can attach it to any given ground spot (e.g., the back of a pot). Don't forget to insulate your new soldering spot with some tape or heat-shrink tubing to avoid any unwanted connections.

Besides using a series/parallel switch on a Telecaster, another option is available for this guitar breed, the so-called "4-way switch," available from numerous companies. Besides the normal 3-way switch functions, this offers a fourth switching position, ideal for series connection of both pickups. Using such a switch as a substitute for a standard 3-way switch has become a standard mod for a Telecaster, and I recommend it. On a Telecaster, this additional switching position sounds really good and is a perfect addition to the Telecaster's standard tonal palette. Here is the wiring diagram and how to use the 4-way switch. Remember, you will have to first mod your neck pickup as described above.
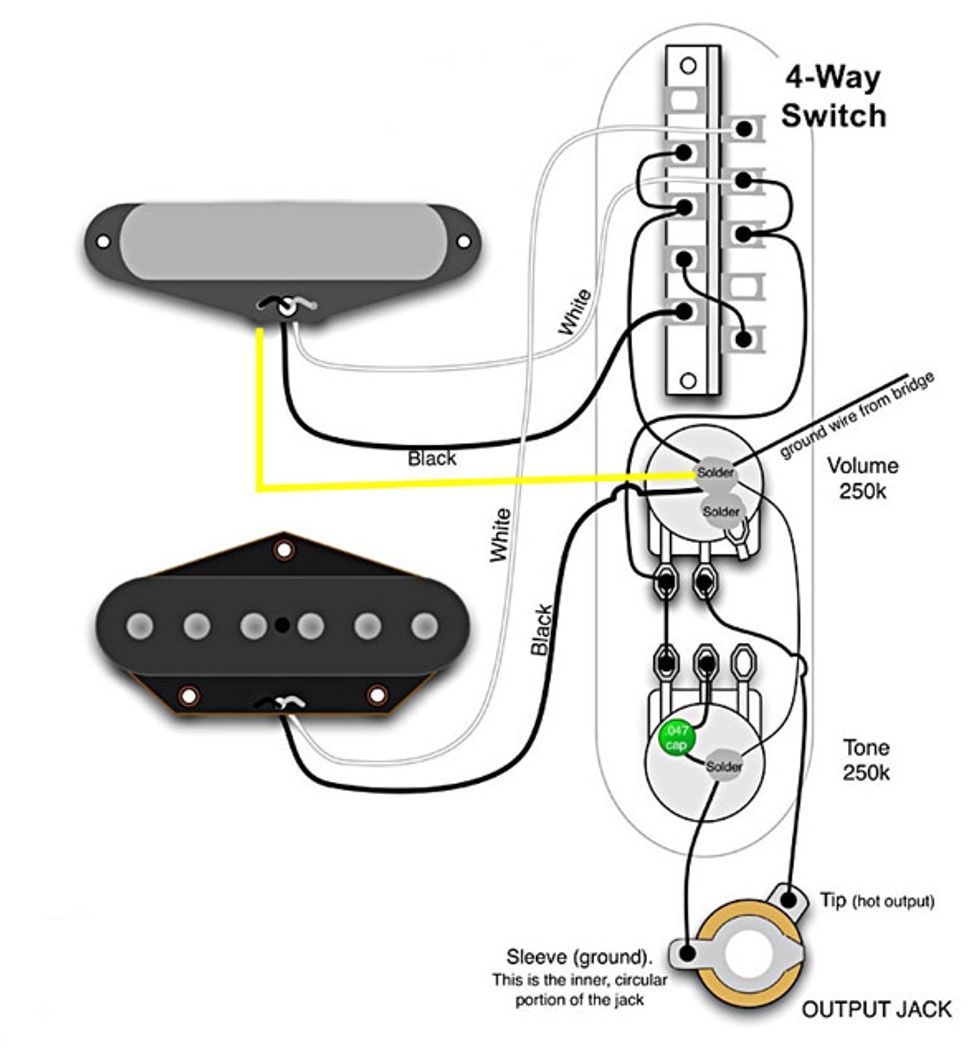
Wiring diagram courtesy of Seymour Duncan Pickups and used by permission. Seymour Duncan and the stylized S are registered trademarks of Seymour Duncan Pickups, with which Premier Guitar magazine is not affiliated.
Les Paul (also SG or ES-335)
Series wiring for Les Paul guitars is not seen very often. The main reason is that the tonal result will depend a lot on the pickups, and can vary from pretty cool to completely useless. If you have vintage-flavored, low-output PAF style humbuckers or P-90/P-94 pickups in your guitar, chances are good that series wiring of them will sound excellent. If you have modern high-gain humbuckers in your guitar, the result may be less than appealing—too much bass and too muddy. Remember, when you have two humbuckers with 14k output each in your guitar, this will result in 28k series output, which is close to insane output. It's always worth a try, though—this is an easy mod to reverse.
How easy or how difficult it is to pull off with your Les Paul, depends on the pickups you have in your axe, with the same considerations as in the intermediate out-of-phase part. If you have single-coil P-90/P-94s or humbuckers with 4-conductor wiring, simply follow the color code from the manufacturer and solder along.
If you have a two-conductor wiring on your humbucker and/or braided shield wiring, you will have to consider some more things, described in detail in the previous mod. Again, if you don't have the skills and tools to convert your pickup to 4-conductor wiring, leave it alone and get this work done by someone who knows how to do it, or get a replacement pickup with factory installed 4-conductor wiring.
That concludes our “3 Mods for 3 Guitars" series, from easy to difficult. I hope you had some fun and found some useable and doable mods to enhance your personal tonal palette!


![Rig Rundown: Russian Circles’ Mike Sullivan [2025]](https://www.premierguitar.com/media-library/youtube.jpg?id=62303631&width=1245&height=700&quality=70&coordinates=0%2C0%2C0%2C0)