Matamp''s lunchbox amp offers ''70s rock tones with reasonable volume
Matamp Amplification has quite a history. The tale begins with German radio engineer Mat Mathias, who fled Germany for England during World War II when he was just a child. In 1945, he joined a radio repair business called Radio Craft, and which he eventually purchased. Mathias developed the first Matamp model—the Series 2000—in 1964. Like many guitar amps of the day, it incorporated ideas from contemporary hi-fi circuits. The Series 2000 gained a devoted following after Peter Green used one to record Fleetwood Mac’s “Albatross.” In 1968, Matamp’s most famous product, the 100-watt Orange Matamp, made its debut. Over the years, Matamp products have gained cult status among collectors and players. Though Mathias died in 1989, the company continues to build tube amps in a converted mill workshop in West Yorkshire, England.
In 2005, Matamp joined the low-wattage amp party with their MiniMat head, and in 2007 they updated the original design with a valve-driven (rather than chip-driven) boost and a Master Volume, and rechristened it the MiniMat II.
Take a Tour
Even by miniature amplifier standards, the 12" x 7 1/4" x 6 1/2" MiniMat II head is diminutive. Sporting one Edicron 6V6GT power tube and two JJ ECC83S preamp tubes, the head delivers four watts of power.
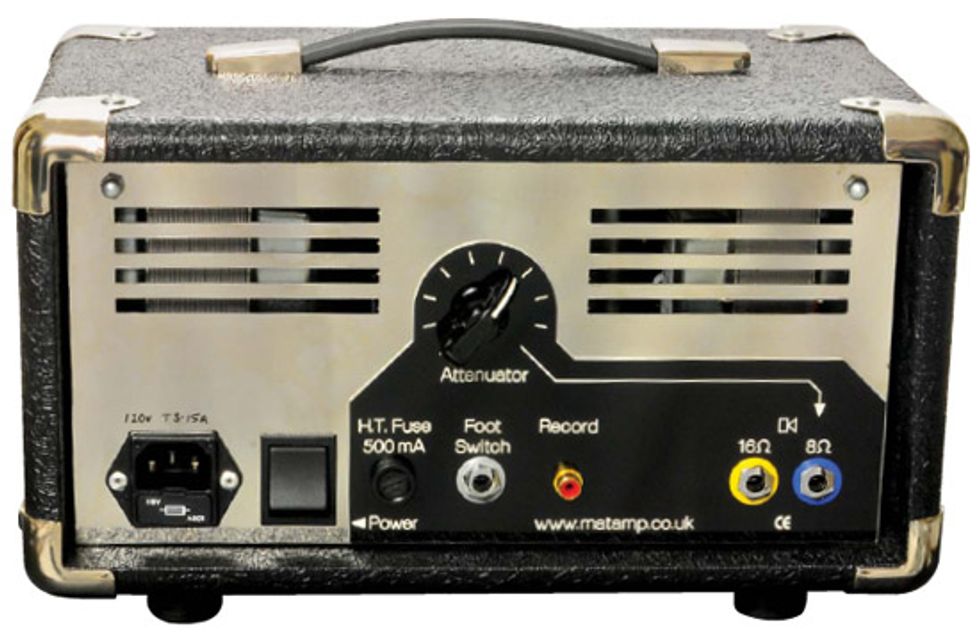
The MiniMat’s front panel offers a single input and four controls: Gain, Boost, Volume, and Tone. The Boost knob lets you preset additional gain and turn it on and off with a footswitch. The rear panel provides 16- and 8-ohm speaker outputs, a footswitch jack for the Boost circuit, a mono RCA direct out, and a handy power attenuator that’s wired to the 8-ohm speaker jack.
After eyeballing the exterior, I couldn’t resist peering inside. Sliding the chromed chassis out from the head shell, I inspected the component layout and milling, and was impressed by the impeccable workmanship. Matamp products are all handmade, and the company’s attention to detail really shows with the MiniMat II.
Pint-Sized Punch
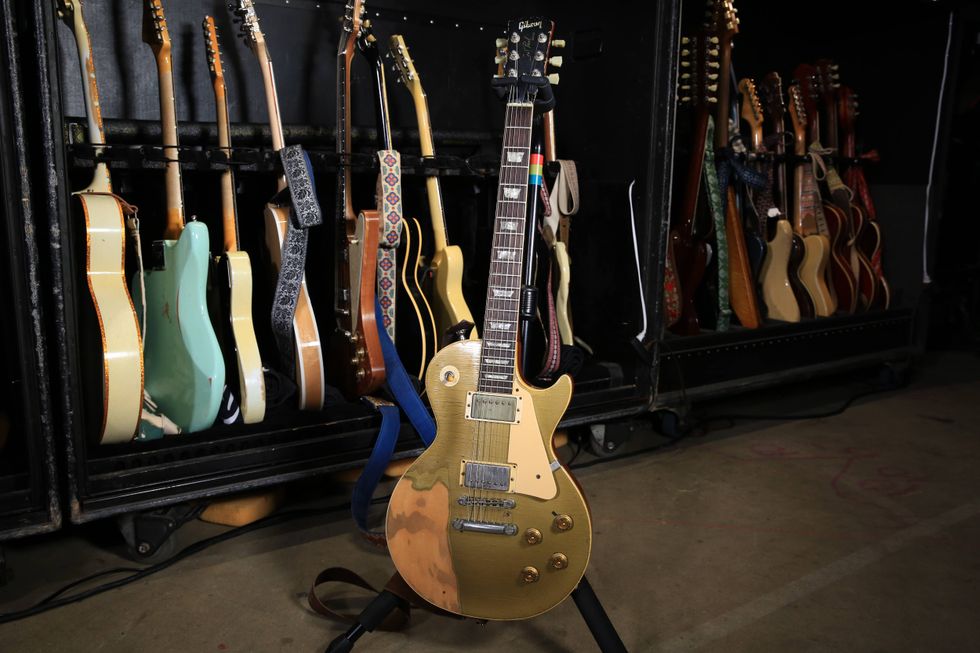
Plugging in a Gibson Les Paul Custom with Tom Anderson pickups, I began exploring the MiniMat II’s sonic palette. For my initial tests, I used a Matamp 112S cabinet, loaded with a single 25-watt Celestion G12M Greenback speaker. In short order, I was rewarded with superb, smooth tones reminiscent of several mid-’70s Orange heads I’ve had the pleasure of playing over the years. For those unfamiliar with that era of Orange models, the highs are very smooth and biting, and the strong, growling midrange is supported by a fuzzy, blooming low end. The MiniMat II captured this tone extremely well, though it lacked the thick, fuzzy lows. That’s not surprising, though, because you can only create that type of burly bottom by pushing a high-wattage amp through a speaker cabinet with several drivers. Because of this, the MiniMat II’s drive tone is compelling, but somewhat limited.
Kicking on the boost, I found some great overdriven lead sounds that reminded me of Paul Kossoff’s fat tone with Free. However, even with the boost engaged, the MiniMat II is not a high-gain, fire-breathing beast. In terms of preamp gain, I was reminded of older Supro combo amps.
If you’re a fan of Matamp tone and are looking for a big pristine sound, you’ll need to explore the company’s higher-wattage heads, such as the GT1. The MiniMat II doesn’t have the headroom to produce pristine clean tones at a significant volume. Even playing a Fender American Telecaster, I found it difficult to coax a tone out of the MiniMat II that didn’t have at least a little grit on it.
Cab Experimentation
One thing I’ve noticed playing low-wattage heads is that the cabinet you run them through dramatically affects the overall sound. In fact, with small amps, the cabinet seems to play a larger role in the sonic equation than it does with higher-wattage heads. The Matamp 112S cabinet with the G12M Greenback was a great match for the MiniMat II, because this semi-open cab delivers a warm, expansive tone. But after I plugged the MiniMat into a Krank Revolution Jr. 1x12, the sound became more defined and focused, with greater projection and aggression. This didn’t surprise me, given the Krank’s closed-back design and solid-poplar construction. If you get a chance to test the MiniMat II, I highly recommend experimenting with different cabinets, including Matamp’s closed-back models.
The Verdict
The MiniMat II has an astonishing ability to recreate early-’70s overdrive tones at reasonable volumes. Its lack of versatility might turn off some players, but in fairness, it isn’t designed to be a do-all amplifier. With its attenuator and line out, the MiniMat II is a great amp for recording distorted guitar tones. If you’re in the market for a studio head with a British accent, absolutely give this one a try.
Buy if...
you want to practice or record with great ’70s overdrive tones.
Skip if...
you demand versatility and/or higher volume.
Rating...
Street $990 - Matamp Amplification - matamp.co.uk |
Building upon the foundation of the beloved Core Collection H-535, this versatile instrument is designed to serve as a masterpiece in tone.
The new model features striking aesthetic updates and refined tonal enhancements. Crafted at the iconic 225 Parsons Street factory, home to other world-famous models like the H-150, H-157, and H-575 - the H-555 continues to exemplify the very best of American craftsmanship.
The Core Collection H-555 features a set of Custom Shop 225 Hot Classic Humbuckers, meticulously wound in-house with carefully selected components, and voiced to deliver added punch and richness while preserving exceptional dynamics and touch sensitivity. Seamlessly complementing the H-555’s semi-hollow construction, they blend warmth and woodiness with refined, articulate clarity.
The Core Collection H-555’s aesthetic has been elevated with multi-ply binding on the body, headstock, and pickguard. Its neck, sculpted in a classic ’50s profile, delivers effortless comfort and is adorned with elegant block inlays, seamlessly blending style with playability. Gold hardware complements the aesthetic, exuding elegance while presenting the H-555 as a truly premium and versatile instrument for the discerning player.
Available in Ebony and Trans Cherry, each Core Collection H-555 is beautifully finished with a nitrocellulose vintage gloss that features a subtle shine and gracefully ages over time. An Artisan Aged option is also available for those seeking an authentically well-loved look and feel, achieved through a meticulous, entirely hand-finished aging process. The new Core Collection continues Heritage’s tradition of world-class craftsmanship, offering a true masterpiece in tone and design for discerning players. Each guitar is shipped in a premium Heritage Custom Shop hard case.
Key Features
- Finest Tonewoods: Laminated highly figured Curly Maple (Top & Back) with solid Curly Maple sides
- Heritage Custom Shop 225 Hot Classic Humbuckers: Designed and wound in-house
- Headstock: Multi-ply bound headstock, featuring a Kite inlay, 3×3 tuners laser-etched with Heritage graphics
- Neck Profile: Comfortable ’50s C-shape for a vintage feel
- Bridge: Tune-O-Matic with aluminum stopbar tailpiece for enhanced sustain
- Made in the USA: Crafted at 225 Parsons Street
For more information, please visit heritageguitars.com.
Ariel Posen and the Heritage Custom Shop Core Collection H-555 - YouTube
Enjoy the videos and music you love, upload original content, and share it all with friends, family, and the world on YouTube.Watch the official video documenting the sold-out event at House of Blues in Anaheim. Join Paul Reed Smith and special guests as they toast to quality and excellence in guitar craftsmanship.
PRS Guitars today released the official video documenting the full night of performances at their 40th Anniversary celebration, held January 24th in conjunction with the 2025 NAMM (The National Association of Music Merchants) Show. The sold-out, private event took place at House of Blues in Anaheim, California and featured performances by PRS artists Randy Bowland, Curt Chambers, David Grissom, Jon Jourdan, Howard Leese, Mark Lettieri Group, Herman Li, John Mayer, Orianthi, Tim Pierce, Noah Robertson, Shantaia, Philip Sayce, and Dany Villarreal, along with Paul Reed Smith and his Eightlock band.
“What a night! Big thanks to everyone who came out to support us: retailers, distributors, vendors, content creators, industry friends, and especially the artists. I loved every second. We are so pleased to share the whole night now on this video,” said Paul Reed Smith, Founder & Managing General Partner of PRS Guitars. “I couldn’t be more proud to still be here 40 years later.”
With nearly 1,400 of the who’s who in the musical instrument industry in attendance, the night ended with a thoughtful toast from PRS Signature Artist John Mayer, who reflected on 40 years of PRS Guitars and the quality that sets the brand apart. “The guitars are great. You can’t last 40 years if the guitars aren’t great,” said Mayer. “Many of you started hearing about PRS the same way I did, which is you would talk about PRS and someone would say ‘They’re too nice.’ What’s too nice for a guitar? What, you want that special vibe that only tuning every song can give you on stage? You want that grit just like your heroes … bad intonation? The product is incredible.”
Be sure to locate your sample library where it can be quickly referenced on your DAW.
Improve your recordings using your own samples. Bryan Clark, house producer at Nashville’s Blackbird Studio, tells you how to take the final steps in building your own sample library.
Mastering the sample import process in your chosen DAW can significantly enhance your creativity and streamline your workflow. With a clear understanding of the tools and techniques available, you will be better equipped to bring your musical ideas to life and make your productions stand out.
This month, we finish up a three-part series on creating your own sample libraries. In this final installment, I’m going to give you the basic ways to import your samples into various popular DAWs. Each one has its unique workflow and user interface, but the fundamental process remains very similar. This Dojo guide will cover how to import samples into Ableton Live, LUNA, Logic Pro, Pro Tools, and Studio One.
Ableton Live
Steps to Import Samples
Drag and Drop: Simply locate the sample file in your computer’s file explorer, then drag and drop it directly into an audio track in the session or arrangement view.
Browser Window: Use Ableton’s built-in browser (on the left-hand side). Navigate to the sample’s location on your hard drive, then drag it into the workspace.
Create a Simpler or Sampler Instrument: Drag the sample into a MIDI track with Simpler or Sampler loaded. This allows you to trigger the sample using MIDI notes.
Tips: Use the warp feature for time-stretching and syncing samples to your project’s tempo.
Organize your samples into collections using the “Add Folder” option in the browser.
LUNA
Steps to Import Samples
Drag and Drop: Drag the sample from your file explorer directly into the timeline. Then hold the CTRL key down, click on the end of the loop, and drag it to the length it needs to be.
Browser/Workspace: Use the media browser to navigate to your sample’s location on your hard drive. Drag it into an audio track in your session.
Audio Track Import: Right-click on an empty area in the timeline or a track and select “Import Audio” to locate and add your sample.
Tips: Use LUNA’s built-in varispeed capabilities to match your sample to the session’s tempo.Logic Pro
Steps to Import Samples
Drag and Drop: Drag the sample from the Finder directly into an audio track in the workspace.
File Browser: Use the file browser (accessible via the media sidebar or “F” key) to locate and drag samples into the timeline.
Quick Sampler: Drag your sample onto a MIDI track with the Quick Sampler plugin loaded. This lets you play the sample chromatically.
Tips: Use Logic’s flex time feature to sync samples to your project’s tempo. Organize samples into Logic’s library for quick access.Pro Tools
Steps to Import Samples
Import Audio Dialog: Go to File > Import > Audio; then locate your sample and click “Convert” or “Add” to bring it into the session.
Drag and Drop: Drag the sample directly from your file explorer into an audio track.
Workspace Browser: Use the workspace (accessible via Window > New Workspace) to locate your sample. Drag it into your session.
Tips: Use the elastic audio feature for tempo matching and pitch adjustments.
Place your samples into playlists for efficient access during editing.
Studio One
Steps to Import Samples
Drag and Drop: Drag your sample directly from your file explorer into the timeline or browser.
Browser: Open Studio One’s browser (on the right-hand side), navigate to the folder containing your sample, and drag it into your project.
Sampler Track: Drag the sample onto a MIDI track, and use the Sample One sampler for additional manipulation.
Tips: Enable the “Stretch Audio Files to Song Tempo” option in the browser for automatic tempo synchronization. Create sample folders within Studio One’s browser for quick access.General Best Practices
Regardless of the DAW you use, it is important to maintain a smooth and efficient workflow. Organize your sample library with clear folder names and categories to make locating files easy (see last month’s installment for detailed strategies). Where possible, learn DAW-specific shortcuts for importing and editing samples to save time. Always check if your DAW offers a feature to sync the sample’s tempo to your project to ensure seamless integration. Finally, regularly back up your sample collection to avoid losing important audio files and preserve your creative assets! Seriously. Do it now.
Next month, we’re off to “console” land and I’ll be investigating console emulations (hype or not?), summing bus processors, and more to give you a more “studio” sound. Until then, blessings and namaste.
Stretching the boundaries of reverb’s realm through dynamic and pitch control.
Nice core reverb sounds. Invites cool compositional and arrangement directions. High quality.
If you lack patience, it will be hard to unlock its coolest secrets.
$329
Gamechanger Audio Auto Reverb
gamechangeraudio.com
When the first Moog synthesizer appeared, it freaked out a lot of musicians—not least for the way it blurred the divisions between instruments and their roles. Was it percussion? A keyboard? A reed instrument? Many effects makers build from this philosophical foundation. The Latvian company Gamechanger often seems to revel in it—an attitude that’s manifest in the company’s Auto Series pedals, which includes the Auto Reverb.
There’s no reason you can’t use the Auto Reverb in a very straightforward fashion. The plate, spring, and hall settings are all very nice digital representations of their analog inspirations—and I’d be perfectly happy playing an instrumental surf set with the spring mode, for instance. But because you can control the parameters like the reverb’s level, decay, tone, and the filter with changes in pitch and dynamics, the Auto Reverb can function in highly orchestral ways, transforming itself from subtle to outlandish as a musical piece shifts in intensity or rises from low to high keys toward a blurred, hyper-spacious climax. While these attributes make the Auto Reverb a great fit for prepared guitar and conceptual pieces—and invites many themes and compositional ideas within those forms—it can just as easily be configured to create an especially dynamic and dramatic pop song arrangement on stage or in the studio that might otherwise be relegated to automations within a DAW. It’s fun to use, if not always intuitive. But knowing its ways can expand your musical options significantly.