
Chops: Intermediate
Theory: Beginner
Lesson Overview:
• Investigate old-school soul rhythms pioneered by the likes of Curtis Mayfield.
• Learn how to craft melodic phrases on a single string.
• Understand how to effectively choose notes that outline the changes.
Click here to download a printable PDF of this lesson's notation.
John Mayer has earned the music world's respect as a modern master of blues, rock, and pop guitar. An adroit musician who can combine these worlds in a distinctively original style, he also unapologetically displays a variety of strong influences from the greats.
In this lesson, we'll learn key aspects of Mayer's rhythm and lead playing approach. We'll develop a solid foundation in his soulful rhythm guitar style, and also investigate several of the ways he'd approach soloing over some basic chord progressions.
Rhythm Guitar
To explore Mayer's take on rhythm guitar, you'll need to get comfortable with thumb-fretted chords. These are the same shapes that you might already know from playing the music of Mayer's prime influences, specifically Jimi Hendrix and Stevie Ray Vaughan. If these chord voicings are new to you, here's a primer that introduces the chords that you'll need. Depending on your hand size, you might experience varying degrees of difficulty. Recognize that any way you can fret with the thumb is acceptable—it simply needs to work. You don't need to fret with the thumb's tip, in fact, most people use the inside areas near the first joint.
Learn the Chord Forms
In the series of diagrams below, you can see the various shapes that Mayer favors. The first shape shows the full barre-chord form, and while it's not used in this style, it reveals the basis for constructing the various smaller shapes.
The second shape shows the note you'll want to practice fretting with the thumb. An important additional concept is actually muting the 5th string at the same time. That's done with the thumb tip. If you can't make that happen at first, no worries, just keep working toward that goal.
The third and fourth shapes give your thumb a rest for a moment. These are simple triad voicings that we'll actually be placing above the thumb-fretted bass notes. Get comfortable with these shapes.
The fifth shape shows how it all comes together in the quintessential thumb voicing. The sixth shape, just slightly larger, incorporates a little barre, which makes the grip a little tougher.
The seventh and eighth shapes show the minor chord versions. You'll need these as well, of course. The index finger barre make these a bit more challenging. Work on these last.
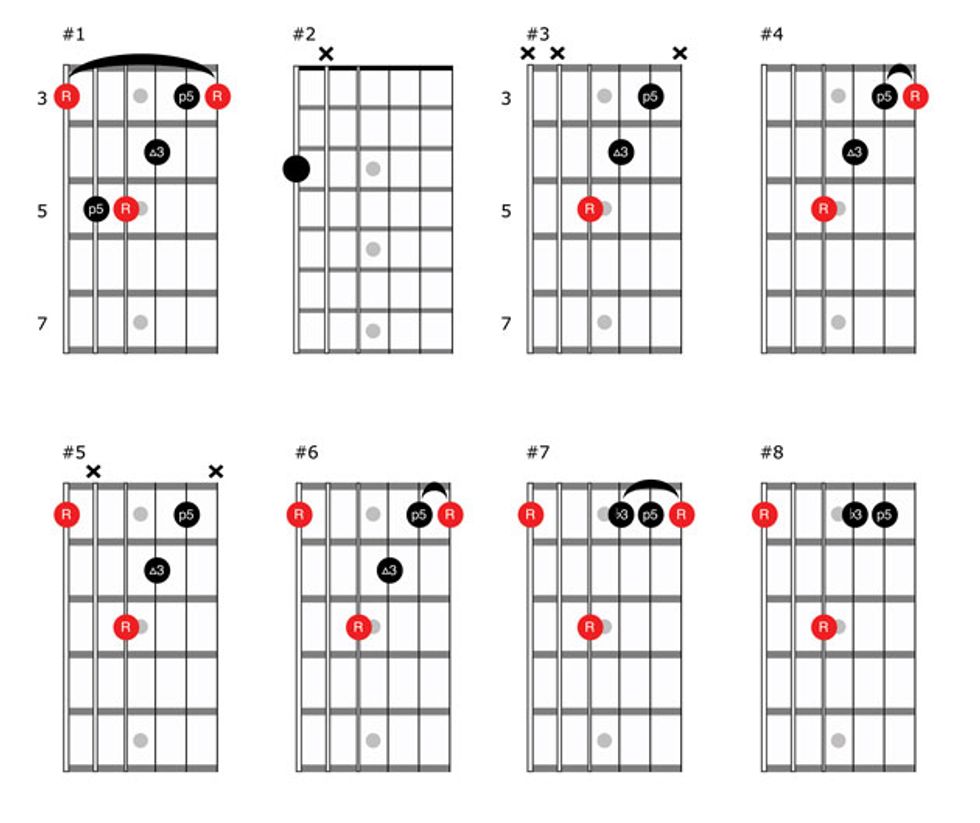
Note: If these thumb based shapes are seemingly impossible or just plain tough, try them on another guitar. A guitar with a narrow nut or slimmer neck profile can make all the difference.
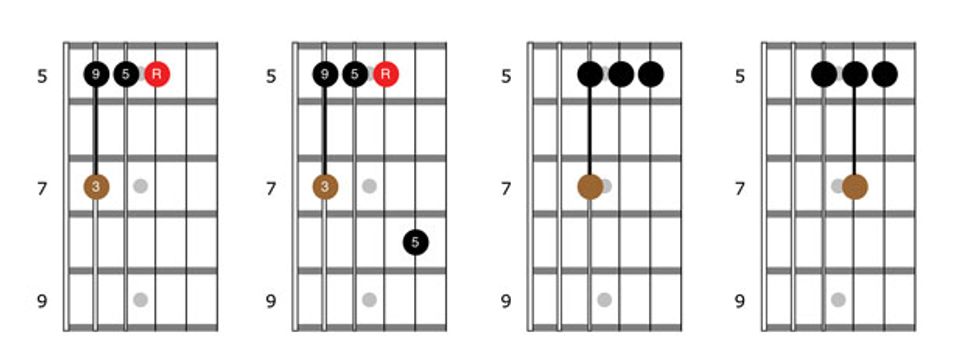
Adding Ornamentation
There are three reasons these thumb-based chords appear in music. First, a practical reason: Barre chords were always hard and using the thumb was a good cheat. (Jimi Hendrix and Jimmy Page were human too.) Second, what might have been a compensation for a difficult chord shape became a desirable and stylistic sound. Third—and most important here—is that the pinky is freed up to play extensions and engage in melodic work around the basic shapes.
These diagrams show common ways the pinky can be used to ornament the basic major shape. Get the sounds of the shapes and them work on actually hammering on or pulling off with the pinky (shown by the brown note). The diagrams show the basic major shape with a sus4, 6, and 9.
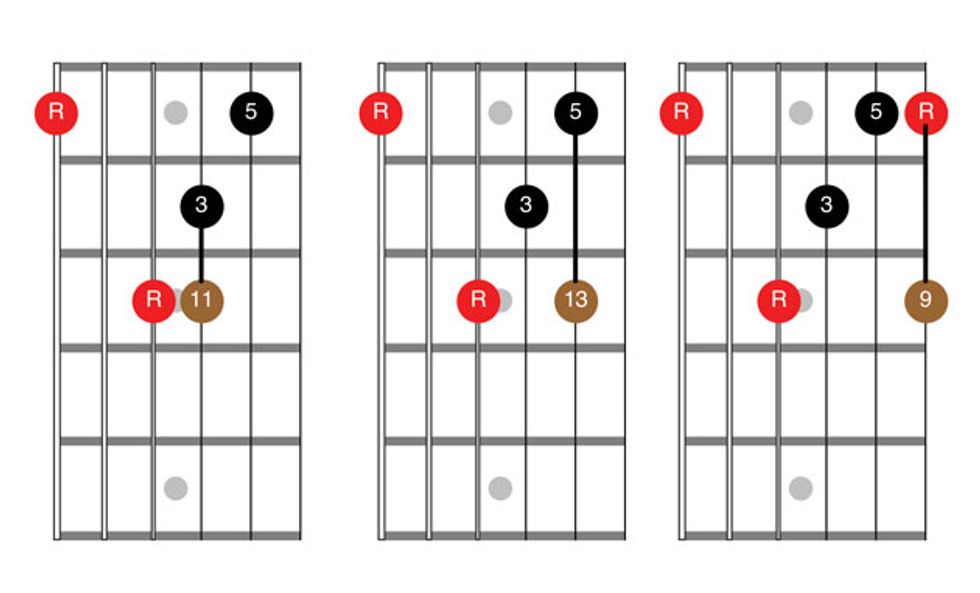
That takes care of the chords with roots on the 6th string. What about chords with 5th-string roots? Well, the good news is, no thumb! We've just got to deal with more of actual barring on the middle strings. The idea here is to use the ring finger to hammer the 3rd of the chord in most situations, but also the 6th.
6/8 Ballad
You're now prepped to tackle some real music, so let's dig into how Mayer might deal with a slow 6/8 ballad. The progression is simple, just the I chord (G) and the IV chord (C). Let the chords ring as much as possible. Hold your thumb steady and firm. The double-stops over the C chord are a bit freer than you might have guessed, and thus allow you to add some contrast and a melodic aspect to the part, rather than simply playing the most basic chord shapes.
Click here for Ex. 1
Let's add a solo on top. Ex. 2 shows how Mayer might expand on his basic melodic theme, improvising with slides and various bending techniques. Notice the pre-bend and release techniques in measures three, four, and six. Here you'll actually bend to pitch before striking the notes.
In measure seven we hear a lick that matches the chord: Rather than sticking to the G major pentatonic (G–A–B–D–E) we've been using until now, we include a C note to reflect the harmony. As the solo works on, we include F#, so now we hear the notes of a full G major scale (G–A–B–C–D–E–F#). This F# isn't actually fretted, it's the result of bending the 17th-fret E in measure 11.
The solo finishes with a pretty challenging fingerstyle lick reminiscent of the kind of double-stop figures Mayer is known for. In measure 13, you'll need to place your first and second fingers on the 14th and 15th frets of the 3rd and 2nd strings, respectively. The slides and the 17th-fret notes are all played with the third finger. The final measures are clearly based on octave-higher versions of what we've done in the rhythm guitar part (minus the thumb).
Click here for Ex. 2
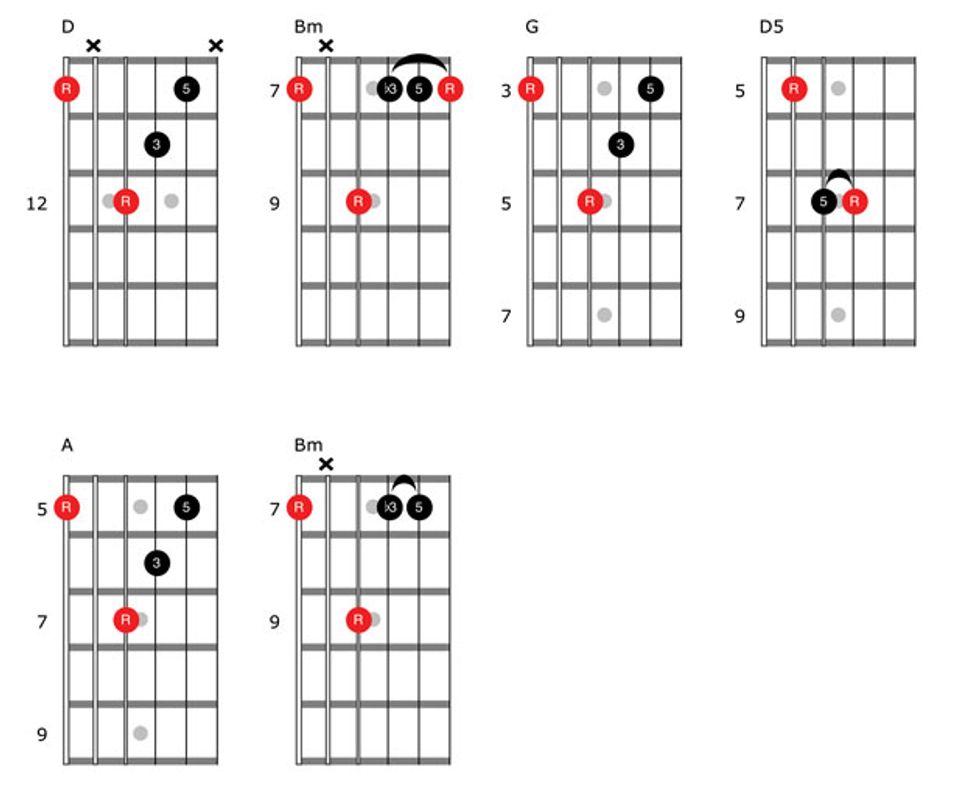
Medium Tempo, Soul Style
In the key of D, the next example has a few more chords in the progression, which harkens back to '60s soul guitar—think Curtis Mayfield and Hendrix. These chord frames below show the basic shapes, in order. You'll want to know them before diving into the music and embellishing the harmony.
The rhythm guitar part in Ex. 3 shows a certain watchfulness in “portioning out" a chord. There's no rule that says a chord needs to be strummed fully, especially not in this style. You can achieve greater depth by thinking in terms of the low, middle, and high portions of a chord. The hammer-on and pull-off figures add melodic and rhythmic interest to the part. First work on each move individually, then integrate the set into the music.
Click here for Ex. 3
This solo (Ex. 4) is in two parts and shows two important approaches that Mayer takes on tunes like this. First, a diatonic approach that actually fits the chords in the “right" way. That is, the progression is in D major, so use a related scale. In this case, it's D major pentatonic (D–E–F#–A–B) and it's presented in a typical Mayer fashion in a single-string approach. Note that almost the entire first phrase is played on the 2nd string. Mayer is a master of single-string melodic playing, so you'll want to investigate playing scales and licks this way.
The second phrase shows a Stevie Ray Vaughan influence, in that blues licks can be played over anything. In these four measures, we shift to D minor pentatonic (D–F–G–A–C). This fights the changes a bit, but even here, the consistent bending of F to F# makes the phrase at once sensible, yet still gutsy.