Chops: Beginner
Theory: Beginner
Lesson Overview:
• Learn how to better coordinate your picking and fretting hands.
• Develop better mental focus when playing.
• Create a better awareness of any unnecessary motion.
Click here to download a printable PDF of this lesson's notation.
I can’t even say how many times I’ve heard a teacher, friend, or colleague tell me to stay “relaxed.” What does that mean? Should I go all limp and fall out of my chair? You mean I should get a foot massage while I practice? Should I go grab another beer? How about a heating pad?
So now let’s talk about how this relates to technique. Because staying relaxed is basically what technique is all about.
Every movement requires muscles to work or flex, so movement requires some action, right? Let’s try some silly exercises and you will get the idea pretty quickly, unless you’re a Walking Dead zombie. Then this may not work for you.
Stupid Activity No. 1:
1. Make a fist and hold your breath.
2. Without releasing that tightly held fist, try to lift your index finger.
Now try and open your hand without releasing the fist.
Huh? That's just stupid, right? It is obviously impossible to do this, to have our hand open and in a fist at the same time.
This next one is especially designed for twits (and Monty Python fans) and should be really easy.
Stupid Activity No. 2:
1. Stand up straight.
2. Stick one leg out in front of you so that the foot is at about chest height.
3. Now stick out the other leg at the same time without letting the first foot down.
If you can do this give me a call because I think I can get you a gig with the circus.
Obviously the exceedingly silly activities above are impossible. But that is precisely what happens when we try to play guitar—or anything, for that matter. What is needed between every activity is rest. So you make a fist, relax the fist, and then open your hand. Yes, simple. Or you stand up and stick out one leg, then lower that leg back to the ground and then move the next one. We all learned how to do this, more or less, when we were kids, but now we need to examine this intuitive thing more closely.
Too often folks take the “relax your fist” part or the “put the first leg down” part for granted. Then, when you want to move faster we tend to leave out the relax part, and that's when we start to hurt ourselves and make mistakes as guitarists.
You must know what and when you want to play—the rhythm and the notes.
Prepare mentally and physically.
Play.
Release the tension from that activity.
Then do it all over again for the next note. This is what playing well feels like, regardless of style, approach, chops, knowledge, string gauge, action, pick choice, fingernail length, hairstyle, or piercings.
Let’s call this PPR. Playing faster means doing PPR faster. Usually we throw out the prepare part, completely poop on the release part, and end up with cramped arms and sloppy playing ... and maybe even a broken string or an empty beer bottle aimed at our head.
The relaxed part happens after the play part. That should be helpful. You don't have to be relaxed when you play the note, but afterward you do. That means that it’s okay for you to use strength to play, as long as you release the energy you’re putting into the activity. This concept applies to any activity. On the guitar, this is equally applicable to the left and right hands.
Now, let’s get on to some exercises to help with this idea. Remember, there is no one right technique! B.B. King's technique is perfect for the blues, lousy for Bach fugues. John William's technique is great for Bach fugues, lousy for the blues. Form follows function. Technique evolves to reflect the style.
Don’t be afraid to use big motions. After many years of study, the general consensus amongst players and medical professionals alike has been that big motions are important and healthy. Check out David Leisner’s site], where the classical guitarist chronicles his own journey through injury to healing and healthy playing. After learning things with big motions, smaller motions will take over as facility and habits set in.
Here are two exercises (Ex. 1 and Ex. 2) that will focus on your fretting hand.
1. Prepare: Choose a note and place your finger on the string without pressing it to the fret.
2. Play: Feel the tension of the string and lightly push it towards the fretboard until the note is fully in contact with the fret.
3. Release: While keeping the finger on the string, let go of the pressure on the note and feel the string push your finger back to its original position.
In general, keep your wrist fairly straight. Let your fingers curl. Push each note with each finger and make sure the finger, not the wrist, is doing all or most of the work.
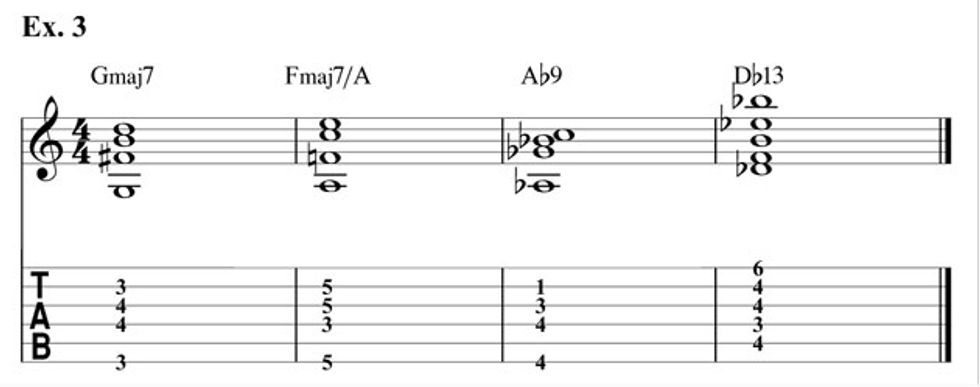
Now let’s move onto chords. Make sure to apply the same principles: PPR. Frame each chord in Ex. 3 before you play it, mentally and physically. Visualize it and then make the chord in the air. Air guitar that sucker! Then touch the strings before you play the chord, push down to play the chord and release the pressure without leaving contact with the strings. To increase chord accuracy and speed, practice dropping your hand all the way off of the fretboard, visualizing the chord and building it in the air while your arm travels to the guitar, then PPR as usual.
The next aspect we’ll look at is pick movement. Prepare the hand by getting the pick just above the string you want to play. Play the note by plucking the string, then relax the arm, wrist, and hand—without dropping your hand—and get ready to prepare to play the next note.
Remember that because the guitar’s strings are all in a single (virtually) flat plane, in order to pick a note you have to start above a string, pass down into the plane of the strings, pluck the string, and then pull up and out of the plane of the strings to cross over to another string. So basically, unless you’re sweep picking a passage, every stroke makes a little U shape.
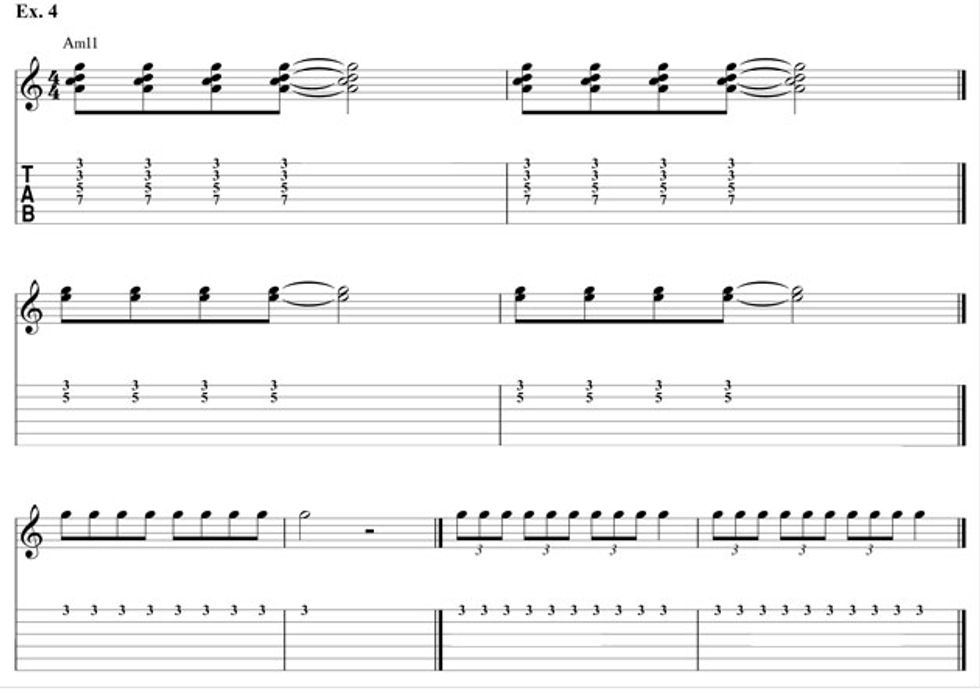
There are three basic areas to focus on when it comes to picking: the elbow, wrist, and fingers. Consider each one of these as you play through Ex. 4.
Elbow: The elbow has limited utility for picking because it’s so big and clumsy. But it can be useful for strumming and big gestures. (Pete Townshend, anyone?)
Wrist: The wrist is the main instrument for picking. You’ll need to decide whether or not you prefer to plant your wrist on the bridge. A floating wrist—à la Jim Hall or Barney Kessel—makes a nice sound, but sacrifices speed and dynamics. Since there’s no anchor for the wrist, you can move your hand around and get all kinds of tones, but when you want to play loud or pluck hard, you can only go so far before your hand wants to go flying off in the direction you are picking. By contrast, a planted wrist like Al Di Meola, John McLaughlin, and Pat Martino, gives you speed and dynamics but sacrifices some tonal variety. Some players compromise by lightly planting on the low strings or planting fingers on the top near the high strings.
Fingers: You can use the fingers only to move your pick through the strings. That gives speed but not a lot of power. Hold the pick between two or three fingers—sort of like holding a pen—and actually use the fingers to move the pick through the strings.
Experiment making the U shape while focusing individually on the elbow, wrist, and fingers. Then observe how they work together.
&
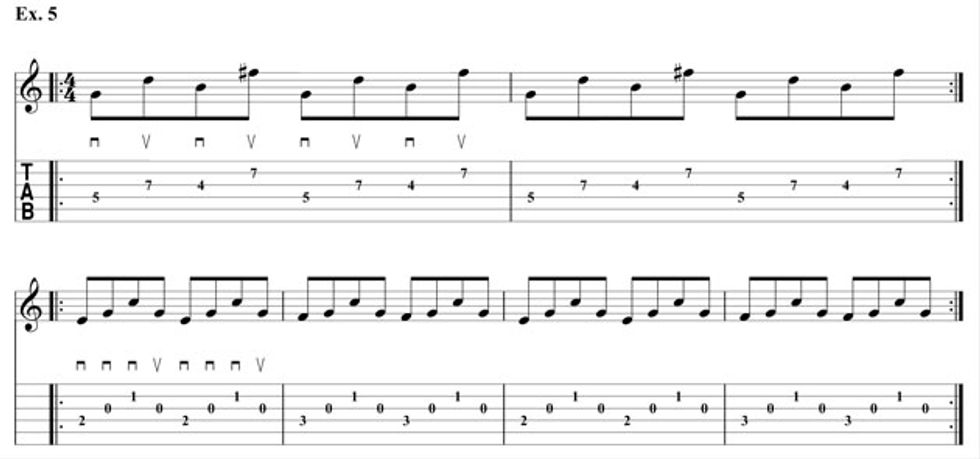
Our final exercise (Ex. 5) covers string crossing. This is a huge issue. In general, alternate picking is the most versatile approach to skipping strings and playing arpeggios. That does not mean it’s the best, but it is the most basic and applicable to many different styles of music. However—and this is an important point—bebop guitar styles, bluegrass guitar styles, and many other traditional guitar styles often use a pick drag over two strings and that can really make certain kinds of lines easier to play. You will always have a little hiccup when dragging the pick over one or two strings. That hiccup is really cool in some styles, not so much in others.


