Taking some time to explore a bit deeper than the winding.
When you hear a bassist describing his or her gear, the type of strings they use is rarely mentioned. This is mainly because roundwounds have become the norm for the vast majority of us. However, there is plenty more to strings than how they are wound.
Strings are under our fingers all the time and have an immense effect on our tone, so it's interesting that they rarely get much attention. Sure, for some players, the search for the right strings is a life-long pursuit, but many others simply stay with whatever they started out with. But again, there's more to talk about beyond flatwound, halfwound, roundwound, and taperwound.
All electric strings have a core, which is what shoulders all the tension. Unlike the two or three highest strings on a guitar, the bass guitar's counterparts always have an outer winding. This winding raises the mass-per-length to lower their natural frequency, while keeping stiffness and dampening low. And this gets even more important the lower we go in frequency.
It isn't generally a bad thing, since it doesn't make us sound like synths, but things can get really ugly for thicker strings once we move up the neck.
Another factor for a string's tone and feel is the ratio of core and winding. (The core is usually 33 to 66 percent of the outer diameter.) Additionally, there are several different cross-sections of cores—round or hexagonal. And we haven't even talked materials yet! There's nickel, stainless-steel, gold, bronze, either solid or plated versions, and, finally, there's the influence of the different coatings introduced in the last two decades to consider.
There are myriad reviews and guides on how to choose strings that try to describe the differences in tone and feel with more or less depth and detail. In my opinion, any good one should be a long one!
Let's not forget about an often-neglected issue: intonation. There have been several attempts to improve intonation with compensated nuts (Earvana, Buzz Feiten, etc.) and True Temperament fretting, but there are also differences in intonation for different string constructions.
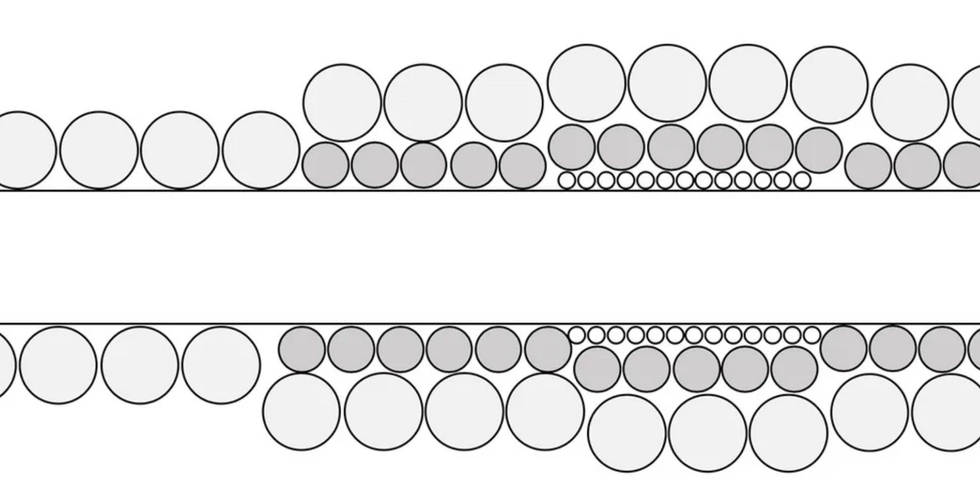
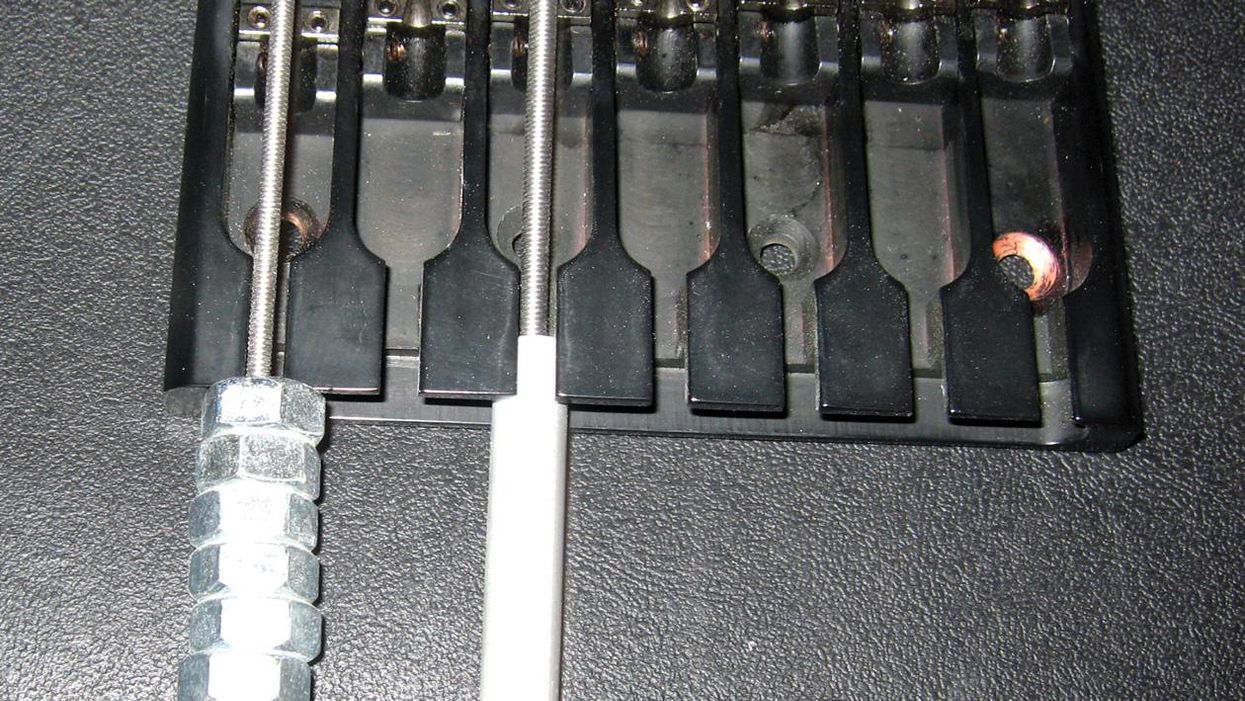
Fig. 1 — As seen in this cross-section of a "lumped" strings bridge area, the smaller the inner-winding diameter, the denser the package and mass.
Photo courtesy of Kemp Strings
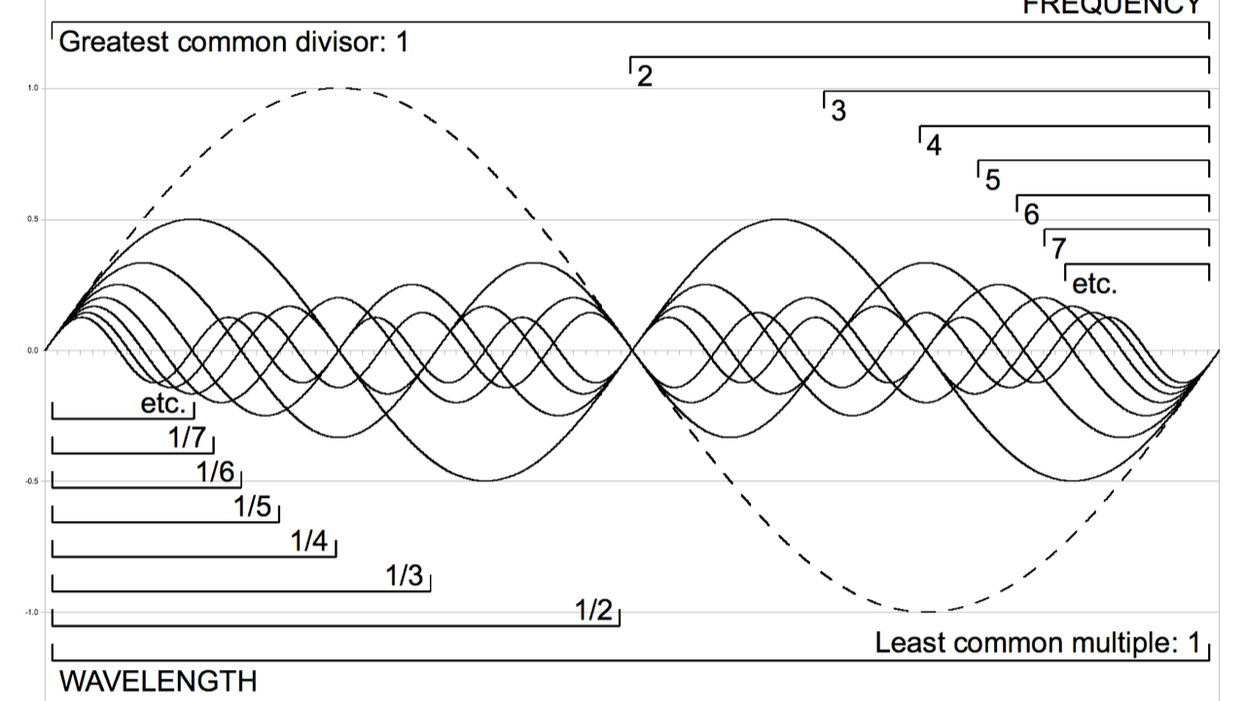
The "bass sound" has changed massively over recent decades by getting way treblier and present for cutting through in the mix. (Check out Michael Thurber's excellent video on YouTube entitled "Story of the Bass.") The result is a much higher portion of upper harmonics, and the way these intonate and their inharmonicities can't be adjusted like the intonation of the natural frequency. An ideal string or oscillator would have its first upper harmonic at exactly twice the frequency, and so on. Unfortunately, the strings' finite stiffness makes them behave less than ideally, where the second harmonic is too high. It's even worse for higher partials. It isn't generally a bad thing, since it doesn't make us sound like synths, but things can get really ugly for thicker strings when we move up the neck.
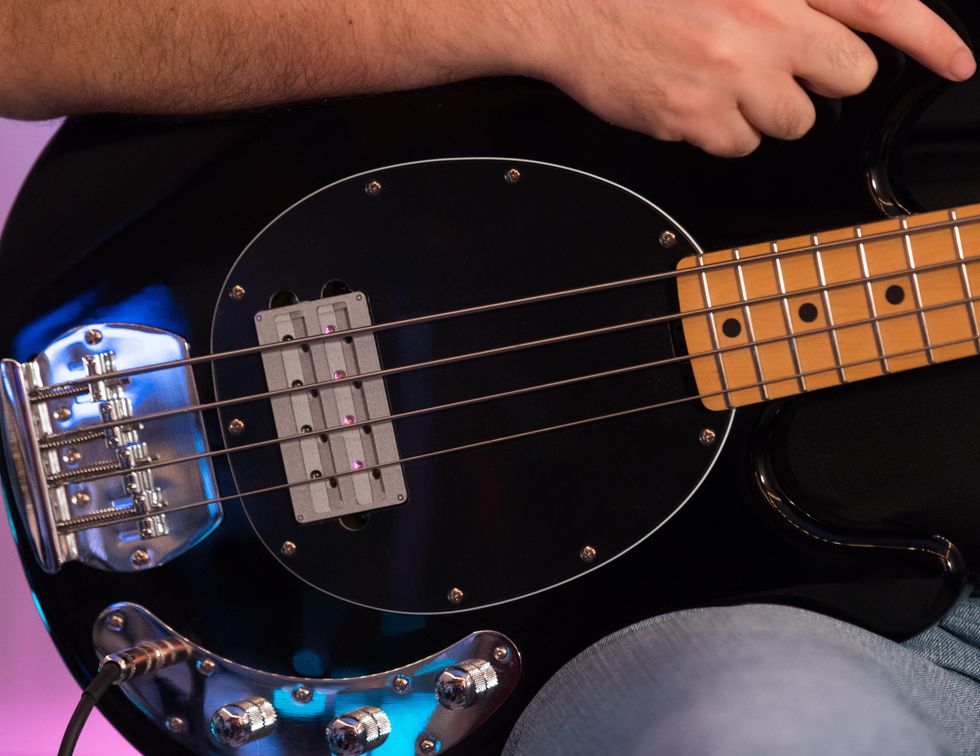
One can fight inharmonicity of an open bass string by increasing scale length. That's the reason there's such a huge difference in the perception of the low end between a small piano and a concert grand, with the shorter of the two showing a much higher pitch glide. Put simply: Adding winding and mass to the string at the bridge area (Photo 1) means raising the specific weight-per-length when moving up the neck. This mass fights the raising stiffness when fretting up the neck, finally reducing the shift of upper harmonics. This construction, coined "lumped" strings (Fig. 1), has been researched specifically for bass by Dr. Jonathan Kemp at the University of St Andrews in the U.K.
For those who would like to dig a bit deeper into the subject, you can find Dr. Kemp's peer-reviewed paper at kempstrings.com, but please be prepared to absorb some serious math and physics! That said, it's refreshing and encouraging to see something going much further and deeper than the same old "and the vibration travels through the bridge and resonates with the wood."
[Updated 7/26/2021]
- Bass Bench: The Mystery of Aging Strings - Premier Guitar ›
- Bass Bench: Beef Up Your 4-String - Premier Guitar ›
- Bass Bench: Dead Strings ... Revive or Replace? - Premier Guitar ›
- Myths and Rumors on Scale Length - Premier Guitar ›
- Consider the Mighty Bass Speaker - Premier Guitar ›
- Flashy Is Fun, but the Bass Has a Deeper Function - Premier Guitar ›
- What Are the Best Bass Guitar Strings For You? Here's How to Choose Bass Strings - Premier Guitar ›
In a career defined by evolution, Joe Bonamassa is ready to turn the page once again. The blues-rock virtuoso has just announced Breakthrough, his most adventurous and genre-blending studio album to date, out July 18th via his own J&R Adventures.
At the heart of the announcement is the release of the album’s powerful title track—“Breakthrough' —a soulful, hard-hitting anthem about letting go, moving forward, and finding your fire again, available today on all streaming platforms.
Crafted across multiple continents and infused with a world’s worth of inspiration, Breakthrough marks a bold new chapter for Bonamassa—one that leans on fiery solos, emotionally rich storytelling, groove-driven arrangements, and stylistic exploration. Produced by longtime creative partner Kevin Shirley (Iron Maiden, The Black Crowes, Journey), the album was shaped by sessions in Greece, Egypt, Nashville, and Los Angeles, resulting in a vibrant sonic tapestry that shifts effortlessly from funky blues and Texas swing to acoustic ballads and swaggering hard rock.
Joe Bonamassa “Breakthrough” - Official Lyric Video
Watch the official lyric video for "Breakthrough" by Joe Bonamassa
“I think this album, Breakthrough, marks a shift in the styling of Joe Bonamassa’s recording output,” says Shirley. “While there are plenty of guitar solos on this record, his emphasis has been on songs primarily. Each time Joe undertakes a new recording project, he seems to access a different part of his vast library of music genre from the jukebox-in-his-head! This album is a round-the-world musical trip—from Little Feat funkiness to Texas swing, from hard rock power to acoustic singer/songwriter-style songs.”
The newly released single “Breakthrough,” co-written with longtime collaborator Tom Hambridge (Buddy Guy, ZZ Top, Lynyrd Skynyrd), captures the emotional core of the record—an uplifting anthem about transformation, persistence, and letting go of the weight that holds us back. With gritty vocals, melodic guitar lines, and lush instrumentation, the track embodies Bonamassa’s signature blend of power and finesse while ushering in a bold new direction.
“Breakthrough” follows the success of Bonamassa’s recent singles “Still Walking With Me” and “Shake This Ground,” both of which hinted at the adventurous spirit behind the full album. “Shake This Ground” delivered a moody, introspective edge, while “Still Walking With Me” leaned into warmth, gratitude, and classic soul. Each track reflects a different facet of Bonamassa’s evolving songwriting approach, rooted in emotional honesty and anchored by his unmistakable guitar work.
The album announcement caps a stretch of extraordinary momentum for Bonamassa. Next up, Bonamassa recently began his extensive *European Spring Tour, followed by a June run with his powerhouse supergroup Black Country Communion* (featuring Glenn Hughes, Jason Bonham, and Derek Sherinian). After another round of summer dates across Europe—including sold-out shows in Ireland—he’ll return stateside for his just-announced* 2025 U.S. Summer Tour*, a limited amphitheater run featuring stops at The Greek Theatre, Red Rocks, and more iconic venues.
With over 50 albums, 28 #1 Billboard Blues albums, and a lifelong commitment to evolving the genre, Bonamassa shows no signs of slowing down. Whether headlining iconic venues, mentoring rising artists through Journeyman Records, or supporting music education via his Keeping the Blues Alive Foundation, Bonamassa continues to shape the future of blues-rock with every note.
For more information on Breakthrough, tour dates, and VIP packages, visit jbonamassa.com.
Patterns can be viewed as boring or trite, but a little bit of creativity can turn them into bits of inspiration.
Chops: Intermediate Theory: Intermediater Lesson Overview: • Learn different ways to arrange scales. • Combine various sequences to create more intersting lines. • Solidify your technique by practicing unusual groupings of notes. Click here to download a printable PDF of this lesson's notation. |
I want to offer some food for thought on making sequences musical. Using sequences in our playing helps develop our musicianship in various ways. It can help us tune into the fretboard, develop melodic ideas all around the neck, and further our improvisation and compositional skills. So, spending time with sequences is certainly not time wasted. Please note that I sometimes use the word “rule" in this column, this is only a pointer to keeping on track of our exploration of these concepts. The intellect is very useful, but intuition is where the creativity comes from. When in balance lots of great things can be done. Let's get stuck in!
It's simple to play a scale from bottom to top, or top to bottom, but we can develop a sequence by shuffling these notes around. In Ex. 1 we have a C Major scale (C–D–E–F–G–A–B) played in thirds followed by a sequence highlighting the diatonic triads of the major scale. By following a “rule" we can develop many different sequences. The options are endless and a little overwhelming.
Click here for Ex. 1
Lets start by simply combining an interval sequence with an arpeggio sequence. In Ex. 2, the first two beats of the first measure feature ascending thirds. This is then followed by a triad arpeggio starting from the third note on the string. The next set of thirds then starts on the “and" of beat 4. The entire sequence is a seven-note pattern that is created by combining two thirds and a triad. It gives us a nice bit of rhythmic displacement as the phrase is now starting in a different place in the measure.
Click here for Ex. 2
Ex. 3 is a descending idea in A minor that basically flips the sequence we looked at in Ex. 2. Here, we are starting with two descending thirds before the triad. I'm using pull-offs and economy picking to articulate the triads. This one works well over D minor as well if you want a D Dorian (D–E–F–G–A–B–C) flavor.
Click here for Ex. 3
You can see the effectiveness of combining different sequences and groupings of notes to create interesting runs. It's also really effective for making phrases. In Ex. 4 we take a small fragment from Ex. 3 and change the rhythm. In the sound example I repeat this a few times over some implied chords in my bass line: Am, F, and Dm. It's great to get more from one line by seeing the different chord types you can play it over.
Click here for Ex. 4
In Ex. 5 we're going to start using fourths and fifths. It starts with an ascending A minor triad (A–C–E) before leaping to the 9 (B) and then hitting a G major triad (G–B–D). A similar pattern leads into the C major triad (C–E–G). Throwing in these wider intervals alongside triads is very effective for creating a dramatic sounding runs.
Click here for Ex. 5
For our next example (Ex. 6), we will take fragments from Ex. 5 and space them out a bit. I wanted once again to show how these sequence ideas can also be helpful for developing melodic phrases. Once we have a cool sequence or fragment, all we need to do is be creative with how we play it. We can change the rhythm, harmonic context, dynamic, and much more.
Click here for Ex. 6
Before we move on, it's important to remember that we can add colorful notes to our triads. Let's begin with some seventh-chord arpeggios. Ex 7 features are diatonic seventh arpeggios in G minor (functioning as a IIm chord) to get a Dorian sound.
Click here for Ex. 7
Ex. 8 is a little gratuitous of me. It begins with an idea made of several different concepts. First, we start with an Am7 arpeggio (A–C–E–G), then descend down an A5 arpeggio. I follow that up with diatonic thirds and end with a pedal-point sequence. If that's not enough, we then take this bigger idea and fit it around a chord progression. I move it to G7, Dm7 and then I break my “rule" slightly and outline notes of a C6 arpeggio (C–E–G–A). However, it does keep the same melodic contour of the initial idea. I used my ear and fretboard to guide me. It's always healthy to have a fine balance between intellect and intuition.
Click here for Ex. 8
We dig into C harmonic minor (C–D–Eb–G–Ab–B-C) for Ex. 9's monster two-measure lick. It sounds evil! In composing this phrase, I kept to the basic concept of finding seventh-chord arpeggios within C harmonic minor in the 8th position. I followed my ear as well as my slowly developing intellect. However, if you look closely you can see I was following a mini chord progression through this line. We start out with a CmMaj9 arpeggio (C–Eb–G–B–D) in the first beat, followed by a G7b9 arpeggio (G–B–D–F–Ab). Here we have a very strong Im-V7 movement in C minor. I then move back to our CmMaj9 arpeggio and in the second measure we start descending down an Eb augmented triad (Eb–G–B). This is then followed by more CmMaj9 goodness.
Click here for Ex. 9
Ex. 10 is now taking Ex. 9 and extending it into a cool flamenco-inspired melody. The rhythms in this were inspired by the incredible Paco De Lucia. I follow the sequence from the previous example almost exactly, but I use a bit of artistic license to repeat certain fragments to fit into a “top line" or “head"-style melody.
Click here for Ex. 10
My aim here isn't to give you one rule to follow but instead to encourage you to take the sequences you know and love and start getting more out of them. Enjoy and stay safe!
Neutrik’s Timbre plug, made for toggling between capacitors.
This follow-up to May 2025’s column shows you a few basic techniques to inject some capacitance into your rig.
Hello, and welcome back to Mod Garage. This month, we will dive into the details of how to add additional guitar-cable capacitance—the right way. Time to get started!
Let’s begin with some typical additional capacitance values that certain lengths of cable (or capacitors) can bring to your system:
• 10’ vintage coiled cable (approx. 3 meters) -> 1 nF
• 15’ vintage coiled cable (approx. 4.5 meters) -> 1.5 nF
• 20’ vintage coiled cable (approx. 6 meters) -> 2.2 nF
• 30’ vintage coiled cable (approx. 9 meters) -> 3.3 nF
• Ritchie Blackmore-style, ultra-long vintage coiled cable -> 4.7 nF
I listed standard values here, so you should have no problem getting caps to match them in any local electronics store or online; the type of cap doesn’t really matter and will mostly be dominated by size, but I’ll share more about this in a minute.
Let’s quickly summarize the first installment of this column from last month’s issue: From a technical point of view, added capacitance shifts down the resonance frequency of the pickups, so they sound fatter, especially when using overdrive. This is exactly the reason why a lot of distortion and fuzz boxes with a vintage voicing use an additional cap at the input section; the resulting overdriven tone is fat and warm.
This month’s mod, which involves adding a capacitor to your signal, works best with vintage-flavored single-coil pickups (approximately 2.4 H inductance) or a typical old-school PAF-style pickup (approximately 3.8 H inductance). Modern high-output pickups are often sporting inductances of 6 H to 8 H, and don’t sound very good with this mod—when adding more cable capacitance to such pickups, the result is a dull and wooly tone without any clearness and definition. If you want to make your single-coil guitar sound more Les Paul-ish, you should try a 4.7n capacitor. It will shift the resonance frequency of your single-coil pickups down to the typical PAF ballpark, making for a very cool and usable old-fashioned guitar tone. It might feel a little muffled when playing clean, but ultra fat and punchy when using overdrive! In general, values higher than 4.7n are not recommended.
We have two options for where to install our cap.
On the Guitar Cable
This is the easiest location to add additional capacitance to your system, with several mod options:
1. The lightest mod ever isn’t a mod at all—it’s to simply buy a vintage guitar cable and plug it in whenever you need it! I don’t know of any company that offers modern guitar cables with intentionally high capacitance.
2. The Neutrik company offers a special angled plug, called the Timbre Plug, that you can solder to any guitar cable of your choice. The plug has a 4-way rotary knob on top to toggle between different capacitors. In addition to a bypass setting, the plug offers capacitances of 1nF, 2.2nF, and 3.3nF, letting you simulate different cable lengths on the fly.
3. You can add an additional capacitor to any guitar cable of your choice to convert it into a “longer-sounding” cable. You simply open one of the plugs to solder the cap between the hot and ground—that’s it. Small, 2.5 mm contact spacing ceramic caps are easy to put into a standard plug and are your weapon of choice here. It’s essential to only add the additional cap to one of the two plugs, but it doesn’t matter if you plug this side into your guitar, an effect, or your amp. This method allows you to build yourself some cables that simulate their older, longer relatives.
You can add an additional capacitor to any guitar cable of your choice to convert it into a “longer-sounding” cable.
Photo courtesy SINGLECOIL (https://singlecoil.com)
Inside the Guitar
You can also add a cap (or several) inside your guitar if you only need this mod for one instrument. If you’re looking for added capacitance with all your guitars, you’d be better off choosing one of the techniques mentioned above.
1. The easiest way is to solder your additional capacitor directly to your volume pot; this way it has a fixed value that can’t be changed and is always engaged. This operation is very simple to do, and you can use regular-sized caps for this.
You can add a cap (or several) inside your guitar if you only need this mod for one instrument.
Illustration courtesy SINGLECOIL (https://singlecoil.com)
2. If you want to make the cap switchable, such that you can run it either bypassed or engaged, you can install a SPST mini toggle switch or use half of a push-pull or push-push pot, which usually sport a DPDT switch underneath.
This drawing shows how to make your additional cap switchable.
Illustration courtesy SINGLECOIL (https://singlecoil.com)
3. If you want to use more than one cap to simulate different cable lengths, your weapon of choice is a rotary switch, setting up a kind of Gibson Varitone wiring without the inductor. Because we are switching capacitances, it is essential to run an additional 10 meg resistor in parallel to each of the caps, and to use a make-before-break, not a break-before-make, rotary switch to prevent loud popping noises when using the switch while your guitar is plugged into an amp. Leave the first lug of the rotary switch open for the bypass position without an additional cap.
If you want to use more than one cap to simulate different cable lengths, use a rotary switch.
Illustration courtesy SINGLECOIL (https://singlecoil.com)
4. If you want to make this mod even more flexible, you can add an additional “cable simulator pot” to your system. The pot should have the same resistance as your volume pot, and should be wired to your volume pot. This way, for example, you can add a 3.3nF or 4.7nF cap to the extra pot, and dial in as much cable capacitance as you like.
You can also add an additional “cable simulator pot” to your system.
Illustration courtesy SINGLECOIL (https://singlecoil.com)
On the Pedalboard
The idea of putting a rotary switch or cable-simulator-pot solution into an external unit to create a kind of extra-capacitance stompbox to use with all of your instruments is just around the corner, and yes, it’s possible! However, I don’t recommend this, because it’s physically located after the volume pot in the guitar, which means less volume (no unity gain) and less high end. But don’t worry: If you are looking for a pedalboard solution to simulate different cable lengths (which, as we defined earlier, means to shift the resonance frequency of the pickups), there are some active solutions on the market offering such a feature, usually in combination with a boost or buffer functionality. To name just a few, you should look into the Seymour Duncan Pickup Booster, Stellartone Micro Pedal, or the i2e Audio AG1.0 The PURR. Along with some other brands, these pedals will do the trick, and they’re not difficult to build if you are looking for a DIY solution.
So far, I’ve received several emails from readers asking for some more DIY guitar tools, so next month, we will look into some sustainable and environmentally friendly DIY guitar helpers—all of which you can build yourself easily by upcycling things you already have at home. Stay tuned!
Until then... keep on modding!
MayFly Le Habanero Review
Great versatility in combined EQ controls. Tasty low-gain boost voice. Muscular Fuzz Face-like fuzz voice.
Can be noisy without a lot of treble attenuation. Boost and fuzz order can only be reversed with the internal DIP switch.
$171
May Fly Le Habanero
A fuzz/boost combo that’s as hot as the name suggests, but which offers plenty of smoky, subdued gain shades, too.
Generally speaking, I avoid combo effects. If I fall out of love with one thing, I don’t want to have to ditch another that’s working fine. But recent fixations with spatial economy find me rethinking that relationship. MayFly’s Le Habanero (yes, the Franco/Spanish article/noun mash-up is deliberate) consolidates boost and fuzz in a single pedal. That’s far from an original concept. But the characteristics of both effects make it a particularly effective one here, and the relative flexibility and utility of each gives this combination a lot more potential staying power for the fickle.
“Le Habanero’s fuzz circuit has a deep switch that adds a little extra desert-rock woof.”
The fuzz section has a familiar Fuzz Face-like tone profile—a little bit boomy and very present in that buzzy mid-’60s, midrangey kind of way. But Le Habanero’s fuzz circuit has a deep switch that adds a little extra desert-rock woof (especially with humbuckers) and an effective filter switch that enhances the fuzz’s flexibility—especially when used with the boost. The boost is a fairly low-gain affair. Even at maximum settings, it really seems to excite desirable high-mid harmonics more than it churns out dirt. That’s a good thing, particularly when you introduce hotter settings from the boost’s treble and bass controls, which extend the boost’s voice from thick and smoky to lacerating. Together, the boost and fuzz can be pushed to screaming extremes. But the interactivity between the tone and filter controls means you can cook up many nuanced fuzz shades spanning Jimi scorch and Sabbath chug with tons of cool overtone and feedback colors.