We began tracking progressions on
the Circle of Fourths and Fifths in
our previous lesson [“Running in Circles,”September 2011]. If you missed that installment
of Rhythm & Grooves—or simply
want to brush up on the theory behind the
cycle chart—take a moment to check it out
online at premierguitar.com.
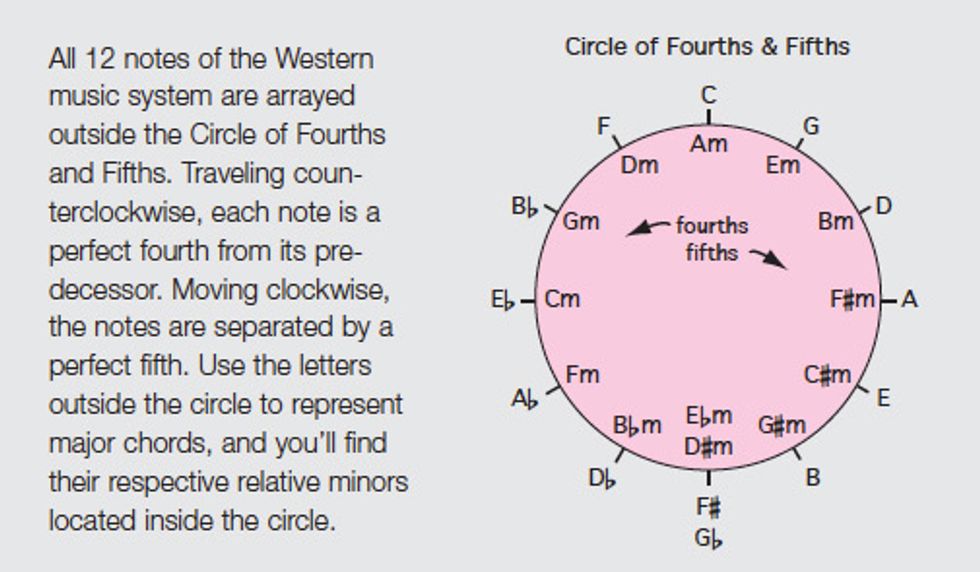
The cycle chart is an invaluable tool: As we saw last time around, it’s our secret weapon for mastering all 12 keys on the guitar. The simple diagram offers us a disciplined and thorough way to map essential progressions in keys we guitarists often avoid—Eb, Db, and Ab, for instance.
But the cycle chart has many other uses, and we’ll look at several of these right now. So you won’t have to move back and forth between this month’s and last month’s lesson, we’ve again included this handy diagram. (But in a new color, just for variety. It looks pretty in pink, doesn’t it?) Okay, let’s get busy.
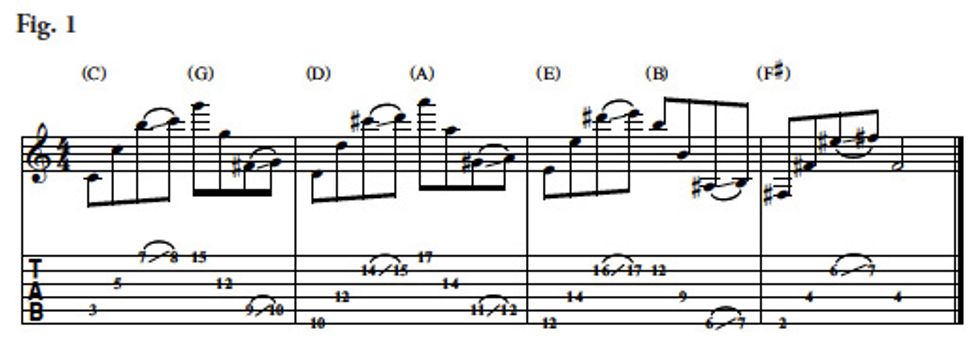
Learning to name the notes on the fretboard is a big deal. The goal is to be able to press any string to any fret and immediately identify the resulting note. Quick: 5th string, 11th fret is what? Or 3rd string, 8th fret? Or 2nd string, 14th fret? If you can name these pitches, especially without a guitar in your hand, well done. If not, it’s a great skill to acquire because it allows you to communicate with musicians who play other instruments than guitar. A saxophonist won’t know what to make of “play the note on the 3rd string, 10th fret.” Yet “play F” gets the point across. To fluently speak this universal language, however, you need to know where every F is located ... along with each instance of the Western music system’s other 11 notes.
One excellent way to learn all the note names—even those lurking in little-used nooks and crannies of the fretboard—is to play two-octave patterns up and down the fretboard and on various string sets. Fig. 1 illustrates how to use the cycle chart to map out a series of two-octave patterns while moving in fifths around the wheel.
or Download Example Audio

We begin with C octaves, then take one step clockwise (CW) to G, then another CW step to D, to A, etc. Because the octave pairs alternately ascend and descend, we get a complete workout shifting back and forth across the strings, as well as up and down the fretboard. You’ll notice we’ve added a half-step approach into the last note of each two-octave figure. This chromatic approach tone gives us four beats in each figure and also provides an opportunity to identify yet another note as we play the “name the octaves” game.
For space considerations, Fig. 1 ends halfway around the wheel at F#, but if you’re up for the challenge, move CW completely around the wheel until you return to C. For variety, begin with a descending figure or try launching this exercise from a different note (F, for example) and then cycle CW around the wheel.
Want more variations? You can place the half-step approach tone before the middle octave note or even before the first one. Also, you can move your two-octave pattern counterclockwise (CCW) around the circle in fourths. Practicing different versions of this simple routine will pay huge dividends in terms of learning the notes on the fretboard.
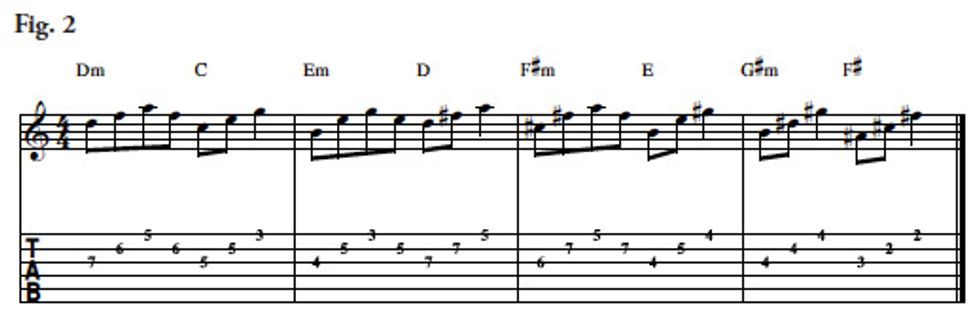
Fig. 2 has us zigzagging CW between major triads (represented by the letters on the outside of the circle) and minor triads (shown inside the circle). In this triad-mapping exercise, we’re playing only eight chords, but if you continue around the wheel until you reach your starting point, you’ll hit 12 chords.
or Download Example Audio

By staying on one string set—as we’ve done here—you’re forced to move up and down the fretboard as you navigate the wheel. Great, that’s one type of workout. Another excellent option is to restrict yourself to a five-fret location and find the triads on a variety of string sets. Both approaches force you to think about triad inversions, and that’s the point.
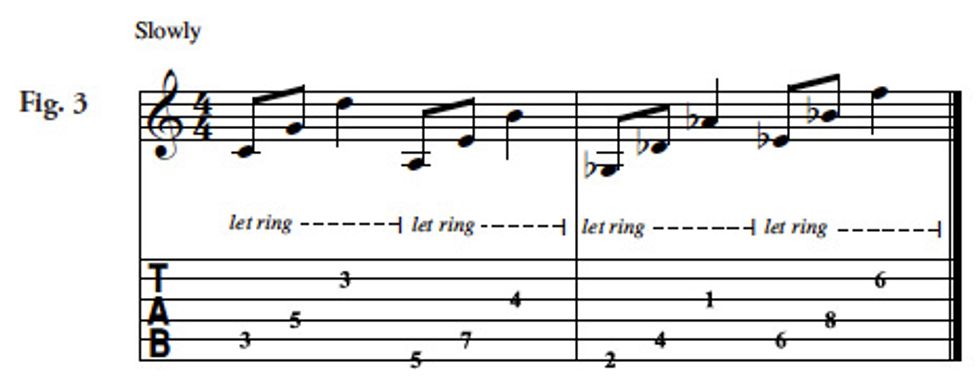
Fig. 3 is all about stacking fifths to create quintal harmony—a cool, impressionistic sound. If you scrutinize the notation, you’ll see that each note is located one CW “click” from its predecessor. Play slowly and observe the let ring markings to create three-note quintal voicings: C–G–D, A–E–B, Gb–Db–Ab, and Eb–Bb–F. Once again, you can generate variations by simply starting on a note other than C.
or Download Example Audio

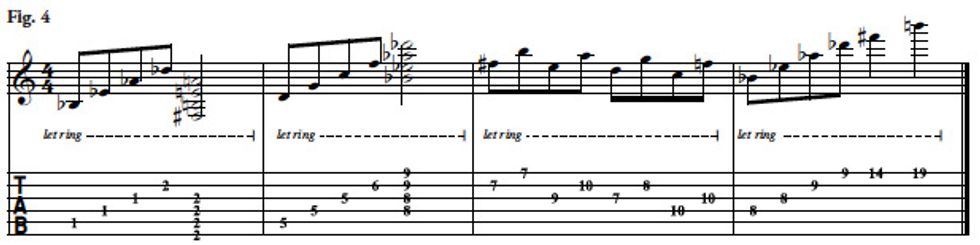
For a real brainteaser, try Fig. 4. Starting on Bb, we’re moving CCW in fourths, mixing arpeggios (composed of single notes spaced a fourth apart) with four-note quartal clusters and fourth intervals. Whether we’re plucking notes one at a time (as in the arpeggios and intervals) or in a cluster (the half-note voicings), every note is spaced one click away from its immediate neighbors. By the time you’ve reached the end of this exercise, you will have crawled CCW two-and-a-half times around the wheel.
or Download Example Audio

Compared to typical songs with their keys and diatonic chords, an exercise like this can sound alien. But it’s good to stretch your ears in the privacy of a practice session. (And if you like this edgy sound, be sure to check out these Rhythm & Grooves lessons on premierguitar.com: “Exploring Quartal Harmony,” April 2011; “Crazy Quartal Comping,” May 2011; and “Stealth Quartal Colors,” June 2011.)
If you put your mind to it, there are virtually endless ways to use the cycle chart as a practice tool. For instance, take any scale you know and play it CW or CCW around the wheel. As you work through each scale, name every note out loud. Another idea: Take your favorite blues licks and move them around the wheel. You’ll have to change octaves in the process, but exploring a familiar pattern in a new register is an excellent way to expand your improvisational bag of tricks.

The cycle chart is a demanding mistress—perfect for generating ideas that force you into unfamiliar areas of the fretboard. What are the odds you’d do this on your own? Have fun spinning the wheel!
 Andy Ellis is a veteran guitar journalist
and Senior Editor at PG. Based
in Nashville, Andy backs singer-songwriters
on the baritone guitar, and also
hosts The Guitar Show, a weekly on-air
and online broadcast. For the schedule,
links to the stations’ streams, archived audio
interviews with inspiring players, and more,
visit theguitarshow.com.
Andy Ellis is a veteran guitar journalist
and Senior Editor at PG. Based
in Nashville, Andy backs singer-songwriters
on the baritone guitar, and also
hosts The Guitar Show, a weekly on-air
and online broadcast. For the schedule,
links to the stations’ streams, archived audio
interviews with inspiring players, and more,
visit theguitarshow.com.
The cycle chart is an invaluable tool: As we saw last time around, it’s our secret weapon for mastering all 12 keys on the guitar. The simple diagram offers us a disciplined and thorough way to map essential progressions in keys we guitarists often avoid—Eb, Db, and Ab, for instance.
But the cycle chart has many other uses, and we’ll look at several of these right now. So you won’t have to move back and forth between this month’s and last month’s lesson, we’ve again included this handy diagram. (But in a new color, just for variety. It looks pretty in pink, doesn’t it?) Okay, let’s get busy.
Learning to name the notes on the fretboard is a big deal. The goal is to be able to press any string to any fret and immediately identify the resulting note. Quick: 5th string, 11th fret is what? Or 3rd string, 8th fret? Or 2nd string, 14th fret? If you can name these pitches, especially without a guitar in your hand, well done. If not, it’s a great skill to acquire because it allows you to communicate with musicians who play other instruments than guitar. A saxophonist won’t know what to make of “play the note on the 3rd string, 10th fret.” Yet “play F” gets the point across. To fluently speak this universal language, however, you need to know where every F is located ... along with each instance of the Western music system’s other 11 notes.
One excellent way to learn all the note names—even those lurking in little-used nooks and crannies of the fretboard—is to play two-octave patterns up and down the fretboard and on various string sets. Fig. 1 illustrates how to use the cycle chart to map out a series of two-octave patterns while moving in fifths around the wheel.
or Download Example Audio
We begin with C octaves, then take one step clockwise (CW) to G, then another CW step to D, to A, etc. Because the octave pairs alternately ascend and descend, we get a complete workout shifting back and forth across the strings, as well as up and down the fretboard. You’ll notice we’ve added a half-step approach into the last note of each two-octave figure. This chromatic approach tone gives us four beats in each figure and also provides an opportunity to identify yet another note as we play the “name the octaves” game.
For space considerations, Fig. 1 ends halfway around the wheel at F#, but if you’re up for the challenge, move CW completely around the wheel until you return to C. For variety, begin with a descending figure or try launching this exercise from a different note (F, for example) and then cycle CW around the wheel.
Want more variations? You can place the half-step approach tone before the middle octave note or even before the first one. Also, you can move your two-octave pattern counterclockwise (CCW) around the circle in fourths. Practicing different versions of this simple routine will pay huge dividends in terms of learning the notes on the fretboard.
Fig. 2 has us zigzagging CW between major triads (represented by the letters on the outside of the circle) and minor triads (shown inside the circle). In this triad-mapping exercise, we’re playing only eight chords, but if you continue around the wheel until you reach your starting point, you’ll hit 12 chords.
or Download Example Audio
By staying on one string set—as we’ve done here—you’re forced to move up and down the fretboard as you navigate the wheel. Great, that’s one type of workout. Another excellent option is to restrict yourself to a five-fret location and find the triads on a variety of string sets. Both approaches force you to think about triad inversions, and that’s the point.
Fig. 3 is all about stacking fifths to create quintal harmony—a cool, impressionistic sound. If you scrutinize the notation, you’ll see that each note is located one CW “click” from its predecessor. Play slowly and observe the let ring markings to create three-note quintal voicings: C–G–D, A–E–B, Gb–Db–Ab, and Eb–Bb–F. Once again, you can generate variations by simply starting on a note other than C.
or Download Example Audio
For a real brainteaser, try Fig. 4. Starting on Bb, we’re moving CCW in fourths, mixing arpeggios (composed of single notes spaced a fourth apart) with four-note quartal clusters and fourth intervals. Whether we’re plucking notes one at a time (as in the arpeggios and intervals) or in a cluster (the half-note voicings), every note is spaced one click away from its immediate neighbors. By the time you’ve reached the end of this exercise, you will have crawled CCW two-and-a-half times around the wheel.
or Download Example Audio
Compared to typical songs with their keys and diatonic chords, an exercise like this can sound alien. But it’s good to stretch your ears in the privacy of a practice session. (And if you like this edgy sound, be sure to check out these Rhythm & Grooves lessons on premierguitar.com: “Exploring Quartal Harmony,” April 2011; “Crazy Quartal Comping,” May 2011; and “Stealth Quartal Colors,” June 2011.)
If you put your mind to it, there are virtually endless ways to use the cycle chart as a practice tool. For instance, take any scale you know and play it CW or CCW around the wheel. As you work through each scale, name every note out loud. Another idea: Take your favorite blues licks and move them around the wheel. You’ll have to change octaves in the process, but exploring a familiar pattern in a new register is an excellent way to expand your improvisational bag of tricks.
The cycle chart is a demanding mistress—perfect for generating ideas that force you into unfamiliar areas of the fretboard. What are the odds you’d do this on your own? Have fun spinning the wheel!
 Andy Ellis is a veteran guitar journalist
and Senior Editor at PG. Based
in Nashville, Andy backs singer-songwriters
on the baritone guitar, and also
hosts The Guitar Show, a weekly on-air
and online broadcast. For the schedule,
links to the stations’ streams, archived audio
interviews with inspiring players, and more,
visit theguitarshow.com.
Andy Ellis is a veteran guitar journalist
and Senior Editor at PG. Based
in Nashville, Andy backs singer-songwriters
on the baritone guitar, and also
hosts The Guitar Show, a weekly on-air
and online broadcast. For the schedule,
links to the stations’ streams, archived audio
interviews with inspiring players, and more,
visit theguitarshow.com.