In music, “dynamics” refers to varying volume levels over time. The word usually has positive associations, as in, “That’s a dynamic song,” or “She has a great sense of dynamics.”
So why is one of the most important recording tools all about reducing dynamics?
Compressors gonna compress. Compressors decrease the variation between loud and soft passages by making the loudest bits quieter. This lets us raise the overall volume without overpowering other parts or introducing unwanted distortion. So ironically, even though compressors reduce level, they’re usually used to make things seem louder.
This tendency can be taken to extremes—and is. (Just Google the phrase “loudness wars” to hear countless engineers, musicians, and listeners moan about how recordings of the last 20 years have gotten louder at the expense of dynamics.) These days, anyone with a DAW has access to great-sounding compressor plug-ins, prompting additional compressor abuse. Still, most great recordings of the last half-century or so have relied on the artful use of compression. So let’s get artful.
Compressor basics. While compressor designs vary, they usually revolve around four key parameters:
• Threshold determines the volume level at which gain reduction kicks in. A high threshold means only the loudest peaks are adjusted. At low thresholds, everything gets squished. Some compressors have a dedicated threshold control, while others (including the iconic Teletronix LA-2A and Urei 1176) use the input level to set the threshold—more signal equals more compression. (Compressors always have an output control to set the overall volume after applying the effect.)
• Ratio determines how severely levels are lowered once they reach the threshold. A 2:1 ratio usually produces a subtle effect, while a 20:1 ratio can squash everything above the threshold like a boot on a bug. (Such extreme compression is called limiting, a technique widely used in broadcast and crappy-sounding modern rock recordings.) Some retro compressors, like the LA-2A, have no ratio control. The 1176 uses preset ratio pushbuttons, while newer models usually have continuously adjustable ratios.
• Attack controls how fast level reduction kicks in. As you lower the attack speed, more sound slips through uncompressed. At maximum settings, almost nothing does. Retro compressors often have no attack control.
• Release regulates how quickly gain reduction backs off once sounds dip below the threshold. Some retro compressors have no release control, while modern ones often offer a choice between adjustable release times and retro-style automatic settings.
Compression case study. One way to get a handle on compression is to start with extreme settings, and then back them down. There’s a great explanation of this technique in Mixing with Your Mind, an extraordinary 2003 recordingbook by engineer Michael Paul Stavrou. (It’s also extraordinarily expensive for a small book with lots of white space: 78 Aussie dollars when purchased from the author’s site. But it’s packed with unique perspectives, and I’ve never regretted the purchase.)
Stavrou emphasizes the rhythmic role of compression—the way it can contribute to a groove. As an example, Clip 1 is a rough mix of a passage with uncompressed acoustic guitar, bass, and drums (courtesy of the brilliant Dawn Richardson). Clip 2 solos the uncompressed guitar.

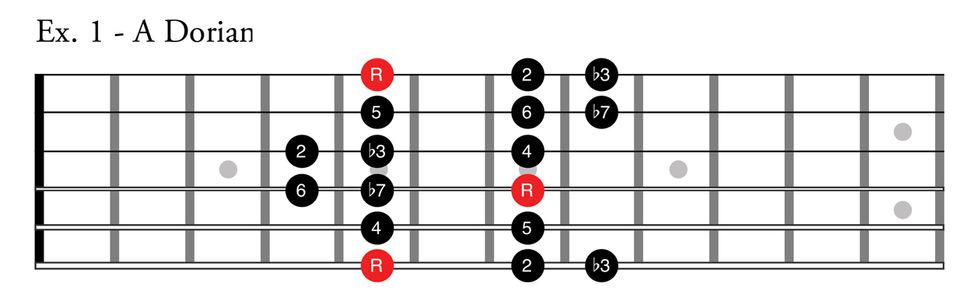
Image 1
Following Stavrou’s lead, I dialed in an extreme compression setting on a Universal Audio 1176 plug-in (Image 1). I set the ratio to 20:1. Attack and release are at maximum speed. The 1176 has no dedicated threshold control, but I’ve got the input cranked, producing a low threshold. The meter depicting the amount of gain reduction barely budges from its far-left extreme. Clip 3 sounds awful, with minimal dynamics, boomy low-mids, and unpleasant pumping.

Image 2
(I use soloed guitar to illustrate this process, but in practice, you’d listen often to the guitar in its mix context.)
First, ease back the attack time. It won’t sound much better, but focus for now on the leading edge of each strummed chord. As you slow the attack, you hear a percussive “pop” or “kiss” at the front of each attack. Depending on the setting, it might be just the initial scrape of pick against string, or it might include some of each chord’s “body.” There’s more zing to each attack in Clip 4 (Image 2).

Image 3
Release me. Next, slow the release time. Now you start to perceive how attack and release settings alter the groove. Sadly, there’s no magic formula, such as making the release coincide with the upbeat. It’s a feel thing—just slide the control around till you find yourself nodding your head in time. Clip 5 (Image 3) is still morbidly over-compressed, but it has a subtle loping feel that supports the slow quarter-note groove. (A/B it with Clip 3, which now sounds lifeless in comparison.)

Image 4
Now that the rhythm feels better, try lowering the ratio. Ideally, you’ll still feel the groove, but in a more natural way. In Clip 6 (Image 4) I’ve dialed the ratio back to 4:1, and I still perceive the head-nod impulse. There’s a dance to it.

Image 5
Finally, raise the threshold (or, as on my 1176, lower the input control and then adjust the output to suit the mix). How far back can you dial the effect and still feel its benefits? In Clip 7 (Image 5) I’ve pulled it way back—the gain reduction meter, formerly pinned to the left, bounces merrily, with maximum reduction of about -5 dB.
After the extremes of the previous examples, you might wonder whether the compressor is having much effect. Hell yeah—just compare it to unprocessed Clip 2! In fact, it might still be too extreme, though it’s probably close enough to move on to other mix details before returning to fine-tune.
Now listen to the entire rough mix with this setting (Clip 8).
Finally, compare the result to raw Clip 1. All these settings are matters of taste, but to my ear, the final clip grooves better. The guitar competes less with the rhythm section, and the part feels less obviously overdubbed.
There are other compression terms and techniques to cover, such as knee settings, side chaining, parallel compression, bus compression, and the distortion/coloration unique to analog compressors, which digital clones mimic with ever-increasing realism. We’ll cover those topics in future columns. But for now I recommend focusing on the four essentials: threshold, ratio, attack, and release. Once you learn those moves, the remaining dance steps are easy.