If you’ve been reading this
column recently, you’ll recall
we’re in the middle of restoring a
’72 Gibson Les Paul Deluxe. In
my September 2011 column, I
took you through the evaluation
process we used to determine
exactly what this restoration
would entail. In October’s column, I covered extracting
the flat and pitted frets, and
explained how I prepped and
skimmed the rosewood fretboard
to remove any micro high spots.
When you’re dealing with
vintage guitars, some clients
don’t want us to even take a
polishing cloth to the instrument,
because it changes the
mojo for them. So when it
came to micro-spot sanding
this LP’s fretboard, I made sure
the owner was okay with the
procedure.
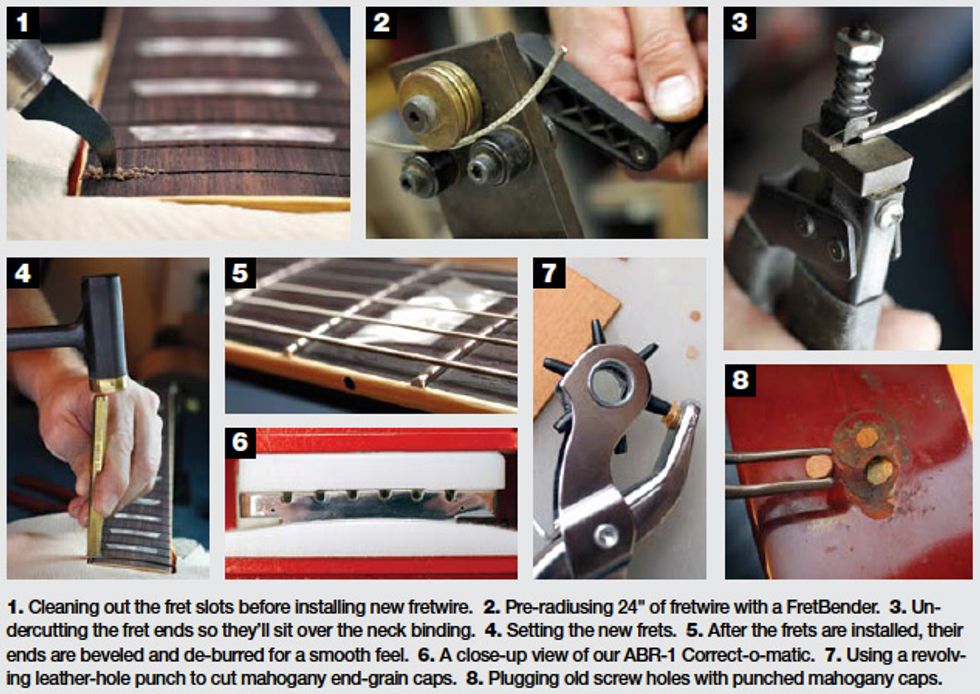
Once I’d checked the fretboard with a straightedge and radius gauge, I confirmed the guitar was ready for its new frets. After consulting with the client and referencing the original frets, we decided to go with Wide/Medium fretwire (item #149 at stewmac.com). This is slightly taller than the old Gibson jumbo wire, and its .046" crown provides ample height for a precision leveling after the frets are installed.
Preparation: For starters, I used a Japanese Fret Slot Cleaning Saw (#3616) to deepen any shallow slots in the fretboard, measuring the depth as I went with a Fret Slot Depth Gauge (#5435). I then used the Fret Slot Cleaning Tool (#4870) to remove old glue and debris so the new frets would seat correctly.
Tailoring: Over the years, I’ve occasionally chosen to bend each individual fret by hand before installing it, but typically I use the FretBender (#0345)— a time-saving tool that lets me accurately radius 24 inches of fretwire at a time. Once a strip of fretwire was radiused, I laid it across the fretboard slot, gauged the length I’d need, and cut it with a Fret Cutter (#0619). This Les Paul has neck binding, so I used a Fret Tang Nipper (#1626) to undercut the fret ends so they’d sit over the binding properly.
Installation: A Deadblow Fretting Hammer (#1296) and brass Fret Setter (#1666) are my tools of choice for this task. As part of this process, I used StewMac #10 Thin Super Glue (#7001) glue to secure each fret in its slot.
Dressing: After the frets were installed, I used a Fret Beveling File (#3759) to put a uniform, 35-degree angle on all the fret ends, and then took off any burrs with a Fret End Dressing File (#1175). The next step was to give the Deluxe’s new frets a full dress. When it comes to fret dressing, there are a variety of tools and procedures for leveling, crowning, and polishing fretwire. You’ll find lots of information online, including reputable demonstrations on YouTube. If you’re interested in this subject, my advice is to keep an open mind and really do some homework.
Bonus Trade Secrets: Before we wrap up this installment of the ’72 Deluxe project, I thought I’d share a couple of trade secrets we used during this phase. As I mentioned in the September column, the guitar’s original ABR-1 Tune-o-matic bridge had collapsed and was unusable. Over the years we’ve experimented with different jigs for correcting this problem, and we’ve now developed a system that’s consistent and easy to use.
We call this device our ABR-1 Correct-o-matic, and it consists of two polyethylene plates mounted to a vise. The bottom plate is radiused, while the outer wings of the flat top plate have .015" shims added to create the desired pitch. The idea is to clamp the bridge and—in a very controlled way— bend it back into its original position by applying pressure to the vise. Once the bridge’s underside is snug against the radiused polyethylene plate, the bridge is correctly arched and ready to come out. This process literally takes seconds.
My second trade secret comes from a farm-and-horse supply store. Such outlets sell a tool called a revolving leather-hole punch. It’s designed to punch holes into leather straps of horse saddles, but we are using it to make mahogany end-grain caps. This punch lets you select multiple hole sizes— from 5/64" to 3/16". Very handy. As you can see in the photos, the tool works perfectly for capping unwanted screw holes in the Les Paul Deluxe.
Thank you for allowing me to share my world with you!
 John Brown is the
inventor of the Fretted/Less
bass. He owns and operates
Brown’s Guitar Factory,
a guitar manufacturing,
repair, and restoration facility
staffed by a team of talented
luthiers. His guitar-tool and accessory designs
are used by builders all over the world. Visit
brownsguitarfactory.com or email John at
info@brownsguitarfactory.com.
John Brown is the
inventor of the Fretted/Less
bass. He owns and operates
Brown’s Guitar Factory,
a guitar manufacturing,
repair, and restoration facility
staffed by a team of talented
luthiers. His guitar-tool and accessory designs
are used by builders all over the world. Visit
brownsguitarfactory.com or email John at
info@brownsguitarfactory.com.