Modern stomps offer more sounds than ever before, but a laptop can help you delve into an even deeper world of live sonic manipulation. Here’s what you need to know to get started.
The beauty of a great guitar plugged straight into a great tube amp is undeniable. Still, some might say the full potential of an electric guitar is realized only when processing that signal. Of course, some of the most groundbreaking players of all time—from Jimi Hendrix to The Edge—have illustrated this point, and the current deluge of new pedals and thriving builders seems to bear this out.
If you are into processing, pedals might be plenty for you, especially in this era of stompboxes that do things even top studio gear couldn’t manage a decade ago. Still, there is a portal to another world of sound available for live use—a world explored by guitarists like Adrian Belew, John McLaughlin, Eivind Aarset, Fennesz, Dan Phelps, the late Andy Gill, and others. It’s a portal you may be looking at as you read this. I am talking about a laptop computer.
I was introduced to the concept of guitar and laptop performance through the series of Warper parties— gatherings dedicated to computer-based music—I attended in New York City. At the very first one, I encountered a guitarist with a computer built into his guitar and another playing jazz fusion through his laptop to backing tracks, also on computer. Yet a third player was performing arrangements of TV themes, playing guitar with one hand and keyboards with the other—all through a laptop.
Plug-ins offer sonic shaping and effect routing that is difficult or impossible to achieve with pedals. Even if you could, it would require a pedalboard the size of the entire stage and a router/switching system of NASA-level complexity.
For me, performing solo with a laptop let me privilege the kind of sonic fairy dust I had been offering as a side musician, shifting the lush pads and textures I had delivered to singer/songwriters for years out from the background and into the focus of attention. Plus, as someone who does not sing or play typical solo guitar, playing through a laptop let me take control of my performance opportunities: no pesky bandmate schedules to consider for rehearsal or booking.
Many guitarists already use a laptop to record everything from demos to final releases. These days, all it takes is a guitar, an audio interface, a DAW (Digital Audio Workstation), and a pair of speakers or even good headphones, and you are ready to make your next masterpiece. If you have worked this way, you have likely discovered plug-ins. Instantiated in a DAW, plug-ins offer sonic shaping and effect routing that is difficult or impossible to achieve with pedals. Even if you could, it would require a pedalboard the size of the entire stage and a router/switching system of NASA-level complexity. Multi-effects units might get you part of the way there but as yet cannot offer the range of potential sounds available with a computer.
With a wealth of creative software, a laptop lets you easily take lush reverbs and mangle them with filters or distortion. You can sequence effects to automatically appear and disappear over the course of a song or composition. If that sounds interesting, you might want to consider transporting your laptop, DAW, and plug-ins to the stage, either as your sole processing system or in conjunction with pedals. Here’s what you’ll need to get started.
Hardware
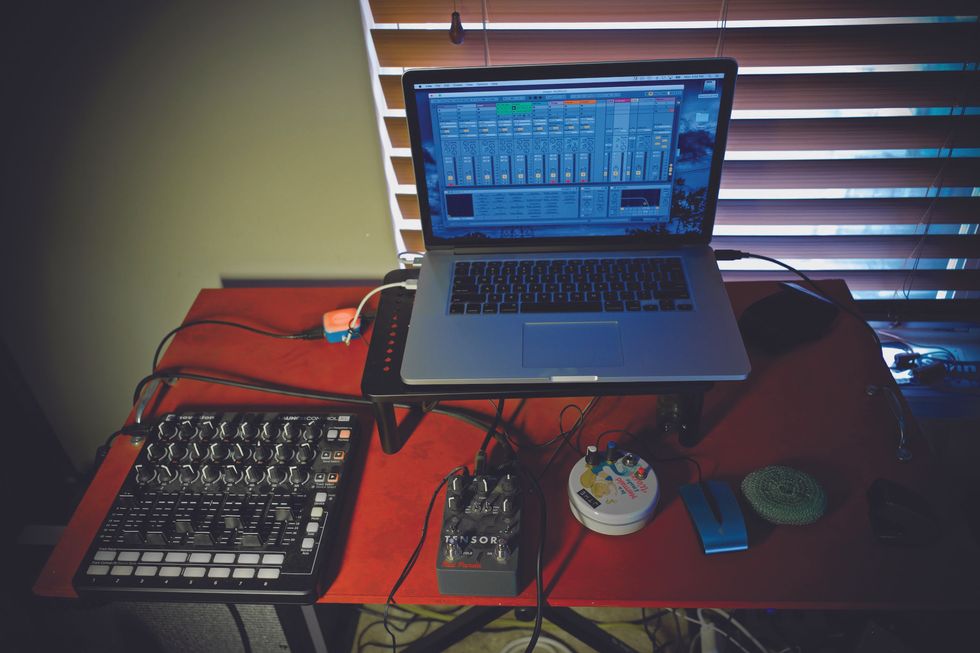
A MIDI controller, like the Novation Launch Control ($159 street) seen here, isn’t necessary to use Ableton Live, but using one increases interactive functionality.
Because live performance has different requirements than recording, ultra-high audio specs are not quite as important, but portability, reliability, build quality, and low latency are crucial. Latency is the time it takes for your signal to go into the audio interface, pass through the software on the laptop, go back into the interface, and travel out to the speakers, as measured in milliseconds. You will want the latency low enough that you don’t hear the sound reaching your ears noticeably after you hear/feel your pick hit the strings. Ideally, you will want the most powerful laptop you can afford in order to have access to the fastest processor possible. Plenty of RAM and a solid-state drive will contribute to the computer’s speed.
There are factors that affect latency. One is buffer size, delineated in samples. Without getting too technical, the lower you can set the buffer in your DAW, the less latency you will hear. How low you can set it, without getting dropouts and other unwanted glitches, is determined by the number of plug-ins you are running and the power of your computer. With virtually any of the current Apple M1 powered laptops you should be good to go. If you can’t afford a new computer, don’t worry. I was performing with a MacBook Pro over a decade ago with no problems. You can attempt this with a non-Apple computer, but virtually every major touring act uses Macs thanks to their reputation for reliability.
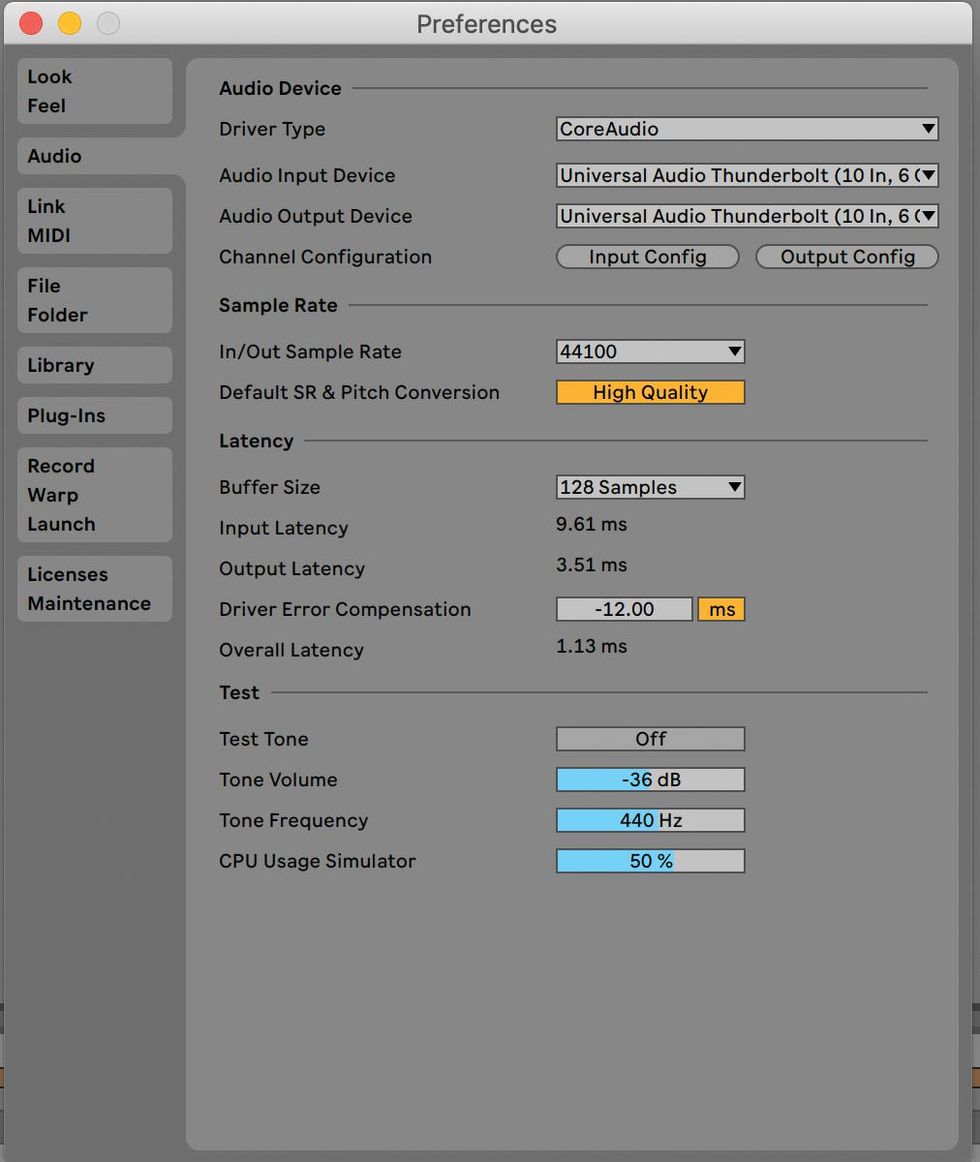
Here I have the buffer size set to 128, where I find I can record tracks without latency issues. With modern computer power and minimal plug-ins, you can probably set this even lower.
To plug your guitar into your computer, you will need an interface, which converts your signal from analog to digital. There are many available options, including the Universal Audio Arrow (available used for $350-$399) or Focusrite Scarlett ($179 street). You only need one input, unless you use both electric and acoustic guitars, which have different input requirements. The number of outputs will depend on your signal chain.
A MIDI controller of some sort—foot switcher, tabletop controller, or both—is a good idea because, as with pedals, you will want to turn effects on and off and have access to parameters. Akai, Korg, and others make a variety of tabletop controllers, ranging from $119 street and up, with knobs and switches that will let you turn on, blend, and manipulate the parameters of the plug-ins in your DAW.
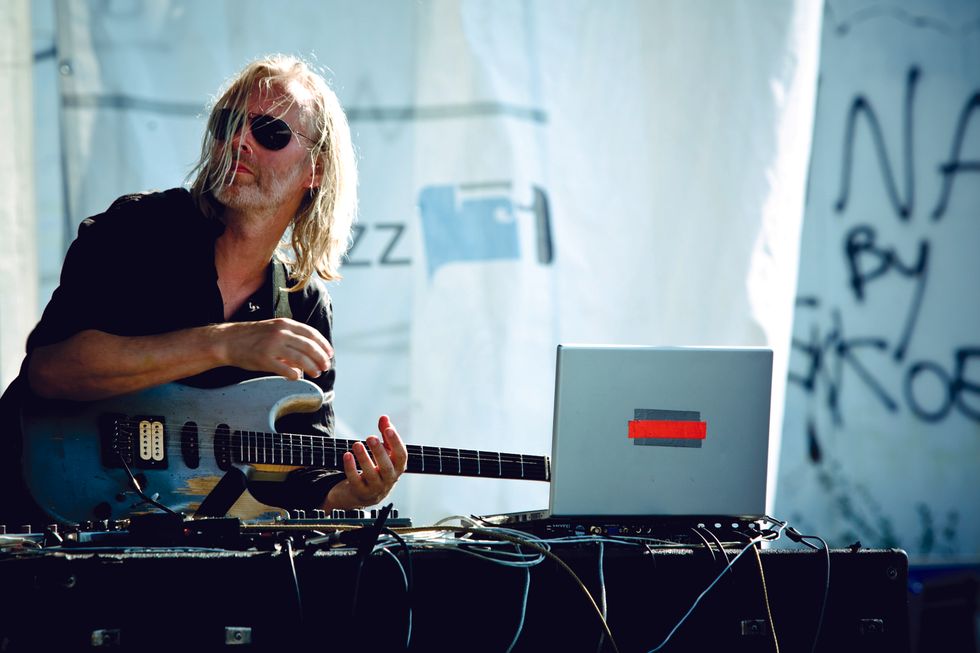
Eivind Aarset is among the group of creative guitarists who bring a laptop into the mix for all gigs.
Photo by soukizy.com
You might be thinking, “Aren’t my hands otherwise occupied playing my guitar?” That’s true, but one of the advantages of laptop guitar is advanced looping. Once a loop is created, a tabletop controller lets you easily route that loop through myriad effects—filters, resonators, delays, reverbs—in ways that are impossible with hardware loopers. A footswitch-style MIDI controller is helpful if you want to do sync’d rhythmic loops, though it’s not as necessary for ambient looping.
Software
To process your guitar in the computer, you can use any software that hosts plug-ins: Logic, Pro Tools, GarageBand, Logic MainStage, and others. As a performing tool, Ableton Live (starting at $99 street for an introductory version) is the most ideal and offers a number of unique features. With Ableton, you can tap in tempo, easily syncing all your effects and loops at once, and there are “nudge” buttons that let you move the tempo of loops slightly up or down to match a drummer’s shifting time without changing their pitch. The “link” feature lets you wirelessly sync your effects with your keyboard player’s laptop, your drummer’s loops, and even the computer running the show’s backing tracks and light show.
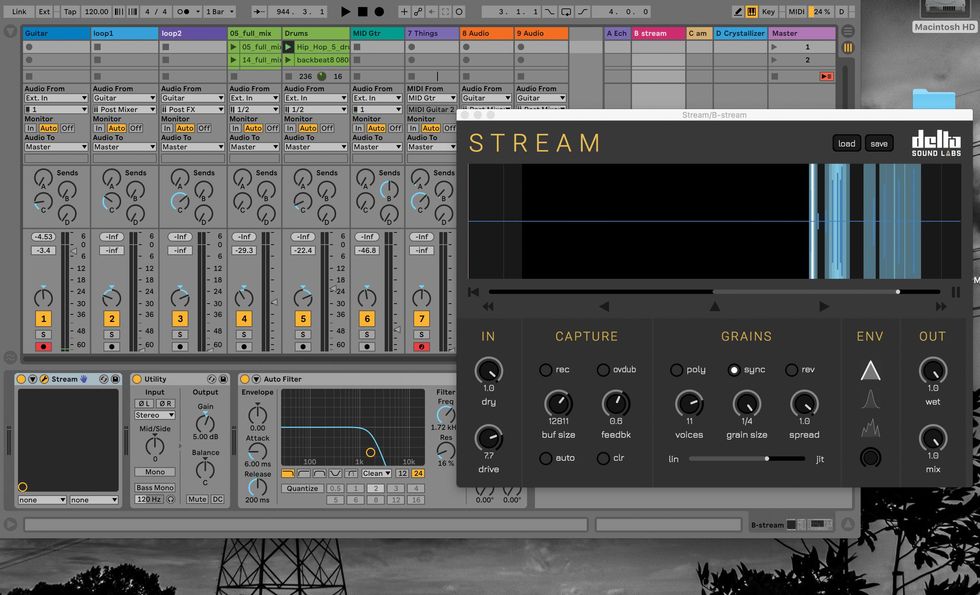
This is my performance setup in Ableton Live. It includes the Jam Origin MIDI Guitar plug-in ($149 street) that lets me control spoken-word recordings in a sampler without any kind of MIDI pickup on my guitar. Also shown is a great granular processing plugin, Stream, from Delta Sound Labs ($49 street).
Live’s native plug-ins will let you create a custom amp-modeling system; emulate digital, analog, and tape delays; and add stutter, granular, or bit-crushing effects. Plus, if you are performing solo using backing tracks and running through a PA, you can easily set a dedicated track to resampling and it will record your entire evening’s performance.
Live lets you loop in two different ways via the looper plug-in and “clip” system. The looper plug-in is great for overdubbing ambient soundscapes, but can also provide timed rhythmic parts, while the clip system is perfect for making multiple rhythmic-based loops that can then be triggered by a MIDI footswitch and/or tabletop controller. While you can’t overdub on a clip, you can set up multiple clip loop tracks where you are able to, for example, record all your verse parts in one row, your chorus parts in a second row just below, and create a third row for the bridge. You can then trigger these rows as scenes.
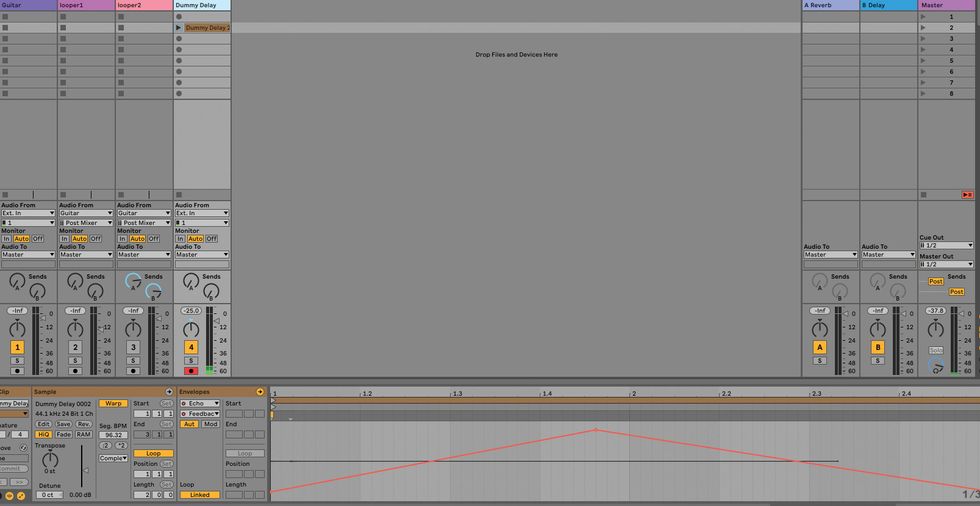
Here is a dummy clip set to raise and lower the feedback of the Ableton echo plug-in.
Live also lets you make “dummy” clips with no audio that can be set to modify effects parameters over time. For example, you could set a dummy clip to increase a delay plug-in’s feedback to just under runaway levels while simultaneously shortening the delay over a period of two bars, and then reverse the process over the next two bars. Try that with pedals!
Would you like to hear two great examples of guitarists using Ableton Live onstage? Check out any video with Eivind Aarset performing. Aarset uses it for a variety of sounds, including ambient reverbs and delays and looping. John Scofield collaborator Avi Bortnick also uses Live for myriad sounds and textures, one of which includes using his guitar to open a noise gate that lets rap vocals cut through only when he plays.
Signal Path
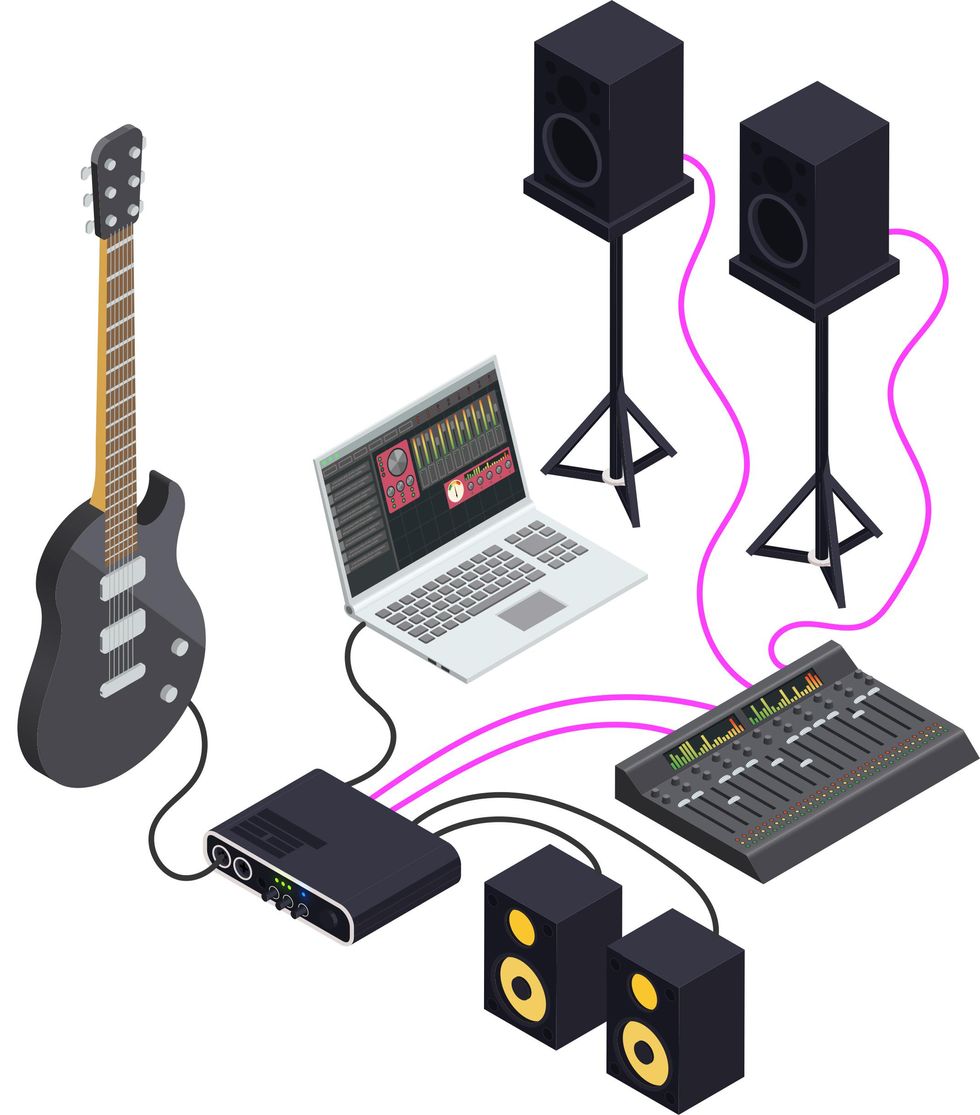
Fig. 1 (*Magenta cables indicate additional or alternative signal path.)
There are multiple ways to insert a laptop into your signal chain. You can run everything through your computer, employing amp modeling software—like Bias FX 2 ($49 street), Guitar Rig ($199 street), or AmpliTube ($99 street)—and running the signal from your audio interface to the house PA or a pair of powered monitors (Fig. 1).
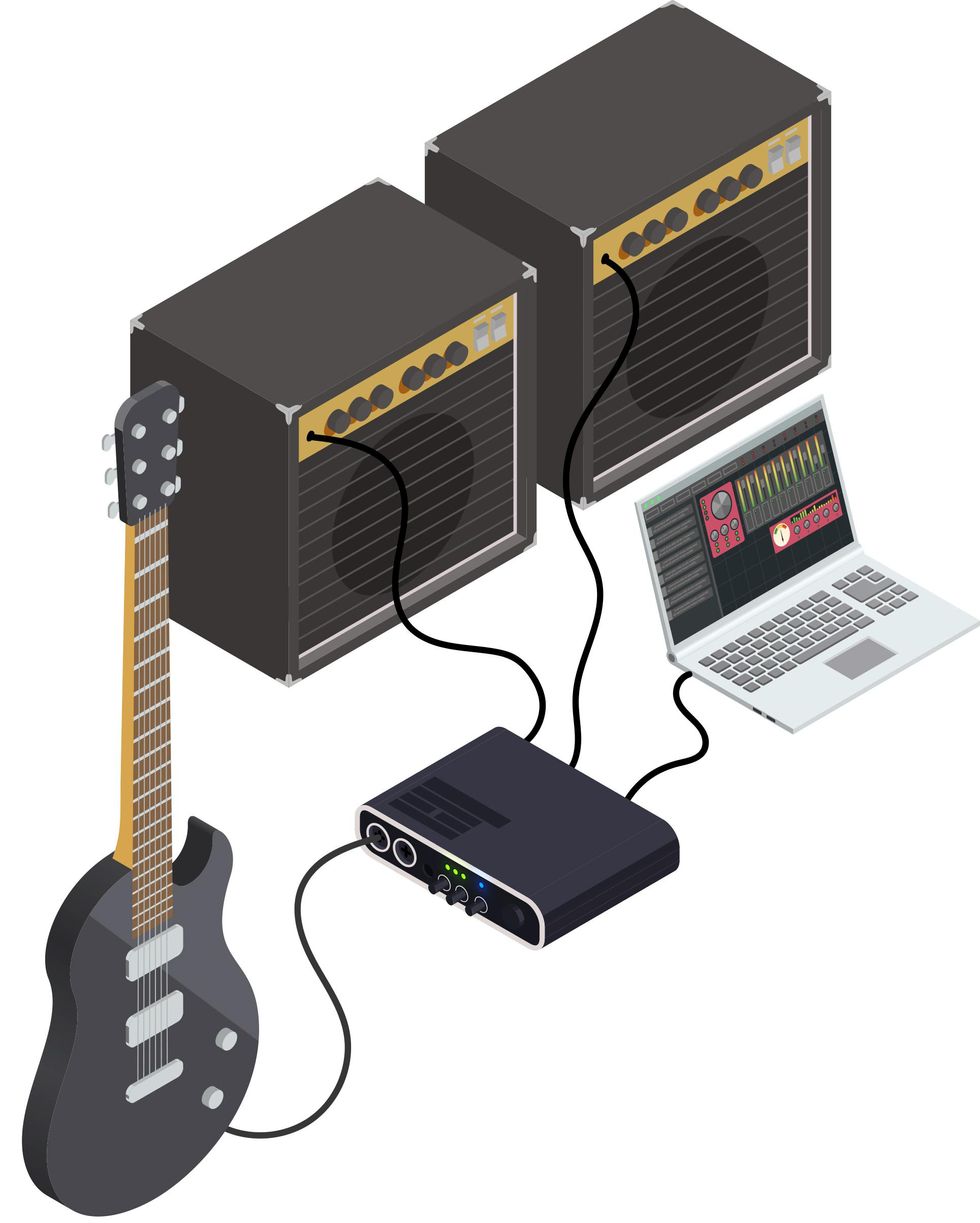
Fig. 2
You might instead eschew the amp modeling software and run the signal into a pair of guitar amplifiers (Fig. 2). This offers a way to keep your favorite tube amps as part of your rig. But be careful: Some effects plug-ins can put out low frequencies that don’t work well with guitar amps and speakers.
For both of those methods, all you need is an interface with one input and two outputs. You run your guitar signal into the interface, which converts your analog signal to digital, and then sends that digital info through USB, Lightning, or Thunderbolt cables into the laptop and the software. Next, a stereo digital signal is sent back to the interface, where it is converted to stereo analog and sent out to the amps, powered speakers, or PA using standard guitar cables or XLR-style microphone cables.
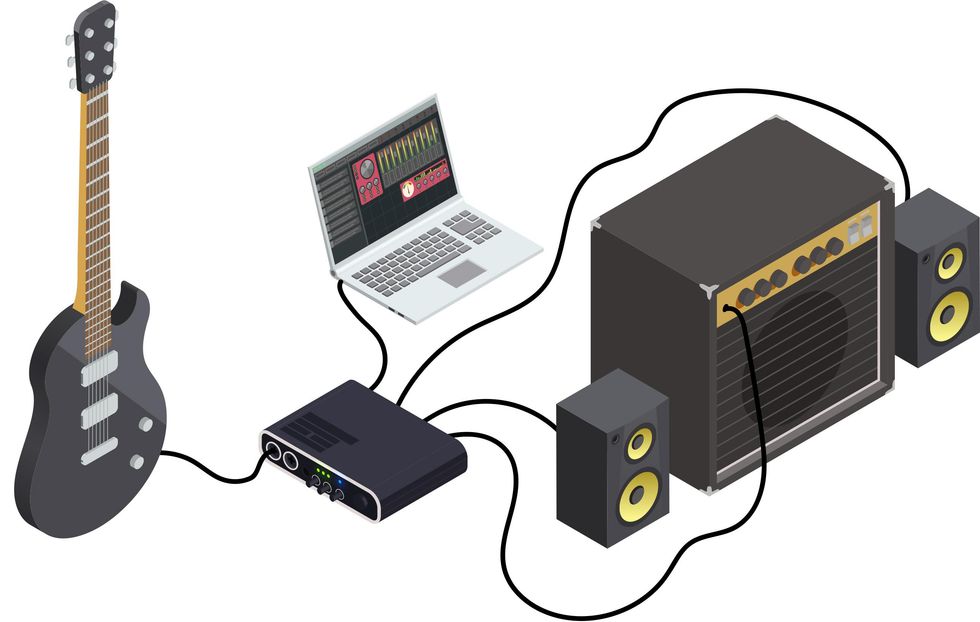
Fig. 3
A more complicated method is a version of the wet-dry-wet setup. Here you would split your guitar signal between a mono signal going directly into a guitar amplifier and the laptop’s stereo output to two full-range powered speakers or the PA. This setup can be achieved in a few ways. You can use an interface with one input and three or more outputs that can be routed inside the interface. This allows you to send your guitar signal from the interface simultaneously to the laptop and directly to a guitar amplifier (Fig. 3).
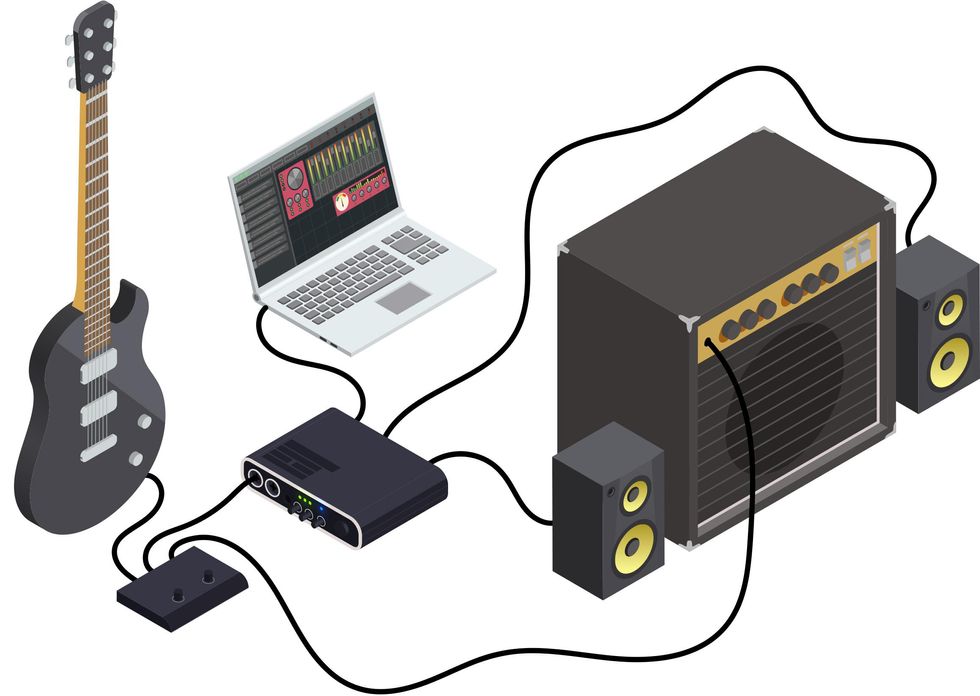
Fig. 4
Alternately, you could use a splitter box before the audio interface that sends one signal to your interface and computer, and one to the amp (Fig. 4).
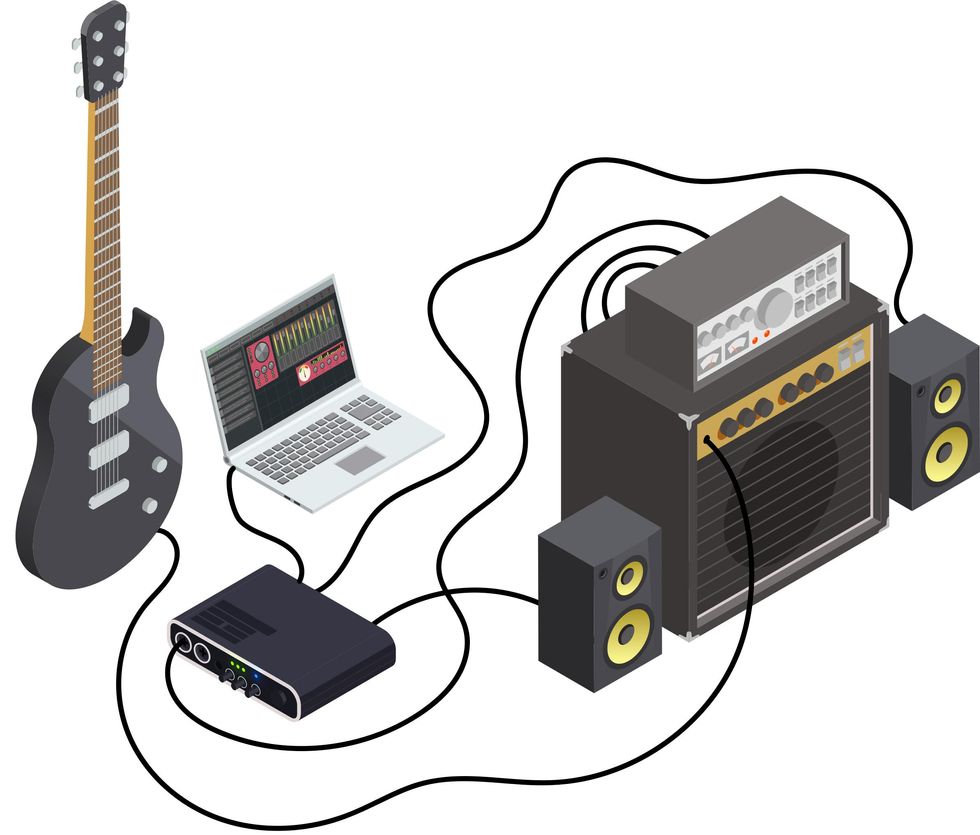
Fig. 5
If you don’t want to use modeling software in the computer for the wet signal, you can use a reactive load box, like the Universal Audio OX ($1,499 street) or Fryette’s Power Station ($899 street) or Power Load ($699 street), which gets placed between your amplifier and its speaker (Fig. 5). You run your guitar into the amp, and two outputs on the load box simultaneously send your amp signal to the speaker and, with speaker emulation, to the computer interface. Sending the sound of your amplifier to the DAW means there is no need for amp modeling within the computer. Once the sound is processed, it is sent to powered speakers or the PA, as in Fig. 2. In this method, your amplifier signal can remain dry and present, while processed sounds will emanate from the powered speakers or PA.
If you don’t want your amplifier signal completely dry or just want to place some of your effects pre-computer, you may want to use pedals in front of your amp. Which brings us to.…
Pedals and Laptop
As much as a computer can do, there are plenty of good reasons to combine pedals with laptop sounds. Digital modeling software sounds excellent these days, but adding a mild overdrive pedal before your interface can lend some analog warmth to the sound. In addition, a drive pedal set for just a little breakup can make the playing experience feel more organic. As you play harder and softer, the “give” of the pedal can often feel more expressive than even the best amp modeling software.
Plus, just as many plug-ins are not yet duplicated in pedal form, likewise there are pedals that perform functions not available as plug-ins. Glitchy, digital micro-looping pedals like the Red Panda Tensor, Hologram Electronics Dream Sequence, Chase Bliss’ Blooper and Mood, and the Hexe FX Revolver do not yet have any direct analogs in the plug-in world. If you want to learn a programming language like Max MSP, you might be able create something like these pedals inside your computer. Ableton includes Max for Live with the purchase of their suite and a plethora of pre-programmed plug-ins are available using Max as their basis, but these pedals still offer something special.
Taking the Stage
You now have all your hardware and software and are ready to perform. Depending on how you use the laptop in your signal chain, you might be able to place it out of the way and use a foot switcher, as if you were using a standard multi-effects unit. But if you want to maximize the advantages of using a computer live, you will likely want it at hand.
In almost two decades of performing with this setup, I have had fewer computer crashes than pedal malfunctions.
You can normally rely on the venue to provide a table of some sort, or you could try Eivind Aarset’s solution. He brings a keyboard stand and places his guitar’s hard case on it, creating a perfect platform for controller, computer, interface, and some of his hardware pedals. I haven’t used a hard case in years, so I just screwed some handles onto a painted piece of plywood and place that on a keyboard stand.
As with any performance, hearing yourself is crucial. If you are using guitar amps or powered speakers, they will act as monitors. Some powered speakers may have XLR outs to send to the house PA. If you are only running through the PA, you may want to use headphones plugged into your interface to be assured of hearing the same thing as the audience.
Some guitarists have trepidation about reliability when using a laptop. All I can say is that in almost two decades of performing with this setup I have had fewer computer crashes than pedal malfunctions. It is also easier to bring a backup laptop and interface than a second pedalboard and amp.
A laptop dedicated to only music is ideal, but if you don’t have that luxury, make sure to quit any programs other than the performing software in use. Turning off WiFi during your set will prevent notifications from interrupting and provide a little extra processing power. And speaking of power, while it is best to keep your laptop plugged in while performing, if there is ever an issue with clean power or a faulty socket, unlike with pedals, your laptop battery will take over and the show will go on.
Is It for You?
Playing through a laptop is not for everyone. You probably won’t be welcome at your local blues jam if you say, “Hang on a minute while I boot up my Mac.” But if your music involves a world of sounds that go well beyond those offered by hardware pedals and multi-effects, or you’re just seeking a more portable way of producing interesting tones, taking the stage with a computer might be an option. And, with tubes becoming harder to get, who knows? Someday it may be the best option.
- Which IR Box Is 4U? - Premier Guitar ›
- 10 Recording Mistakes Guitarists Make (And How to Avoid Them ... ›
- Recording: Going Mobile - Premier Guitar ›
Stompboxtober is finally here! Enter below for your chance to WIN today's featured pedal from Diamond Pedals! Come back each day during the month of October for more chances to win!
Diamond Pedals Dark Cloud
True to the Diamond design ethos of our dBBD’s hybrid analog architecture, Dark Cloud unlocks a new frontier in delay technology which was once deemed unobtainable by standard BBD circuit.
Powered by an embedded system, the Dark Cloud seamlessly blends input and output signals, crafting Tape, Harmonic, and Reverse delays with the organic warmth of analog companding and the meticulous precision of digital control.
Where analog warmth meets digital precision, the Dark Cloud redefines delay effects to create a pedal like no other
Intermediate
Intermediate
• Learn classic turnarounds.
• Add depth and interest to common progressions.
• Stretch out harmonically with hip substitutions.
Get back to center in musical and ear-catching ways.
A turnaround chord progression has one mission: It allows the music to continue seamlessly back to the beginning of the form while reinforcing the key center in a musically interesting way. Consider the last four measures of a 12-bar blues in F, where the bare-bones harmony would be C7-Bb7-F7-F7 (one chord per measure). With no turn around in the last two measures, you would go back to the top of the form, landing on another F7. That’s a lot of F7, both at the end of the form, and then again in the first four bars of the blues. Without a turnaround, you run the risk of obscuring the form of the song. It would be like writing a novel without using paragraphs or punctuation.
The most common turnaround is the I-VI-ii-V chord progression, which can be applied to the end of the blues and is frequently used when playing jazz standards. Our first four turnarounds are based on this chord progression. Furthermore, by using substitutions and chord quality changes, you get more mileage out of the I-VI-ii-V without changing the basic functionality of the turnaround itself. The second group of four turnarounds features unique progressions that have been borrowed from songs or were created from a theoretical idea.
In each example, I added extensions and alterations to each chord and stayed away from the pure R-3-5-7 voicings. This will give each chord sequence more color and interesting voice leading. Each turnaround has a companion solo line that reflects the sound of the changes. Shell voicings (root, 3rd, 7th) are played underneath so that the line carries the sound of the written chord changes, making it easier to hear the sound of the extensions and alterations. All examples are in the key of C. Let’s hit it.
The first turnaround is the tried and true I-VI-ii-V progression, played as Cmaj7-A7-Dm7-G7. Ex. 1 begins with C6/9, to A7(#5), to Dm9, to G7(#5), and resolves to Cmaj7(#11). By using these extensions and alterations, I get a smoother, mostly chromatic melodic line at the top of the chord progression.
Ex. 2 shows one possible line that you can create. As for scale choices, I used C major pentatonic over C6/9, A whole tone for A7(#5), D Dorian for Dm9, G whole tone for G7(#5), and C Lydian for Cmaj7(#11) to get a more modern sound.
The next turnaround is the iii-VI-ii-V progression, played as Em7-A7-Dm7-G7 where the Em7 is substituted for Cmaj7. The more elaborate version in Ex. 3 shows Em9 to A7(#9)/C#, to Dm6/9, to G9/B, resolving to Cmaj7(add6). A common way to substitute chords is to use the diatonic chord that is a 3rd above the written chord. So, to sub out the I chord (Cmaj7) you would use the iii chord (Em7). By spelling Cmaj7 = C-E-G-B and Em7 = E-G-B-D, you can see that these two chords have three notes in common, and will sound similar over the fundamental bass note, C. The dominant 7ths are in first inversion, but serve the same function while having a more interesting bass line.
The line in Ex. 4 uses E Dorian over Em9, A half-whole diminished over A7(#9)/C#, D Dorian over Dm6/9, G Mixolydian over G9/B, and C major pentatonic over Cmaj7(add6). The chord qualities we deal with most are major 7, dominant 7, and minor 7. A quality change is just that… changing the quality of the written chord to another one. You could take a major 7 and change it to a dominant 7, or even a minor 7. Hence the III-VI-II-V turnaround, where the III and the VI have both been changed to a dominant 7, and the basic changes would be E7-A7-D7-G7.
See Ex. 5, where E7(b9) moves to A7(#11), to D7(#9) to G7(#5) to Cmaj9. My scale choices for the line in Ex. 6 are E half-whole diminished over E7(#9), A Lydian Dominant for A7(#11), D half-whole diminished for D7(#9), G whole tone for G7(#5), and C Ionian for Cmaj9.
Ex. 7 is last example in the I-VI-ii-V category. Here, the VI and V are replaced with their tritone substitutes. Specifically, A7 is replaced with Eb7, and G7 is replaced with Db7, and the basic progression becomes Cmaj7-Eb7-Dm7-Db7. Instead of altering the tritone subs, I used a suspended 4th sound that helped to achieve a diatonic, step-wise melody in the top voice of the chord progression.
The usual scales can be found an Ex. 8, where are use a C major pentatonic over C6/9, Eb Mixolydian over Eb7sus4, D Dorian over Dm11, Db Mixolydian over Db7sus4, and once again, C Lydian over Cmaj7(#11). You might notice that the shapes created by the two Mixolydian modes look eerily similar to minor pentatonic shapes. That is by design, since a Bb minor pentatonic contains the notes of an Eb7sus4 chord. Similarly, you would use an Ab minor pentatonic for Db7sus4.
The next four turnarounds are not based on the I-VI-ii-V chord progression, but have been adapted from other songs or theoretical ideas. Ex. 9 is called the “Backdoor” turnaround, and uses a iv-bVII-I chord progression, played as Fm7-Bb7-Cmaj7. In order to keep the two-bar phrase intact, a full measure of C precedes the actual turnaround. I was able to compose a descending whole-step melodic line in the top voice by using Cmaj13 and Cadd9/E in the first bar, Fm6 and Ab/Bb in the second bar, and then resolving to G/C. The slash chords have a more open sound, and are being used as substitutes for the original changes. They have the same function, and they share notes with their full 7th chord counterparts.
Creating the line in Ex. 10 is no more complicated than the other examples since the function of the chords determines which mode or scale to use. The first measure employs the C Ionian mode over the two Cmaj chord sounds. F Dorian is used over Fm6 in bar two. Since Ab/Bb is a substitute for Bb7, I used Bb Mixolydian. In the last measure, C Ionian is used over the top of G/C.
The progression in Ex. 11 is the called the “Lady Bird” turnaround because it is lifted verbatim from the Tadd Dameron song of the same name. It is a I-bIII-bVI-bII chord progression usually played as Cmaj7-Eb7-Abmaj7-Db7. Depending on the recording or the book that you check out, there are slight variations in the last chord but Db7 seems to be the most used. Dressing up this progression, I started with a different G/C voicing, to Eb9(#11), to Eb/Ab (subbing for Abmaj7), to Db9(#11), resolving to C(add#11). In this example, the slash chords are functioning as major seventh chords.
As a result, my scale choices for the line in Ex. 12 are C Ionian over G/C, Eb Lydian Dominant over Eb9(#11), Ab Ionian over Eb/Ab, Db Lydian Dominant over Db9(#11), and C Lydian over C(add#11).
The progression in Ex. 13 is called an “equal interval” turnaround, where the interval between the chords is the same in each measure. Here, the interval is a descending major 3rd that creates a I-bVI-IV-bII sequence, played as Cmaj7-Abmaj7-Fmaj7-Dbmaj7, and will resolve a half-step down to Cmaj7 at the top of the form. Since the interval structure and chord type is the same in both measures, it’s easy to plane sets of voicings up or down the neck. I chose to plane up the neck by using G/C to Abmaj13, then C/F to Dbmaj13, resolving on Cmaj7/E.
The line in Ex. 14 was composed by using the notes of the triad for the slash chord and the Lydian mode for the maj13 chords. For G/C, the notes of the G triad (G-B-D) were used to get an angular line that moves to Ab Lydian over Abmaj13. In the next measure, C/F is represented by the notes of the C triad (C-E-G) along with the root note, F. Db Lydian was used over Dbmaj13, finally resolving to C Ionian over Cmaj7/E. Since this chord progression is not considered “functional” and all the chord sounds are essentially the same, you could use Lydian over each chord as a way to tie the sound of the line together. So, use C Lydian, Ab Lydian, F Lydian, Db Lydian, resolving back to C Lydian.
The last example is the “Radiohead” turnaround since it is based off the chord progression from their song “Creep.” This would be a I-III-IV-iv progression, and played Cmaj7-E7-Fmaj7-Fm7. Dressing this one up, I use a couple of voicings that had an hourglass shape, where close intervals were in the middle of the stack.
In Ex. 15 C6/9 moves to E7(#5), then to Fmaj13, to Fm6 and resolving to G/C. Another potential name for the Fmaj13 would be Fmaj7(add6) since the note D is within the first octave. This chord would function the same way, regardless of which name you used.
Soloing over this progression in Ex. 16, I used the C major pentatonic over C6/9, E whole tone over E7(#5), F Lydian over Fmaj13, and F Dorian over Fm6. Again, for G/C, the notes of the G triad were used with the note E, the 3rd of a Cmaj7 chord.
The main thing to remember about the I-VI-ii-V turnaround is that it is very adaptable. If you learn how to use extensions and alterations, chord substitutions, and quality changes, you can create some fairly unique chord progressions. It may seem like there are many different turnarounds, but they’re really just an adaptation of the basic I-VI-ii-V progression.
Regarding other types of turnarounds, see if you can steal a short chord progression from a pop tune and make it work. Or, experiment with other types of intervals that would move the chord changes further apart, or even closer together. Could you create a turnaround that uses all minor seventh chords? There are plenty of crazy ideas out there to work with, and if it sounds good to you, use it!
Many listeners and musicians can tell if a bass player is really a guitarist in disguise. Here’s how you can brush up on your bass chops.
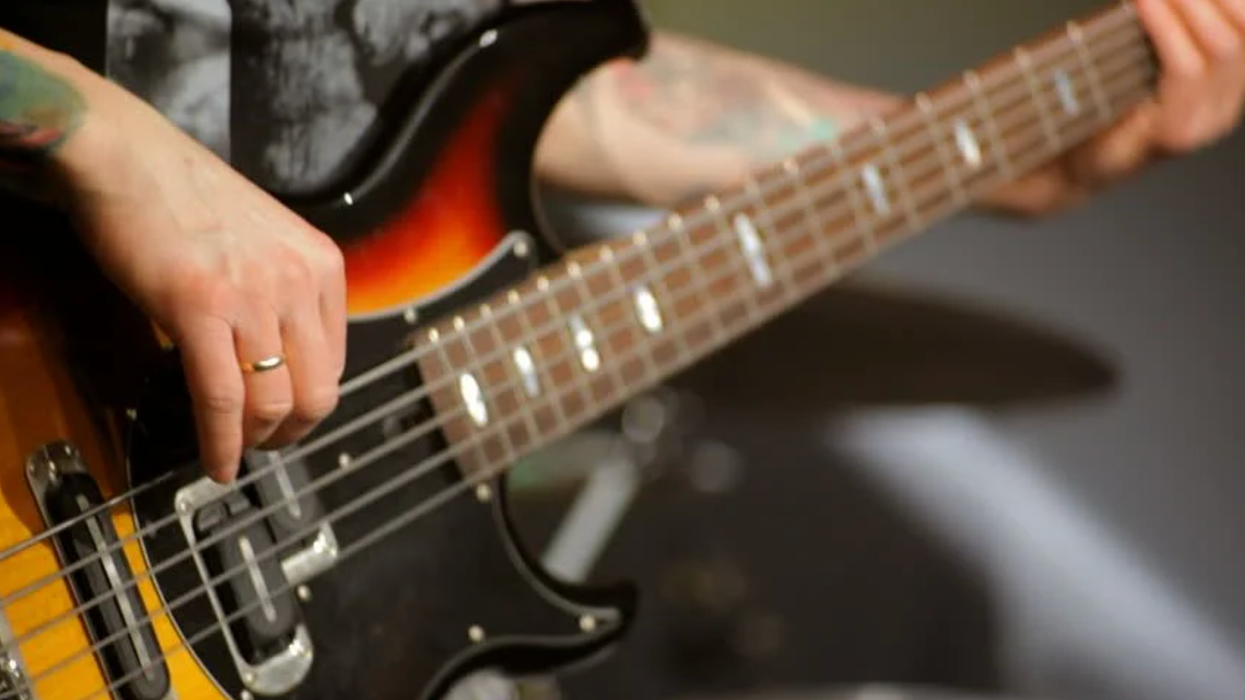
Was bass your first instrument, or did you start out on guitar? Some of the world’s best bass players started off as guitar players, sometimes by chance. When Stuart Sutcliffe—originally a guitarist himself—left the Beatles in 1961, bass duties fell to rhythm guitarist Paul McCartney, who fully adopted the role and soon became one of the undeniable bass greats.
Since there are so many more guitarists than bassists—think of it as a supply and demand issue—odds are that if you’re a guitarist, you’ve at least dabbled in bass or have picked up the instrument to fill in or facilitate a home recording.
But there’s a difference between a guitarist who plays bass and one who becomes a bass player. Part of what’s different is how you approach the music, but part of it is attitude.
Many listeners and musicians can tell if a bass player is really a guitarist in disguise. They simply play differently than someone who spends most of their musical time embodying the low end. But if you’re really trying to put down some bass, you don’t want to sound like a bass tourist. Real bassists think differently about the rhythm, the groove, and the harmony happening in each moment.
And who knows … if you, as a guitarist, thoroughly adopt the bassist mindset, you might just find your true calling on the mightiest of instruments. Now, I’m not exactly recruiting, but if you have the interest, the aptitude, and—perhaps most of all—the necessity, here are some ways you can be less like a guitarist who plays bass, and more like a bona fide bass player.
Start by playing fewer notes. Yes, everybody can see that you’ve practiced your scales. But at least until you get locked in rhythmically, use your ears more than your fingers and get a sense of how your bass parts mesh with the other musical elements. You are the glue that holds everything together. Recognize that you’re at the intersection of rhythm and harmony, and you’ll realize foundation beats flash every time.“If Larry Graham, one of the baddest bassists there has ever been, could stick to the same note throughout Sly & the Family Stone’s ‘Everyday People,’ then you too can deliver a repetitive figure when it’s called for.”
Focus on that kick drum. Make sure you’re locked in with the drummer. That doesn’t mean you have to play a note with every kick, but there should be some synchronicity. You and the drummer should be working together to create the rhythmic drive. Laying down a solid bass line is no time for expressive rubato phrasing. Lock it up—and have fun with it.
Don’t sleep on the snare. What does it feel like to leave a perfect hole for the snare drum’s hits on two and four? What if you just leave space for half of them? Try locking the ends of your notes to the snare’s backbeat. This is just one of the ways to create a rhythmic feel together with the drummer, so you produce a pocket that everyone else can groove to.
Relish your newfound harmonic power. Move that major chord root down a third, and now you have a minor 7 chord. Play the fifth under a IV chord and you have a IV/V (“four over five,” which fancy folks sometimes call an 11 chord). The point is to realize that the bottom note defines the harmony. Sting put it like this: “It’s not a C chord until I play a C. You can change harmony very subtly but very effectively as a bass player. That’s one of the great privileges of our role and why I love playing bass. I enjoy the sound of it, I enjoy its harmonic power, and it’s a sort of subtle heroism.”
Embrace the ostinato. If the song calls for playing the same motif over and over, don’t think of it as boring. Think of it as hypnotic, tension-building, relentless, and an exercise in restraint. Countless James Brown songs bear this out, but my current favorite example is the bass line on the Pointer Sisters’ swampy cover of Allen Toussaint “Yes We Can Can,” which was played by Richard Greene of the Hoodoo Rhythm Devils, aka Dexter C. Plates. Think about it: If Larry Graham, one of the baddest bassists there has ever been, could stick to the same note throughout Sly & the Family Stone’s “Everyday People,” then you too can deliver a repetitive figure when it’s called for.
Be supportive. Though you may stretch out from time to time, your main job is to support the song and your fellow musicians. Consider how you can make your bandmates sound better using your phrasing, your dynamics, and note choices. For example, you could gradually raise the energy during guitar solos. Keep that supportive mindset when you’re offstage, too. Some guitarists have an attitude of competitiveness and even scrutiny when checking out other players, but bassists tend to offer mutual support and encouragement. Share those good vibes with enthusiasm.
And finally, give and take criticism with ease. This one’s for all musicians: Humility and a sense of helpfulness can go a long way. Ideally, everyone should be working toward the common goal of what’s good for the song. As the bass player, you might find yourself leading the way.Fuchs Audio introduces the ODH Hybrid amp, featuring a True High Voltage all-tube preamp and Ice Power module for high-powered tones in a compact size. With D-Style overdrive, Spin reverb, and versatile controls, the ODH offers exceptional tone shaping and flexibility at an affordable price point.
Fuchs Audio has introduced their latest amp the ODH © Hybrid. Assembled in USA.
Featuring an ODS-style all-tube preamp, operating at True High Voltage into a fan-cooled Ice power module, the ODH brings high-powered clean and overdrive tones to an extremely compact size and a truly affordable price point.
Like the Fuchs ODS amps, the ODH clean preamp features 3-position brite switch, amid-boost switch, an EQ switch, high, mid and low controls. The clean preamp drives theoverdrive section in D-Style fashion. The OD channel has an input gain and outputmaster with an overdrive tone control. This ensures perfect tuning of both the clean andoverdrive channels. A unique tube limiter circuit controls the Ice Power module input.Any signal clipping is (intentionally) non-linear so it responds just like a real tube amp.
The ODH includes a two-way footswitch for channels and gain boost. A 30-second mute timer ensures the tubes are warmed up before the power amp goes live. The ODH features our lush and warm Spin reverb. A subsonic filter eliminates out-of-band low frequencies which would normally waste amplifier power, which assures tons of clean headroom. The amp also features Accent and Depth controls, allowing contouring of the high and low response of the power amp section, to match speakers, cabinets andenvironments. The ODH features a front panel fully buffered series effects loop and aline out jack, allowing for home recording or feeding a slave amp. A three-position muteswitch mutes the amp, the line out or mute neither.
Built on the same solid steel chassis platform as the Fuchs FB series bass amps, the amps feature a steel chassis and aluminum front and rear panels, Alpha potentiometers, ceramic tube sockets, high-grade circuit boards and Neutrik jacks. The ICE power amp is 150 watts into 8 ohms and 300 watts into 4 ohms, and nearly 500 watts into 2.65 ohms (4 and8 ohms in parallel) and operates on universal AC voltage, so it’s fully globallycompatible. The chassis is fan-cooled to ensure hours of cool operation under any circumstances. The all-tube preamp uses dual-selected 12AX7 tubes and a 6AL5 limiter tube.
MAP: $ 1,299
For more information, please visit fuchsaudiotechnology.com.