Photo 1
Ready to tweak your 6-string for maximum musical versatility?
For decades, blues and rock guitarists have been laying glass or metal cylinders across their strings to add expressive riffs to their music. Unlike a Dobro or lap steel, which is played horizontally with a bar and has its strings jacked up way off the fretboard, a standard 6-string guitar can be set up for both fretting and slide work—if you know what you're doing.
Let's explore how to finesse a guitar so its strings sit high enough to keep a slide from crashing into the frets, yet remain close enough to the fretboard that you can play chords and riffs with your fingertips. Yes, you can have it all, as Duane Allman, Johnny Winter, Sonny Landreth, Ry Cooder, Derek Trucks, and many other greats have proven over the years.
It's not too hard to set up an electric guitar for dual duties, so that's what we'll focus on. It's more of a challenge with an acoustic, but with a little ingenuity, you can also adapt the following techniques to a flattop, so read on.
Project overview.
To illustrate the steps, I'll use a 2003 Gibson Les Paul Studio (Photo 1) a client brought in to have converted into a ripping slide guitar. He wanted to stick with his moderately light .010–.049 strings so he could comp and solo as usual, but he also wanted to augment his standard riffage with slide licks when the spirit moved him.
To make this happen, I suggested he use a lightweight, straight-wall glass slide—similar to Allman and Trucks—as opposed to the heavier brass or bottleneck slides that are often favored by acoustic resonator guitarists. Why? Using a lightweight slide, such as a Dunlop Derek Trucks Signature medicine bottle or the aluminum BigHeart Firecracker, makes it possible to use slinkier strings and keep the action reasonably low. Heavier slides can sound great, but they demand stouter strings and stiffer action. A light slide allows you to find that sweet spot in your setup where you can use the same guitar for two very different techniques.
Preliminary measurements.
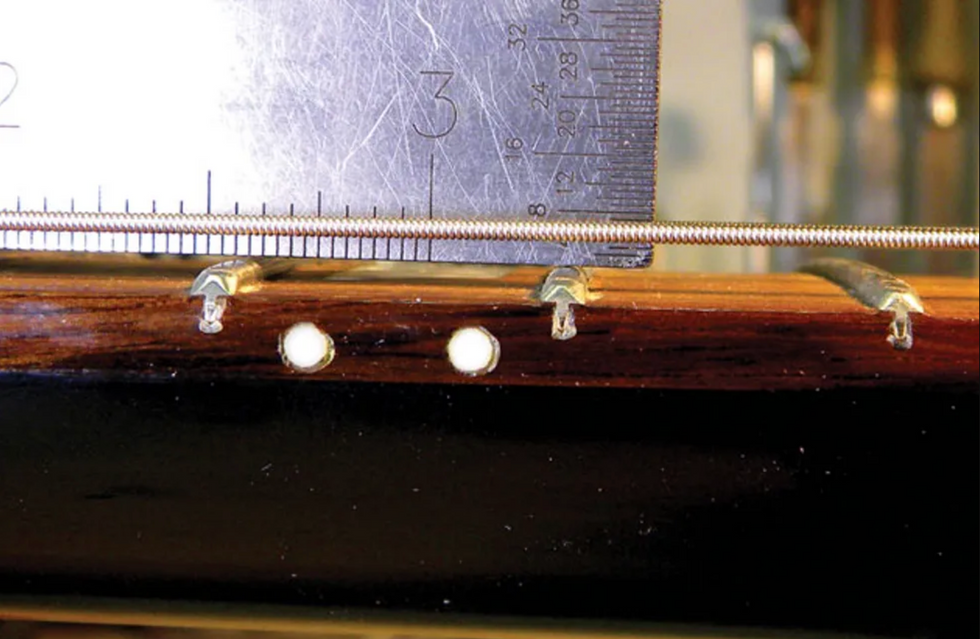
Photo 2
The first step is to measure three things: action at the 12th fret, neck relief, and string height at the 1st fret. These measurements will provide a baseline to work from.
Here's the process: To measure the action, first tune to pitch (this is crucial) and then place a capo on top of the 1st fret. Next use a precision metal ruler to measure the string height at the 12th fret. I use a String Action Gauge—a handy tool from Stewart MacDonald—(Photo 2) for this. You want to determine the distance between the top of the 12th fret and the bottom of both the 6th and 1st strings.
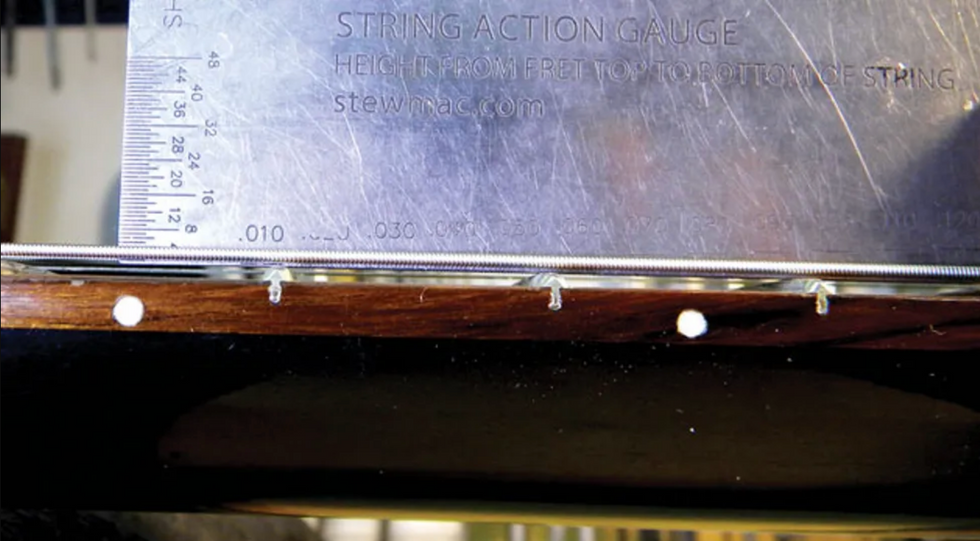
Photo 3
On this Les Paul, the gap was 3/64" for the 1st string and 4/64" for the 6th. This action is comfortable for my client, but too low for slide.
Now to measure the amount of relief. With the capo still on the 1st fret, hold down the 6th string at the last fret and measure the greatest distance between the bottom of the string and the top of the frets (Photo 3).
On my client's guitar, the relief was .012"—perfect for his current playing style and also fine for supporting a lightweight slide. If your guitar has less relief, you may need to loosen the truss rod very slightly to introduce a tad more forward bow. (Read "Time for a Neck Adjustment?" to learn more about working with a truss rod.) But before you take that route, first complete the setup I'm about to describe. It's quite possible these steps will be all you'll need to enter the slide zone.
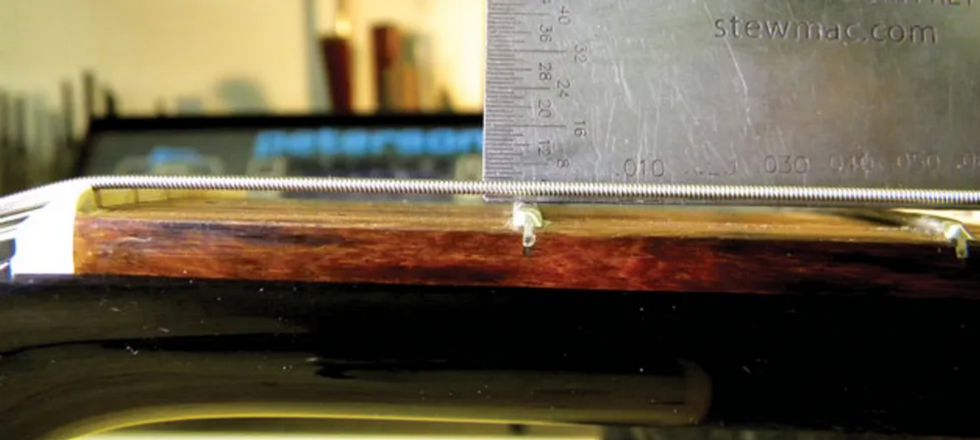
Photo 4
Next, remove the capo (it wouldn't hurt to confirm your strings are still at pitch) and measure the height of the 1st and 6th strings at the 1st fret (Photo 4).
In this case, the height was 1/64" and 2/64" for the 1st and 6th strings, respectively. While this is ideal for fretting chords and lines, it's too low for playing slide.
From these preliminary measurements, I was able to determine what would be required to give this Les Paul its new dual identity:
- Raise the action at the bridge and then adjust individual saddles.
- Raise the action at the nut by either shimming the stock nut or carving a new one.
- Adjust the pickups to balance string-to-string volume.
- Adjust the intonation.
Adjust the bridge.
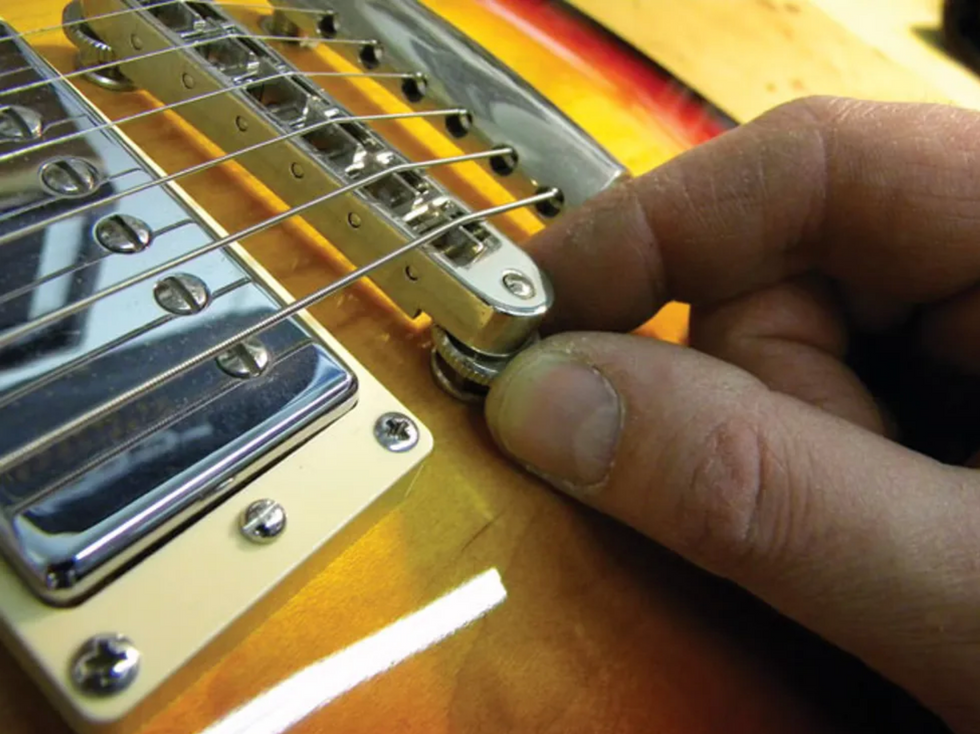
To raise the action on a Les Paul's Tune-o-matic bridge, turn the thumbwheels counter-clockwise (Photo 5). Do this in small increments, perhaps a quarter of a rotation for each thumbwheel. Retune the guitar, put a capo on the 1st fret, and then measure the action at the 12th fret again.
For starters, I suggest adjusting the action to 4/64" on both the 1st and 6th strings. Remember, you can always come back and raise the treble or bass strings a bit more if you find your slide is hitting the frets.
Adjust the saddles.
Now here's our first tricky part. Most lightweight slides (such as a glass or chrome tube, or the medicine bottle favored by Allman and Trucks) contact the strings in a straight line. However, on a guitar set up for fretting—including my client's LP—the strings follow the fretboard radius or curvature. In other words, strings 1 through 6 are subtly arched at the bridge so they sit at a consistent height above the frets.
Slide licks often incorporate two or three strings at a time. When your slide has a straight playing surface, yet the strings are arched, you'll wind up pressing some strings down more than others as you move across the fretboard. This can create subtle intonation problems within a chord or interval.
Yes, you can have it all, as Duane Allman, Johnny Winter, Sonny Landreth, Ry Cooder, Derek Trucks, and many other greats have proven over the years.
The solution is to flatten the string radius at the bridge so the strings sit in a straight line that corresponds to the slide's playing surface. On a guitar with individually adjustable saddles, like a Strat, it's easy to raise or lower each string to achieve the target 4/64" gap between the bottom of all the strings and the top of the 12th fret.
However, on a guitar with a fixed-radius bridge—such as a Les Paul with a Tune-o-matic—some saddle slots will need to be deepened slightly to create a flat line between strings 1 and 6. Typically it's the middle saddles that need attention, but your current bridge radius and string gauges will determine which slots require recutting and by how much.
Gauged nut slotting files, which are available from Allparts, Stewart-MacDonald, and other luthier suppliers, work great for this task because you can precisely size the slot to match the string. For example, knowing that my client plays a .010–.046 set, I'll use a .036 gauge nut file to deepen the notch for the .036 A string.
The process is pretty straightforward: After you've set the bridge so the 1st and 6th strings are 4/64" above the 12th fret, measure the 2nd string. If it's also 4/64" at the 12th fret, move onto the 3rd string. But if it's higher, carefully deepen the slot to bring the 2nd string down to 4/64".
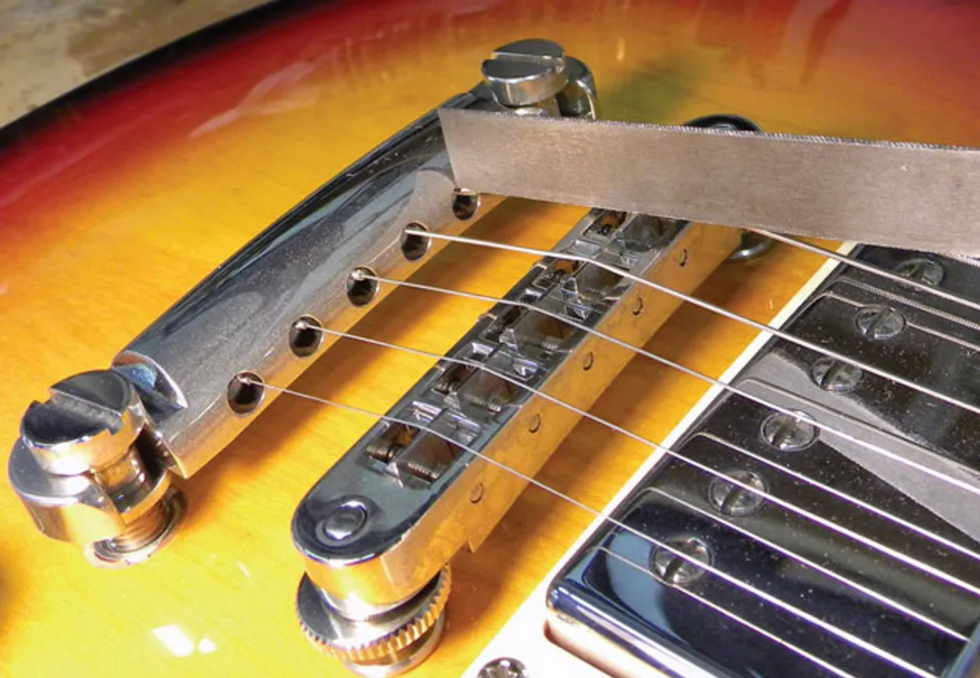
Photo 6
When re-cutting a notch, always follow the angle of the string as it emerges from the tailpiece up to the saddle (Photo 6). Go slowly, retuning and then measuring the action every few file strokes. Gently clean off any burrs on the front or back of the saddle using the nut file. This will prevent the string from getting caught up on the saddle and creating tuning issues.
Repeat the process on each inside string until you've achieved a uniformly level playing surface across all six strings. It's painstaking work, but the payoff in tone and feel will be worth the effort. Once you've flattened the radius and are satisfied with the overall action, you'll be ready to move over to the nut.
Raise the nut.
From experience, I knew that having the 1st string sit 1/64" above the 1st fret is too low for slide, so I'd need to raise the nut on this Les Paul. The trick, of course, is to get the nut high enough to accommodate slide technique, yet not make the guitar unplayable when fretting. Based on the owner's playing style, string gauges, and light glass slide, I decided on a uniform height of 2/64" for all six strings on his guitar.
There are only two ways to correctly and permanently raise the nut: You can shim it or carve a new one. The owner wanted to keep the stock Gibson nut, which was in excellent condition, so we elected to shim it.
Here's how that works: First remove the nut by gently tapping it on the fretboard side with a flathead screwdriver and small hammer (Photo 7). Next, clean up the nut slot by removing the excess glue with a small chisel or razor knife, and then scrape any glue off the nut.
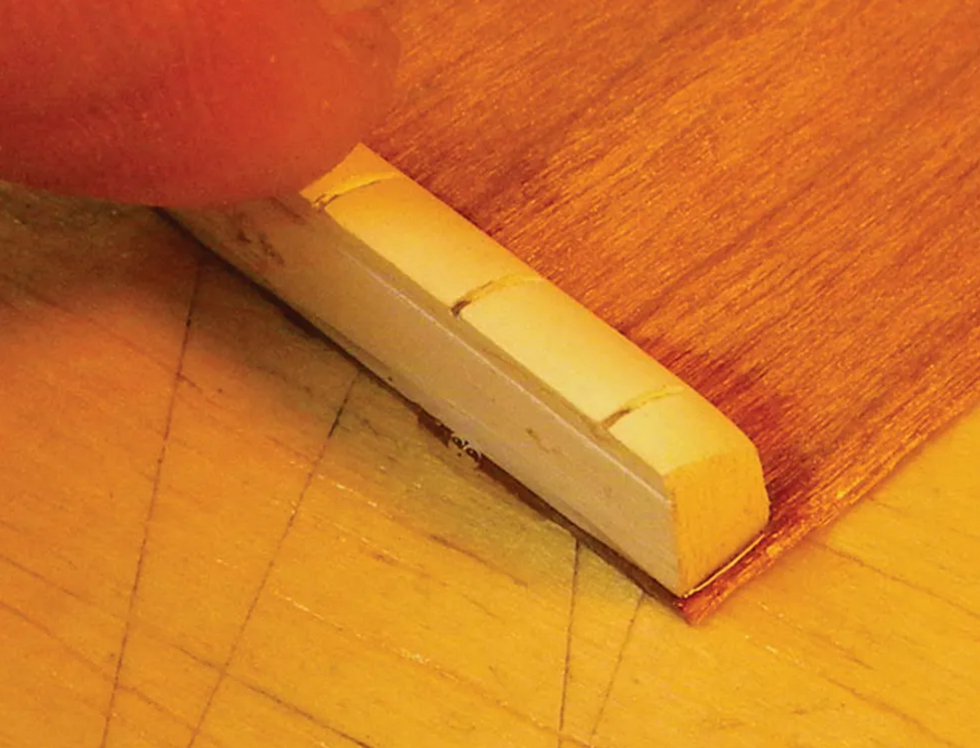
Photo 8
Now super-glue the nut onto a thin piece of mahogany (Photo 8). For this kind of shim, I use a .020" thick piece of wood.
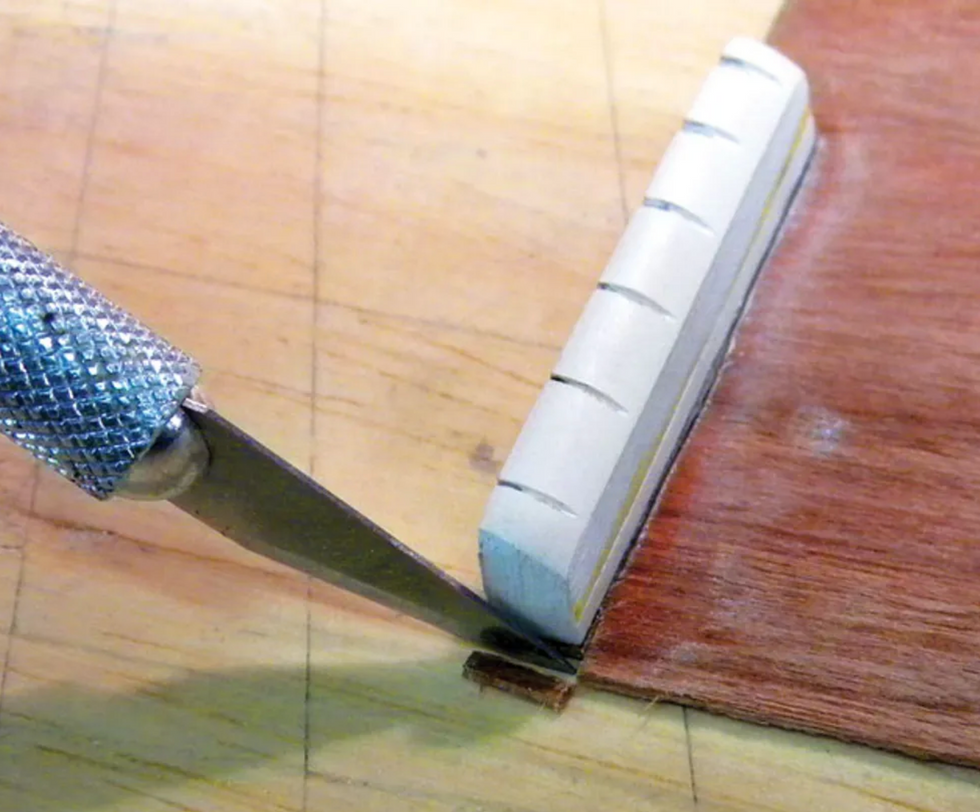
Trim off the excess wood around the string nut with a razor knife (Photo 9). Install the string nut and secure it with one drop of super glue on the face of the nut between the 4th and 3rd strings.
Adjust the pickups.
After you change the action on a guitar—especially to this degree—it's a good idea to adjust the pickups to make sure the treble-to-bass and string-to-string balance is how you want it.
First start with overall pickup height. Hold the 1st and 6th strings down at the last fret and measure the distance from the bottom of the strings to the top of the pickup. The distances in this table provide a good starting point for humbuckers.
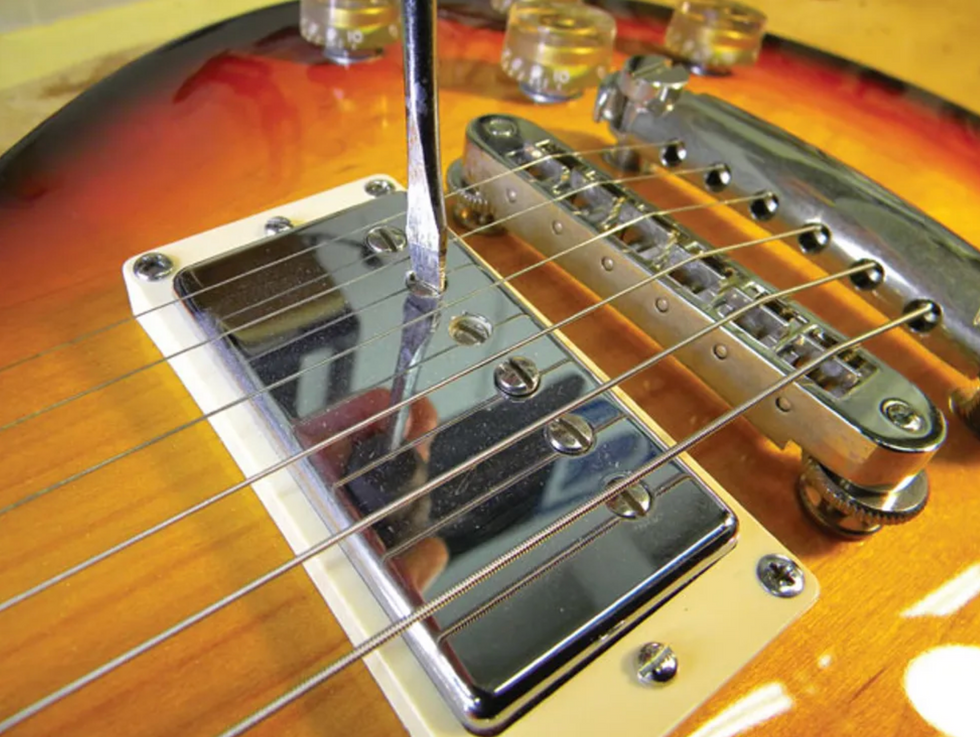
Photo 10
The next step is to adjust the individual pole pieces using a small flathead screwdriver (Photo 10). The goal here is to create an even and consistent string-to-string balance.
Begin with the 5th string pole piece and adjust it to match the volume of the 6th string. Raising the pole piece will make a string louder and vice versa. Then move to the 4th string and compare it to strings 6 and 5. Continue working across the strings, checking them relative to each other and making small tweaks as necessary. Typically, the 3rd string is the loudest, so don't be surprised if you wind up lowering it below the pickup cover to keep it in balance with the other strings.
It's a wrap.
The final step to complete the project is install a new set of strings, tune to pitch, and adjust the intonation. If you need instructions for checking and adjusting the intonation, read "How to Install a New Tune-o-matic Bridge."
With the string height and pickups adjusted for playing slide, our project Les Paul is ready to return to its owner. But before he carts it off, I'll listen to him play and see if the bridge height and pickup pole pieces are dialed in to his satisfaction. If you set up your own guitar for double duty, you may find yourself making small adjustments after playing it for a few days. That's the beauty of being your own tech, right? That said, if you're not confident you can safely work with glue, files, and other tools around your guitar, take it to your local pro.
[Updated 11/18/21]
- DIY: How to Set up Jazzmasters & Jaguars - Premier Guitar ›
- Mod Garage: Humbucker Height Adjustment - Premier Guitar ›
- Epiphone Prophecy SG Review - Premier Guitar ›
Reader: T. Moody
Hometown: Myrtle Beach, South Carolina
Guitar: The Green Snake
Reader T. Moody turned this Yamaha Pacifica body into a reptilian rocker.
With a few clicks on Reverb, a reptile-inspired shred machine was born.
With this guitar, I wanted to create a shadowbox-type vibe by adding something you could see inside. I have always loved the Yamaha Pacifica guitars because of the open pickup cavity and the light weight, so I purchased this body off Reverb (I think I am addicted to that website). I also wanted a color that was vivid and bold. The seller had already painted it neon yellow, so when I read in the description, “You can see this body from space,” I immediately clicked the Buy It Now button. I also purchased the neck and pickups off of Reverb.
I have always loved the reverse headstock, simply because nothing says 1987 (the best year in the history of the world) like a reverse headstock. The pickups are both Seymour Duncan—an SH-1N in the neck position and TB-4 in the bridge, both in a very cool lime green color. Right when these pickups got listed, the Buy It Now button once again lit up like the Fourth of July. I am a loyal disciple of Sperzel locking tuners and think Bob Sperzel was a pure genius, so I knew those were going on this project even before I started on it. I also knew that I wanted a Vega-Trem; those units are absolutely amazing.
When the body arrived, I thought it would be cool to do some kind of burst around the yellow so I went with a neon green. It turned out better than I imagined. Next up was the shaping and cutting of the pickguard. I had this crocodile-type, faux-leather material that I glued on the pickguard and then shaped to my liking. I wanted just a single volume control and no tone knob, because, like King Edward (Van Halen) once said, “Your volume is your tone.”
T. Moody
I then shaped and glued the faux-leather material in the cavity. The tuning knobs, volume knob, pickguard, screws, and selector switch were also painted in the lemon-lime paint scheme. I put everything together, installed the pickups, strung it up, set it up, plugged it in, and I was blown away. I think this is the best-playing and -sounding guitar I have ever tried.
The only thing missing was the center piece and strap. The latter was easy because DiMarzio makes their ClipLock in neon green. The center piece was more difficult because originally, I was thinking that some kind of gator-style decoration would be cool. In the end, I went with a green snake, because crocodiles ain’t too flexible—and they’re way too big to fit in a pickup cavity!
The Green Snake’s back is just as striking as the front.
Ethnomusicologist Frances Densmore records the song of Mountain Chief, head of the Blackfeet Tribe, on a phonograph for the Bureau of American Ethnology in 1916.
Once used as a way to preserve American indigenous culture, field recording isn’t just for seasoned pros. Here, our columnist breaks down a few methods for you to try it yourself.
The picture associated with this month’s Dojo is one of my all-time favorites. Taken in 1916, it marks the collision of two diverging cultural epochs. Mountain Chief, the head of the Piegan Blackfeet Tribe, sings into a phonograph powered solely by spring-loaded tension outside the Smithsonian. Across from him sits whom I consider the patron saint of American ethnomusicologists—the great Frances Densmore.
You can feel the scope and weight of theancient culture of the indigenous American West, and the presence of the then-ongoing women’s suffrage movement, which was three years from succeeding at getting the 19th Amendment passed by Congress. That would later happen on June 4, 1919—the initiative towards granting all women of this country the right to vote. (All American citizens, including Black women, were not granted suffrage until 1965.)
Densmore traversed the entire breadth of the country, hauling her gramophone wax cylinder recorders into remote tribal lands, capturing songs by the Seminole in southern Florida, the Yuma in California, the Chippewa in Wisconsin, Quinailet songs in Northern Washington, and, of course, Mountain Chief outside the Smithsonian in Washington, D.C. Author of more than 20 books and 200 articles, she carefully preserved the rich cultural diversity of Native Americans with over 2,500 field recordings.
Why am I writing about this? Firstly, to pay homage! Secondly, because it serves as a great reminder to seek and cultivate sound outside the studio as well. We live in a time of great technological power and convenience. Every week a new sample pack, plugin, pedal, or software instrument hits the market. For all the joy that these offerings bring, they deprive us of the joy of creating our own instruments from scratch.
This month, I’m advocating for you to make some field recordings of your own—nature, urban, indoor, outdoor, specific locations, animals, or anything that piques your interest! Bring the material back to the studio and make music with it! I’ll show you how to make your own sample libraries to use in your music. Tighten up your belts, a multipart Dojo is now open.
What do you need to get started? Quite simply, you just need any device that is capable of recording. This can range from your cell phone to a dedicated field recorder. The real question is: Do you want to use mics housed in handheld units or have more robust mic pres with the ability to power larger live/studio microphones using XLR connectors found with the larger units? Let’s look at three scenarios.
The Cellular Approach
The absolute easiest way to get started is with your cell phone. Take advantage of a voice-memo recording app, or use an app that records multitrack audio like GarageBand on iOS. Phone recordings tend to sound very compressed and slightly lo-fi—which might be exactly what you want. However, the method can also introduce unwanted noise artifacts like low-end rumble (from handling the phone) and phasing (moving the mic while recording). I recommend using a tripod to hold your phone still while recording. You might also want to consider using an external mic and some software to edit your sample recordings on the phone. I like using a Koala Sampler ($4.99) on iOS devices.
Upgrade Me
The next step up is to use a portable recorder. These have much better mic pres, and offer true stereo recording with pivoting mic heads. This can give you the added benefit of controlling the width of your stereo image when recording or helping isolate two sound sources that are apart from each other. You sacrifice the ability to easily edit your recordings. You simply import them into your computer and edit the recording(s) from there.
Pro-Level Quality
I would recommend this scenario if you want to record multiple sources at once. These devices also have SMPTE time code, 60+ dB of gain, phantom power (+48 volts), advanced routing, and a 32-bit/192 kHz sampling rate, so you’ll never have a distorted recording even when the meter gets unexpectedly pegged into the red from a loud sound source. I recommend the Zoom F8n Pro ($1099). Now you can use your microphones!
Best Practices
Try to safely record as close to the sound source as you can to minimize ambient noise and really scrub through your recordings to find little snippets and sound “nuggets” that can make great material for creating your own instrument and sample library—which we’ll explore next month! Namaste.
Left to right: Joe Lally. Brandan Canty, and Anthony Pirog
The bassist, now with the Messthetics, has had a long learning journey. Thanks to the online-lesson boom, you can study directly from Lally.
Although it’s been years since the beginning of the pandemic, many monumental things can still be explained in a single phrase: It all started because of Covid. One of those is that you can take online bass lessons from Joe Lally, bassist and co-founder of Fugazi, the unyieldingly indie post-hardcore band that raged out of Washington, DC’s ever-vibrant punk scene. From 1987 to 2003, over the band’s six studio albums, assorted EPs, and hundreds of live shows, Lally demonstrated his utter mastery of intense, full-throttle bass playing and writing.
So you might be surprised to learn that such an accomplished low-ender didn’t always feel confident about his own musical knowledge. “I spent all that time in Fugazi not formally being able to articulate about music very well with the other people in the band,” Joe says. “It was very frustrating at times. There were times I wanted to leave the band because it felt like I couldn’t even talk about what I wanted to do.”
It was only after Fugazi went on indefinite hiatus that, realizing he wanted to keep making music, Joe decided to get some education. “I took a few lessons at Flea’s school in L.A., the Silverlake Conservatory. I studied with Tree, the dean of the school, who showed me some things about songwriting on piano. I was looking at it like I was getting piano lessons, but really he was showing me the sound of major, the sound of minor, and the sound of the dominant 7 chord. Those three chords are the basic beginnings of learning music theory.”
As Joe learned it, the major sound was “Here, There, and Everywhere" by the Beatles, the minor was Santana’s “Evil Ways,” and the dominant 7 was “I Feel Good” by James Brown. “I learned to play those chord changes on piano, and came to understand more about songs and completing my own song ideas.”
Joe mainly learned by asking questions. “To a degree, that’s what I want people to get from the lessons I give,” he continues. “There’s so much you can go into theory-wise, but you don’t really need to to be able to write music, play music, and figure out other people’s music.”
Joe went on to write and release three solo albums, as well as two with Ataxia, his project with Red Hot Chili Pepper guitarists John Frusciante and Josh Klinghoffer. In 2016, he formed instrumental jazz-punk fusion trio the Messthetics with Fugazi drummer Brendan Canty and genre-spanning guitar virtuoso Anthony Pirog. They’ve since toured heavily and released three full lengths. He also joined Ian Mackaye—Fugazi’s and the Evens’s singer-guitarist—along with Evens drummer Amy Farina to form Coriky.
Lally’s humble online flyer.
“I foolishly never picked up a book because I thought it would ruin what I did know. When I told a friend I was teaching theory, he asked, ‘Has it ruined your playing yet?’”
When off the road, Joe worked different jobs in DC’s independent music scene to pay the bills. But when the pandemic lockdown came, he decided to start giving online lessons. He made flyers and posted them on social media.
“I’m not teaching formal theory, which I think is weird and abstract and doesn’t show people everything,” says Joe. “It takes years of learning formally to see how everything is connected to see how this thing is part of that other thing we learned years ago. Most of my students are adults who have been playing but now want to know more about what they’ve been doing.”
But music theory is something we all operate within, says Joe, whether we’re knowledgeable about it or not. “We are engaged in theory. We just may not know it. When you’re playing or writing a song, you might think ‘that note sounds right’ or ‘that note sounds wrong.’ It's because we are relating it to something in theory that we’ve picked up from all the music we’ve listened to.”
Joe recognizes that some people are apprehensive about learning music theory, and he admits that when he was in Fugazi, he was, too. “I foolishly never picked up a book because I thought it would ruin what I did know. When I told a friend I was teaching theory, he asked, ‘Has it ruined your playing yet?’
“But formal study should use your thinking mind, and when you play, you’re outside of thinking. Creativity is outside of thought. You hear about jazz players who practice scales over and over, and what they’re really practicing is the sounds of these things that they want to hear. But when they play, they let go of all of that. So I realized my playing is never going to change. I’m always going to write the way I wrote.”
To immerse yourself in Joe’s creative world, check out the Messthetics’s 2024 album, The Messthetics and James Brandon Lewis, which adds saxophonist Lewis to the trio, bringing together Fugazi’s powerful rhythm section with two players from the creative improv world.
To inquire about bass lessons with Joe Lally, contact him on Instagram at @joelally898.
This year PG landed some elsuive white whales (TOOL, Pantera & Jack White), revisited some revamped setups (Jason Isbell, Foo Fighters & Kingfish), and got introduced to some unusual gear (King Gizzard and the Lizard Wizard. Plus, the hosts share their favorite moments from the last 52 episodes before dropping a few coins into the wishing well for 2025 Rundown guests.
12. Green Day Rig Rundown
The legendary punk band are in the middle of an enormous multi-anniversary tour, celebrating both Dookie and American Idiot. Check out how bassist Mike Dirnt and guitarist Jason White tuned their road rigs to cover decades of sounds.
11. Knocked Loose Rig Rundown
Ungodly, sinister, and maliciously menacing guitar tones erupt from the Kentucky hardcore band’s 7-string Ibanez models, providing the soundtrack to the summer’s biggest mosh pits and nastiest breakdowns.
10. Jason Isbell & Sadler Vaden Rig Rundown
With four Grammys, loads of gear, and millions of tour bus miles, Isbell is back for an updated Rig Rundown with his 400 Unit co-guitarist, Sadler Vaden.
9. Extreme's Nuno Bettencourt & Pat Badger Rig Rundown
Guitar legend Nuno Bettencourt crashes his own Rundown to showcase the “Bumblebee” guitar he cooked up to honor Eddie Van Halen, while bassist Pat Badger shares two killer stories about basses that once belonged to members of Van Halen and Aerosmith.
8. Slash's Blues Ball Band Rig Rundown
The rock ’n’ roll icon brings his blues-rockin’ Orgy of The Damned to the people headlining the S.E.R.P.E.N.T. Blues Festival tour.
7. Kingfish Rig Rundown
Kingfish doesn’t play a lot of gear, but with a signature Fender Tele Deluxe, a Chertoff Custom guitar, a pair of road-worthy amps, and a handful of effects, the Clarksdale, Mississippi, native is well on his way to becoming the blues’ newest 6-string ruler. He returns for his second Rundown with a Grammy under his belt, supporting his new Live in London album.
6. Jack White Rig Rundown
Get an up-close look at the tone wizard’s rig for his action-packed 2024 tour.
5. Jerry Cantrell Rig Rundown
The legendary Alice in Chains axeman gives us a look at his updated solo touring setup.
4. King Gizzard and the Lizard Wizard Rig Rundown
Just like their records, the Australian rockers’ road gear is eclectic and adventurous, ready to cover ground from metal to microtonal Turkish psychedelia.
3. Foo Fighters’ Chris Shiflett Rig Rundown
The Foos’ guitarist and intrepid Shred With Shifty host opens the guitar garage for his current tour and details his brand-new pedal setup.
2. Pantera's Rex Brown & Zakk Wylde Rig Rundown
The original Cowboys from Hell bassist reclaims his spine-rattling position as the band's charging piston, while his guitar brother brings his fleet of Wylde Audio gear and a few tone sweeteners from Dimebag Darrell's private stash.
1. Tool's Justin Chancellor Rig Rundown
The bass lord morphs and mutates between rhythm and lead parts with a hearty Wal 4-string, Gallien-Krueger crushers, and a pedalboard that could make Adam Jones jealous.