
The proper cleaning and conditioning of your instrument is critical to its health. Over the years, I've seen many extreme cases of guitars that were permanently damaged from neglect. Without proper care, a guitar will lose value and eventually become unplayable. However, it's not difficult to clean and condition a guitar—it simply takes a little time and effort. And that's a worthy investment: Keeping your instrument in top condition will save you a lot of money in future repairs.

Fig. 2. Not only does fretboard gunk look unattractive, over time it can damage your instrument.
As we play, dead skin cells, sweat, and dirt build up on the fretboard and collect around the frets. Not only is this unattractive (Fig. 2), but the moisture, acids, and salts in sweat cause the wood around the frets to deteriorate. This can cause dry rot in the fretboard, which results in loose frets and very expensive repairs.

Fig. 3. These frets have become corroded through neglect.
I can always tell if a fretboard hasn't been conditioned when I examine the frets. This is especially noticeable when I'm doing a refret. After I remove the old frets, I can see nasty gunk on the tangs and green corrosion all over the fret wire (Fig. 3).
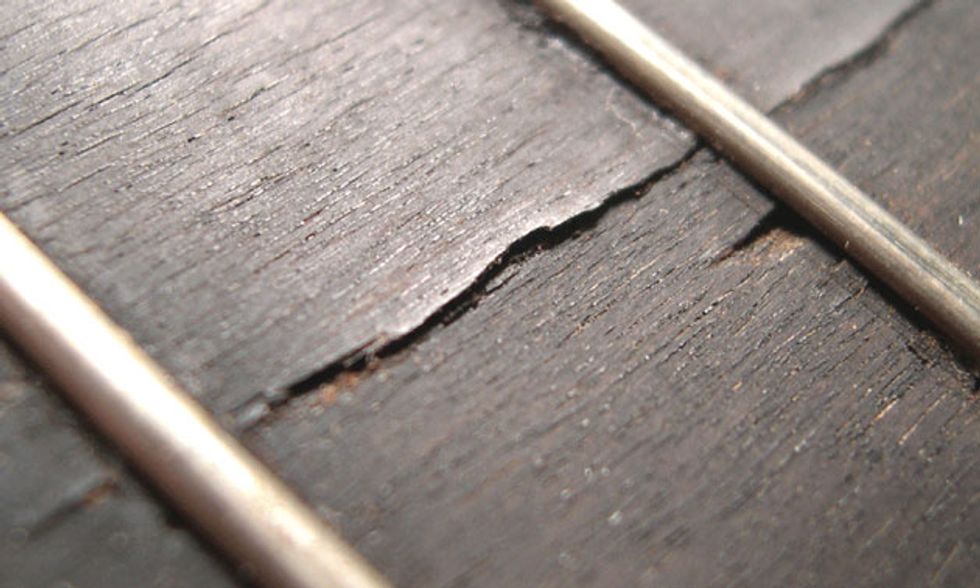
Fig. 4. If you don't clean and condition your fretboard, it may crack.
Cracks are another terrifying byproduct of not conditioning your fretboard (Fig. 4). When sweat evaporates, it can dry out the fretboard and cause it to crack.
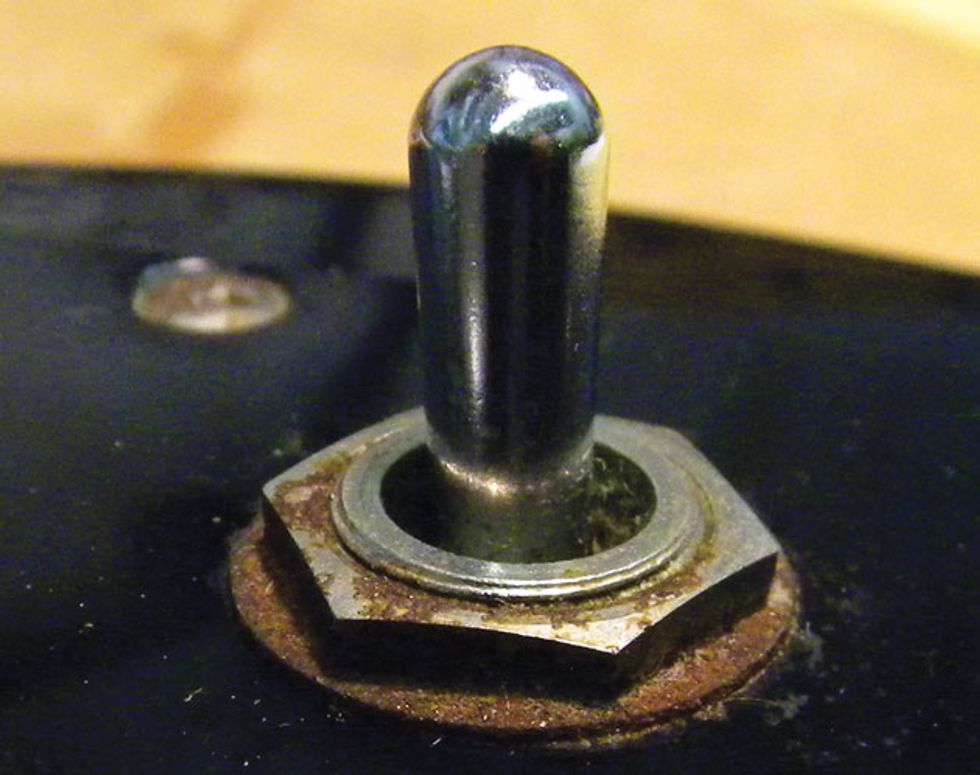
Fig. 5. If they're not cleaned regularly, pickups, potentiometers, and switches can become corroded by the salts and acids in sweat.
A guitar's electronics can also suffer from dead skin cells and sweat. When acids and salts build up on a pickup, they can corrode the coils and magnets and cause the pickup to fail. These corrosive materials have the same effect on potentiometers and switches (Fig. 5).
Many string and accessory manufacturers offer conditioners for your guitar. But be aware that most of these products, including lemon oil, contain harmful chemicals and solvents that will damage your guitar's wood and finish. Avoid anything that contains d-Limonene, alcohol, or silicone.
Derived from oil extracted from citrus rind, d-Limonene contains natural acids. These acids can act as a solvent and break down finishes and cause the wood around the frets to deteriorate. Alcohol dries out the fretboard, bridge, and other unfinished wood, and can cause cloudiness in certain types of finish. Silicone prevents the wood from breathing and can cause the finish on your guitar to become hazy. It's also very difficult to remove.
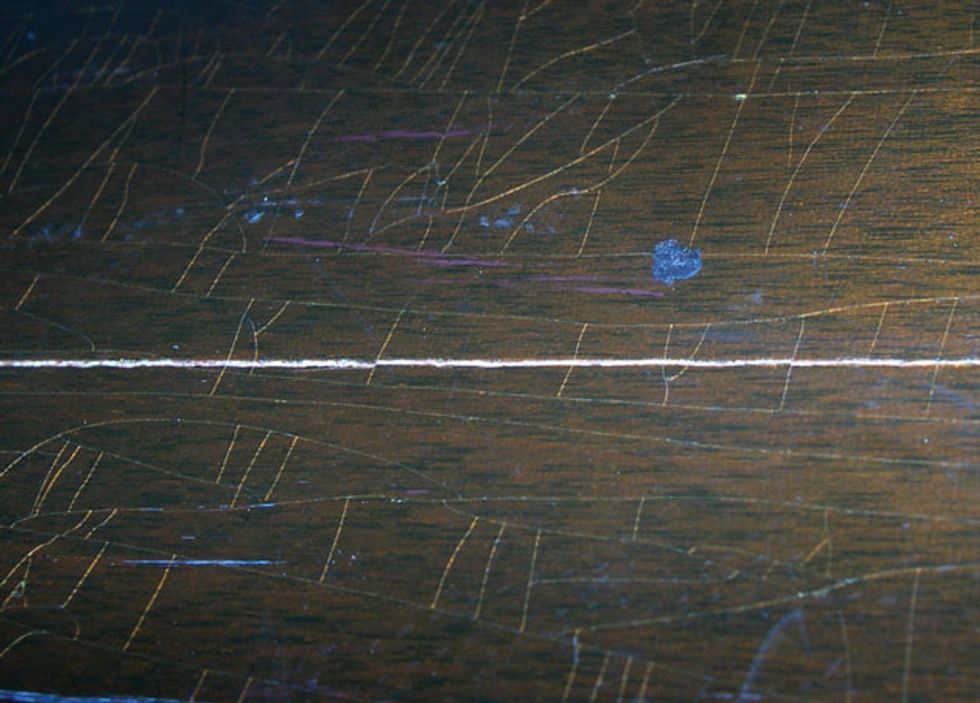
Fig. 6. When wood isn't sufficiently humidified, it can dry out and crack. This guitar back has seen better days.
Controlling humidity is another important aspect of guitar care. When a guitar gets too dry, the wood cracks (Fig. 6). Conditioning wood certainly helps prevent it from cracking, but it's also a good idea to use a humidifier. New guitars tend to be more prone to humidity cracks than older instruments. Here's why: Most older or vintage guitars were made from air-dried wood. This wood was dried out over several decades, and during this process any pieces that cracked were culled out. The older harvested wood gets, the more stable it becomes, but it's a lengthy, painstaking way to dry wood. Modern guitars are primarily made from kiln-dried wood. Kiln drying is designed to speed up the aging process, but only time can truly age a piece of wood. Guitars made from kiln-dried wood are more susceptible to changes temperature and humidity. Maintaining a guitar-friendly humidity level helps prevent wood from cracking, and we'll discuss how to do this in a moment.
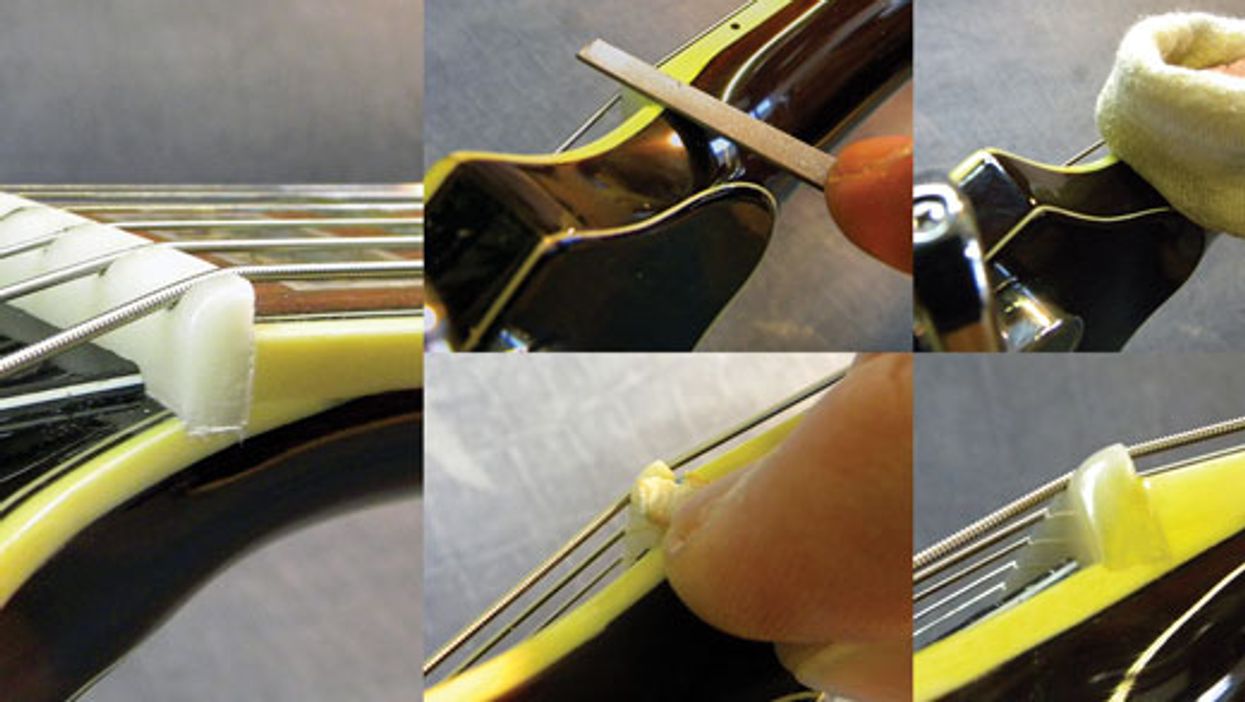
Cleaning and conditioning the fretboard. We'll start by cleaning the fretboard, and the first step here is to remove the strings. Yes, all of them! People often say, “Won't removing all the strings at the same time damage the neck?" The fact is, it won't. Wood has an excellent memory, so you don't have to worry about removing all the strings to service your fretboard. Luthiers do it all the time.
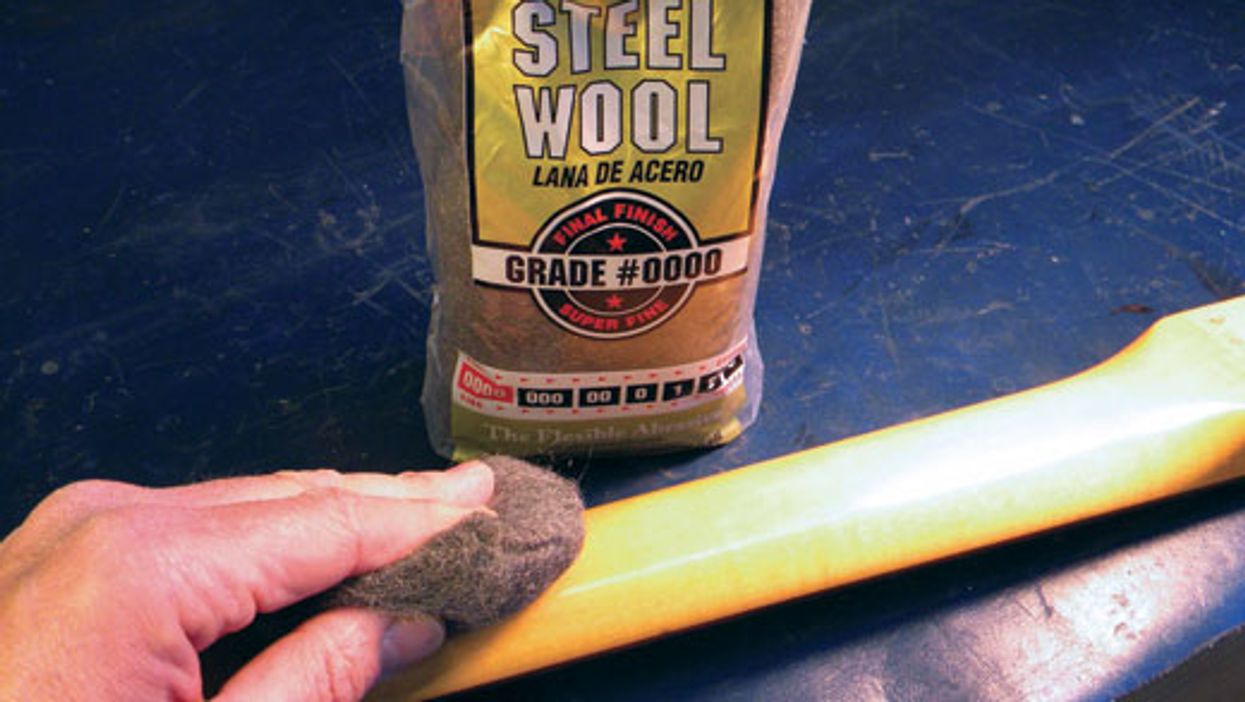
There are several ways to clean a fretboard, and one approach is to use 0000 steel wool. This works great, especially when you want to make your frets shine, but it makes a big mess. Caution: Do not use steel wool on a maple fretboard that has a glossy finish. Rubbing steel wool on any finish will make it hazy.
If you decide to use steel wool, use only 0000 grade. This is the finest steel wool and will not damage the fretboard or frets. If you're cleaning an electric guitar (or an acoustic with a magnetic soundhole pickup), cover the pickups with painter's tape to prevent the steel fibers from collecting around the pole pieces. These very fine steel fibers can cause a pickup to corrode, and they also cause noise if they contact the strings.
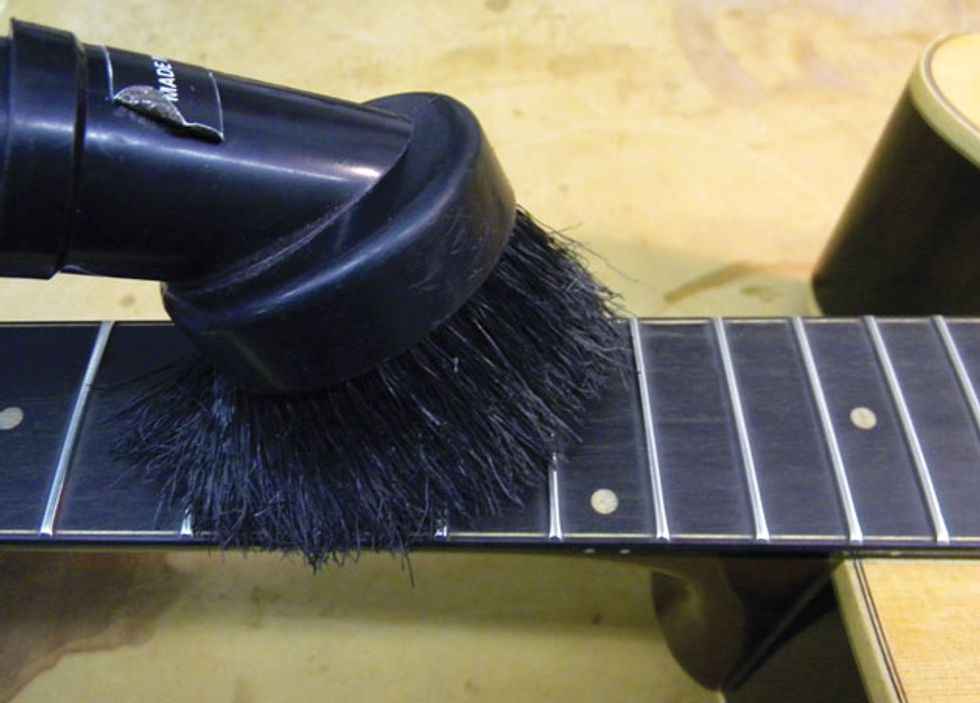
Fig. 7. If you opt to clean your fretboard and polish its frets with 0000 steel wool, remember to vacuum up the fibers that inevitably shed during this procedure.
Apply a fretboard conditioner to the fretboard and gently rub the conditioner into the wood with the steel wool pad, turning it frequently. Move across the fretboard, cleaning the wood between the frets, and then work the pad along the side of each fret. Once the fretboard is clean, run the pad up and down along the top of the frets to polish them.
After cleaning the fretboard with steel wool, use a vacuum to carefully remove the steel fibers that inevitably shed from the pad (Fig. 7). Avoid getting the fibers on the guitar's finish, as they can scratch it.
My preferred method for cleaning the fretboard is to use an old toothbrush and Planet Waves Hydrate, a type of fretboard conditioner. This approach is less messy than using steel wool, but it's important to note that Hydrate is only for dark fretboards—don't use it on maple 'boards.
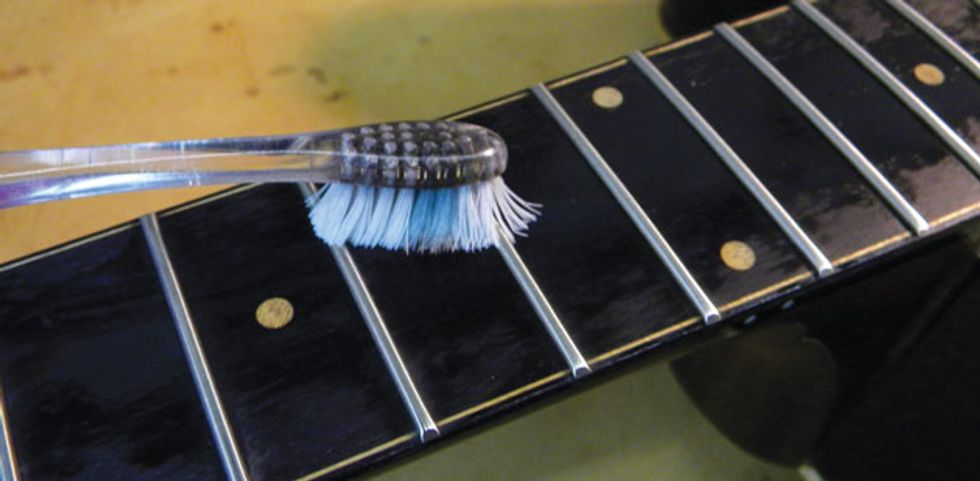
Fig. 8. An alternative to steel wool: Clean the wood with a toothbrush and fretboard conditioner.
I like using a toothbrush because you can scrub all you want without damaging the wood or the frets. Simply spray Hydrate onto your fretboard and work it into the wood and around the frets with the toothbrush bristles (Fig. 8). Once the gunk is loosened, wipe it off with a paper towel. Also be sure you wipe off any excess conditioner to prevent it from coating the strings.
But the toothbrush technique won't polish the frets. If you're not too keen on using 0000 steel wool to do this (and I don't blame you), Planet Waves makes a product called the Fret Polishing System. Basically, it's super-fine polishing paper that's packaged with a protective stiff paper template that covers the wood while exposing the fretwire. The template fits medium or jumbo frets and you can use the kit on maple or dark fretboards.

Fig. 9. Planet Waves' Fret Polishing System includes super-fine abrasive paper and a guard to protect the wood.
Simply lay the template over the fretwire and polish the frets until they glisten (Fig. 9). The kit works great and there is little mess to clean up. But even with this system, you'll want to vacuum the residue off the neck left by the polishing paper.
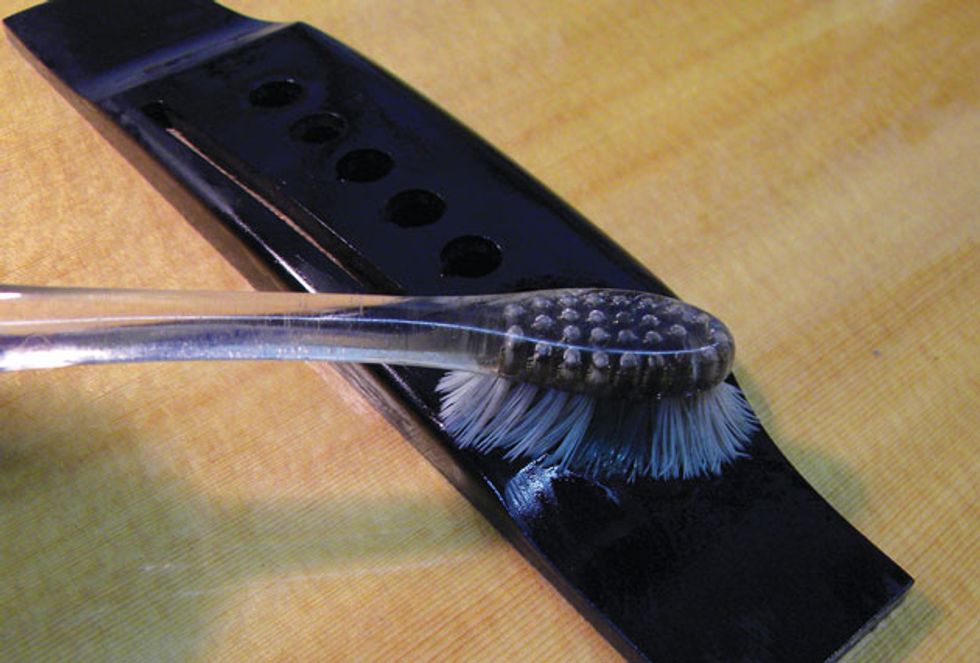
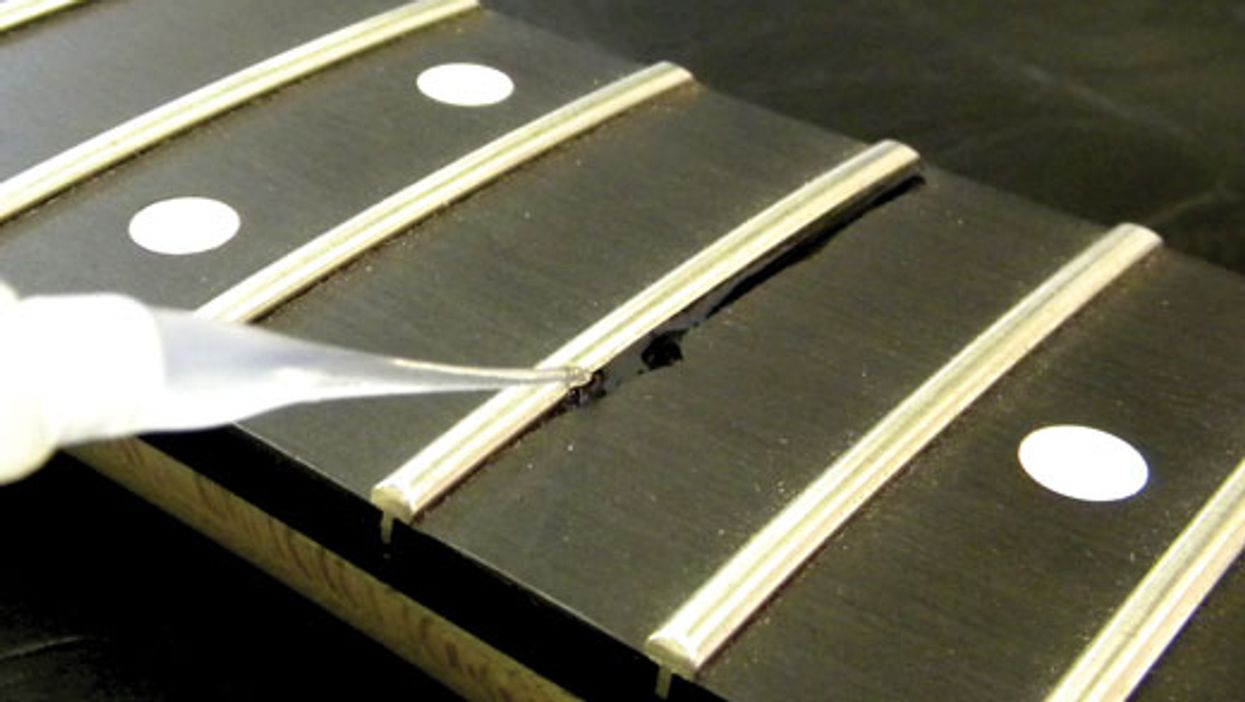
Fig. 10. Like the fretboard, an acoustic guitar's bridge needs to be cleaned and conditioned.
Cleaning and conditioning a bridge. It's very simple to clean and condition the bridge on an acoustic guitar. Remove the bridge saddle and then scrub the bridge with a toothbrush and conditioner (Fig. 10). Use cotton swabs to clean inside the saddle slot. When the gunk is cleaned off, wipe down the bridge with a paper towel. That's it!
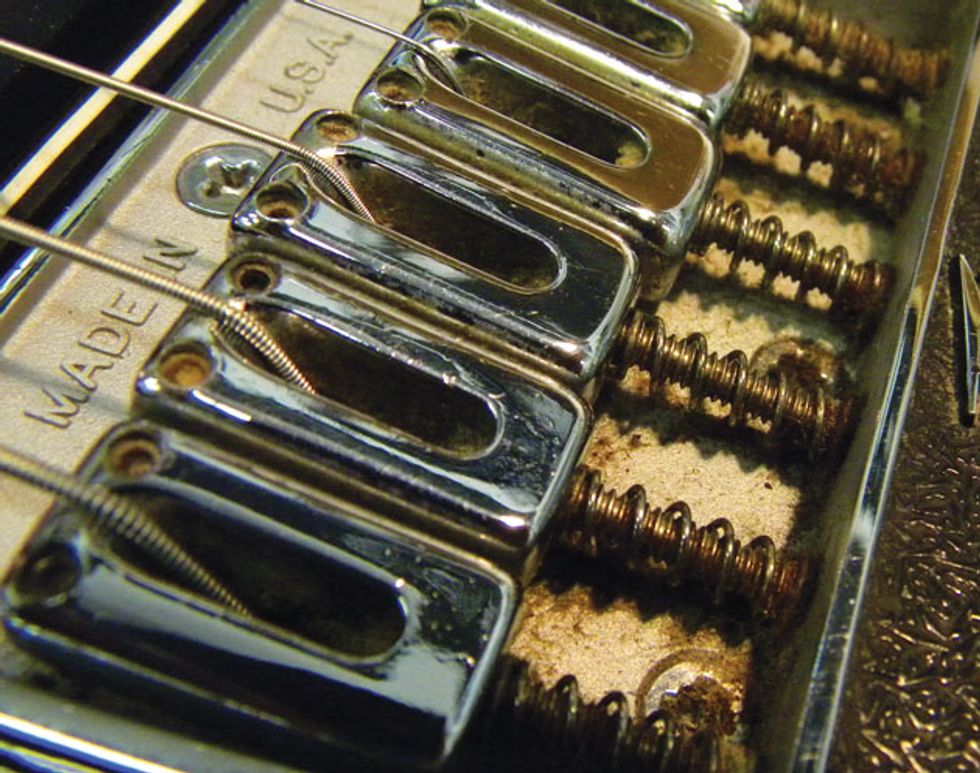
Fig. 11. Filth can build up on a bridge and its saddles. When hardware gets this dirty and rusty, you'll need to disassemble and clean it with WD-40 or 3-in-One oil.
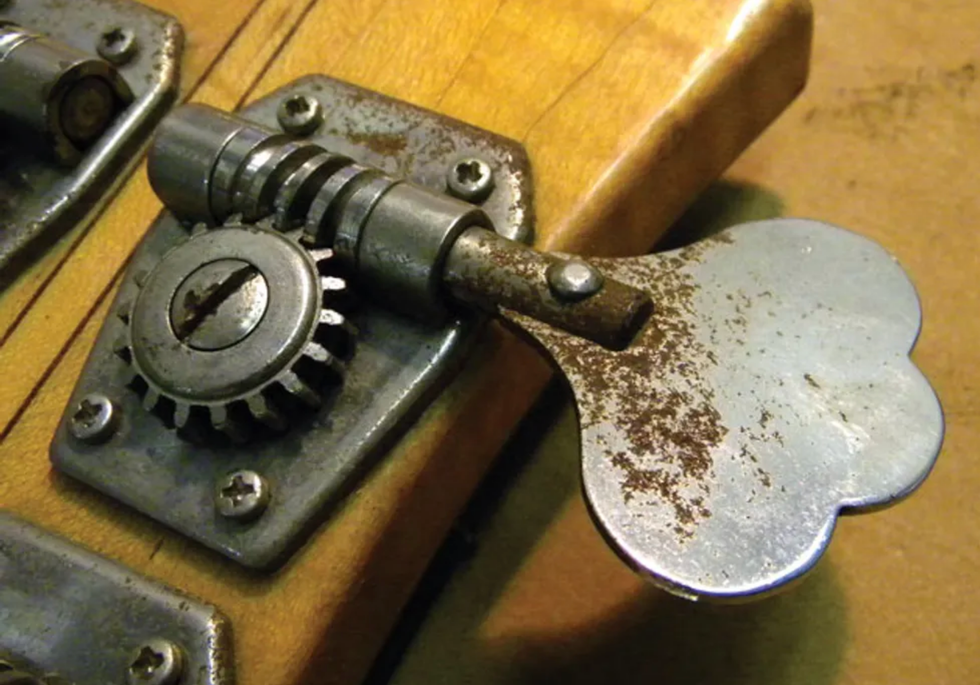
Cleaning the hardware. Sweat is a big enemy of hardware because its acids and salts corrode the metal plating and attract dirt that clogs up any moving parts. In extreme cases, a guitar's bridge (Fig. 11) and tuning keys (Fig. 12) can begin to rust. Cleaning these important mechanisms keeps them looking good and functioning at their best.
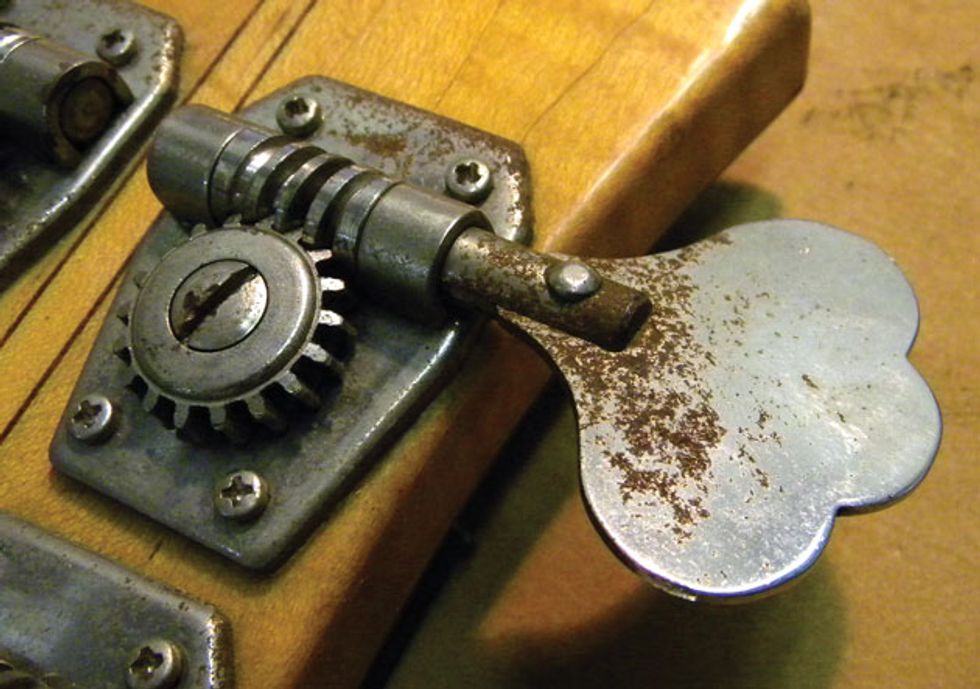
Fig. 12. If left on metal hardware, sweat can eat right into the plating and cause rust.
For cleaning metal hardware, I've had success with 3-in-One oil and WD-40. Remember that these products are only safe on metal, so avoid getting them on the fretboard or finish. I typically remove the hardware to clean it with an old toothbrush and then carefully wipe it off before reinstalling.
Cleaning the finish. When cleaning your guitar's finish, avoid furniture polishes like Pledge, which contains lemon oil, or products that contain d-Limonene, alcohol, solvents, or silicone. All of these will damage the finish over time. Sweat is another finish-eater because it causes lacquer to soften and break down.
Water actually works well to clean a guitar finish. Use a slightly damp micro-fiber cloth to wipe away dust and grime, and rinse the cloth frequently to remove any debris. As for a good polish, I only use pure carnauba wax, which is safe for most finishes.
The Issues
Before we discuss how to clean and condition a guitar, it's important to understand where the potential problems lie and why we need to address them.
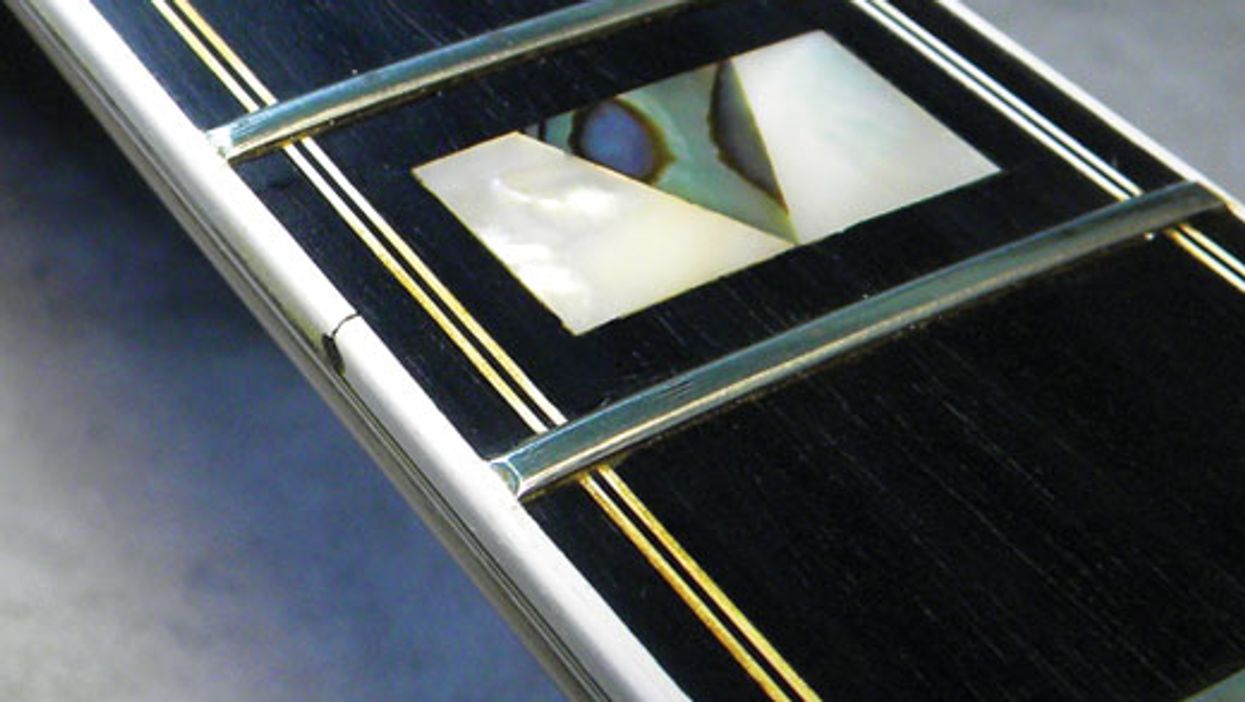
Two important components to clean, condition, and humidify are the fretboard and bridge. This is crucial because they are typically made of unfinished or untreated wood. Maple fretboards are an exception because they have some type of finish and therefore just need to be cleaned, but not conditioned. Rosewood and ebony fretboards and bridges must be cleaned and conditioned to prevent sweat and dirt from damaging the wood. A clean fretboard not only looks great (Fig. 1), but it feels great under your fingertips.
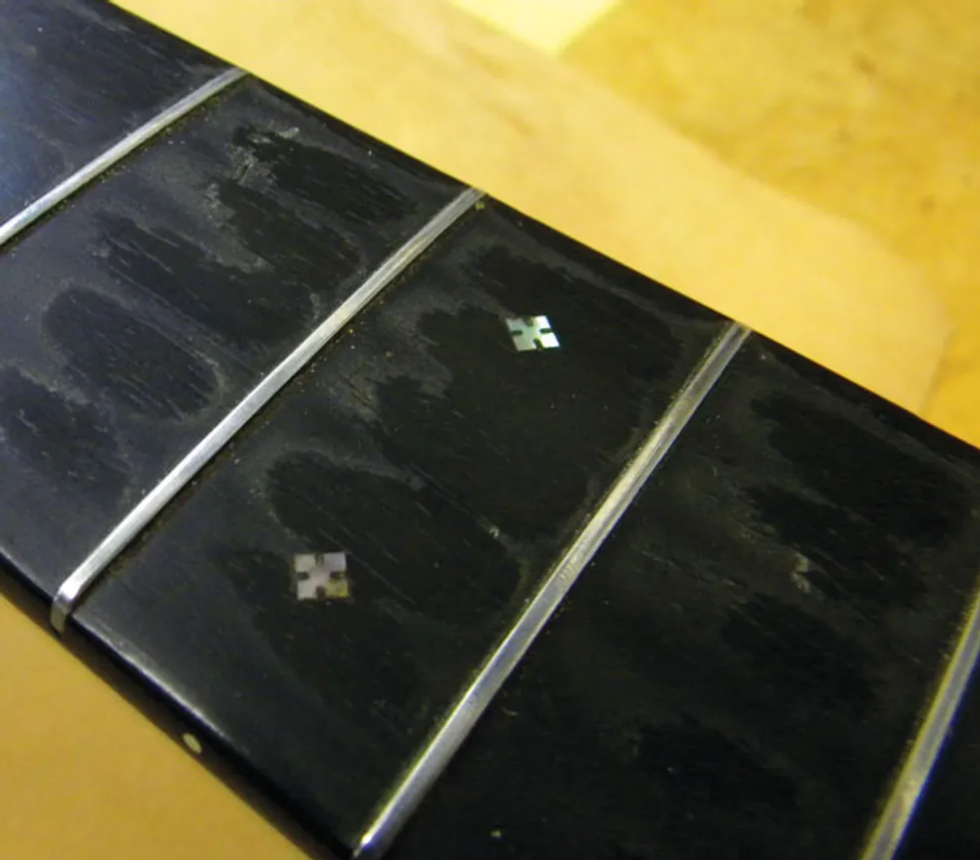
Fig. 2. Not only does fretboard gunk look unattractive, over time it can damage your instrument.
As we play, dead skin cells, sweat, and dirt build up on the fretboard and collect around the frets. Not only is this unattractive (Fig. 2), but the moisture, acids, and salts in sweat cause the wood around the frets to deteriorate. This can cause dry rot in the fretboard, which results in loose frets and very expensive repairs.

Fig. 3. These frets have become corroded through neglect.
I can always tell if a fretboard hasn't been conditioned when I examine the frets. This is especially noticeable when I'm doing a refret. After I remove the old frets, I can see nasty gunk on the tangs and green corrosion all over the fret wire (Fig. 3).
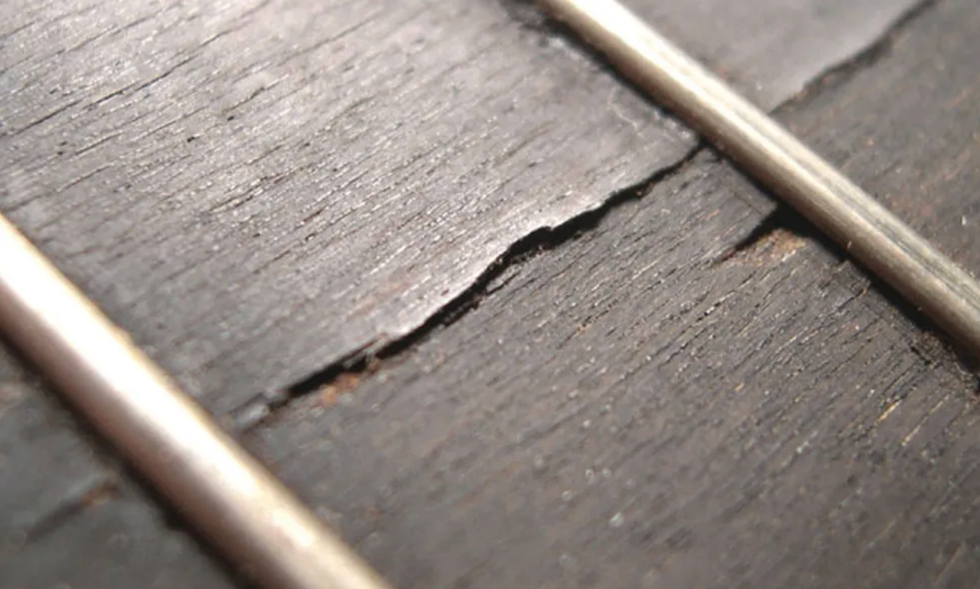
Fig. 4. If you don't clean and condition your fretboard, it may crack.
Cracks are another terrifying byproduct of not conditioning your fretboard (Fig. 4). When sweat evaporates, it can dry out the fretboard and cause it to crack.
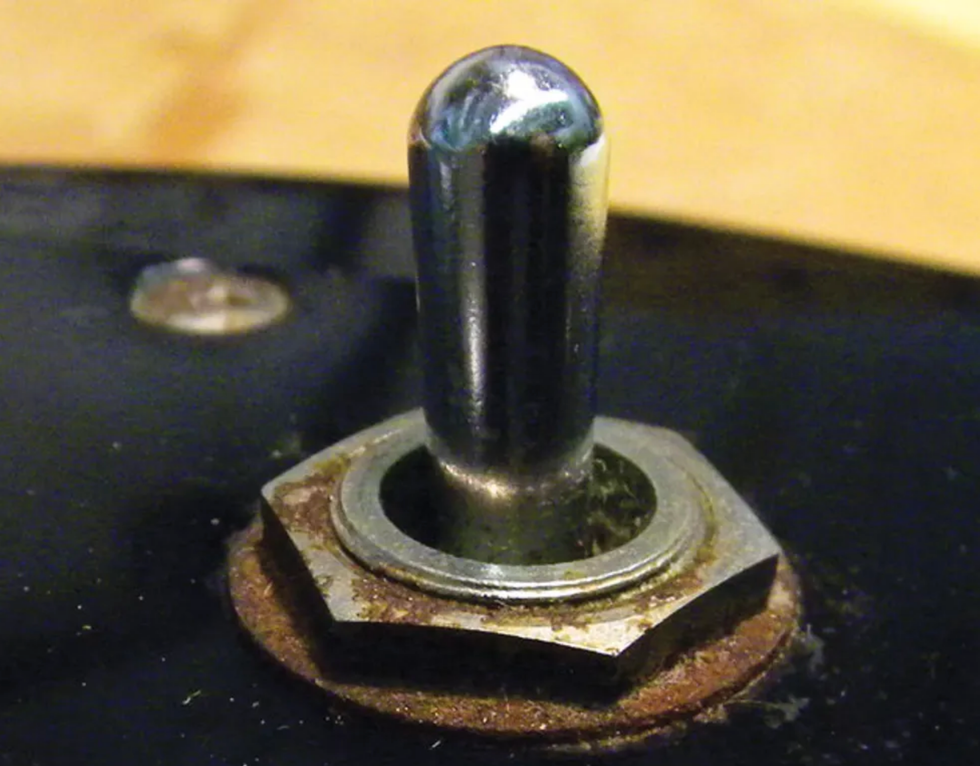
Fig. 5. If they're not cleaned regularly, pickups, potentiometers, and switches can become corroded by the salts and acids in sweat.
A guitar's electronics can also suffer from dead skin cells and sweat. When acids and salts build up on a pickup, they can corrode the coils and magnets and cause the pickup to fail. These corrosive materials have the same effect on potentiometers and switches (Fig. 5).
Many string and accessory manufacturers offer conditioners for your guitar. But be aware that most of these products, including lemon oil, contain harmful chemicals and solvents that will damage your guitar's wood and finish. Avoid anything that contains d-Limonene, alcohol, or silicone.
Derived from oil extracted from citrus rind, d-Limonene contains natural acids. These acids can act as a solvent and break down finishes and cause the wood around the frets to deteriorate. Alcohol dries out the fretboard, bridge, and other unfinished wood, and can cause cloudiness in certain types of finish. Silicone prevents the wood from breathing and can cause the finish on your guitar to become hazy. It's also very difficult to remove.
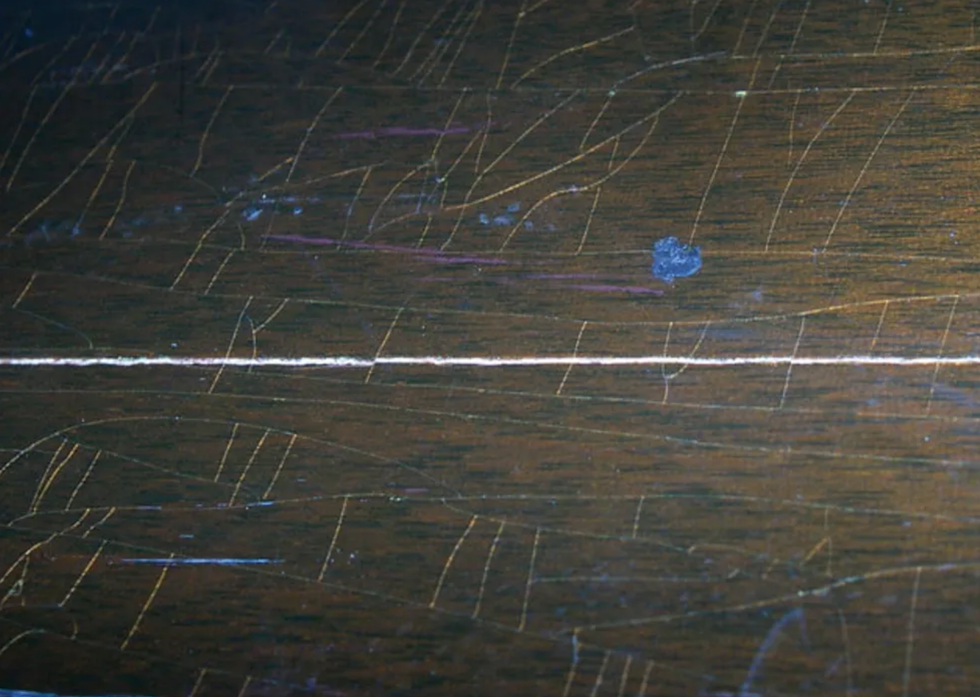
Fig. 6. When wood isn't sufficiently humidified, it can dry out and crack. This guitar back has seen better days.
Controlling humidity is another important aspect of guitar care. When a guitar gets too dry, the wood cracks (Fig. 6). Conditioning wood certainly helps prevent it from cracking, but it's also a good idea to use a humidifier. New guitars tend to be more prone to humidity cracks than older instruments. Here's why: Most older or vintage guitars were made from air-dried wood. This wood was dried out over several decades, and during this process any pieces that cracked were culled out. The older harvested wood gets, the more stable it becomes, but it's a lengthy, painstaking way to dry wood. Modern guitars are primarily made from kiln-dried wood. Kiln drying is designed to speed up the aging process, but only time can truly age a piece of wood. Guitars made from kiln-dried wood are more susceptible to changes temperature and humidity. Maintaining a guitar-friendly humidity level helps prevent wood from cracking, and we'll discuss how to do this in a moment.
Cleaning and Conditioning the Fretboard.
We'll start by cleaning the fretboard, and the first step here is to remove the strings. Yes, all of them! People often say, "Won't removing all the strings at the same time damage the neck?" The fact is, it won't. Wood has an excellent memory, so you don't have to worry about removing all the strings to service your fretboard. Luthiers do it all the time.
There are several ways to clean a fretboard, and one approach is to use 0000 steel wool. This works great, especially when you want to make your frets shine, but it makes a big mess. Caution: Do not use steel wool on a maple fretboard that has a glossy finish. Rubbing steel wool on any finish will make it hazy.
If you decide to use steel wool, use only 0000 grade. This is the finest steel wool and will not damage the fretboard or frets. If you're cleaning an electric guitar (or an acoustic with a magnetic soundhole pickup), cover the pickups with painter's tape to prevent the steel fibers from collecting around the pole pieces. These very fine steel fibers can cause a pickup to corrode, and they also cause noise if they contact the strings.

Fig. 7. If you opt to clean your fretboard and polish its frets with 0000 steel wool, remember to vacuum up the fibers that inevitably shed during this procedure.
Apply a fretboard conditioner to the fretboard and gently rub the conditioner into the wood with the steel wool pad, turning it frequently. Move across the fretboard, cleaning the wood between the frets, and then work the pad along the side of each fret. Once the fretboard is clean, run the pad up and down along the top of the frets to polish them.
After cleaning the fretboard with steel wool, use a vacuum to carefully remove the steel fibers that inevitably shed from the pad (Fig. 7). Avoid getting the fibers on the guitar's finish, as they can scratch it.
My preferred method for cleaning the fretboard is to use an old toothbrush and Planet Waves Hydrate, a type of fretboard conditioner. This approach is less messy than using steel wool, but it's important to note that Hydrate is only for dark fretboards—don't use it on maple 'boards.
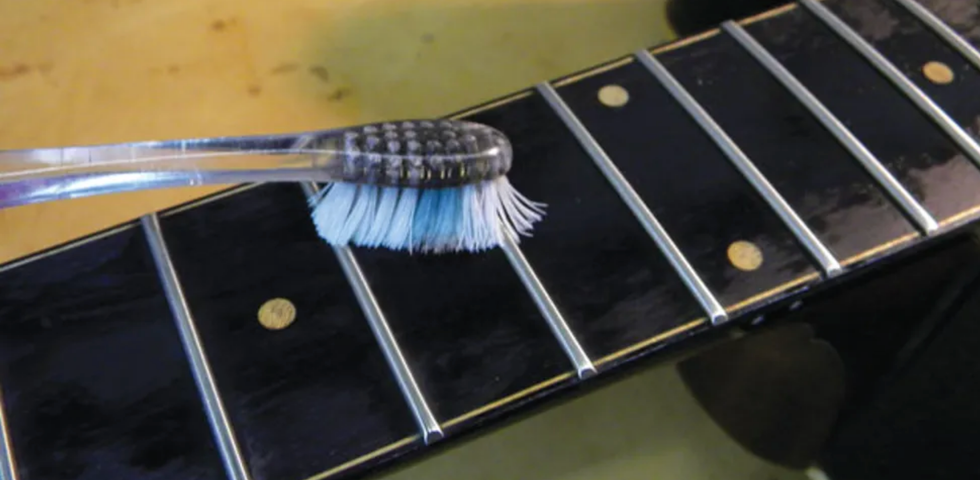
I like using a toothbrush because you can scrub all you want without damaging the wood or the frets. Simply spray Hydrate onto your fretboard and work it into the wood and around the frets with the toothbrush bristles (Fig. 8). Once the gunk is loosened, wipe it off with a paper towel. Also be sure you wipe off any excess conditioner to prevent it from coating the strings.
But the toothbrush technique won't polish the frets. If you're not too keen on using 0000 steel wool to do this (and I don't blame you), Planet Waves makes a product called the Fret Polishing System. Basically, it's super-fine polishing paper that's packaged with a protective stiff paper template that covers the wood while exposing the fretwire. The template fits medium or jumbo frets and you can use the kit on maple or dark fretboards.

Fig. 9. Planet Waves' Fret Polishing System includes super-fine abrasive paper and a guard to protect the wood.
Simply lay the template over the fretwire and polish the frets until they glisten (Fig. 9). The kit works great and there is little mess to clean up. But even with this system, you'll want to vacuum the residue off the neck left by the polishing paper.
Cleaning and Conditioning a Bridge.

Fig. 10. Like the fretboard, an acoustic guitar's bridge needs to be cleaned and conditioned.
It's very simple to clean and condition the bridge on an acoustic guitar. Remove the bridge saddle and then scrub the bridge with a toothbrush and conditioner (Fig. 10). Use cotton swabs to clean inside the saddle slot. When the gunk is cleaned off, wipe down the bridge with a paper towel. That's it!
Cleaning the Hardware.

Fig. 11. Filth can build up on a bridge and its saddles. When hardware gets this dirty and rusty, you'll need to disassemble and clean it with WD-40 or 3-in-One oil.
Sweat is a big enemy of hardware because its acids and salts corrode the metal plating and attract dirt that clogs up any moving parts. In extreme cases, a guitar's bridge (Fig. 11) and tuning keys (Fig. 12) can begin to rust. Cleaning these important mechanisms keeps them looking good and functioning at their best.
For cleaning metal hardware, I've had success with 3-in-One oil and WD-40. Remember that these products are only safe on metal, so avoid getting them on the fretboard or finish. I typically remove the hardware to clean it with an old toothbrush and then carefully wipe it off before reinstalling.
Cleaning the Finish.
When cleaning your guitar's finish, avoid furniture polishes like Pledge, which contains lemon oil, or products that contain d-Limonene, alcohol, solvents, or silicone. All of these will damage the finish over time. Sweat is another finish-eater because it causes lacquer to soften and break down.
Water actually works well to clean a guitar finish. Use a slightly damp micro-fiber cloth to wipe away dust and grime, and rinse the cloth frequently to remove any debris. As for a good polish, I only use pure carnauba wax, which is safe for most finishes.
Controlling Humidity
Once your guitar is clean, you'll want to protect the wood with some type of humidifier. For a guitar that's stored in its case, I recommend the Humidipak from Planet Waves. It's a simple, accurate, and effective way to maintain the ideal humidity for your guitar. If you keep your guitar out in a studio or living area, try running an ultrasonic or warm mist humidifier in that room. For most stringed instruments, the optimum humidity level is 45 percent.
[Updated 3/24/22]