Ken Settle is a Detroit area photographer who
specializes in music photography. Ken began
his career while barely in his teens,
photographing rock’n’roll legend Bob Seger
during his days playing in Detroit hockey rinks
and clubs, and still keeps a full schedule
shooting live photos and portraits of today’s
top artists.
The Cars burst onto the national music scene in the late 1970s, capturing the attention of rock radio listeners when the demo of their now-classic “Just What I Needed” went what today we would call “viral.” In the 1980s, the band was also a constant presence on MTV. Like the uniqueness of the Cars’ music, with its quirky mix of pop, rock, and new wave, guitarist Elliot Easton’s playing defies labeling, his genre-hopping blend of rock, blues, jazz and rockabilly seamlessly knit together by his savvy and adventurous musical sense.
Easton’s classic solos and creative rhythm playing turned so many of the Cars’ songs into thrilling guitar adventures, without overshadowing them. Let’s see if we can decipher just how he did it.
Knowing Your Stuff
Easton attended Boston’s Berklee College of Music, where he studied guitar, arranging, and composition. While his peers were leaning heavily on Eric Clapton, Jeff Beck, and Jimmy Page, Easton—who is a big Clapton fan—also loves classic Telecaster players like James Burton, Steve Cropper, and Clarence White. Armed with the skills he learned at Berklee, Easton approached his solos from more of a jazz perspective, wending his way through the chord changes creatively, without relying on simply playing pentatonic licks in the song’s key. He deftly shows us how in his solo from the title track of 1981’s Shake It Up. It packs quite a wallop and is widely considered to be one of his best.
In the key of C, Ex. 1 illustrates how Easton nimbly navigates the chord change between Am and Bb, the bluesy b7 chord.
Ex. 1
Over Am, he plays a wicked lick based on the A blues scale (A–C–D–Eb–E–G). Now, he could have continued to use the same scale over the Bb chord. However, in bar two, Easton instead chooses to slide into a Bb triad (Bb–D–F) starting on the “and” of beat 1. He then tops things off with a tasty whole-step bend into D, the 3 of Bb.
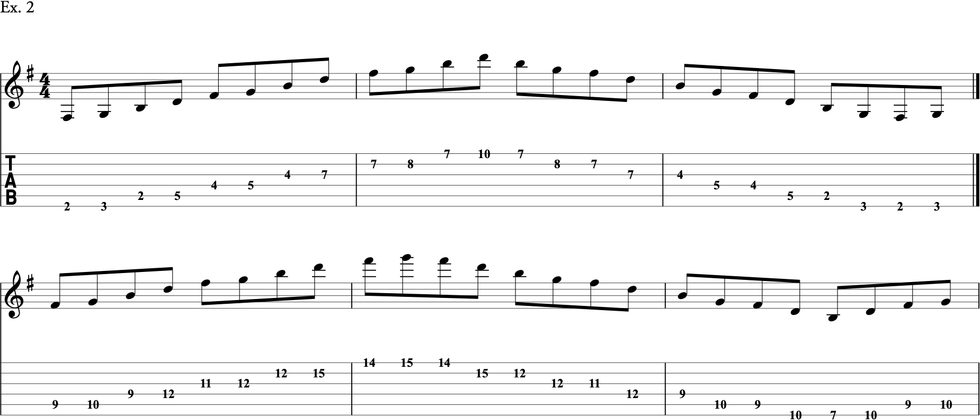
Let’s see how we can apply Easton’s approach to create our own phrases. First, Ex. 2 shows how to play the three Bb triad shapes up and down the neck. (You’ll find these on any set of three adjacent strings, though the fingerings change slightly.)
Ex. 2
Now, we can create more Easton-inspired licks with the two new triad shapes. Ex. 3 begins with an A minor pentatonic (A–C–D–E–G) phrase in the eighth position, leading into the new Bb triad shape at the 10th position, and ending with a nod to Easton’s tasty final bend.
Ex. 3
For the Bb chord in measure two of Ex. 4, we lend a new bluesy touch on beat 2 by employing a half-step bend from Db to D, moving between the chord’s b3 and 3. This makes the lick sound less “clinical” and gives it some fire. Staying aware of these subtle elements will serve to add genuine personality to your playing. Easton’s is chock full.
Ex. 4
Expanding Your Horizons
Most mainstream rock guitarists of the 1970s and ’80s didn’t openly draw very much from disparate styles of music. As mentioned above, Easton was drawn to the pedal-steel-inspired playing of Clarence White, guitarist for the bluegrass group the Kentucky Colonels and the rock band the Byrds. He was also a fan of the Bakersfield sound, the offshoot of country music coming out of the California city, played by the likes of Merle Haggard and Buck Owens.
Easton notably pays homage to those styles in the Cars classic “My Best Friend’s Girl” from their 1978 self-titled debut. First, there’s his rhythm part in the chorus.
A boilerplate country guitar part of this variety would generally be played fingerstyle (or with hybrid picking) and include a Travis-picked bass line, as illustrated in Ex. 5. Note that it is traditionally played with a slight palm-mute on the lower three strings only.
Ex. 5
Let’s look at how Easton retrofits his part to make it just right for this song. Ex. 6 is based on what he plays in the chorus.
Ex. 6
Note how Easton omits the bass notes, which don’t quite jibe rhythmically with what bassist Benjamin Orr is playing. He also exclusively uses his pick, adding brightness to a part that is the star of the show here. (Note that the studio version is sped up, causing it to sound a half-step higher.)
In the second bar of his solo, Easton neatly slips in a Clarence White-style like (Ex. 7) that fits the song to a T.
Ex. 7
The opening dyad involves simultaneously executing two bends, one a half-step, the other a whole-step. To pull this off, it’s best not to think too much about it, as the 1st string has more tension than the 3rd, lending itself more easily to bending just a half-step. Lastly, to get that genuine country sound, play the dyad with your pick and middle finger. The rest of the phrase can be played the same way, though Easton chooses to use his pick.
Style with Substance
Easton’s penchant for colorful bends is also apparent in the title track of the Cars’ 1979 album, Candy-O. His solo enters like a freight train, fueled by achingly slow bends, which again include both the half- and whole-step variety. (He even repeats the phrase a couple of bars later.) Ex. 8 is both challenging and fun.
Ex. 8
An effective way to execute this phrase is to fret both strings with your 3rd finger, bending them downwards towards the floor. But be sure to use your 1st and 2nd fingers to help support the bend. Again, personality rules the day in Easton’s playing; his entrance here is deceptively simple and is both striking and unforgettable.
Part of the charm of Easton’s style is the imaginative way in which he constructs his parts, as in the pre-chorus of “Magic,” a hit from 1984’s Heartbeat City. Singer and guitarist Rik Ocasek’s song presents Easton with a standard VIm–IV–V–VIm chord progression, which in the key of A is F#m–D–E–F#m. Ex. 9 is based on the magic Easton conjures. It’s doubled by keyboardist Greg Hawkes’ synth for effect.
Ex. 9
Here, Easton takes a commonplace progression and creates an earworm of a part by allowing the open 1st and 2nd strings to ring through all of the chords. It’s a new hook we look forward to hearing as the section approaches, and, as is often the case, Easton’s guitar makes the song that much better.
In “Magic,” Easton again begins his solo in a unique and ear-catching way (Ex. 10). He simply plays one note over the entirety of the first three bars, continually re-striking it to propel it rhythmically. It couldn’t be simpler, as the note is A, the root of the key. But fueled by imagination, simplicity can create remarkably powerful statements.
Ex. 10
Easton has said he doesn’t improvise his solos, but instead works them out beforehand. Still, his playing is imbued with a sense of inspired spontaneity, as is the Cars’ music, some of which goes back almost 50 years. The hits still sound fresh, and, together with the deep cuts, they are a treasure of Easton’s guitar goodness.
I’ve always loved the unconventional technique of using two-handed tapping in a “chordal” way. In my younger years, I found myself utilizing it for the wow factor. As I matured in my musicianship, I began asking myself, “What is the practical application of this, and how can it be used in a more musical situation?” I began to use the technique as a way to expand solo/chord-melody guitar playing in the style of players such as Stanley Jordan and Victor Wooten. But that is a whole other ball game in terms of time, practice, and development.
As for how this can be used in a simpler and more typical situation, I found the rhythmic,
percussive, and chordal elements of this technique to be extremely fun and expansive when working with small groups such as duos, trios, and quartets. This is especially exciting when applying it to ethnic rhythms such as Latin, Anatolian, and Middle Eastern rhythms.
When I practice this, I think of two main things: left hand and right hand apart, and left hand and right hand together. I would say left and right hand apart is an easier starting point as it doesn’t require the same coordination. I generally like to utilize root, fifth, and octave with the left hand, and extensions like thirds and sevenths with the right hand as they are the color tones.
Explanation of tabs: Below each column of the noted tab, I use the letter R to indicate right hand and L to indicate left hand. They are stacked in a way that represents the tabs. For example, if you see the letter L all the way at the bottom and the letter R on top of that, that would mean your left hand is tapping the lower note while your right hand is tapping the higher note.
Let’s start off with a straightforward syncopated rhythm that focuses on the left and right hand playing apart from each other.
Ex. 1
Ex. 1: Left hand and right hand apart. This example creates a typical 3+3+2 rhythm by playing two individual notes on the left hand, followed by two notes together (two-note combo) on the right hand, repeat, then finish with one note on the left hand and one combo on the right hand.
Ex. 2
Ex. 2: This is the same rhythm and pattern as the first example, but we begin to have some melodic movement in the right hand.
Ex. 3
Ex. 3: Left hand and right hand begin playing together. This example has a bit of a Latin flavor and the juxtaposition of strong down beats in the left hand and syncopations in the right hand creates a cool effect.
Ex. 4
Ex. 4: This is the same rhythm and pattern as Ex. 3 but we have some movement with the extensions of the chords.
Ex. 5
Ex. 5: This example begins to incorporate sliding in the right hand. Whenever I present a new technique, I simplify the overall example to focus on the new technique.
Ex. 6
Ex. 6: This is a standard progression based on the first eight measures of “Blue Bossa.” Clearly, I like minor keys. This example demonstrates more bassline movement with the left hand and application of the style over a longer chord progression. We are keeping the left hand and right hand apart to ease into a busier left hand.
Ex. 7
Ex. 7: This example utilizes all the prior concepts, including slides in the right hand, hammer-ons and pull-offs between the two hands, both hands together, and both hands apart.
I hope these examples help with getting started on some basic—and some not-so-basic—tapping
techniques while playing something that sounds musical and usable.
Great music tells a story. It builds on a plot and holds the listener’s attention as the story unfolds. We are especially moved by soloists who bare their souls and who keep us riveted with every twist and turn from their narrative. Pentatonics are the backbone of modern guitar vocabulary. Partially because they just sound good, but also because they lay so easily on guitar. There are several ingredients that make a guitarist sound brilliant, but one of the most important is chromaticism. Could there a be a way we could combine these two? Let’s find out.
This term chromaticism comes from the Greek word chroma, which means “color.” Using chromaticism means having the freedom to use all 12 notes over a given chord. Imagine the possibilities and freedom to play any note over a chord in composition or improvising! The quickest way to start adding color notes to the minor pentatonic scale is to add the 2nd and the 6th, which then gives you a Dorian mode. I’ve outlined it below using the A minor pentatonic scale.
A Minor pentatonic: A–C–D–E–G
A Dorian: A–B–C–D–E–F#–G
In general, there are chromatic notes that are outside the chord/scale, and notes that are outside the key. The latter carries a lot of tension against a chord and needs movement or resolution. From my days of playing jazz gigs in Toledo, OH, I recall what legendary trumpeter Jimmy Cook once told me regarding playing outside: “You can go up to the attic, but you have to come back down.” In other words, you can play outside tonally, but you must resolve at some point in order for your music to sound coherent.
Let’s get started on this journey of chromaticism together.
Before we go hog wild and add random notes, let’s begin by taking an A minor pentatonic scale and fill in the chromatic notes between the already existing box pattern. It’s almost arbitrary, but it will enable you to hear different colors added within the scale (Ex. 1).
Chromatic Burst of Energy. In beat 1 of Ex. 2, we start with an A Dorian fragment followed by an extended chromatic line. The line in beat two starts on the b7 (G), highlighting the b5 (Eb) on beat 3, descending chromatically all the way down to B, and ending with A major pentatonic.
Bounce Around! We start on the b5 (Eb) followed by a typical chromatic rotation where we bounce around the b5. This idea lays quite well in the familiar pentatonic box. It’s easy and will add spice to your shredding (Ex. 3).
Side Stepping. A common approach to playing “outside” is side stepping. In other words, take the scale you’d normally use and displace it by a half-step above or below. By doing this, you’ll have instant access to notes that are harmonically outside the key—don’t think of them as wrong notes, just coloring notes. In Ex. 4 we take a pentatonic pattern from E minor pentatonic and sequence it in F minor pentatonic. As the notes can be analyzed over the E5 chord, it’s more important to view them as passing notes. Remember, the power of the sequence overrides the harmony!
Extend the Side Step. Ex. 5 uses the same concept of side stepping above but adds a note (D) to the displaced pattern. By doing so, this breaks the predictability of the phrase and places subsequent notes in new places.
Changing Tones.Ex. 6 is a fun lick to learn that starts with a strong, repeated three-note polyrhythmic figure (A#–B–D). The chromatic part occurs on beat 4 and utilizes changing tones, which is a type of non-harmonic tone.
Don’t Start On 1. The line starts on the 2nd (B), goes up a whole-step to C# followed by a double chromatic approach to Bb, down a whole-step to (G#), and finally resolving to the root (A). Once the A note is reached, there’s a cascading flurry of four-note groups settling in A minor pentatonic (Ex. 7).
Scrambles. This example (Ex. 8) was inspired by the legendary New York guitarist, Mark Hitt. Mark was a unique player, combining a rock sensibility with a jazz quotient. He developed an arsenal of twisting lines using chromaticism that he referred to as “scrambles.”
The pattern alternates between 1–3–4 and 1–2–4 fingerings, a typical fingering of the diminished scale. It can be analyzed where notes of the pentatonic are being targeted, but it’s all about the texture and excitement that is created. Make sure to play the line with slurs to get a fluid, legato sound.
Half-Step Approach. In this instance, we take the Im triad (Am) from the pentatonic scale and approach each chord tone from a half-step below (Ex. 9). This is more of a concept and exercise rather than a lick. This idea can be used with just about any improvising application.
One String Wonder. Ex. 10 highlights a series of chromatically descending half-steps. It’s an easy technique to get down and one I often use. It provides melodic interest, but also serves as an easy way to connect one position to the next. Here, we start on a high F that walks down a fourth to C in half-steps, followed by a C minor blues phrase.
Practice Tip
These chromatic lines sound best when played fast and with conviction. As always, approach new material slowly and accurately. Ignore your inner voice that may tell you that the “outside” notes are wrong. Once you’re able to play the lines up to speed, you’ll be amazed by how impressive it sounds. These ideas that will add motion, color, and excitement to your playing and enhance your musical expression when soloing.
In my experience, constructing lines has always been about texture and structure. Developing ideas for soloing and writing melodies takes a keen sense of harmonic and rhythmic context. It’s about seducing the listener and delivering a ride that’s hard to forget—a ride that caters to the listener. Of course, it’s important to write for yourself and from the heart, but also remember that if your heart’s intent is to inspire others, then you’re on the right track for the long haul. And this is where melody comes in.
Melody deserves a certain level of priority in relation to harmony and rhythm. In this lesson, I’m going to show you a quick way to start improving your lines. The good news is music knows no bounds and music doesn’t care what level you’re at. Harmony and rhythm need to help each other tell your story.
In Ex. 1 we’ll be playing the Em7 arpeggio (E–G–B–D) in two positions. Don’t worry, we won’t get into too much theory, just remember these shapes can be transposed into any key. The top one starts in 10th position and shifts up the neck, while the bottom one starts in 5th position. Getting these under your fingers will help map out quite a bit of the fretboard. I try to only visualize one octave at a time, and then take that shape and move it wherever I need to chase the melodic and rhythmic ideas that inspire me.
Ex. 2 follows the same idea, but this time using a Gmaj7 arpeggio (G–B–D–F#). I’ve chosen E minor and G major because they are closely related key centers. When learning these arpeggios, focus on the string pairs that occur in each octave. In the extended arpeggio that ascends from the 2nd fret, notice how the patterns recur in each octave. That’s not always the case, as you’ll see in the second arpeggio that ascends from the 9th fret.
Next, we’re going to use the first Gmaj7 arpeggio—the one with the recurring pattern—to practice running through a sequence. Think of Ex. 3 in groups of five. When practicing such lines, I like to use drum grooves instead of a metronome. Now here’s the twist: To progressively challenge my technique, I keep changing the subdivision of the meter I’m using. For example, we’re in 4/4 time here. As I develop the sequence, I’ll increase the subdivision from quarter-notes, to quarter-note triplets, to eighth-notes, to eighth-note triplets, then 16th-notes, and finally 16th-note triplets. That not only increases my speed but it also forces me to be rhythmically aware, thus giving me both speed and accuracy. It gives me full control. Take your time with this example because we’ll apply the same shifting-subdivision concept to the next one.
We revisit the Em7 arpeggio pattern at the 12th fret for Ex. 4. Let’s take a moment to talk about picking. Please use whatever technique you feel most comfortable with, but if you must know, in the corresponding audio clip I’m using as much legato technique as I can. For those not familiar with this term, it means I’m using hammer-ons and pull-offs to sound many of the notes, as indicated in the notation and tab. But there’s no need to get hung up in the picking technique. If you want to pick every note using alternate or economy picking, then do so with style. If you want to hybrid pick, go for it. The point is to increase your rhythmic knowledge and execute some creative ideas.
Now it’s time to step up the subdivisions. In Ex. 5 and Ex. 6, we’re using the same arpeggios we mapped out earlier, only this time we’re playing 16th-notes. If this is something you haven’t done before, don’t be alarmed. Just think of it as a slight increase in speed. Learning to shift subdivisions with seamless control is a great way to expand your ability to develop lines.
Enough with the exercises—let’s make some music. Ex. 7 starts out by traversing the Em7 arpeggio with 16th-notes, then transitions into the next octave using 16th-note triplets. Then for variety, we mix in some pentatonic lyricism. That brings me to a side note: Always step away for a moment from using only arpeggios by mixing in some pentatonic or scalar lyricism to your lines. A line composed of only arpeggios can sound stiff and redundant. One way to avoid this is to sprinkle some scale tones into the phrase.
In Ex. 8, we’re using Em7 arpeggios again, but the position conveniently gives us a full three octaves to work with. Instead of sticking exclusively to the basic shape, I also included some pentatonic moves. Notice how mixing 16th-notes and 16th-note triplets add color to the line. The key to sounding like a professional player is to make sure your playing offers the listener variety in rhythm and note choice.
We head back to the Gmaj7 shape for Ex. 9. It starts out in the lowest octave, which is at the 2nd fret, and once again mixes in that good ol’ E minor pentatonic (E–G–A–B–D) tonality. We repeat the same thing an octave higher, but because we run out of real estate, we need to slide up before finishing off the line in a G major tonality.
In our final example (Ex. 10), we return to the Gmaj7 arpeggio in its higher position, though we’re treating it a bit more lyrically this time around. No sequences, just playing bits and pieces of the arpeggio.
Hybrid picking is a technique used by many players that combines regular flatpicking with fingerpicking. It’s not all arpeggio and patterns though. Caitlin Caggiano guides us through a lesson using this picking technique for chords, melodic lines, and lead lines, and she shows us how the Beatles, Heart, and others have applied hybrid picking to create classic parts. In this video, you’ll learn what hybrid picking is, why we use it, how to implement good technique, and how to practice and apply the technique in your playing.