


These days, rather than miking my guitar amps to track clean tones in my home studio, I record direct into my computer and get my sounds using digital “fingerprints” of these amps I’ve generated using impulse response (IR) technology. Frankly, the tones I get using amp IRs with direct-to-interface recording are 99-percent identical to the sound of a miked clean amp ... without the hum and hiss. The process is like using an amp simulator plug-in, but rather than the edgy, artificial tones they often yield, IRs sound startlingly real. As an added benefit, you skip the endless preset scrolling that often comes with using amp sims. It has made me an IR convert.
Through the miracle of IR technology, you too can easily make tone clones of your clean guitar or bass amps, and quickly load the digital replicas into your favorite digital audio workstation (DAW) for late-night sessions or just plain hassle-free recording. If this sounds intriguing, let me take you through the step-by-step process of making your own clean amp IRs. I’ll use popular software from Apple and Ableton to illustrate the procedure. We’ll start with the basics.
IR Background
Typical impulse responses are made by playing and recording a sine sweep (a succession of sine waves spiraling up in frequency) through a system (i.e., speaker plus room plus mic), and then “deconvolving” the recorded signal to derive an impulsive sound, or IR, that reflects the sonic characteristics of the system. You then load the IR into a “convolver,” which can be a plug-in or hardware box. The sound fed through the convolver reflects the frequency response, phase, and ambience captured in the IR.
just plain hassle-free recording.
As a Premier Guitar reader, you may be familiar with the technique of using IRs of speaker cabinets to accurately reproduce the sound of an amp plugged into a speaker. This typically involves running the speaker output from an amp head into a load box, and then feeding the line out of the load box into your audio interface. The interface sends the signal into your chosen DAW software running a cabinet IR plug-in that’s loaded with a 4x12, 2x10, 1x12, or whatever cabinet style you have available. This is an excellent way to record your amp’s tones—including overdriven sounds—without having to set up microphones and make a racket that’s inappropriate for most domestic home studios.
Using techniques that are similar (but a bit easier) than making cabinet IRs, you can make IRs of the whole amp experience—tone control settings, cabinet, speaker, and, if you like, spring reverb. If you use distant mic techniques, you’ll have the sonic imprint of your recording room, too. What you cannot capture with amp IRs, however, are qualities that are non-linear, such as overdrive, distortion, or compression.
Listen Up!
Before we dive into creating IRs, let me convince you that modeling clean amps with IRs is worth the effort and yields sounds that are essentially indistinguishable from an actual miked amplifier. You’ll be able to compare a phrase played through a 20-watt, 1x12 Fender Deluxe Reverb II tube combo (Fig. 1) and miked with a Shure SM57 to an identical phrase recorded direct into the DAW and then processed with an IR made using the same Deluxe Reverb, settings, and mic. (I’ll describe this IR-crafting process in a moment, but for now, let’s focus on the A/B comparison.)
To ensure there was no variation in performance from example to example, I captured the initial phrase using a Boss RC-2 looper. The looper pedal then ran into either the miked Deluxe Reverb II or directly into my Apple Logic Pro X DAW and Impulse Response Utility software. My audio interface was a RME Babyface Pro. I kept the phrase short to facilitate our comparison test.
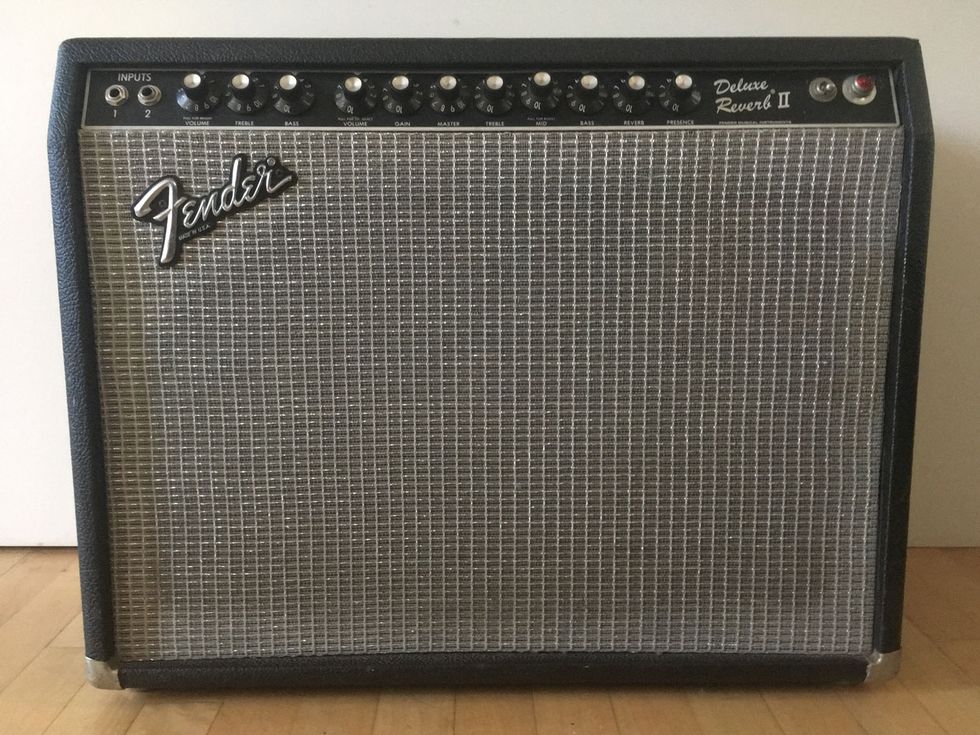
Fig. 1. — The 20-watt tube combo featured in both the miked amp and IR clips: a fantastic 1985 Fender Deluxe Reverb II. The volume was on 3 (loud, but not loud enough to noticeably distort), and the 12" speaker was miked with a Shure SM57 positioned at the center of the cone.
For even more comparison fun, I added a third example. Once again, I ran the looper directly into the DAW, but this time the signal fed an amp simulator plug-in, rather than the IR plug-in.
To avoid confirmation bias, initially I’ll identify the audio clips only by number. Later, I’ll reveal which of the three clips is the actual miked amp, which is the direct recording convolved with an IR, and which is the direct recording processed with an amp sim. These examples have no EQ, compression, or other processing.
Ready? Check out Clip 1, Clip 2, and Clip 3 online.
Now let’s crank up the Deluxe Reverb II’s glorious spring reverb and try another A/B test. We’ll skip the amp sim, which means one of these clips is the direct recording run into an IR and the other is the miked amp. Listen to Clip 4 and Clip 5 and see if you can distinguish one from the other.
Now for the big reveal: In Clip 1 and Clip 4, you hear the miked amp; Clip 2 and Clip 5 are the direct guitar feeding Logic’s Space Designer convolution plug-in hosting the Deluxe Reverb II’s IR. Clip 3 is the direct guitar running into the amp sim—in this case, Logic’s Amp Designer.
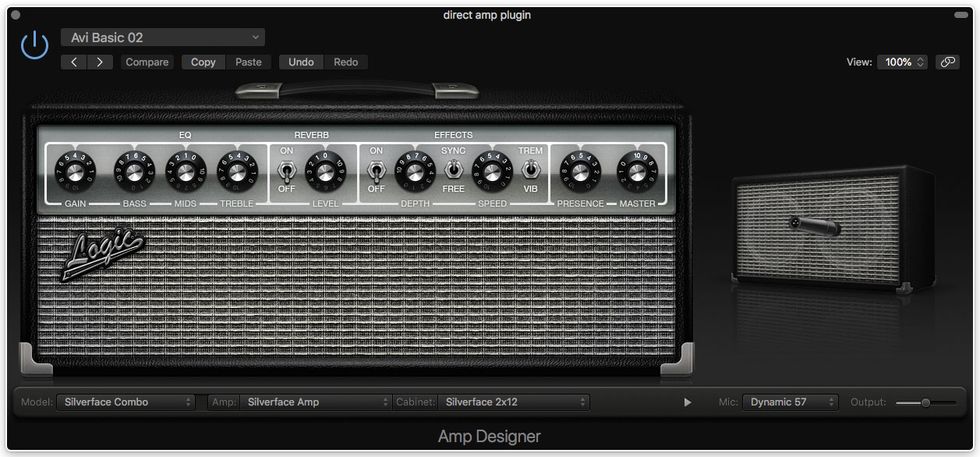
Fig. 2. — The Amp Designer settings used in Clip 3. How does this compare to the Deluxe Reverb II’s IR?
Close, but no cigar.
A couple of things stand out in these clips: The actual amp recordings (Clip 1 and Clip 4) have a constant low-level hum and hiss, particularly when the reverb is engaged. I was tempted to remove it with Izotope’s Denoiser plug-in but thought it best to leave the recordings unprocessed.
Anyway, what is remarkable to me is not only how the guitar tone is darn near identical between the miked amp and IR clips, but that the spring reverb in Clip 5 is perfectly captured with the IR, just without the extra hiss. And while I got close in Clip 3, the amp sim version, I couldn’t replicate the Deluxe Reverb II tone in Amp Designer, so I gave up tweaking. Fig. 2 is a screenshot of Clip 3’s amp sim settings.
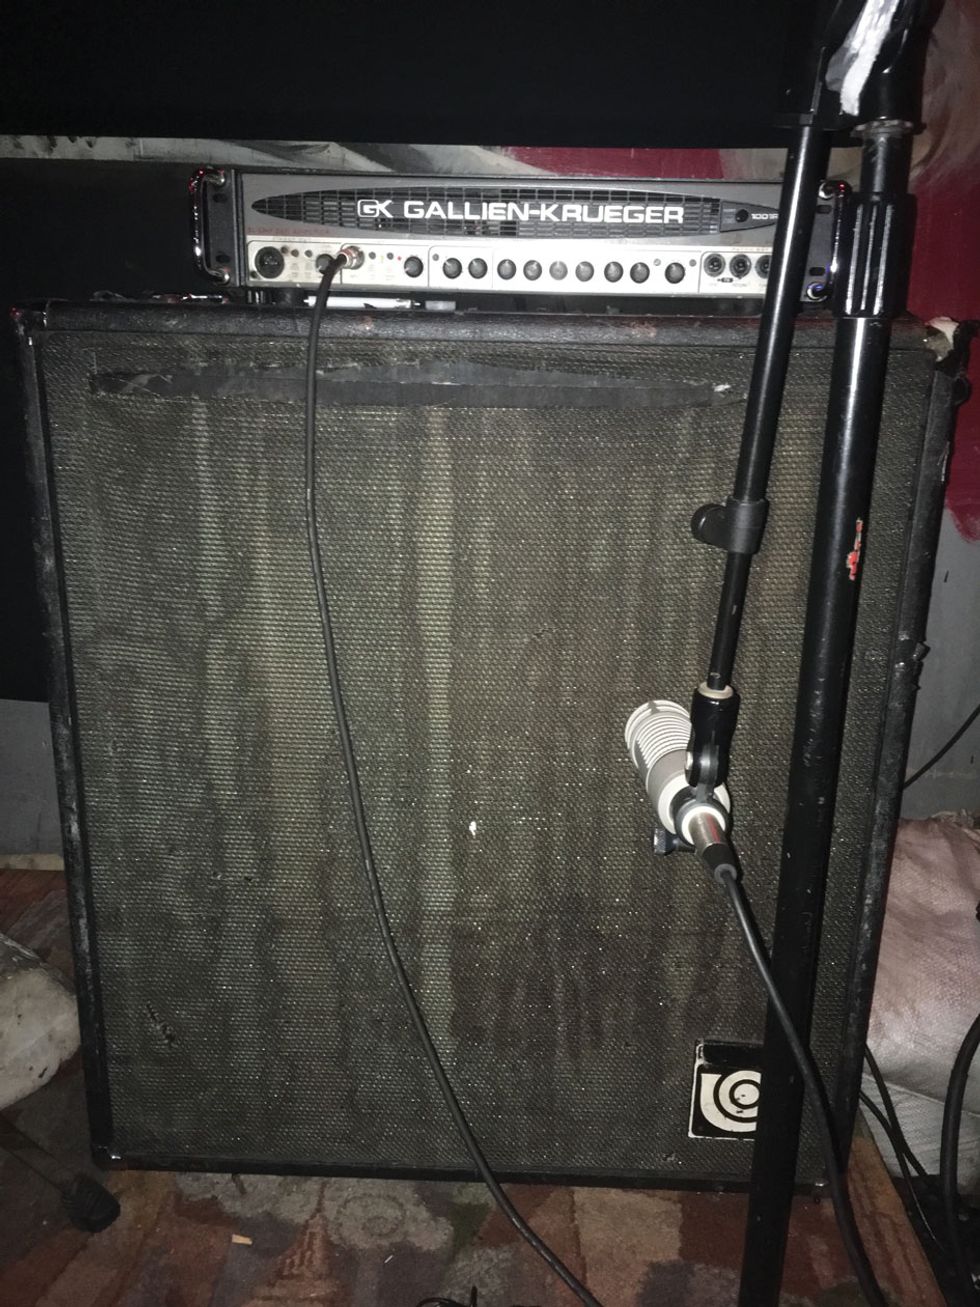
Fig. 3. — The well-worn Gallien-Krueger 1001 RB head and beer-streaked Ampeg 4x10 cabinet used for the bass clips are parked at NYC’s Nublu Classic club. The mic is an Electro-Voice RE20 placed close to the grille.
I wondered how well IRs would work with a bass amp, so I grabbed a bass and played the two phrases you hear in Clips 6–9. Again, I recorded each phrase into the Boss RC-2, played them into a Gallien-Krueger 1001 RB bass amp head driving an Ampeg 4x10 closed-back cabinet miked with an Electro-Voice RE20 (Fig. 3), and then captured the results using my RME Babyface Pro interface and Logic Pro X. For the A/B comparison, I played the same phrases from the RC-2 directly into my interface and laptop, and then ran them through Logic’s Space Designer plug-in loaded with an IR I’d made of the GK bass rig.
In all four bass clips, I just hear the same beefy tone. But for the record, Clip 6 and Clip 8 are the miked amp, and Clip 7 and Clip 9 are the direct recordings running through the Space Designer IR.
Adding FX to Clean Amp IRs
While you can’t capture amp distortion or compression with IRs, you can run effects into your clean amp IR with great results. Listen to Clip 10, which I made in GarageBand using one direct guitar audio file to create two separate tracks with two different IRs: a stereo IR of my Deluxe Reverb II and a mono IR of a Fender Princeton Reverb.
To make the IRs, I put a close mic on the Princeton and both a close mic and distant mic on the Deluxe. Going into GarageBand, I used a J. Rockett Animal Overdrive and a touch of MXR Carbon Copy analog delay set to a single slapback echo.
I also used the Rockett Animal Overdrive to record Clip 11, as well as two different convolution plug-ins: ReaVerb and LAConvolver. I used the former on my Deluxe Reverb and the latter for my Princeton. I captured both IRs with the amps’ spring reverb on, which raises an important point: Both ReaVerb and LAConvolver allow for long IRs, which is not always the case. If you intend to make clean amp IR using generous amounts of spring reverb, you’ll want to bear this in mind. [For a list of alternative IR tools—some of which are free—see the sidebar “Other Convolution Plug-ins.”
Clip 12 uses the same IRs as Clip 11, but I set different panning and relative levels, and also added a touch of compression to the clean guitar.
Clip 13 features a stereo IR of my Deluxe Reverb II; a close mic is panned left and a room mic is panned right.
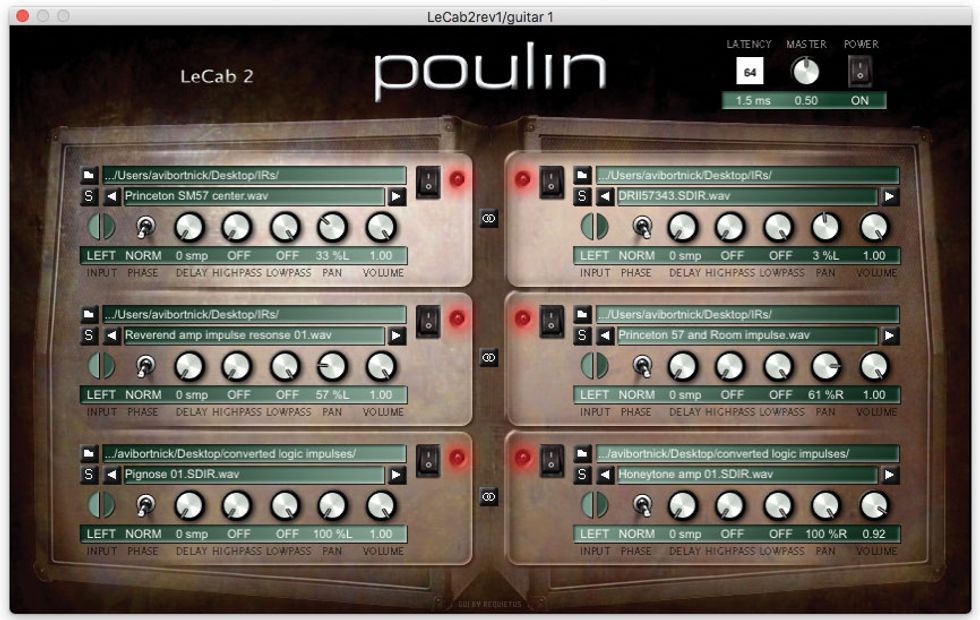
Fig. 4. — A screenshot of the Poulin LeCab 2 plug-in running six clean amp IRs, as heard in Clip 14.
And finally,I couldn’t resist simultaneously running six different clean amp IRs in yet another convolution plug-in—Poulin’s LeCab 2 (Fig. 4). For grit, I again used the Animal Overdrive pedal into my interface and DAW.
Glad I didn’t have to set up six mics and amps at once to try this! Clip 14 is the result. In case you’re curious, I created the six IRs using the five amps shown in Fig. 5.
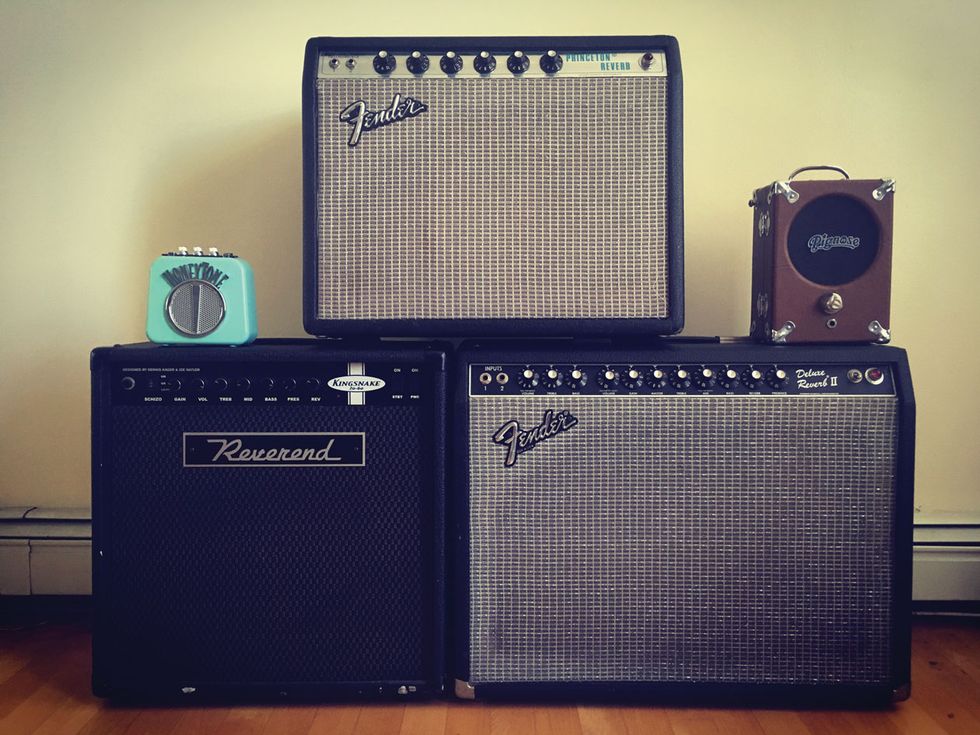
Fig. 5. — Clip 14 features six IRs made from these amps: my trusty Fender Deluxe II and Princeton Reverb, a Reverend Kingsnake, and Pignose and Danelectro HoneyTone mini amps.
As you can tell, I’m an evangelist for the power of IRs. If hearing IRs in action has made you a believer, now I’ll show you how to create accurate digital reproductions of your miked-up clean amps using different DAW’s and plug-ins. So we can dive right into the process, we’ll skip the theory and computation behind creating IRs and convolving them with audio signals. If you’re interested in understanding the underlying technology, there’s a lot of info on the interwebs.
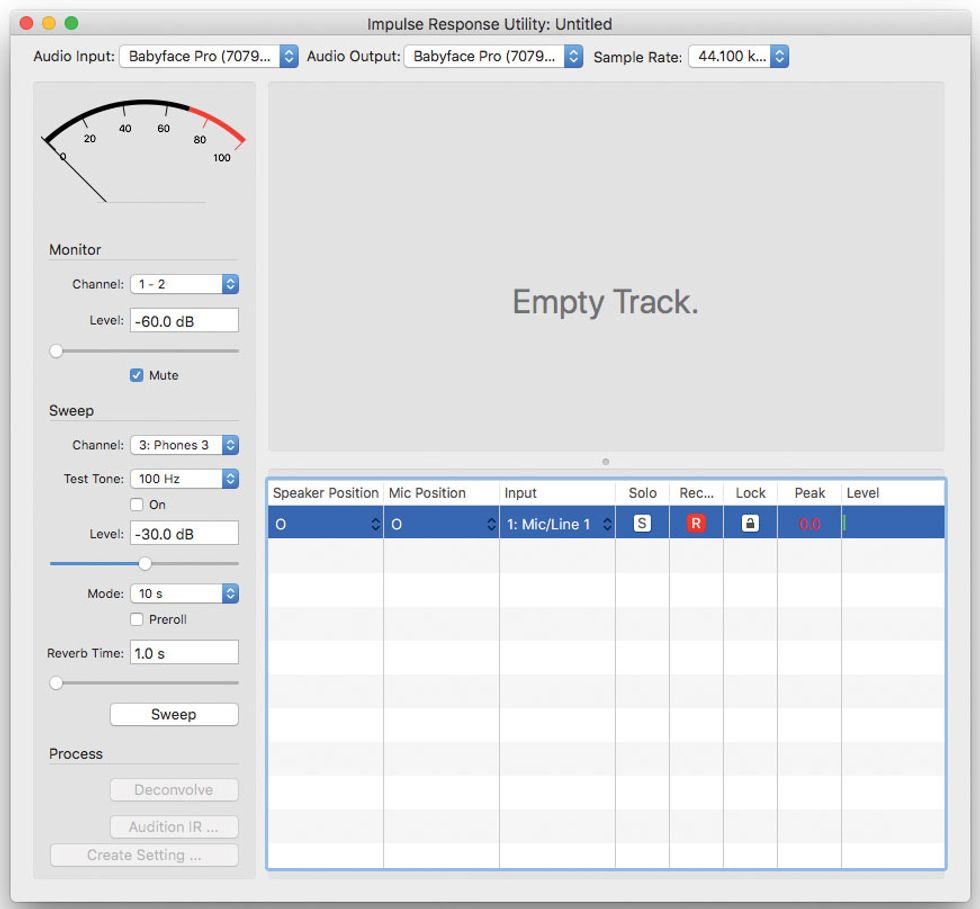
Fig. 6. — The setup window for Apple Logic’s Impulse Response Utility.
Making Impulse Responses Using Apple’s Impulse Response Utility
Apple includes the Impulse Response Utility with Logic Pro X. To find it on your drive, perform a Spotlight search or Finder window search for Impulse Response Utility. Once it’s open (Fig. 6), follow these steps:
1) Select File > New (or command+N) and choose Mono (1 Speaker position, 1 Mic position). Click OK.
2) Look at the top of the IR Utility window and confirm that your audio interface is selected for Audio Input and Audio Output.
3) In the Monitor section of the IR Utility window, Mute should be checked.
4) In the Sweep section, make sure Channel is set to the output channel that will run into your guitar amp input, set the level to something like -30 dB or less. This is very important because you don’t want to pummel your amplifier’s input and cause distortion, or perhaps damage your hearing because of an excessively loud sine wave sweep.
5) Run a cable from the interface output you selected in the Sweep section to your guitar amp input, turn your amp volume all the way down, and turn on your amp.
6) In the Sweep section of IR Utility, use the pull-down menu to select Test Tone: 100 Hz, and check the On box.
7) Now, gradually turn up your amplifier until you hear the 100 Hz low-frequency test tone, which is about a low G (6th string, 3rd fret) on your guitar. Without changing the amp volume, unplug the cable from your guitar amp’s input, plug in a guitar with its volume set to full, and play a low G. The subjective volume level of the low G and the 100 Hz test tone should be about the same. If the test tone is too loud or too soft, adjust it using the Level slider in IR Utility. The idea here is to approximately match the test tone with your guitar’s signal. Remember: We don’t want the sine sweep from IR Utility to cause the amp to distort.
8) Set up a microphone as if you were recording your amp. Typically, you’ll place the mic right up on the speaker grille, but if you prefer a roomier sound, move the mic back accordingly. Connect the microphone cable to an input on your audio interface. Set the input level to avoid overloading.
9) Set the Mode to 10 seconds and the Reverb Time to 1.0 second. If you’re recording your amp in a large space or using your amp’s built-in reverb, increase the Reverb Time to 2 seconds or more.
10) Confirm that the correct input is selected in the Input column of IR Utility’s right window, then press the R button to record-enable the software. Now press the Sweep button on the left. You’ll hear a 10-second swept sine wave, which goes from rumbly lows to piercing highs. (You may want to cover your ears or wear earplugs for this.) During the sine sweep, monitor your input recording levels to make sure there is sufficient level, but that it has not overloaded during the sweep. If levels are too low or too high, make adjustments, and start the sweep again. Follow the prompt and name and save the swept sine wave that IR Utility generated.
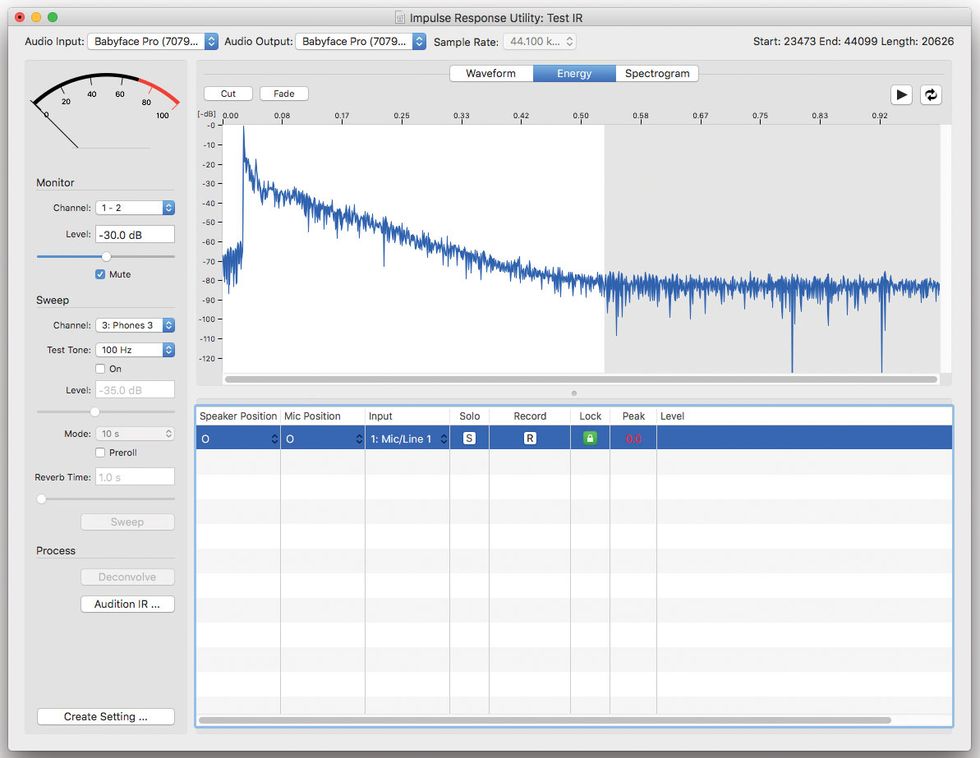
Fig. 7. — The waveform tail being selected for trimming in IR Utility.
11) Press IR Utility’s Deconvolve button on the lower left. The “blob” of the sine sweep waveform will turn into a spikey impulse. It’s a good idea to trim off the excess of the generated impulse. You do this directly in IR Utility by clicking on the Energy tab, visually finding the approximate point that the impulse signal merges with baseline noise (the grayed right side in Fig. 7) and clicking Cut. Now trim the beginning of the impulse by highlighting the portion just prior to the waveform peak (see Fig. 8), and again click Cut.
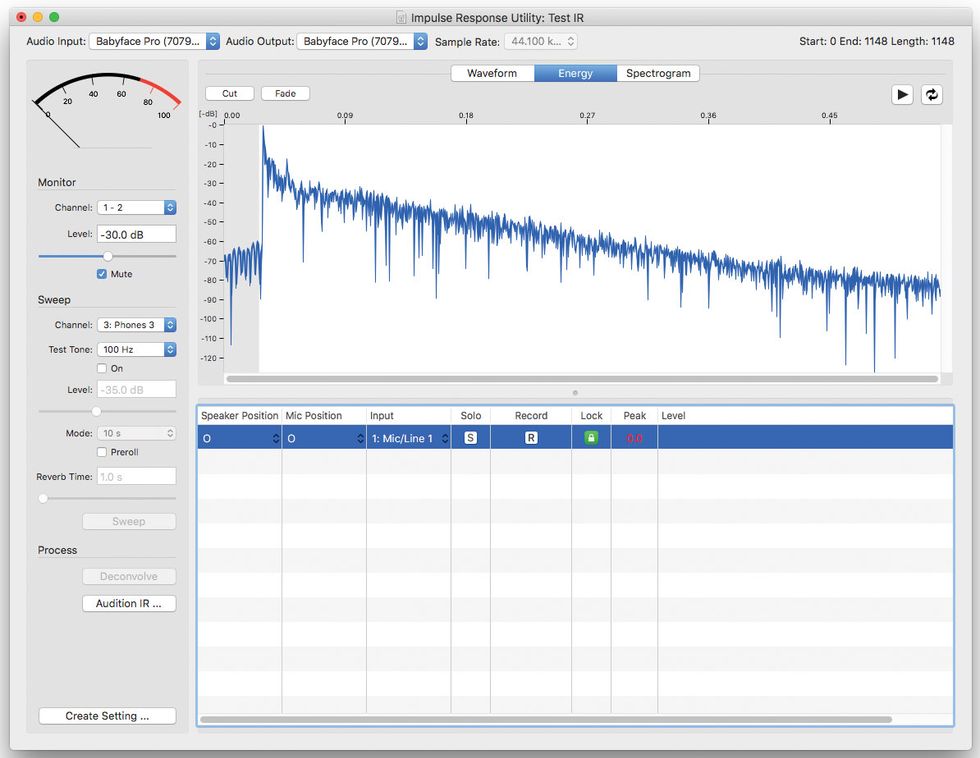
Fig. 8. — Using IR Utility to trim the beginning of the waveform.
12) Press the Create Setting button, and name the IR file (i.e., “My amp with close mic 01”).
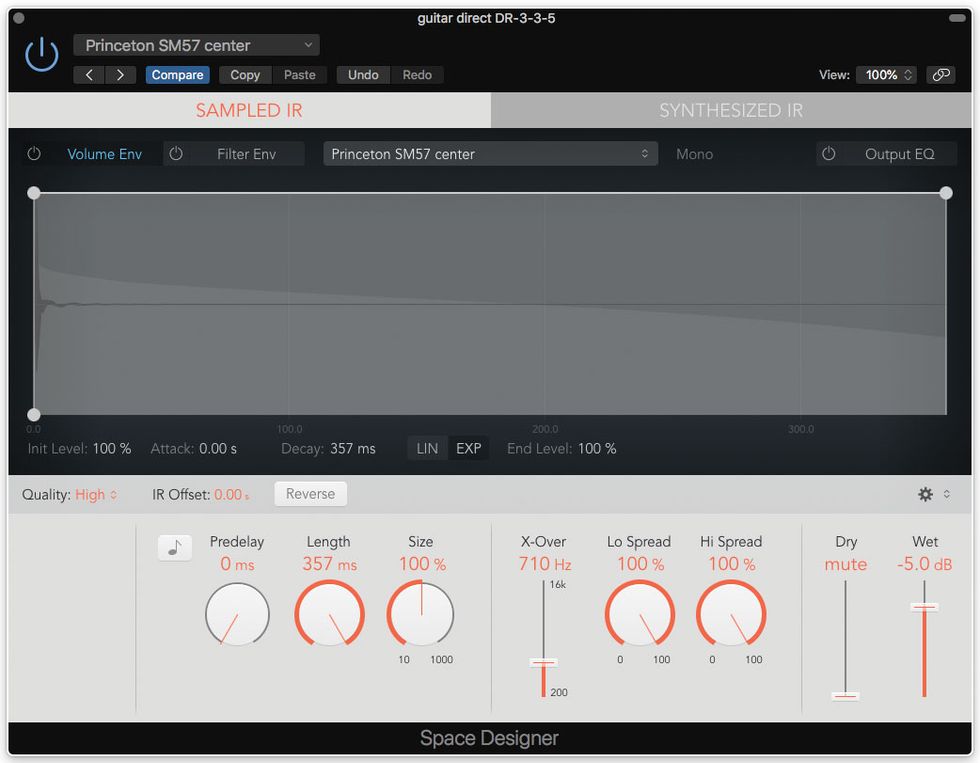
Fig. 9 — Logic Pro X Space Designer with an IR of a Princeton Reverb amp. Note: Dry fader is set to zero.
You have now created an impulse response profile of your amp/mic/room/reverb that is available in the pull down presets of Logic’s (or GarageBand’s) Space Designer. If you’re using Logic, put Space Designer as a plug-in on a track, call up your preset, and disable the Volume Env, Filter Env, and Output EQ buttons. Most importantly, turn the Dry signal to zero/mute, so you only hear the IR of your amp. See Fig. 9.
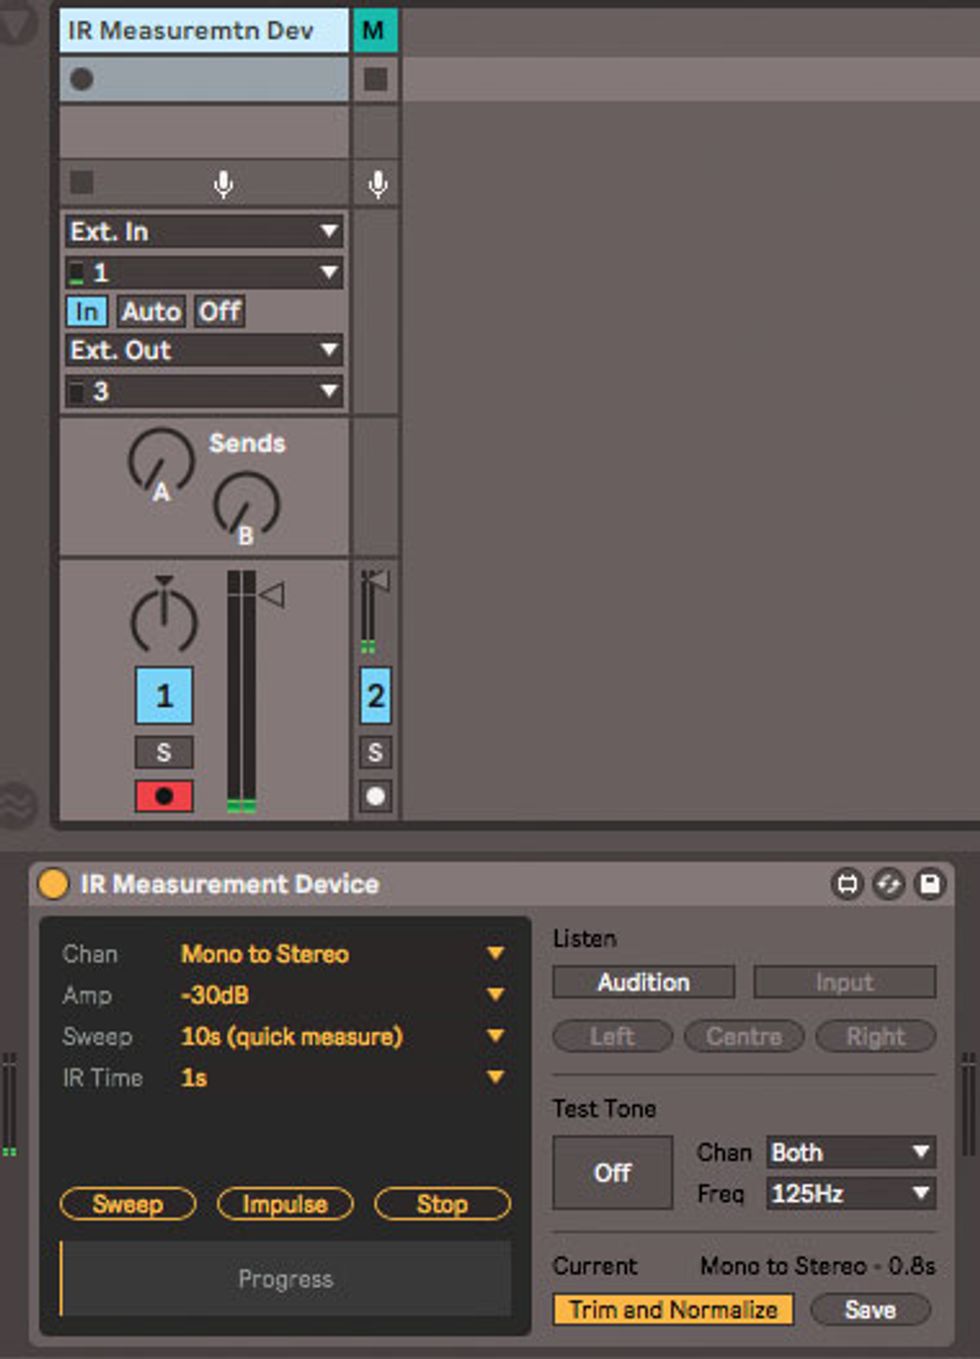
Fig. 10. — The settings for capturing an impulse response using Ableton Live’s IR Measurement Device.
Making Impulse Responses Using Ableton Live’s IR Measurement Device
Another way to make IRs of clean amps is with Ableton Live Suite. The trick is to use Max for Live’s IR Measurement Device and Max’s Convolution Reverb plug-in.
1) Find the IR Measurement Device in the Max for Live/Max Audio Effect location, and then drag it to an audio track.
2) On the track, enable the input for your microphone. Next, select the In button in the Monitoring Row and then the output that will connect to your amp. Now record-enable the track.
3) On the IR Measurement Device, use the pull-down menus to select the following: Mono to Stereo (assuming you’re only using one microphone), Amp -30, Sweep 30s (good quality), and IR Time 1s (unless you’re capturing spring reverb or a large room sound along with your clean amp, in which case you’ll want a longer IR Time of 2 seconds or more). See Fig. 10.
4) Run a cable from the output that’s selected in the record-enabled audio track to your guitar amp input, turn your amp volume all the way down, and turn on your amp.
5) In the Test Tone section of the IR Measurement Device, use the pull-down menu to select Freq: 125 Hz, and press the button to turn on the test tone.
6) Now gradually turn up your amplifier until you hear the 125 Hz low-frequency test tone, which is about a low B (5th string, 2nd fret) on your guitar. Without changing the amp volume, unplug the cable from your guitar amp, and plug a guitar into your amp with its volume knob wide open.
Play a low B. The subjective volume level of the B note and the 125 Hz test tone should be about the same. If the test tone is too loud, reduce the output from your interface. If it’s too soft, raise it. The goal is to match both the test tone and guitar volumes as best you can. We don’t want Ableton’s sine sweep to cause the amp to distort.
7) Set up a microphone as if you were recording your amp. Put it right up to the grille cloth, unless you prefer a roomier sound, in which case you’ll place the mic further away. Connect the microphone cable to an input on your audio interface. Set the interface’s input level to avoid overloading.
8) Press the Sweep button. (Consider earplugs for this step!) During the sine sweep, monitor your input recording levels to make sure there is sufficient level, but that it has not overloaded during the sweep. If levels are too low or too high, press Stop, make adjustments, and start Sweep again.
9) Make sure the Trim and Normalize button is selected, then press Save on the bottom right of the plug-in screen. Name your impulse and save it to a location of your choice.
10) On a new audio track, find the Convolution Reverb plug-in in the Max for Live/Max Audio Effect location, and drag it to the track. Now drag the impulse you created directly on to the Convolution Reverb plug-in window. Dial the Dry/Wet mix to 100 percent but keep everything else set to default values.
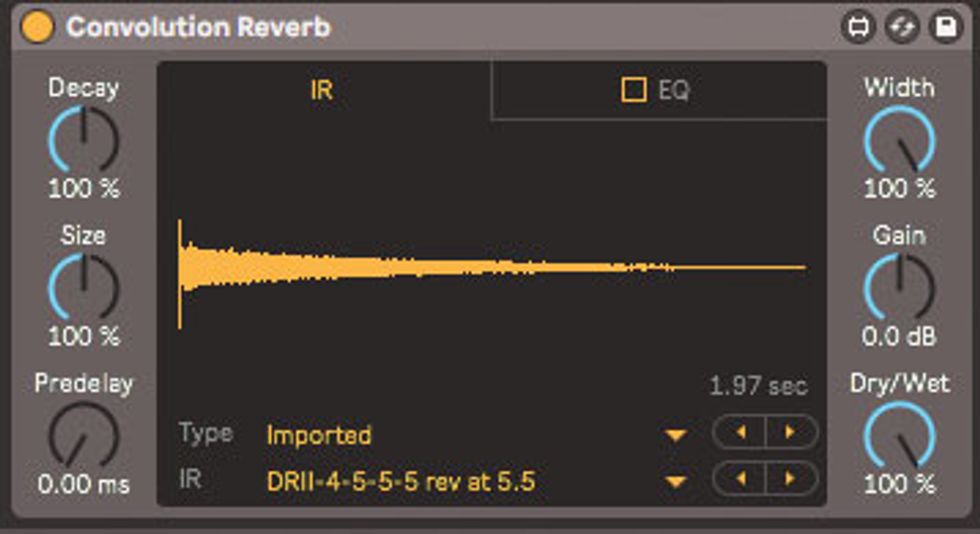
Fig. 11. — Ableton Live’s Convolution Reverb with a Deluxe Reverb II IR. Note that the Dry/Wet knob is set to 100-percent wet.
Fig. 11 shows a screenshot of Ableton Live’s Convolution Reverb with an IR made using a Deluxe Reverb II with its onboard spring reverb set to 5 1/2.
Check, Check ... One, Two
If you want to test the accuracy of your impulse, record your guitar with the same settings and mic position you used to create the IR. Now set up a track with your new IR loaded into Space Designer, Convolution Reverb, or another convolution plug-in, and record into that track going direct through your interface. Listen to both tracks while toggling between them. If the two tracks are level-matched, you should not hear any significant differences—except that the IR will not have amp hiss or hum.
Now you’re ready to make multiple IR clones of your favorite amps set to different clean settings. When inspiration strikes, these IRs will be available for easy recall. Rock on, guitar amigas and amigos!
Other Convolution Plug-ins
While Ableton Live Suite and Apple Logic Pro X come with everything you need to make IRs and convolve them with audio, other options abound. Note that some of the IR loaders listed here are strictly for short IRs, like cabinets and close-miked amps, while others can accommodate longer IRs.IR Loaders (Convolvers)
• NadIR (free) kvraudio.com/product/nadir-by-ignite-amps
• Pulse (free) lancasteraudio.com/pulse
• LeCab (free) lepouplugins.blogspot.com
• Fiddlicator (free, iOS) itunes.apple.com/us/app/fiddlicator/id813106474?mt=8
• LAConvolver (free; this will accommodate long, reverberant IRs) audio.lernvall.com
• ReaVerb (part of the Reaper DAW; this will accommodate long, reverberant IRs) reaper.fm
• MixIR2 ($49; this will accommodate long, reverberant IRs) redwirez.com/mixir2.jsp
IR Generators with Deconvolvers
• Voxengo Deconvolver (free, Windows only) voxengo.com/product/deconvolver/
• Room EQ Wizard (free) roomeqwizard.com
IR Hardware
Numerous hardware devices, such as the Line 6 Helix and the diminutive Mooer Radar, can load IRs. Most of these units are designed for short, cabinet-style IRs. However, the Logidy EPSi pedal (logidy.com) can handle both cabinets and long reverberation.


