


A gorgeous ’54 Gibson Les Paul came through our shop
for show-and-tell one day. I must
admit it was an exquisite-looking,
mint-condition guitar, and if it
weren’t for the one volume pot
that had been replaced, it would
still be in 100-percent original
condition. There are people who
wouldn’t have a big issue with
this, yet others would react to the
replaced pot and think, “If the
volume pot has been changed,
what else is not straight on the
guitar?” This is just one of those
concerns and quirks of doing biz
in the world of vintage guitars.
Many very qualified and
well-educated collectors and
dealers say that in today’s vintage
guitar market, you have to
accept that things get changed
along the way when it comes to
worn-out electronic parts. It is
just a reality, like a Stradivarius
violin needing a neck rebuild,
fingerboard level, or top or back
removal over time.
That’s all true, but when
it comes to manufacturing
potentiometers, most of today’s
materials are subpar compared to
the virtually unbreakable materials
of yesteryear. This is certainly
true when it comes to guitar electronics.
Have you ever noticed
how often you might replace the
pots on your main guitar from
the ’70s or ’80s, or how your
newer guitar can lie in its case
for a few months and when you
go to play it, the volume pots are
scratchy and won’t even clean up
with proper cleaner?
Vintage guitars from the
’50s and ’60s have some of the
best-built potentiometers ever.
These pots featured heavy carbon-resistance
material instead of the
inferior silk-screening currently
used by many of today’s makers.
These old-school materials rarely
wear out. If there’s a problem, it’s
usually caused by corrosion on the
wipers or brushes, solder bleed, or
tainted substances that find their
way onto the resistive material. For
the most part, this is all restorable.
When the original pot
was removed from the
show-and-tell ’54 Les Paul,
fortunately the owner placed it
inside the case’s compartment.
I couldn’t have been more
pleased to find this, and I was
certainly up for a challenge in
restoring this 1954 pot.
IRC (International Resistive
Company) pots were used on
many Gibson Les Pauls. Today,
IRC provides one of the industry’s
most comprehensive ranges
of innovative resistor solutions
for automotive, computer, communications,
medical, industrial,
military, and instrumentation
markets worldwide.
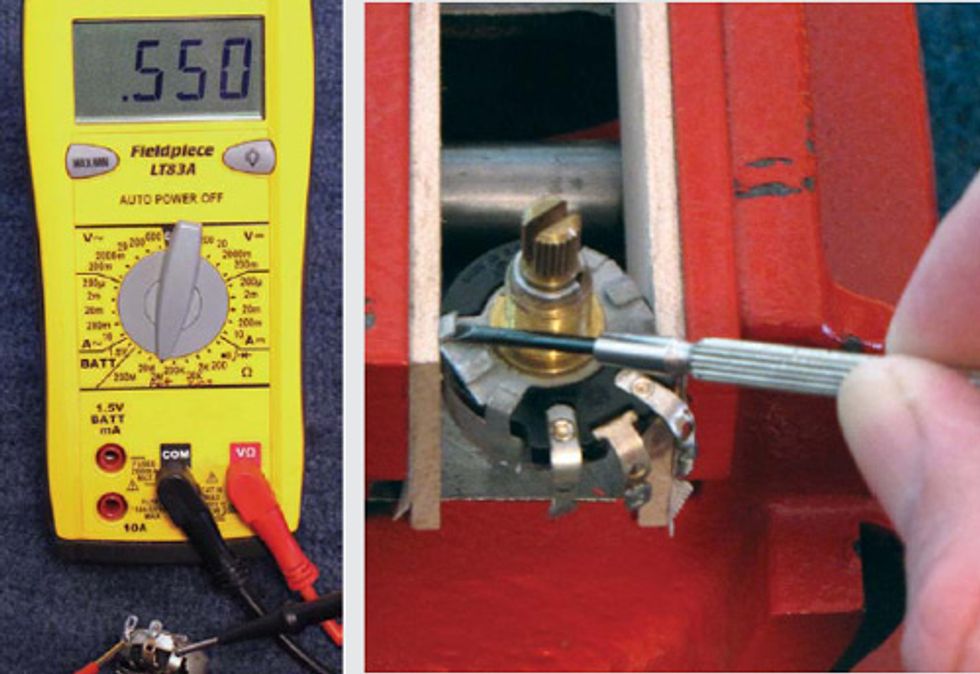
Left: Measuring the potentiometer’s resistance with a digital multimeter.
Right: Carefully prying open the pot’s chassis-support tabs.
I began restoring this vintage IRC pot by using my portable digital multimeter to read the pot’s resistance in ohms (Photo 1). The brass shaft section of the pot was locked in open position, and it would not rotate. In open position, the resistance read 550 kΩ— despite the fact that the pot’s chassis was stamped 500 kΩ. On the side, another group of numbers indicates the year of manufacture (you’ll need a source-date code system to interpret them).
Consider this: In pursuing ultimate tone, if we’re really stuck on the accuracy of a 500 kΩ pot, we have to be aware of some serious variability going on here. The IRC pot I was restoring reads 550, yet I can buy a bag of modern pots and most of those will read under 500 kΩ, at times even as low as 450 kΩ. That’s a potential 100 kΩ difference between the two. Wow—isn’t that an eye-opener? It’s a good idea to always use a meter and select your pots accordingly.
My next step was to use an angle vise (which works well because it has some girth) to hold the pot as I tried to manipulate its shaft (Photo 2). Unfortunately, the pot’s durable brass shaft wouldn’t budge loose—it was as if it was once glued into position. This meant it was time to investigate inside.
Notice how I attached two maple strips to the vise jaws to support the pot and protect it from scratches or damage. I used a mini screwdriver that’s slightly narrower than the chassis- support tabs to bend them open. The size is important, because later when everything is reassembled, any micro pressure marks will be hidden under those four tabs. This creates an invisible restoration.
We’ll conclude our pot-restoration project next month and list the tools you need for this work, so be sure to swing by for the second installment.
 John Brown is the
inventor of the Fretted/Less
bass. He owns and operates
Brown’s Guitar Factory,
a guitar manufacturing,
repair, and restoration facility
staffed by a team of talented
luthiers. His guitar-tool and accessory designs
are used by builders all over the world. Visit
brownsguitarfactory.com or email John at
info@brownsguitarfactory.com.
John Brown is the
inventor of the Fretted/Less
bass. He owns and operates
Brown’s Guitar Factory,
a guitar manufacturing,
repair, and restoration facility
staffed by a team of talented
luthiers. His guitar-tool and accessory designs
are used by builders all over the world. Visit
brownsguitarfactory.com or email John at
info@brownsguitarfactory.com.


