Arpeggios are some of the most useful musical
snippets ever invented. Think about it,
how can you go wrong playing just the notes
of the chord? Of course, this has a downside
as well. It becomes really easy to fall into a rut
where your lines sound sterile and predictable.
In this lesson, we’ll explore ways to focus our
single-note lines and interject some cool voice-leading
ideas into our vanilla arpeggios.
To do this, we’ll base our arpeggio ideas on
the most important notes in a chord. These
notes are called guide tones and consist of the
3rd and 7th degrees of the chord. These two
notes best define the quality of the chord.
For example, over a C7 chord the guide tones
would be E (3rd) and Bb (b7th). Quite simply,
even if you just play E and B% without the root
or 5th, you can hear the chord’s essential sound.
Let’s begin by outlining the harmony of
a blues progression using just guide tones.
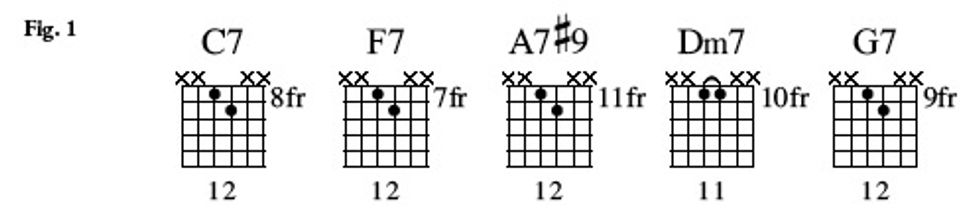
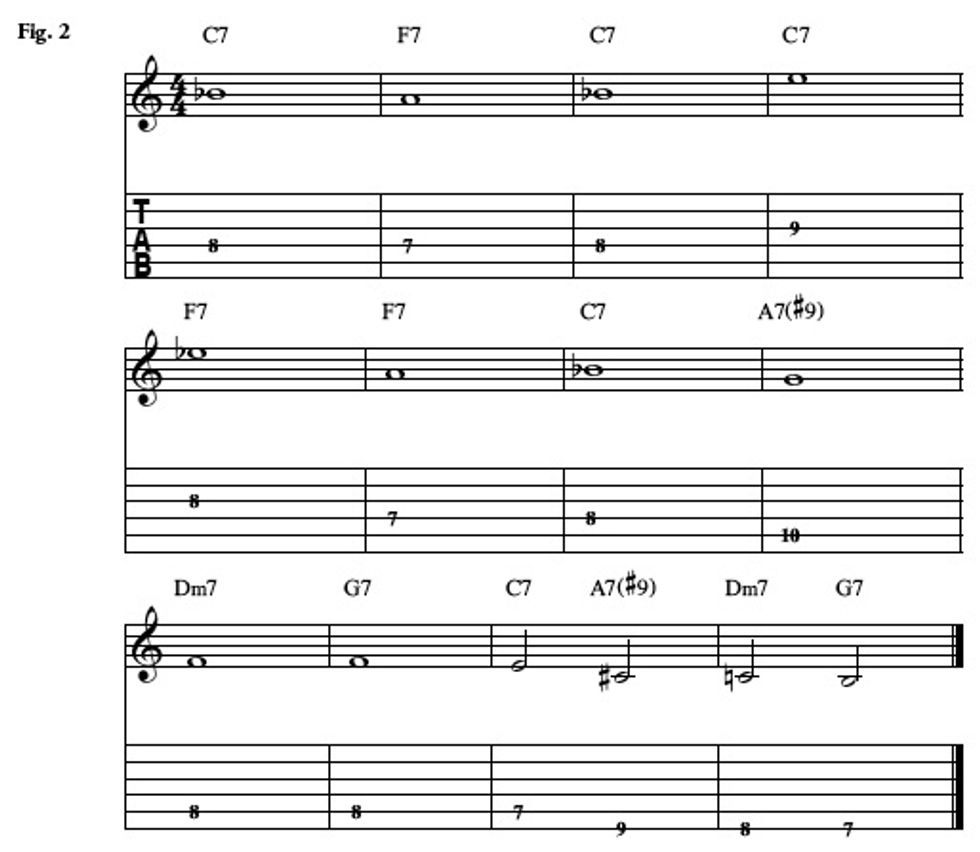
In Fig. 1, you can see one way to voice
the guide tones for each chord used in the
progression we covered in the December issue
(“Peaks and Valleys”). In this progression, we
use two qualities of 7th chords, dominant
and minor. As you can see, the shape for
dominant chords stays constant while you
move it up and down the fretboard to make
each chord change. A cool thing to notice
is the half-step movement between C7 and
F7. This makes shifting from the I chord to
the IV chord really easy and it creates some
smooth voice leading.
Many tunes use guide tones as anchor points, not only to create a melodic line through the harmony, but also to keep the listener interested. The classic jazz standard “All The Things You Are” uses guide tones almost exclusively throughout the A section. As we play through this blues progression, we want to keep in mind that the goal is to always relate to the harmony. The trick is to make it subtle.
Once we have the basic chord shapes under our fingers, we want to create a smooth line using these guide tones. This will act as our blueprint as we add more notes. In Fig. 2, I have written out a sample line to get us started. The goal is to internalize the sound of this line as much as you can. In grad school, I used to record guide tone lines to various tunes and then put them on my iPod. Pretty soon, my mind’s ear was able to fill out the rest of the harmony. You really want to own the sound of these chords. Another method (although not as popular as it should be) is to sing the lines. Don’t worry—we aren’t looking for the next George Benson or Joe Bonamassa, just concentrate on matching the pitch with your voice. Test yourself by playing the first note of the line and then try and sing the next note before you play it. I assure you, even though this method might be difficult, it is worth it. Download example audio 2...
There are two basic patterns we want to remember for these arpeggios. The first one will go 3rd–5th–7th–root, and the second pattern will be 7th–root–3rd–5th. Both of these patterns work best for ascending lines. Reverse the order to get the descending version. In Fig. 3, you can see an example of some arpeggio fingerings over the progression’s first four measures using the patterns mentioned above, along with the line from Fig. 2. Download example audio 3...
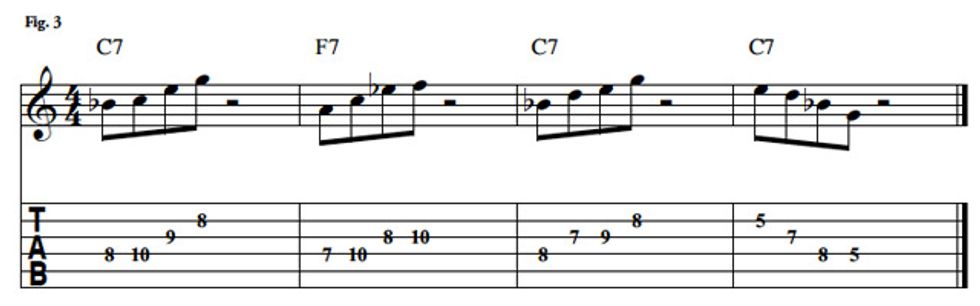
Even though these are rhythmically pretty boring (generating rhythmic interest is a topic for a different column), the goal here is to get the new shapes together and to really understand the sound of the chords. There are a few things I did differently in this example. In the third measure, I substituted the 9th of the chord (D) for the root on the “and” of beat 1. This “9 for 1” technique can be used in chord voicings as well. Since the last two measures of the example are both over a C7 chord, I wanted to change the direction of the line. In the fourth measure, I started with the 3rd (E) and descended to the 9th (subbing for the root again) and then continued to the b7th and 5th.
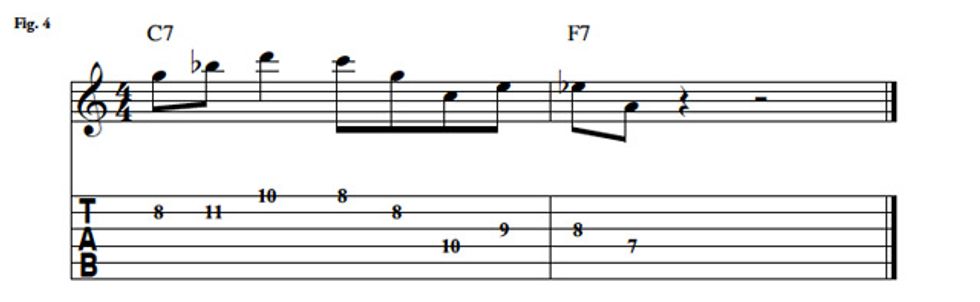
The real magic comes when you start to create lines that connect two chords. The smoothest resolutions happen when a note resolves by a half-step. In Fig. 4, there is a sample lick that you can use over the first two measures of the progression. Here, we are going from the I chord (C7) to the IV chord (F7). As you will notice from the guide tone shapes we worked on earlier, the 3rd of the C7 chord (E) is a half-step away from the b7th of F7 (Eb). This creates a built-in resolution when moving between these two chords. The whole lick is made up of chord tones and is based out of the 8th position. The last three notes of the first measure are simply a displaced C major triad, and that leads nicely into the Eb in the second measure. If you listen to the solos of Kenny Burrell, Grant Green, and Robben Ford you will begin to spot these subtle, but important, shifts. Download example audio 4...
Jason Shadrick is an associate editor of PG, and he as been mixing blues, jazz, and rock since he first picked up a guitar. Mostly because nobody told him not to. He has degrees in Music Business and Jazz Pedagogy, and he previously worked with Lower Dyad Records and the National Guitar Workshop.