Chops: Intermediate
Theory: Intermediate
Lesson Overview:
• Develop a better awareness of 16th-note rhythms and accents.
• Learn how to play more syncopated rhythm parts.
• Create more interesting strumming patterns.
Click here to download a printable PDF of this lesson's notation.
In a previous lesson [16th Note Accents], we explored different ways to accent 16th-notes and generate compelling rhythmic patterns with them. We practiced accenting every beat while placing extra focus on strengthening our upstrokes. In those exercises, we muted the strings to fully focus on the strumming hand technique. In this lesson, we’ll add chord progressions and combine accents in different ways to create practical strumming patterns.
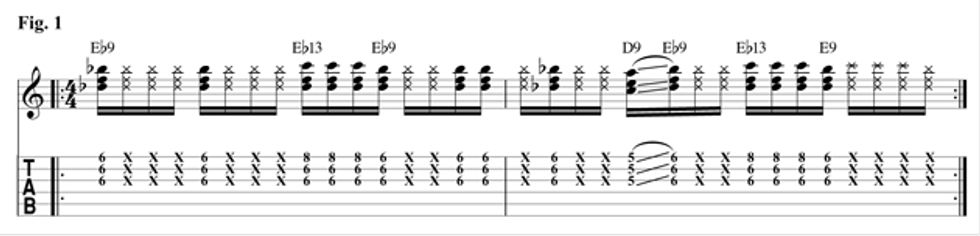
As we progress from our previous exercises, let’s keep something in mind: Being able to strum continuous 16th-notes with varying accents is super cool, but in reality, we usually don’t want to leave all these notes in. In most cases, playing every 16th-note is just too busy. I call this the “Sex Machine Syndrome.” Unfortunately, being totally comfortable with 16th-notes is a leading cause for this ailment and guitar players tend to be susceptible to it. When performing James Brown’s “Get Up (I Feel Like Being a) Sex Machine,” many musicians play too many notes. They catch the main accents, but they also add in some extras that step all over the vocals and other instruments. Here’s an example (Fig. 1) of one of those obnoxious rhythms.
While that rhythm is pretty darn fun to play, it might not be the most tasteful choice. The actual guitar part goes like what's shown in Fig. 2. Notice how many notes we’re leaving out! The lone “a” accent of beat 3 is enough to give us that 16th-note groove and fits in nicely with the vocals and rhythm section.

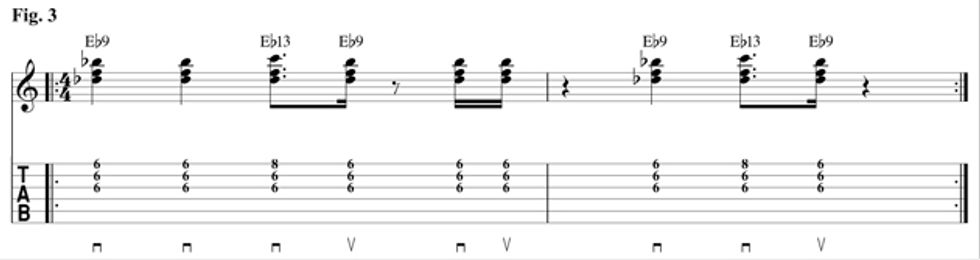
Fig. 3 is a nice variation from a live James Brown performance. The extra “+ a” on beat 4 really complements the vocal line, without getting super busy. You wouldn’t play this groove every two measures, but it works nicely once in a while throughout the song.
So that’s the concept here! Basically, we want to imply the 16th-note feel without actually playing every note. To do this, we must keep the accents on the correct strokes: “1” and “+” will always be downstrokes, and “e” and “a” will always be upstrokes. We also have to keep the general strum motion going at all times, even if we’re not strumming every note. That means we’ll be intentionally missing the strings on certain beats.
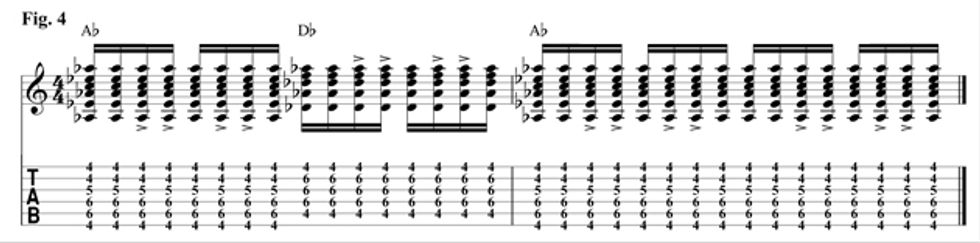
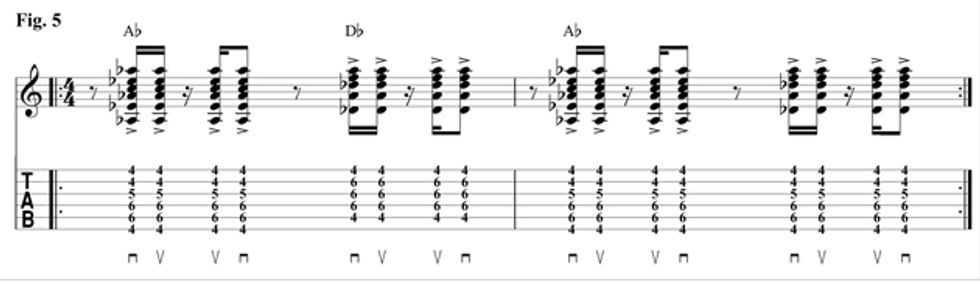
Here’s another sparse pattern, similar to the progression in “Ramblin’ Man” by the Allman Brothers. Notice how in this groove, we’re leaving out beat 1 and starting on the “+” of 1. This can be tricky. You really have to imagine playing that first beat in order to get to the “+” in time. Imagining that note is much easier if you keep that strum motion going! Just be sure to physically miss the strings on the downstroke of beat 1. In Fig. 4, all 16th-notes are written with the accents marked. The purpose of this example is to help you visualize the notes we’ll be taking out or “missing” within the strum pattern. In Fig. 5 we eliminate the unaccented notes.
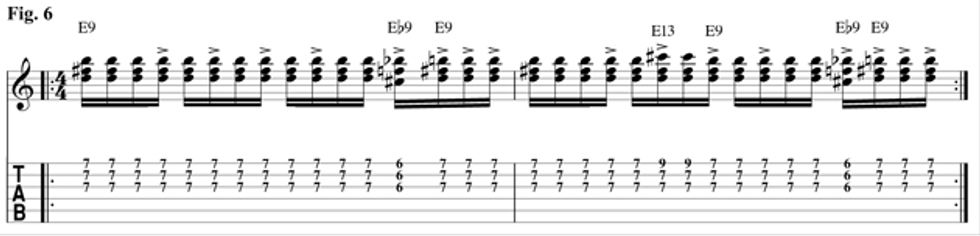
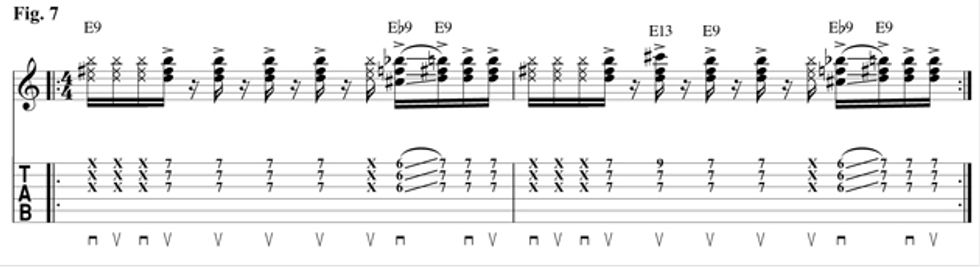
Here’s a funky one in the style of Tower Of Power. This groove begins with an accent on the “a” of one—this will be an upstroke. You can get away with playing very lightly muted strumming on the first three 16th-notes, which makes it easier to play that first accent in time. However, I’d recommend being able to do it without the dead notes as well. Once again, Fig. 6 shows the pattern before the unaccented notes are removed, and Fig. 7 is the one we want to nail.
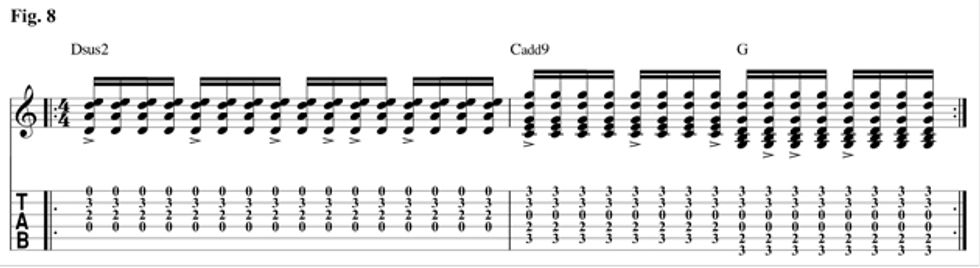
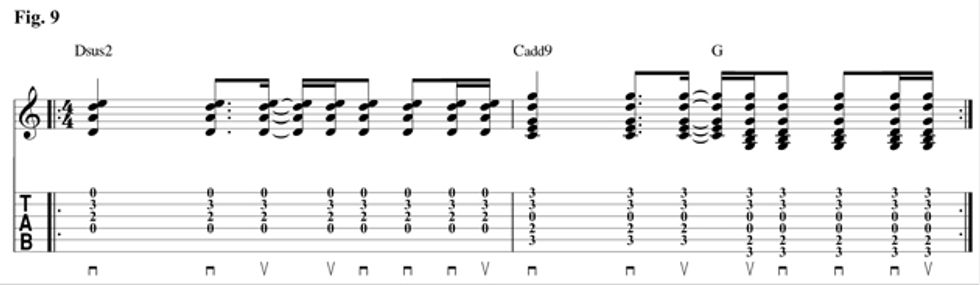
Funk guitar isn't the only place where syncopated 16th-note strums come into play. Here’s a very common (more folky) strum pattern. You can get a lot of mileage out of this one when accompanying a singer. Notice that you’ll be switching to the G chord on the “e” of beat 3 in the second measure, which falls on an upstroke. Let's start with the entire progression in Fig. 8 and then move to the syncopated version in Fig. 9.
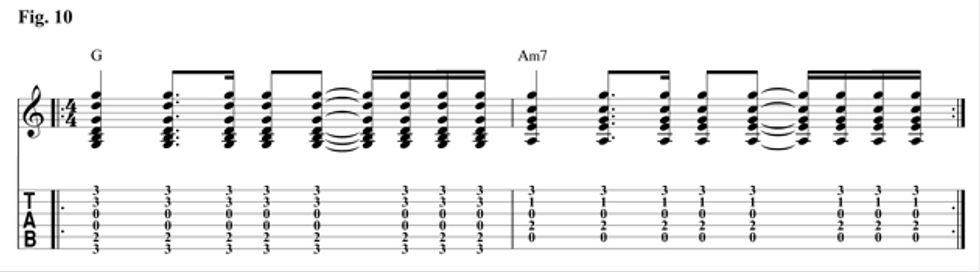
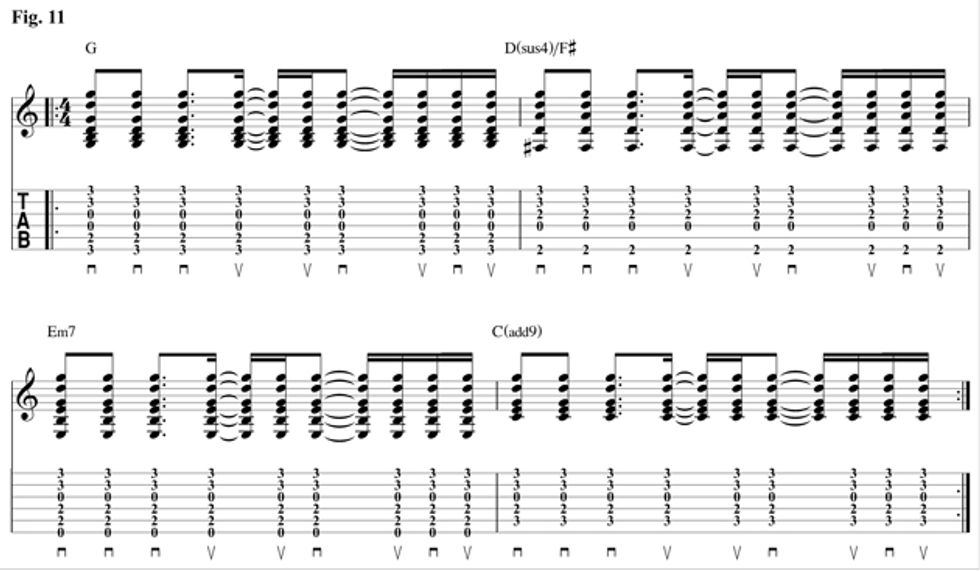
The next two examples are very familiar progressions. In Fig. 10, we cop a '70s Rolling Stones vibe and then go more modern in Fig. 11 with something you could easily hear from someone like singer/songwriter James Blunt.
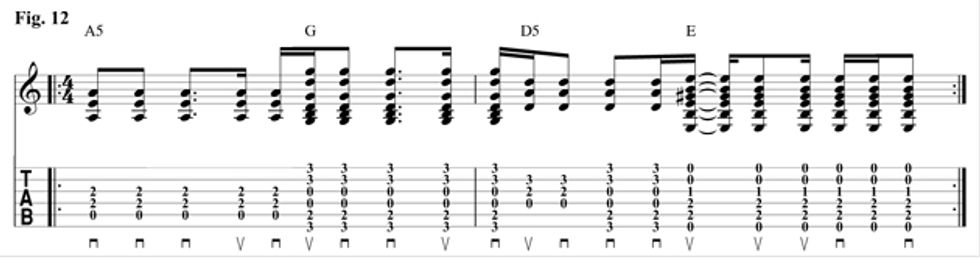
Things get even busier in Fig. 12, where we play a more British-inspired riff. Keep an eye out on the strum patterns in the second measure—they're the key to getting the feel right.
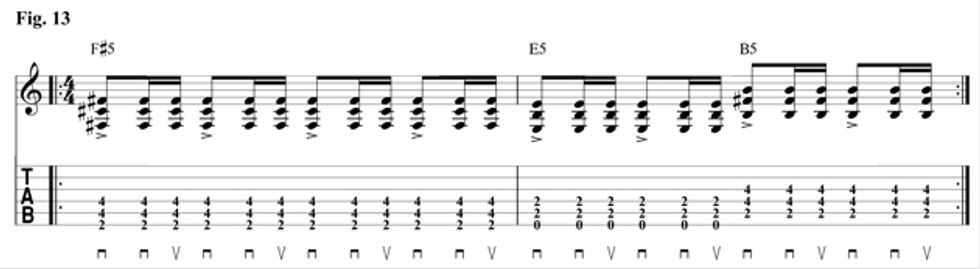
The next three examples are a little more challenging to execute cleanly, especially at faster tempos. Remember there’s no shame in practicing slowly at first.
In Fig. 13, we’ll play on every beat, except on "e." Yes, it’s the familiar gallop pattern you might recognize from a million different songs. This pattern really forces your strumming hand to be consistent in the 16th-note motion. Let’s accent all the downbeats by making those downstrokes a bit stronger than the strums on the “+ a” beats. Also, try dampening the strings with your strumming hand.
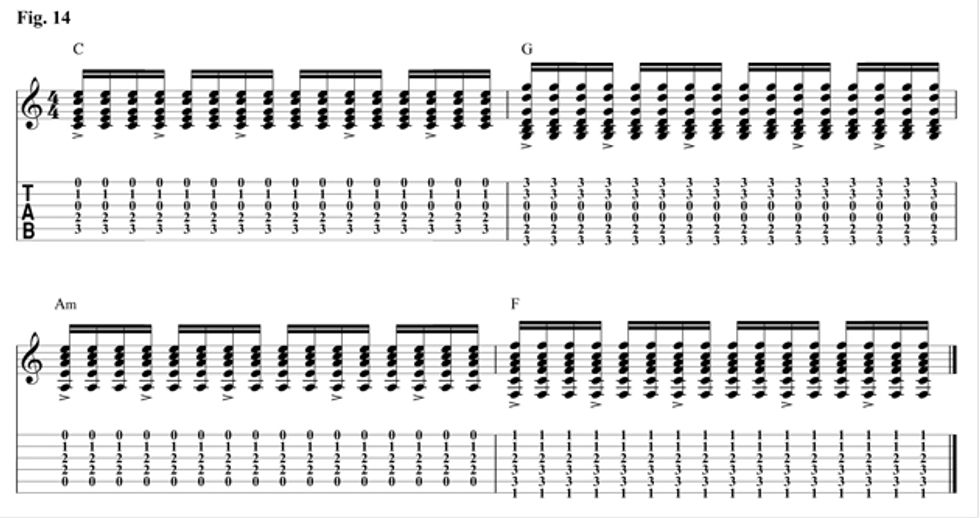
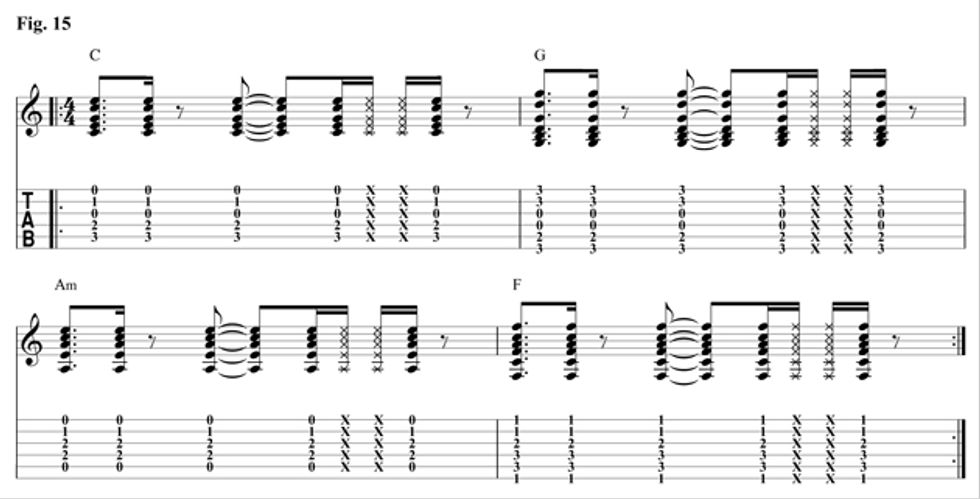
Here’s a cool pattern that's similar to something Duncan Sheik might play. I’ve included Fig. 14 to show where all the notes are, before we take them out. Fig. 15 is the one we’ll play.
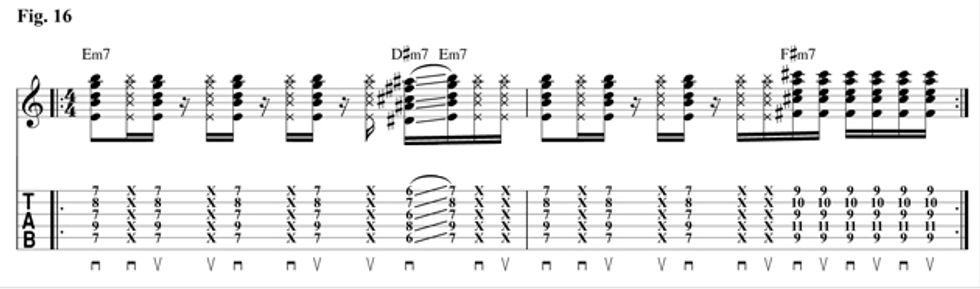
Last but not least, we have something straight out of the ’90s alt-rock scene (Fig. 16). This rhythm totally rocks! If you can play this well, then I’d say you’ve got some rhythm chops. Be sure to get those dead notes by lightening your grip on the chord (which will stop the sustain and mute the strings). It might take some practice getting the accents and dead notes in sync with your strumming hand, but the result will be worth it.


![Rig Rundown: Russian Circles’ Mike Sullivan [2025]](https://www.premierguitar.com/media-library/youtube.jpg?id=62303631&width=1245&height=700&quality=70&coordinates=0%2C0%2C0%2C0)