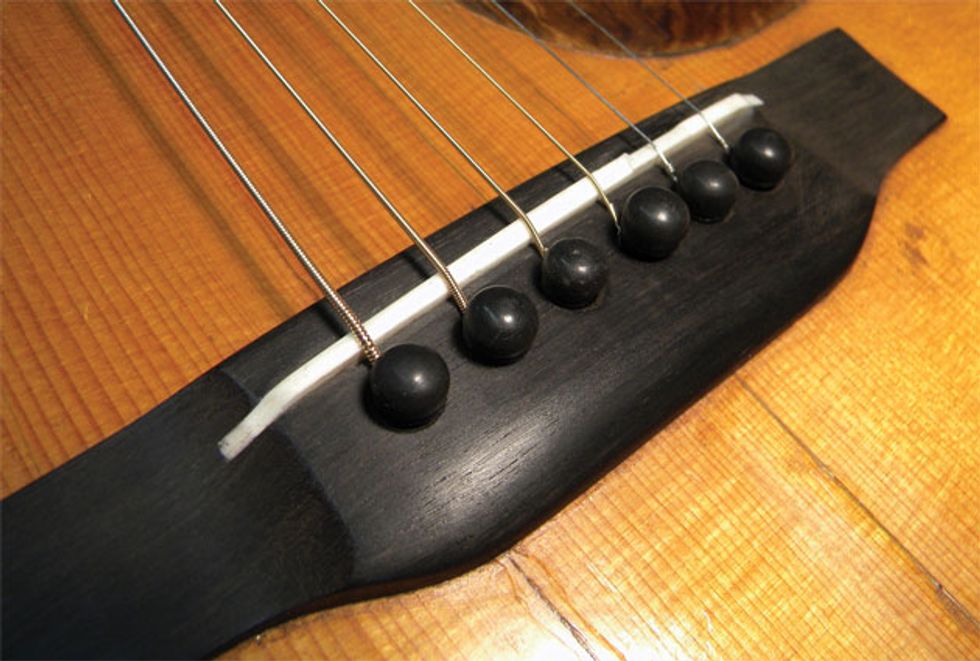
Fig. 1. This 1937 Martin 000-18 has an open-slot saddle. Notice how the saddle’s ends are exposed,
rather than enclosed in a routed slot.
Carving a new saddle for any flattop guitar takes skill and patience, but crafting an open-slot saddle—the type that’s found on vintage Martins and many other older guitars—is especially tricky. Most modern flattops have a drop-in saddle that’s housed in a slot routed into the bridge. A drop-in saddle is surrounded on its front, back, and both ends by the bridge. By contrast, the ends of an open-slot saddle are exposed and tapered to match the contour of the bridge itself (Fig. 1).
A client recently brought in a beautiful sounding 1937 Martin 000-18 that needed a new saddle because the action was too low. This guitar provides us a perfect opportunity to discuss the process and challenges of creating an open-slot saddle. The owner wanted a “compensated” saddle to make the guitar play in tune, so we’ll cover that as well.
Before starting a project like this, it’s important to take four primary measurements: neck relief, action at the 12th fret, action at the 1st fret, and intonation. Gathering this baseline information will give you a sense of what the project will entail—what’s working and what needs fixing.
Remember: Always tune to pitch before taking these measurements.
Measuring relief. Start by placing a capo directly on the 1st fret. Next, hold down the low E string at the last fret and measure the greatest distance between the top of the frets and the bottom of the string. (The largest gap typically occurs somewhere between the 7th and 10th frets.) The easiest way to do this is with a String Action Gauge—a handy tool available from stewmac.com. If you don’t have one, a 6" machinist steel ruler will also work.
This 000-18 had .010" of relief, which is acceptable, but not ideal. For flattops like this, I prefer .015" of relief, but because this lovely old Martin was made in ’37, it doesn’t have an adjustable truss rod. So we’re going to have to live with this .010" relief—no change here.
Measuring action. When you’re carving a new saddle, you have to know how much taller or shorter it needs to be compared to the one you’re replacing. You determine this by measuring the action at the 12th fret with the original saddle installed. Again, use a String Action Gauge or precision steel ruler to read the gap between the top of the 12th fret and the bottom of the two E strings.
On this vintage 000-18, the high E measured 3/64" and the low E was 4/64". This action was too low—for the guitar to play without a lot of string rattle, the saddle should be taller. An action of 4/64" on the treble, and 5/64" on the bass side is ideal.
Once I knew how much taller the new saddle would need to be, I turned to the string nut. Here the action was perfect: 1/64" on the high E and 2/64" on the low E string.
Measuring intonation. The final step of the evaluation is to check intonation with a strobe tuner. First tune each string using its 12th-fret harmonic. Next, fret each string at the 12th fret and compare the fretted note to its corresponding harmonic. Using each harmonic as a benchmark, check the fretted note against it. If there’s a difference, determine the deviation in cents (a cent is 1/100th of a semitone) and write it down.
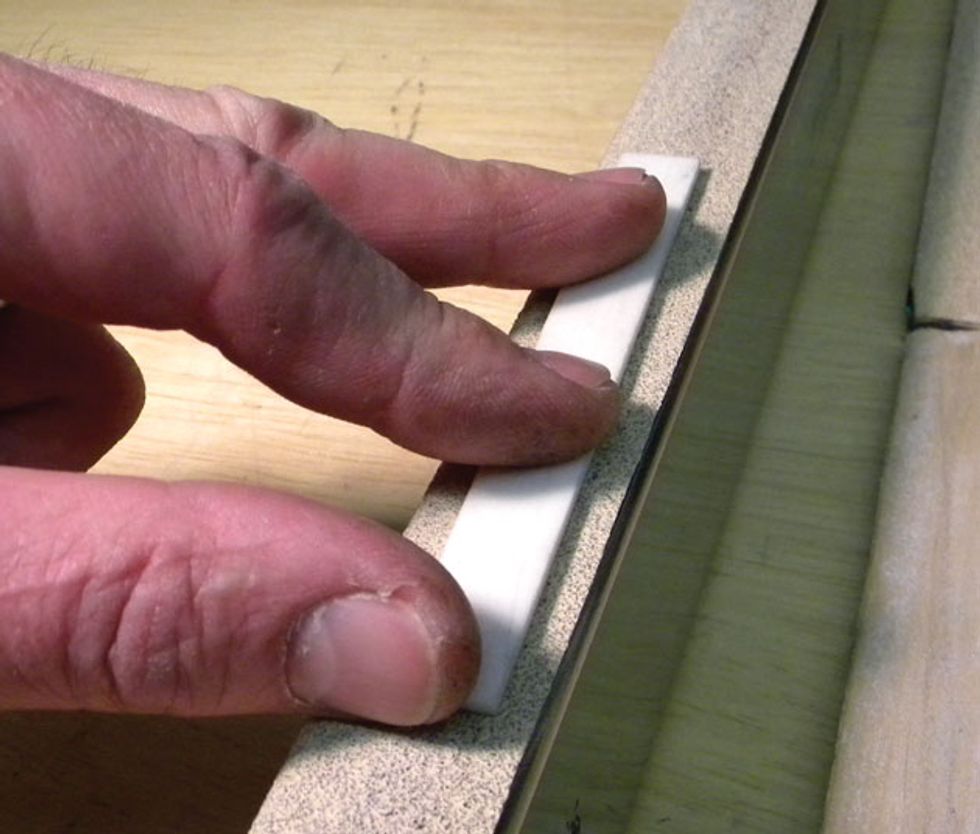
Fig. 2. Using 80-grit paper to sand the new bone saddle blank to the correct thickness.
In this case, the low E, A, and B strings were sharp and the G and D strings were flat. The good news for me was that none of the strings were off more than a few cents, so I knew setting the intonation on the new saddle wouldn’t be a problem.
Crafting the saddle. Begin by sanding the bone stock to the correct thickness of the saddle slot. I do this on a flat metal bar with 80-grit self-adhesive sandpaper (Fig. 2). Then I move to 600-grit paper to polish the saddle. If you don’t have a metal bar to mount your self-adhesive sandpaper, a 1/4" piece of glass will also work well. If you opt to use the top of your bench for this, make sure it’s dead flat, otherwise the saddle won’t fit properly.
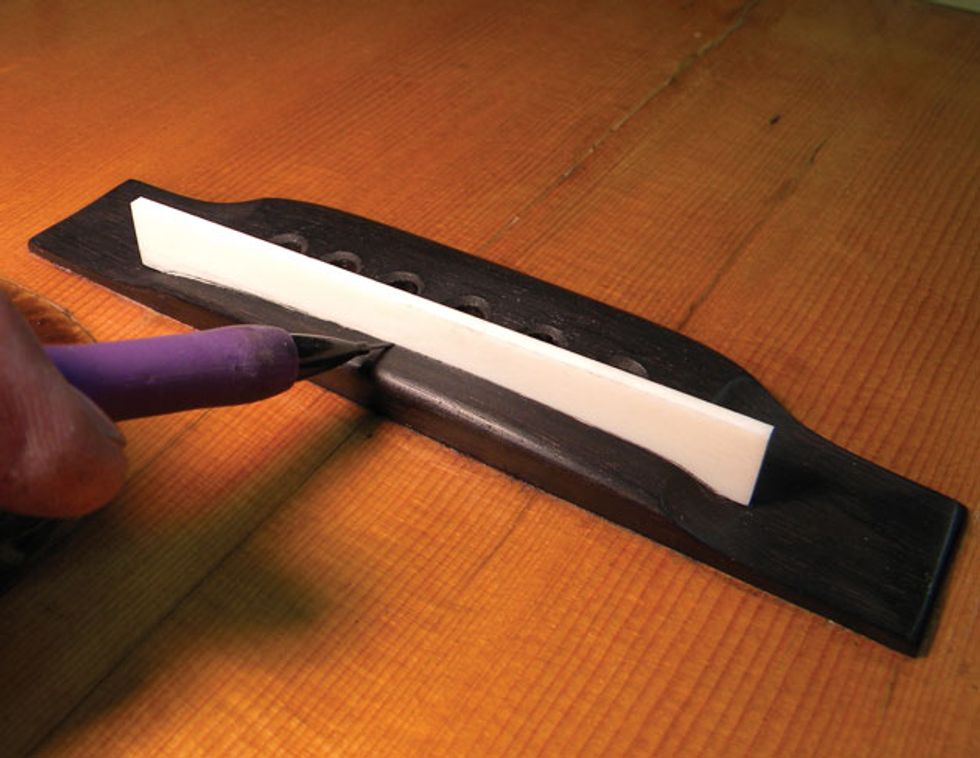
Fig. 3. Tracing the bridge’s contours onto the saddle blank.
Once you have the saddle sanded to the correct thickness, place it in the slot and trace along the top of the bridge with a mechanical pencil (Fig. 3). The resulting line will give you a template illustrating where to carve the open ends and also provide a baseline for the saddle height.
Fig. 4. Measuring fretboard radius.
The next step is to determine the fretboard’s radius. This is a critical measurement because the saddle must match this radius for the action to be correct across all six strings. You need a radius gauge to take this measurement (Fig. 4). Various types of radius gauges are available from luthier supply companies, and if you search online you’ll also find free plans for crafting your own.
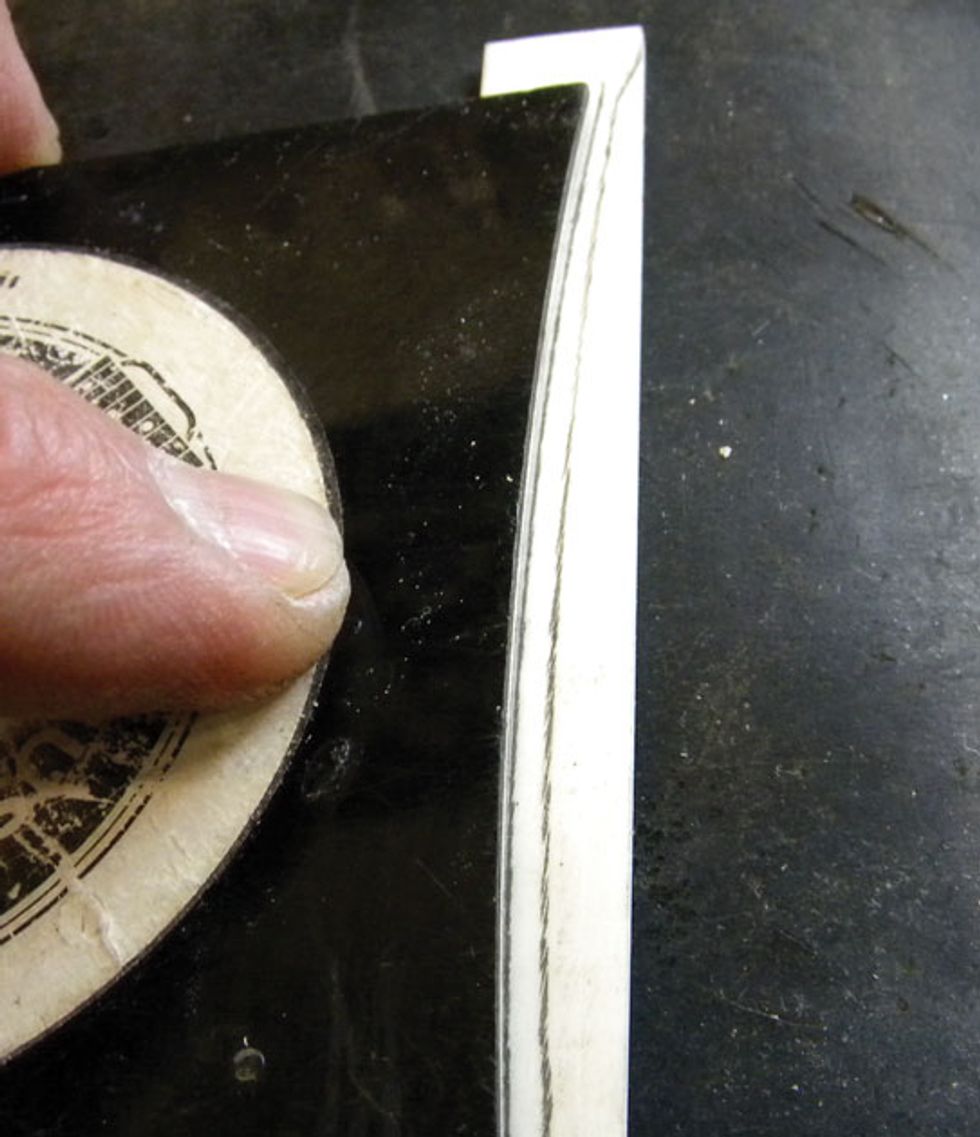
Fig. 5. Transferring the fretboard radius to the saddle blank at the height required for the new action, which is calculated during the initial evaluation. In this case, the new saddle will measure 4/64" on the treble side and 5/64" on the bass side.
This Martin’s fretboard has a 14" radius. Knowing I wanted an action of 4/64" on the 1st string and 5/64" on the 6th, I added 2/64" to the height of the original saddle and then marked a 14" curve on the new blank (Fig. 5). Adding 2/64" to the original numbers gave me 1/64th" extra height to work with, a slight margin that would allow me to confidently shape and file the saddle down to my target specs.
Tip: When carving a bone saddle, it’s a good idea to add a little extra to your calculations. It’s easier to remove excess material than begin anew.
Fig. 6. Removing excess material from the saddle blank. You can do this by hand with a fine-tooth hobby saw.
Once the saddle is marked with the radius line at the desired height, you’re ready to cut down the blank. I use my shop band saw for this (Fig. 6), but you can manually trim off the excess material using a fine-tooth hobby saw.
To finish the basic shaping job, I like to flip the saddle upside down and sand the top on a 14" radius block fitted with fine self-adhesive sandpaper. This ensures a smooth surface and accurate radius. Radius blocks are available online, as are instructions to make your own, if you’re so inclined.
Once the top is shaped, slide the new saddle into its slot. Restring the guitar and check your action. Important: If the action is still too high, do not sand the bottom of the saddle. On an open-slot saddle, always remove material from the top of the saddle. Remember, the finished saddle has curved ends—which we’re about to finalize—and filing the bottom of the saddle will mean our “faded” ends will “fade away” and not match the bridge curves.
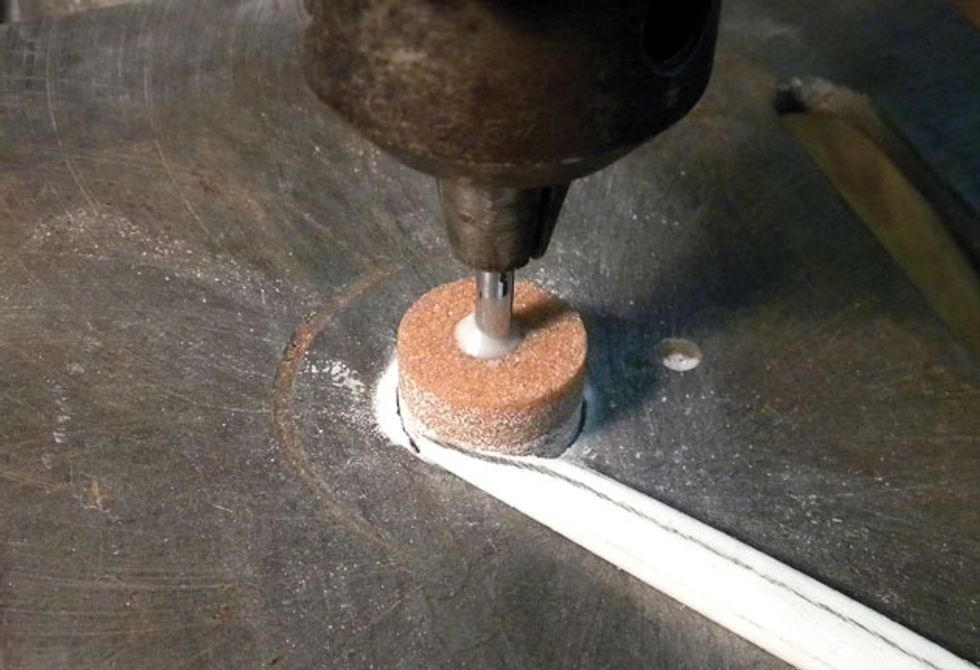
Fig. 7. Shaping the saddle ends to match the bridge contour on a drill press.
Another way to do this is with a Dremel rotary tool.
To carve those nice curves for each end of the saddle, I use a small spindle sander attached to my drill press (Fig. 7). Another option is to use a Dremel rotary tool, which also offers a high degree of control and precision. Go slowly and check your work frequently by fitting the saddle in the slot and comparing its ends to the bridge’s contours.
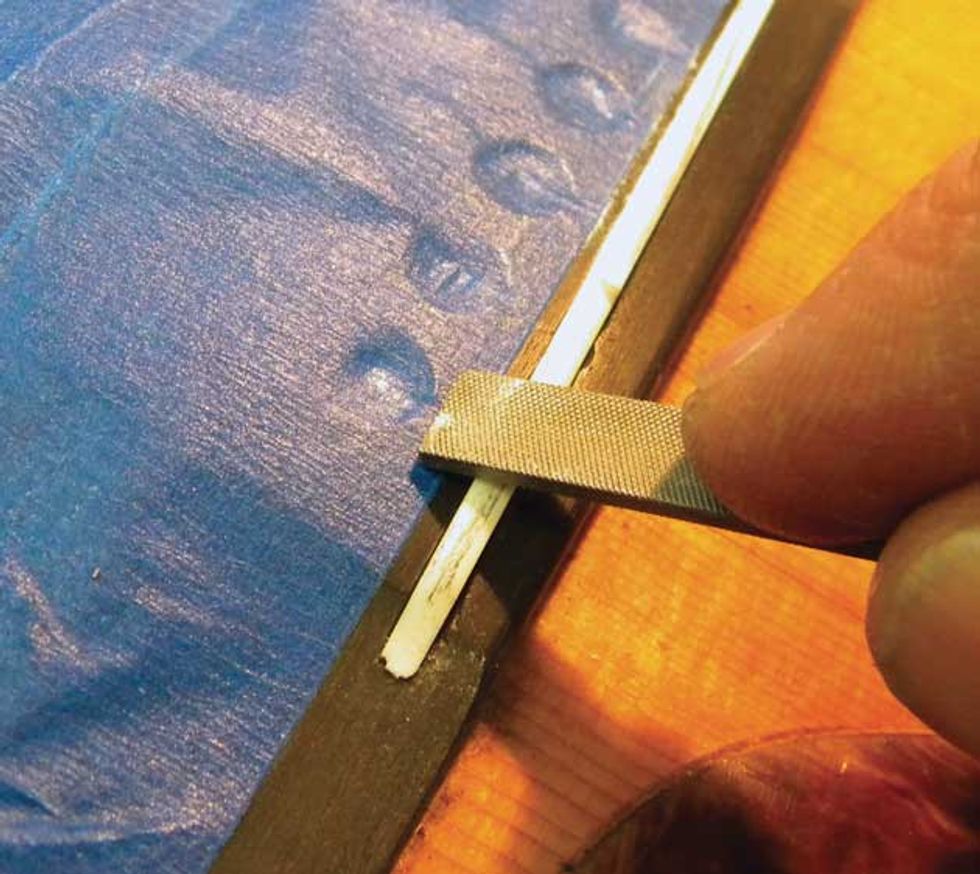
Fig. 8. Each string’s intonation point can be subtly shifted by removing material from either the front or rear of the saddle.
Carving new intonation points. After the saddle ends are properly contoured, it’s time to compensate the saddle. With the saddle in the slot, use a miniature flat file to carve the intonation points for each string (Fig. 8), based on the numbers you gathered earlier.
Each string typically emerges from the pin hole at a unique angle, and you want the contact point on the rear of the saddle to match this angle for every string. If the point of contact is too shallow or too steep, it can cause tuning problems and string breakage. By laying your file against both the pin hole and saddle contact point, you’ll be able to visually determine the correct angle for each string. Cover the pin holes on the bridge with a strip of painter’s tape. This way, if you slip when carving the angles, it won’t scar the bridge.
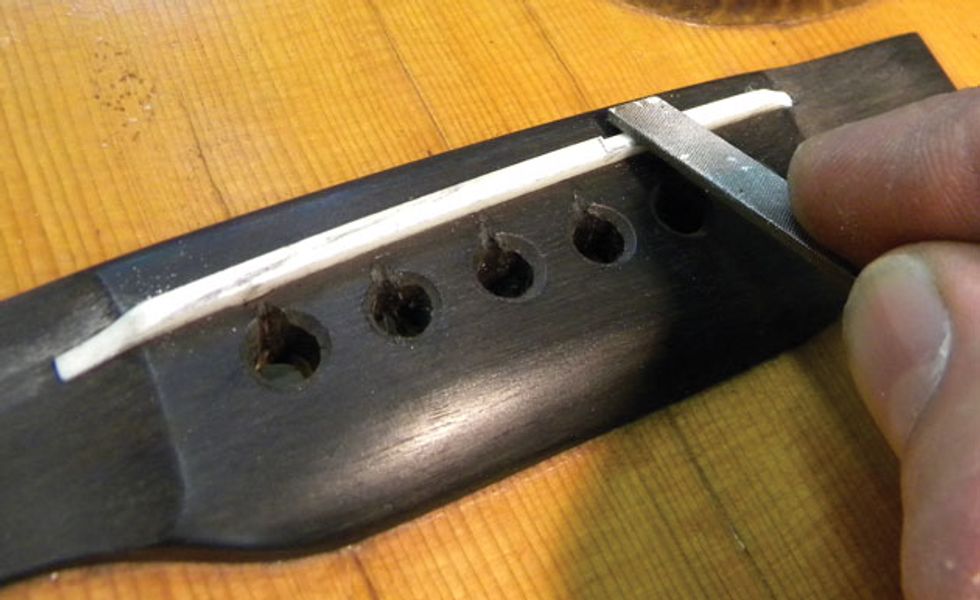
Fig. 9. Here, the B string’s intonation point is moved back toward the pin holes to extend the vibrating length of the string and slightly lower the pitch of notes fretted in the higher registers.
Earlier I mentioned the intonation was a little off on the 000-18’s original saddle. By filing the contact points forward for the flat strings and back for the sharp strings—especially the B string (Fig. 9)—I was able to improve the intonation. As you adjust the contact points, keep this simple rule in mind: When flat, move toward the neck. When sharp, move toward the pins.
To watch a video with a detailed, step-by-step explanation of how to carve the intonation points on a bone saddle, visit PG’s YouTube channel and watch “DIY: How to Set Up and Intonate an Acoustic Guitar.”
The wrap. I put new strings on the 000-18 and checked the intonation on my strobe tuner. Overall, the guitar played and intonated great, and it looked classy with its new saddle. Even if you don’t attempt work like this yourself, knowing what’s involved helps you communicate better with your local guitar tech. The more you understand about how your guitar is constructed, the easier it is to coax great sounds from it.
![Rig Rundown: The Black Crowes’ Rich Robinson [2026]](https://www.premierguitar.com/media-library/youtube.jpg?id=66952027&width=1245&height=700&quality=70&coordinates=0%2C0%2C0%2C0)